
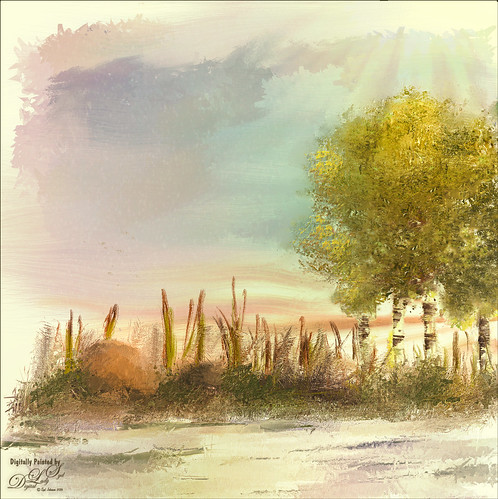
Flowers Enjoying a Planetary Twilight Sky
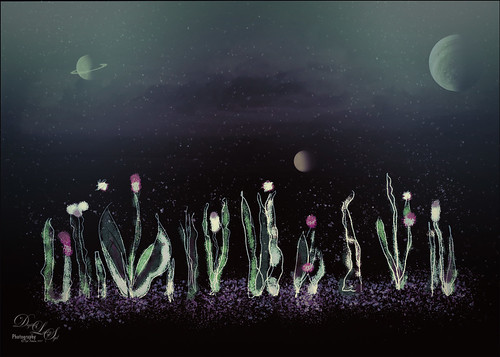
This is just a fun blog. I was doodling with some of Brush Guru Grut’s fabulous brushes (see sidebar for website link and get a free weekly brush to download) and ended up with the flowers looking skyward at an interesting twilight sky. Two layers were painted in a New Document – used one of my favorite drawing brush called Grut-I Qwillo brush. On individual layers, the ground was painted with Grut’s FX IL Bad Mower brush, the flowers and leaves used Grut OI Hip Twitch, and some flower spatters. The Star Field02 is from Frostbo and set to 34% layer opacity. The cloud effect is a cloud brush I created and set to 17% layer opacity. I added Saturn and the moonlet using some brushes I had created a long time ago. Jupiter was created using actual images from NASA’s Mission Juno Project and following a short video by Howard Pinsky called Processing Jupiter in Adobe Photoshop – this was so much fun! It was moved into the sky and that is about all that was done. Last step involved using Topaz (see sidebar for website link) Texture Effects preset called Crisp Morning Run. Lots of fun here!…..Digital Lady Syd
Looking for Love
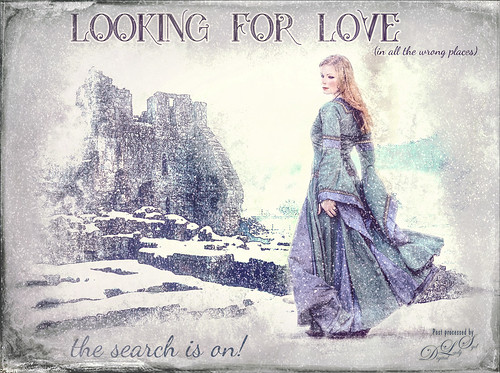
Sometimes it fun to just do something different! This actually took a lot of tweaking to get that romance novel or poster effect. Corey Barker offered one of his tutorials, Quick Hollywood – Inspired Illustrated Effect, for free so off I went. This is not quite what Corey’s poster looked like, but it still has a bit of that old movie magic. Several of the tips from his video were used which is how the illustrative look was created. The girl is called Wayra 11 from Liam Stock and the castle in ruins is called Winter Wonder stock 36 by Tigg, both at DeviantArt – must thank them for allowing the use of their images. Actually used Topaz Studio’s Basic Adjustment and Bloom Adjustment. Nik Viveza 2 was used to adjust the focal points in the image. Love the font called Star Full Inline which has eyeballs in it. The other font is called Dancing Script OT. Had to paint the face a little and added light fog on castle from Topaz Lens Effects. Used my snow effect called Snow1 Overlay and painted it off the foreground. On another layer, used Corey’s Particle Universal brush for snow on the girl and throughout. Last step was Topaz Texture Effects were the border was added. I think it is too hot right now and I am thinking of winter!…..Digital Lady Syd
A Pink Orchard
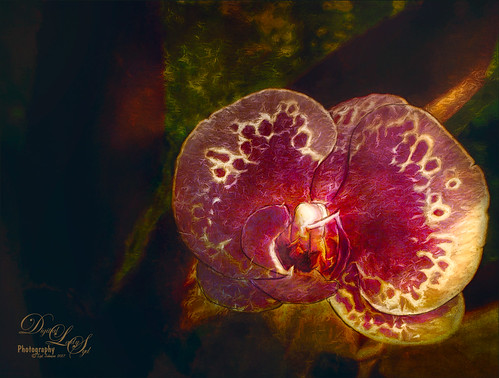
This orchard image was taken at the Harry P. Leu Gardens in Orlando, Florida – a wonderful place to take flower images if you are in the area. This image was started several weeks ago so I am not completely sure what I wanted as an end result. This flower began as a purple orchard, but Topaz (see sidebar for website link) Texture Effects 2 was opened and the Citronella Lily was applied with several adjustments. On a stamped layer (CTRL+ALT+SHIFT+E) Topaz Impression’s Fine Brush Scumble was applied. On another stamped layer, Topaz Detail 3 was applied, another composite layer and Lucis Pro was applied, and finally on yet another stamped layer, Topaz ReStyle’s Rustic Red and Orange preset. Sort of amazing all the Topaz effects in this little flower! I used my favorite line brush, Grut’s Ink Pin Clinger – to actually draw around just a little around the petals. Two textures were added: Kim Klassen’s August Trio Traverse blend mode set to Vivid Light at 18% and her Fav Collection Cinnamon set to Multiply blend mode at 65% layer opacity. A couple Curves Adjustment Layers and a Color Lookup Adjustment Layer set to Foggy Night at 55% layer opacity. Another stamped layer was created and Nik Viveza 2 was used to adjust the lighting in the image. A Red Channel Luminosity Curve was applied as a final step. Lots going on here……Digital Lady Syd
Native American Bottles, Pots and Dishes
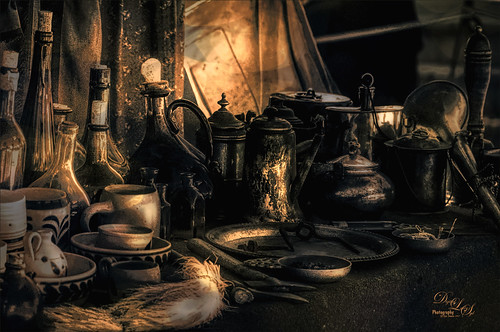
This image taken at the Ormond Beach Native American Festival was actually turned into a black and white in Lightroom. Painting in the highlights with an adjustment brush really made the light pop in the final iteration. In Photoshop, to remove a bit of noise, especially in the shadows, Topaz DeNoise 6 was used to remove it (used the Overall and Shadow sliders). Then Lucis Pro was opened to sharpen the details a little. It was set to Difference blend mode at 24% layer opacity and the Blend If sliders were used to further pull in the details. A Curves Adjustment Layer was used to add contrast. For color a Hue/Saturation Adjustment Layer was set to Colorize and a teal color effect was selected. Next another Hue/Saturation Layer was opened and a yellow-orange was applied to just the Highlights of the image. At this point the image looked really flat, but kind of old and vintage looking. I rather liked it. On a stamped layer (CTRL+ALT+SHIFT+E), Topaz ReStyle was opened and the Rustic Red and Orange preset was applied with a few adjustments and set to 74% layer opacity. On another stamped layer Topaz Texture Effects 2 was opened and A Little Dingy preset was applied. The Texture section was changed to a gold and black bokeh which enhanced the lighting effect. That was all that was done……Digital Lady Syd
An Engraved Leaf
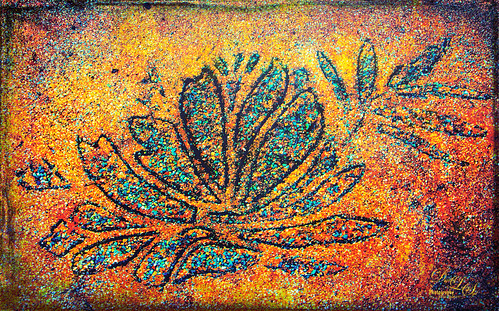
This image was taken at the Ormond Memorial Art Museum and Gardens of a pattern drawn into the sidewalk. The texture in the image was so nice, I decided to add a little pizzaz to it. First Topaz (see sidebar for website link) ReStyle preset Loulou and Mandy was applied. This gave it the bright orange and turquoise colors. Three adjustment layers were stacked: Color Lookup using Fuji F125 Kodak 2395, Levels, and Photo Filter using Cyan at 52% density. On a stamped layer (CTRL+ALT+SHIFT+E) Topaz Texture Effects2 was applied using a Dingy Cream preset. On another stamped layer, Nik Viveza 2 was applied to adjust corners. A Vibrance and Saturation Adjustment Layer was used. Then I decided to create a brush from the texture of a section selected using the Marquee Tool, turned to black and white, then painted out some more areas, and went to Edit -> Define Brush Preset. Now used the brush to paint in some added texture over the feather and flower and in blank parts of the image to add more texture. I really like the brush I created and hope to use it some more!…..Digital Lady Syd
An Urgent Plea
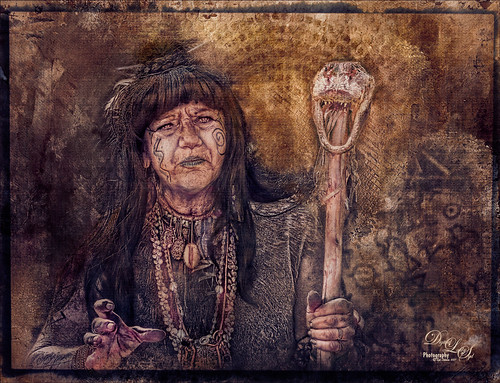
This is a lovely Native American woman I met at the recent Ormond Beach Native American Festival. She was actually doing a little presentation to the students from the local elementary schools on Native American traditions. I wish I could remember which was her tribe, but I would bet she is or was a teacher – very entertaining for the kids, and us adult kids too. Her expression reminded me of the past plight of the American tribes, and liked the fact that she represented how a female member would be attired. I can honestly say this image took me forever to finalize – just could not pull the whole look together. Finally the right textures fell into place and ended up just using my basic Photoshop workflow. Lucis Pro added the detail as an almost hyper-effect mode. Topaz (see sidebar for website link) ReStyle was used to get an interesting color palette and Topaz Texture Effects 2’s Fudge Brownie preset gave the vintage feel to the image. Then several clean up layers and of course, Nik Viveza 2 to draw attention to the face and the Alligator stick (hum). Needless to say, the kids loved that artifact. Just one image but three textures from 2 Lil Owls (see sidebar for website link) and one from Kim Klassen were used to get the final effect. Overall it turned out pretty much like I wanted…..Digital Lady Sy
Tiny Red Berries
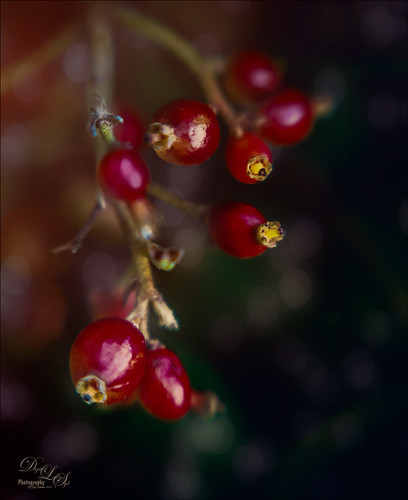
These little red berries were found growing on a shrub in my yard – they appear after some tiny white flowers fall off of it. This strand was only about 1 inch long and the image was taken with my Lensbaby Composer at F/4 using a Macro +4 Lens. In Lightroom a Scott Kelby Trendy High Contrast Look preset was applied and a lot of time was spent to sharpen the berries using the Adjustment Brush. This image had a lot of noise in the image so the Detail Sharpening Amount and Noise Reduction Luminance sliders were set to 0 so it could be removed more effectively in Photoshop. Once in Photoshop Topaz (see sidebar for website link) DeNoise 6 using the Raw Moderate preset was applied and did a much better job of removing the noise. This layer was duplicated and Topaz Texture Effects 2 was opened where the Fantasy Land II preset was added. A bokeh texture was inserted into the preset for the 2nd Texture section. In the Masking Enabled part of the Texture section, a black brush set to a Strength of 0.43 was used to lightly remove any bokeh effect from the berries. The Texture Effects layer opacity was set to 91%. On another duplicated layer, Topaz ReStyle was opened and the Swam and Sherpa Blue preset was applied and set to 50% opacity and Screen blend mode in the plug-in and once applied, the overall layer opacity was set to 85%. Just finished up with the Black & White Adjustment Layer set to 56% layer opacity pop the colors and set to Luminosity blend mode, a Red Channel Luminosity Curve Adjustment Layer to tone down highlights, and Nik Viveza 2 to adjust the focus and add a little vignetting. Pretty much my regular workflow. …..Digital Lady Syd
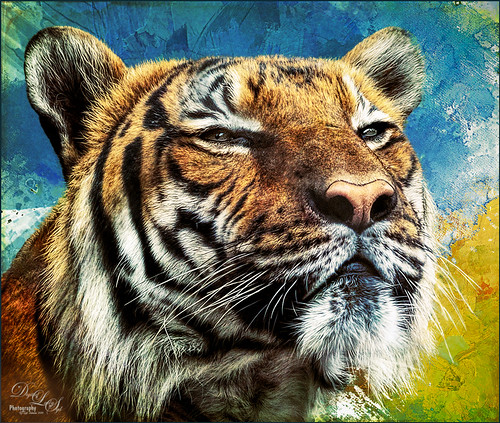
The Break Out
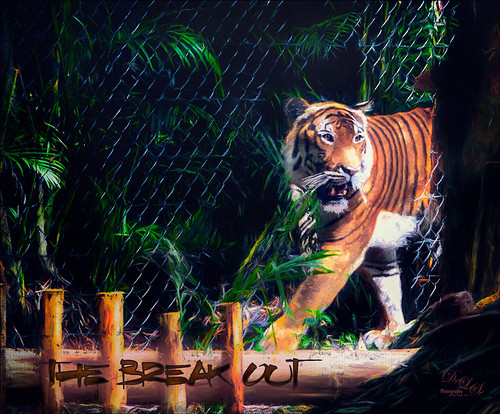
The Malayan Tiger image above was taken at the Palm Beach Zoo in Florida and he really was not trying to get out of his enclosure. He was actually checking out the tortoise in the next enclosure – apparently tigers like to eat tortoises according to his keeper. This image took an excessive amount of painting to get rid of the fence in front of his body. Luckily the eyes, nose and mouth structures were very sharp so the tiger could be reconstructed. Several paint layers were needed. Also several stamped layers (CTRL+ALT+SHIFT+E) were used for the following filters: Topaz (see sidebar for website link) Glow 2 did a great job adding a great effect on the tiger’s body using one of Blake Rudis’s wonderful presets called Room Glow set to Overlay blend mode. Topaz Impression 2 was applied at 82% layer opacity but I am not sure which preset was used to create a unique preset. Topaz ReStyle’s Tangerine Gauze preset, and Topaz Texture Effects 2 was used next. Finally Nik Viveza 2 was used to get the focal point correct. Lots of fun but lots of work……Digital Lady Syd
A Cowboy in Montana
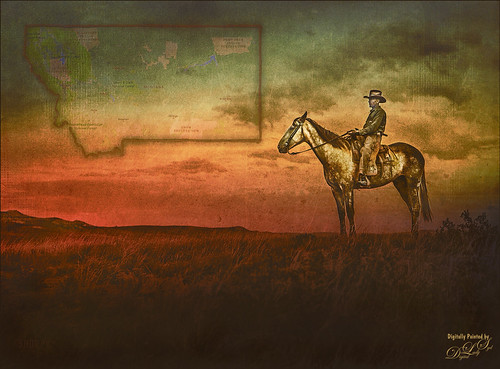
This image is from Shorpy.com, my favorite old image site, and was called Cowboy at Quarter Circle U Roundup in Montana in June 1939. Just had to try to add the hand-tinting and see if I could get that old West look that was so popular in the 60’s. This image was really not that hard to do – just followed the steps in my How to Colorize an Old Photo Fun Photoshop Blog using several Color Fill Adjustment Layers. On a stamped layer (CTRL++SHIFT+ALT+E) on top, used a Sunset Gradient 5 from Oilha Kozacheenko to get the beautiful sunset effect. The map was created by just going into one of the Map Apps and copying down a selection of Montana, removing all the roads, drawing a line around the state lines to thicken them, and removing the white in the map using Color Range. Then it was brought into the cowboy image. 2 Lil Owls (see sidebar for website link) Mosaic Set beneit grunge texture was applied and set to Linear Light blend mode at 25% layer opacity. Topaz (see sidebar for website link) Texture Effects 2’s Urban Grit preset was applied and then Topaz ReStyle’s Natural Brown Shades. It took a little bit of tweaking to get the final result, but it was a lot of fun! I like to hand-tint a good black and white image for a change of pace…..Digital Lady Syd
Mom and Baby Giraffe Looking for a Snack
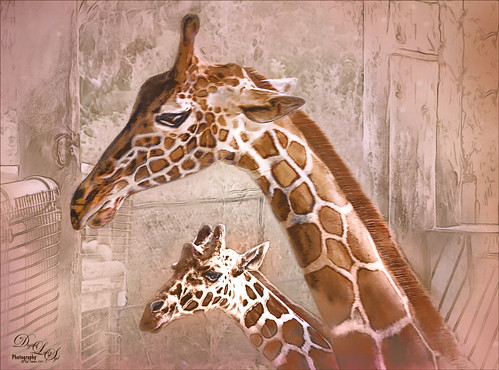
These giraffes are living at the Jacksonville Zoo in Florida. I am a big fan of the sketch effect and this time I added the MixArt – Sketch Photoshop Action to add the sketch effect. (For more info on the action, see my Trying Out the MixArt Action blog.) It is a long action and there are lots of options once it has been run. It is a really nice and inexpensive action which I use quite a bit. Several layers were added on top of the action to give it the look that I like: mainly Topaz (see sidebar for website link) Texture Effects 2 and Nik Viveza 2. Hope you enjoy!…..Digital Lady Syd
Rainbow over Arizona
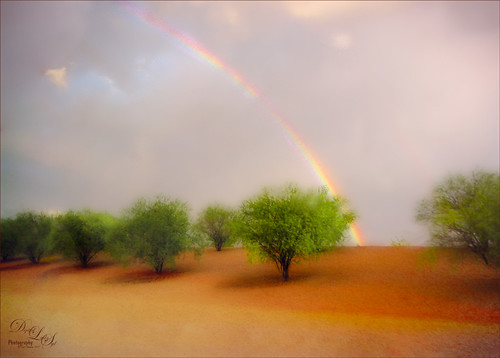
This was a snapshot taken with an old camera several years ago when in Arizona. Just had some fun with it as I loved the way the trees looked and wanted to see if I could get a nice effect with them. Applied Topaz (see sidebar for website link) Impression 2 and used a preset created from watching Jai Johnson’s Topaz Impression Oil Glaze Preset for Noise Removal video – adjusted the Red, Orange and Yellow colors in the plug-in and added a Vignette to it. The preset was not used for noise removal – just liked the effect on the image. Some clean up was done on a layer. On a stamped layer (CTRL+ALT+SHIFT+E) on top, applied Topaz Texture Effects 2 – started a new preset with the Diffusion section (set Diffusion Strength to 1.00, Softness 0.49 and Blur 0.27); Basic Adjustments section to adjust the color in the rainbow with Enabled Mask turned and inverted the mask to just paint back the rainbow; Light Leaks section using the first leak to add a little foreground color; and finally the Masking section using the Brush tab to paint out some of the effect on the foreground tree. On a new stamped layer a little Nik Viveza 2 magic was used to drive the eye to the focal point. That was it!…..Digital Lady Syd
A Surreal New York New York Hotel
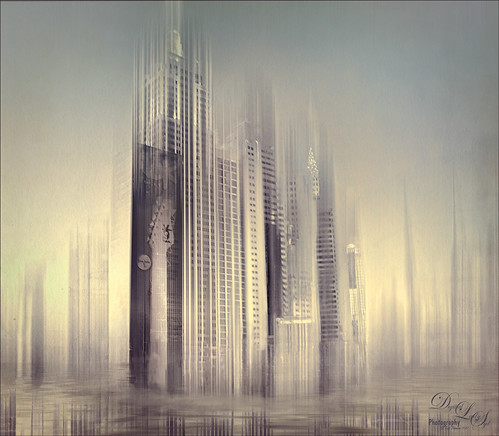
Not sure what possessed me to create this, but it was a lot of fun. This is not really a hard effect to achieve. Just made some basic Lightroom adjustments so my image had nice tones and detail. In Photoshop, added a little Lucis Pro (no longer available) to sharpen it just a little more – could have used Topaz (see sidebar for website link) Detail or Clarity to do this. Had to do quite a bit of clean up since there is there is a roller coaster running in front of the New York New York Hotel in Las Vegas. On a stamped layer (CTRL+ALT+SHIFT+E), added a pretty severe motion blur by going to Filter -> Blur -> Motion Bur and setting the Angle to -90 (vertical effect for this image) and the Distance to 687. Added a duplicate layer of the Lucis Pro layer on top of the blur layer and a Black Layer Mask – the buildings were lightly painted back to give some building effect but still left it really vague. Another stamped layer was used and the now free Nik Silver Efex Pro 2 was opened. Started with a preset and tweaked the sliders to get a pleasing effect. On a duplicate layer, the Flaming Pear Flood filter was added that gave a bit more of an eerie look – the lines in the bottom foreground came by selecting a Glue called spin light – thought it was an interesting effect. On another stamped layer used Topaz Texture Effects 2 using the Crisp Morning Run – did a lot of adjustments and used the Spot Mask a couple times, once on the Texture section and another in the Masking section. Added a Red Channel Luminosity Curve Adjustment Layer. On another stamped layer above used Nik Viveza 2 to add focus to the guitar on the building. Used a Selective Color Adjustment Layer to give that final color look to get the sort of soft abstract effect. This was a lot of fun to try something different……Digital Lady Syd
Bamboo Trees
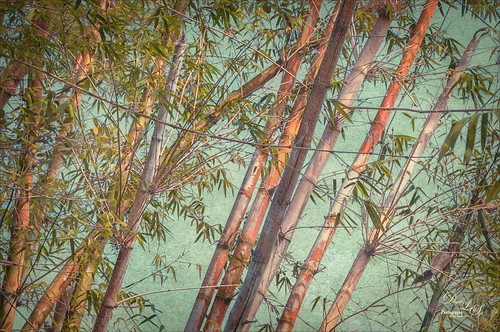
These beautiful trees are part of the Ormond Beach Memorial Art Museum and Gardens here in Florida. The blue sky was a perfect match for the colors in the tree trunks. I really wanted an oriental feel to the image. The first step was working on the RAW file in Lightroom. A free preset obtained from Allen Mowrery called Allen’s Vintage Retro achieved a bit of a sketch feel to the image and really softened the image. In Photoshop Lucis Pro (unfortunately no longer available) was applied using both the Enhance Detail and Smooth Detail sliders on all three channels to get a slight painterly effect in the image. Then Levels, Color Balance, and Selective Color Adjustment Layers were applied. On a stamped layer, Topaz Texture Effects 2 was opened and this is were the bluish texture became more obvious on the background. The texture used is one of the Topaz pinkish textures with darker edges. (Settings used: In Texture Section, selected texture that is a pinkish color with darken edges (in my All, 6th row down and first column), Size 1.00 and Rotation 0 – Keep Aspect Ration; Brightness -0.43, Contrast -0.14, Detail 0.79, Saturation -0.49, Color Strength 0; Opacity 0.33 set to Normal blend mode; and Enabled Masking and set the Color tab to Hue 0.12 and Range 0.09, which blacked out most of the trees and leaves leaving the white sky for the area the texture would be applied. Next Vignette section Strength 0.40, Size 0.70, Transition 0.53, Roundness 0.61, Color Black and center in middle, Opacity 0.90 set to Normal. Basic Adjustments Brightness -0.08, Shadow 0.11, Highlight 0.12, Clarity 0.24, Saturation -0.12, Temp -0.10, Tint 0, Opacity 0.43 set to Soft Light. Overall Opacity set to 0.62 and Luminosity blend mode.) My regular workflow was done next with a Black and White Adjustment Layer set to Luminosity blend mode, Nik Viveza 2 to emphasize the focal point, and a Red Channel Luminosity Curves Adjustment Layer. (Search on my Fun Photoshop Blog for info on these techniques.) The last step involved adding a Layer Style for a little Impasto texture effect on the tree bark. Used John Derry’s Impasto Smooth Light layer style and Grut’s IO (Impasto Oil) Gypsum Slate brush to paint in some of the tree trunks on a New Layer with a Fill set to 0. In areas that still needed a little texture, used the same brush on a New Layer just sampling nearby colors. Grut’s Impasto Oil brushes are great for just adding a bit of texture and depth here and there without going to the trouble of using a layer style. This was a lot of fun to do and I like the oriental color palette which bamboo always reminds of using……Digital Lady Syd
Window Flowers
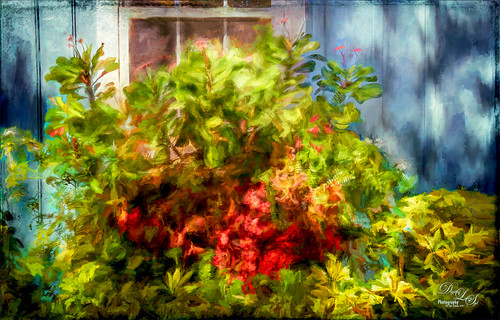
These pretty flowers were snuggling up against the window and enjoying a nice sunny January morning at the Ormond Beach Memorial Art Museum and Gardens. Just having some fun here with Topaz (see sidebar for website link)K Impression and Topaz Texture Effects. Lots of masking and painting in areas with Regular brushes and Mixers. Could have worked on this image for hours! Love the colors!…..Digital Lady Syd
High Tide at the Sand Dunes
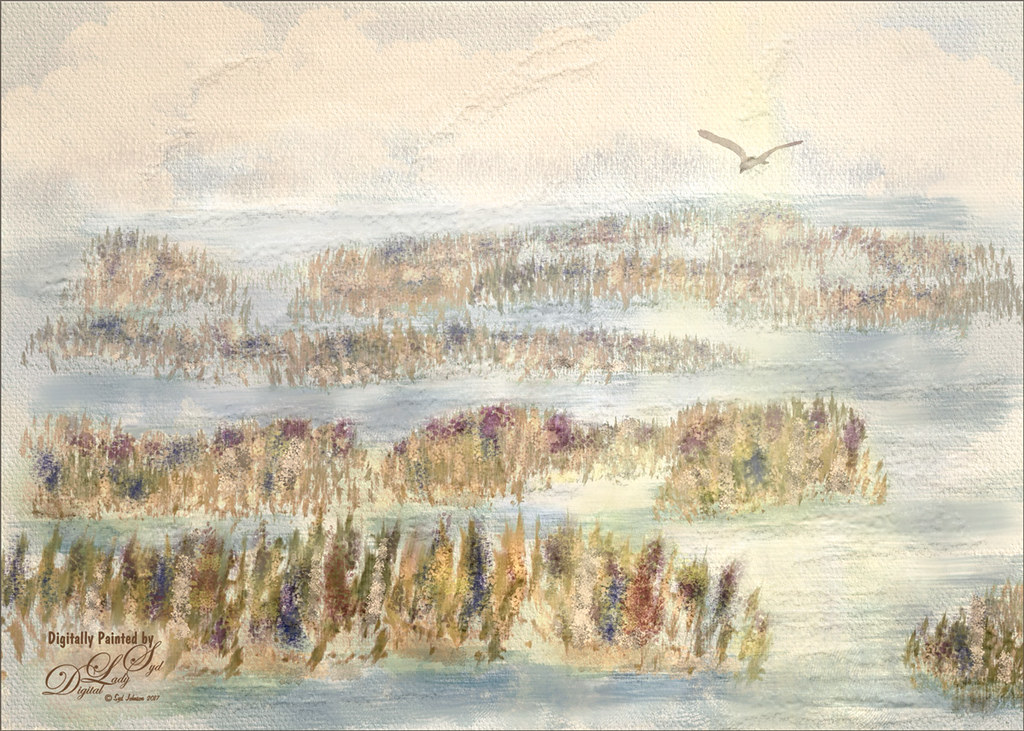
Back into my painting mode with what I envision the Sand Dunes in Indiana would look with a high tide. This image was completely painted in Photoshop using a basic white Canvas Texture as the background above my Background layer and set to the creamy cloud color using a Color Fill Adjustment. Layer. Next the ground areas were painted in using the various flower brushes, including several I created. On a layer below the flowers, the water was painted in. A bird from Obsidian Dawn was added – actually 4 birds were in the group but 3 were masked out. It looked pretty good at this point. Then Topaz (see sidebar for website link) Restyle Lavender gray preset was applied on a stamped layer on top (CTRL+ALT+SHIFT+E) to create a little bit different color palette. Duplicated the layer opened Topaz Texture Effects 2 – just added Diffusion section and used a mask to only apply the effect to the background plants; and Texture section using one of my own textures and removed effect from water with a mask. On layer above filled in a few more plants and added some color the the sky with a fog brush. To add a little warmth to the water, used a Sunbeam brush set to a low opacity. On another stamped layer, Topaz Lens Effects Fog 1 Filter was applied to soften the middle ground of image just a little. Last step was to add Kyle T. Webster’s Gentle Glaze layer style with Fill set to 0 and painted over the water areas to give a really nice painted effect in the water and sky areas. Painting in Photoshop is really fun!…..Digital Lady Syd
Contemplating Life
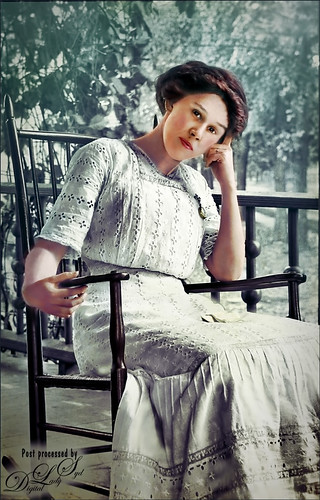
This was a black and white image from one of my favorite websites, Shorpy’s Historic Picture Archive (click on link to see original image). This image just sort of struck me as one I would really like to colorize. The first step was to sharpen up the image using the now free Nik Silver Efex Pro 2 to add some natural contrast to the overall image. Next I used two different methods in this image, although I probably should have stayed with just one, but here are links to my blogs on these techniques: How To Hand Tint a Vintage Image and Create a Brush To Do This blog and How To Colorize an Old Photo blog. A Red Channel Luminosity Curves Adjustment Layer was used to add in more contrast. (See my How To Use a Red Channel To Create a Nice Blended Image Effect blog.) On a stamped layer above (CTRL+ALT+SHIFT+E), opened Topaz (see sidebar for website link) Texture Effects 2. My Crisp Morning Run preset was run (this used the original Topaz Crisp Morning Run preset and switched out the Texture to a bright turquoise one half-way down the list and the Opacity was set to 0.29; also changed Vignette Strength set to 0.60 and Size 0.53.) Then in Light Leaks section, the Enable Masking was turned on. Brush tab was selected, and the woman was painted out with a brush around the head area (brush settings: Radius 0.50, Strength 0.59, and Hardness 0.30). In the Split Tone section, used the Enable Masking feature with the Spot tab to just hide the face area – set sliders to Transition 0.84 and Color Aware 0.86. Nik Viveza 2 (also free) was used to sharpen up the texture on her dress using a Control Point and the Structure slider. Added a Black and White Adjustment Layer set to Luminosity blend mode to balance the contrast. (See my How To Use a Black & White Adjustment Layer To See Contrast in an Image blog.) I just did not like the way her arm and hand on the chair looked too large so the Liquify Filter was used to adjust. Frooze the dress sleeve and chair behind and under the arm, then reduced the size and straightened the arm with Forward Warp Tool set to Size 300, Density 50, Pressure 100, and Rate 0 – just moved a little. Next PS’s Liquify Pucker Tool was set to Size 200, Density 50, Pressure 1 and Rate 80 – dabbed on hand a couple times. To enlarge the eyes just slightly, used the Bloat Tool set to Size 70, Density 50, Pressure 1, and lowered Rate to 32. Clicked once on each eye to just gently enlarge. Now all I could see was the red moire in the shadows of her arm skin and around eyes. Used Topaz DeNoise 6 set to overall Strength of 0.14, adjust Shadow 0.37, and adjust Color Red 0.69 to remove – set this layers opacity to 87%. I could paint these old vintage images all day long – really relaxing to do!…..Digital Lady Syd
Happy New Year
Wishing everyone a very Happy New Year and hope all your days are sunny as above in the coming year! I just created this image in Corel Painter – have not digitally painted in quite a while so it was fun to poen up Corel Painter and see what happened! Original painting used various brushes from Karen Bonaker, Melissa Gallo, John Lowther, and a few of my own. Then it was saved as a PSD file and brought into Photoshop where a few clean up layers were created using the Clone Stamp Tool and some regular brushes to even out the tones. The image was then taken into Topaz (see sidebar for website link) Texture Effects 2 to just give a nice overall effect to pull it all together. Last step, used Nik Viveza 2 to adjust the lighting to my liking. This was so much fun to create. Feels good to paint again!…..Digital Lady Syd
Purring Tiger
This image is of a Malaysian Tiger at the Palm Beach Zoo – I think he was actually purring – I sort of connected with him. I tried a couple different plug-ins on this guy. Started with Topaz (see sidebar for website link) Clarity, then Topaz Clean’s Cartoon preset where a black layer mask was added and just the whiskers were painted back to give the sharp effect. First time I have used this plug-in so it was really good to see the results. Used PS’s Select and Mask panel and then followed up with a Defringe of 1 px to get rid of the gray edging. Used two of Jai Johnson’s new Unpredictable Textures for the interesting painted look behind him. On a stamped layer (CTRL+ALT+SHIFT+E) and applied Topaz Texture Effects 2 – one of Blake Rudis’s from a while ago (check out his videos on Topaz Labs). On another stamped layer Nik Viveza 2 was applied and that was it. It has a bit of an engraved feeling to it and was a lot of fun to try…..Digital Lady Syd
Bird of Paradise
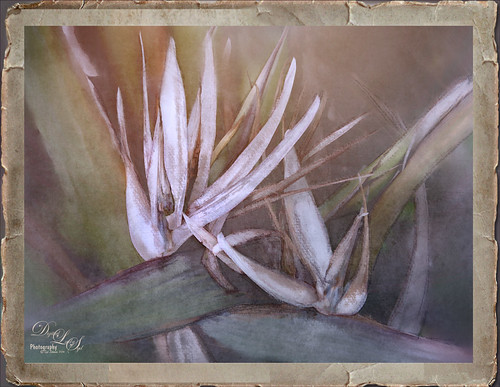
This beautiful white flowers in a Bird of Paradise in my front yard was fun to post-process. Used Topaz (see sidebar for website link) Clarity to sharpen overall, and Topaz Simplify with the Simplify Size slider set to 0.17 which removed some of the bad spots on the leaves. Painted on the flower stems and stalks to further remove bad areas and add a little texture to them. Used the Corel ParticleShop plug-in to remove the background area using Blend brush and the Blender Tool. This plug-in can be very handy! On a stamped layer (CTRL+ALT+SHIFT+E) Topaz Texture Effects 2 was used – used Fall Foliage Foggy Morning (downloaded from the Topaz Community) with a few adjustments to the Basic Adjustments section. In the Texture section, masked the texture off the focal point with the Brush tab set to a Strength of 0.66. Did some clean up and added the free Nik Viveza 2 to enhance the focal point. Added Sarah Gardner’s Frame Collection Paper Frame 05 on top that is a free download. That is all that was done for this nice vintage effect!…..Digital Lady Syd
Flowers Enjoying the Day
These cute little flowers are Crepe Jasmine, I believe, and are growing in my front yard. Not a whole lot post-processing on this image. Topaz (see sidebar for website link) Clarity was used to sharpen up the overall image. On a duplicate layer Lucis Pro (unfortunately no longer available) was set to Enhance (R161/G169/B67). Duplicated the layer again and applied Topaz Texture Effects’ Winter Wilderness preset. On yet another duplicated layer, Nik Viveza 2 (now free) was applied to darken the corners slightly and sharpen the focal point at the center of the flowers. Finally, a New Layer was opened on top. Used a soft round brush to paint with black at a very low opacity to reduce the brightness of the stems of the flowers and leaves. Applying the Lucis Pro plug-in gave the very well defined effect on the leaves and flowers. This image was a lot of fun to do!…..Digital Lady Syd
Happy Thanksgiving!

Happy Thanksgiving to all my US friends celebrating the holiday today!
This was a really quick image to create – just used one of 2 Lil Owls Workshop textures for the background (see sidebar for website link). On New Layers above: Selected a Snow Brush to add a little holiday feel; added some brush strokes using a leafy floral clip art that was turned into a brush and a Bevel and Emboss layer style added to the layer; used Grut’s Inky Leaks FX Il Romato brush (one of my favorite in this great set) to paint over the stalks for some nice detail; and a chunky brush to add in different colors. On a stamped layer above (CTRL+ALT+SHIFT+E), Topaz (see sidebar for website link) Texture Effects 2 using a Dingy Cream preset was applied. A Stroke, Gradient Overlay and Outer Glow Layer Styles waere added to the text layer. The clip art is from Graphics Fairy and used Stroke, Inner Shadow, and Outer Glow Layer Styles. Fill Color and Pattern Fill Adjustments Layers were clipped to the clip art (ALT+click between the layers to clip)……Digital Lady Syd
The Jumper

Just had some fun taking some pictures at Ohe’o Gulch (also called Seven Sacred Pools) on Hana Highway in Maui, Hawaii, a while back. The original image was much larger with people standing on top and swimming below! Very popular place! Note: people are not encouraged to dive or jump into the water here as it is very hazardous and many fatalities have occurred. Just wanted to see if I could get a nice waterfall effect using an old tip on how to smooth out waterfalls. (See my Smoothing Out Those Waterfalls blog.) Two Motion Blur filters had to be used since the water was falling in slightly different directions. To get the soft look in the rocks, used Topaz (see sidebar for website link) Texture Effects 2 and a preset I created called SJ Soft Pastel Effect which uses a Basic Adjustment (need to set to individual image), Diffusion (Strength 0.57, Softness 0.38, Blur 0.39); Split Tone (Highlight Saturation 0.12, Highlight Hue 0.48, Shadow Saturation 0.07, Shadow Hue 0.70, Balance 0.63, and Opacity 1.00), Vignette (use setting to fit your image), Borders (the second row up from bottom on left; Texture – Soft Grunge light beige/gray vertical lines (middle column, 7th row) – Size 1.00, Opacity 0.63, Blending Mode Saturation, Detail 0.07, Saturation 0.08, Color Strength 0.14, Color 0); and Light Leaks (a gold and yellow disk from upper left (2nd row from bottom and left column), Size 1.05, Blending Mode Color Dodge, Saturation 0.68, Color Strength 0.46, Color 0.45). A little burning around the jumper was the last thing done. This was a pretty neat place to visit!…..Digital Lady Syd
A Rainbow Tree
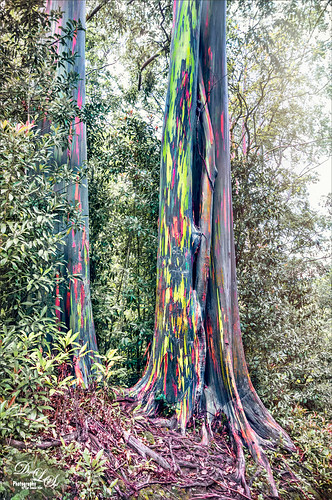
This image is of a beautiful, but unfortunately vandalized, Rainbow Eucalyptus Tree in Maui, Hawaii. Why people would do such a thing is hard to understand! It is a very unusual tree that only grow in frost-free zones. This image a preset in Topaz (see sidebar for website link) Adjust as seen in a Topaz Webinar by by Joel Wolfson called Creative Essential with Topaz Plug-ins Plus the Official Introduction Glow 2. Topaz Glow was used to brighten up the rainbow on the trunk. The last step was using Topaz Texture Effects 2 and the Breaking Down preset. I have never seen this type of tree anywhere else!…..Digital Lady Syd
Bird on a Bird Cage
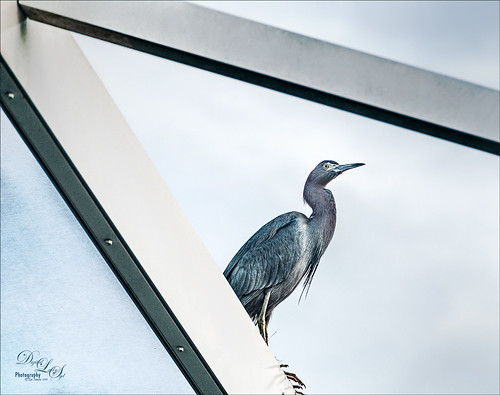
This Little Blue Heron decided to check in on us while we were having dinner on our back porch without electricity after Hurricane Matthew. The screen is blown out there I could get a really nice shot of him. He is a real beauty! Usually I paint these guys, but this time I decided to try out Lucis Pro 6.0.9 (no longer available) on the bird and really liked the results (Enhancement sliders R91/G101/B19 & Assign Original Image Color 5/95). Used the Camera Raw Filter to remove a slight amount of noise the Lucis Pro filter added. On a stamped layer above, Topaz Texture Effects 2 (see sidebar for website link) was applied using the Texture and Vignette filters. The filter mask was used to get the effect correct. Last step was to use the now free Nik Viveza 2 to draw more focus to the face of the bird. That was it. The birds are so pretty around here!…..Digital Lady Syd


