
Happy Veterans Day!

Happy Veterans Day to all who served! While visiting Savannah, Georgia, recently, I was impressed by how patriotic the city is – US flags were everywhere. I found this image to be quite pretty on a beautiful Sunday morning! In Lightroom the NAPP preset called Hang Ten (the preset is referenced in Scott Kelby’s The Adobe Photoshop Lightroom 5 Book for Digital Photographers) and Dave Delnea’s Backlight 002 Vertical preset (which creates the beautiful lighting effect) were applied along with the basic sliders. This image used Topaz (see right side for website link) Simplify and Alien Skin’s Snap Art 3 in Photoshop. A couple Curves Adjustment Layers were used, one for targeting the flag and the other creating a light vignette effect…..Digital Lady Syd
Snap Art and Simplify – Now That’s Painterly!

Just a pretty tulip that cannot decide if it wants to be open or closed. (This link shows some of these beauties in their glory!) This image was converted to a Smart Object and taken into Alien Skin Snap Art 3 and the Oil Paint (dry brush) preset was applied with some adjustments. A stamped layer (CTRL+ALT+SHIFT+E) was created on top and the layer was opened up in Topaz (see sidebar for website link) Simplify 4 and the Oil Painting Toned IV preset applied. Back in Photoshop a black layer mask was added (ALT+click on layer mask icon to make it black), and just the forward leaves were painted back to add the Simplify filter effect. A Curves Adjustment Layer was added to increase contrast and my SJ Painter Oil Frame was added to give it a canvas feel. You can CTRL+T the frame to get just the amount of brushed effect to add. That was it. Fun to do!…..Digital Lady Syd
Pretty in Pink! with Topaz Clarity

I do love to photograph my gerberas – they are always so pretty. This time I really changed them up. I think they are as pretty in pink as they were in yellow! So I was really just playing around in Topaz (see sidebar for website link) photoFXlab just to see if the new Topaz Clarity plug-in would work nicely with it. I didn’t even keep track of the changes I made exactly in Clarity, but I did use the Hue/Sat/Lum section to turn the flowers pink. I just kept fooling around with the sliders until I got a color I liked – used the Overall sliders on each of these sections and also adjusted the Clarity section too. Back in photoFXlab, adjusted the Dynamics slider a little to the right. Created a +From Stack Layer and opened up Topaz Simplify 5 where the Paint 5 preset was applied. Back in photoFXlab, the Mask tab was selected and the centers of the flowers were painted back so the detail from the Clarity layer remained. Exited the plug-in and did some basic flower clean up. Created a couple New Layers and used two of my free Cloud Brushes (Brush 6 and 9) to add some interest to the background. Added a Curves Adjustment Layer and evened out some of the petal color. Then added 2 Lil’ Owls Color Bokeh Grunge Set (see sidebar for website link)-2 overlay to the image (set to Normal at 100% opacity). Next the text was added using the free font Ruthie. Kim Klassen‘s Square 3 border was added last and set to 52%. The last step added another Curves Adjustment Layer to enhance overall contrast. That was it. I just love playing with my flowers in Photoshop!…..Digital Lady Syd
PS: Check out my Fun Photoshop How to Create an Overlay Out of a Texture blog to see the frame it was put in.
Digital Lady Syd Related Blogs:
Digital Lady Syd Reviews Topaz Clarity
Topaz Simplify Artistic Workflow
Digital Lady Syd’s Review of Topaz photoFXlab v1.1
A Vintage Landscape Look on a Scottish Monument

I loved the way this image turned out – never expected it to be this pretty considering it was an image I snapped while standing on the street in front of our hotel. It is Nelson Monument (in center) and Acropolis (aka National Monument of Scotland on left corner) on Calton Hill – I did not get to visit this site but wish I had. This was not difficult to process once I got going. After cleaning up a rather boring image, Topaz (see sidebar for website link) Simplify 4 was opened and a preset I call the John Barclay BuzSim Setting preset was used, (The settings are: Simplify: Colorspace RGB, Simplify Size 0.19, Details Boost 1.00, and Details Size 0.20; Adjust: Brightness 0.01, Contrast 1.08, Saturation 1.03, Saturation Boost 1.15, Structure 1.00, and Structure Boost 1.00; and Edges: Edge Type – Color Edge Normal, Edge Strength 0.00, Simplify Edge 0.30, Reduce Weak 10.00, Reduce Small 0.20 and Flatten Edge 0.00.) I listened to one of John’s excellent videos on Topaz Labs and created this preset which has a very subtle result. Next I added 2 lil Owls (see sidebar for website link) Workshop 6 – Texture 1 which has the beautiful turquoise and light yellow sky color – the layer was set to Overlay Blend Mode. The beautiful text was supplied by my favorite Shadowhouse Creations – his Text Brush 5. I actually clipped a bright green Color Fill Adjustment Layer to the text (to clip just ALT+click between the two layers and the color fill adjustment layer will only affect the layer below) – then the text layer was set to 55% opacity. Another 2 Lil’ Owls Texture – texture 4 was used as an overlay frame (follow the steps in my blog How To Make Frames or Borders – scroll down to the section called “To save the frame you created as an overlay to use again”). A light yellow Color Fill Adjustment Layer was clipped to the texture file. A Curves Adjustment Layer where the red, green and blue channels were adjusted to get this slight vintage feel. The last thing done was to add a Color Fill Adjustment Layer to the whole image using a soft cream color (#c6c3bd) and then Nelson Monument was painted out in the layer mask so the eye is drawn to that area of the image. Had a lot of fun as usual – never get tired of this!…..Digital Lady Syd
Happy Valentines Day!

These flowers were growing in the countryside in Belarus several years ago. I am not sure what kind they are, but the blooms were huge! And the colors are incredible! Not a lot of processing here. After some basic slider adjustments in Lightroom 4, the image was opened up in Photoshop and three inches were added the left side of the image to create an area to add type by going to Image -> Canvas Size. The image was sharpened using Topaz (see sidebar for website link) Detail 3 and the Feature Contrast II preset. Some of the contrast was removed from the image by duplicating the top layer and setting it to Screen blend mode. A black layer mask was added and the high contrast areas were painted back in so they were not so obvious. (See a wonderful video by Melissa Gallo of Painted Textures called Turn Your Photo into a Pastel Painting, Pencil Drawing or Pen and Ink on how to do this.) A New Layer was created and some of the too bright highlights on the pink and purple flowers were lightly painted out. (See my Tidbits Blog Getting Rid of Those Blown Out Areas in Your Image.) Added a Levels Adjustment Layer per Melissa’s suggestion and then Topaz Simplify 4 was opened and the Painting II preset applied. The centers of the large blooms were brushed out to bring back the detail a little using a brush set to 33% opacity in the Local Adjustments section, the Dynamics slider in the Adjust section was set to 0.38, and Tone in Finishing Touches was checked. Back in Photoshop Kim Klassen’s Reentry Texture was added – beautiful texture that was free by signing up for her newsletter. On a white layer mask the flowers were lightly painted out to reveal the flowers just enough. Next on another New Layer some pink hearts were added to the background using Obsidian Dawn’s hearts-glitter brush set’s Glitter Brush set to 4100 px. Once again a white layer mask was added and the flower painted out so the hearts do not cover them. This layer was set to 68% opacity. The text was added using my favorite Freehand575 BT font set to a default setting of the Bevel & Emboss layer style. A basic texture image turned into a Valentine for you!…..Digital Lady Syd
Painterly Effect using Topaz Detail and Simplify
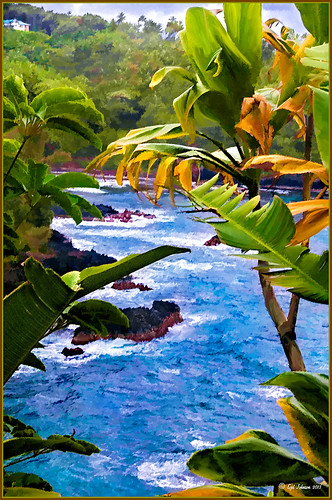 |
I was looking through my notes from last year and came across some nice info on using Topaz (see sidebar for website link) Simplify and Detail together to create an oil painting look. (See Creating an Oil Painting Effect from Topaz Labs.) My Hawaiian image from the east coast of the Big Island was one I had not originally processed as it really did not catch my eye – hoover over image to toggle to original. While doing a little Hawaii dreaming, I came across it again and thought it might look good using some of the settings from this video. (I really was thinking about how it would be to live in the house up in the top left – hum!) I actually did not follow the exact video workflow, but it did get me thinking about how to do this. Now that both Simplify and Detail have been updated, it was easier to get some different looks. Here are the steps I followed:
1. Duplicated the Background layer (CTRL+J). Topaz Detail 3 was opened and the settings from the second example in the video were applied: Small Detail .53, Medium Detail .46, and Large Detail .44.
2. Duplicated the Detail layer. Next Topaz Simplify 4 was opened and the Painting IV preset was applied. The only change to it is that the Edges section was turned off as it made the trees in the background stand out.
3. A Layer Mask was applied to the top Simplify layer. Some of the Detail Layer was brought back in by painting black on the mask on the foreground leaves. Also some detail in the little rock island was painted back.
4. What I did different was to add a New Layer and paint over the foreground leaves and trees in the midground to give a more painterly look and smoothing out some of the rough edges and colors that Simplify can bring into an image. A wet mixer brush was used for this.
5. Next a general Curves Adjustment Layer was added to bring in some contrast.
6. The sky was really blown out, so I added another Curves Adjustment Layer that brought back the natural clouds from the original image into the sky. The Layer Mask was filled with black and just the sky area was painted back with a soft black low opacity brush.
7. The water was way too cyan for my taste, so another Curves Adjustment Layer was added and the different color channels were adjusted to get a better color for the water.
8. I felt like the eye was not guided with a strong enough element to get you through the image. Therefore, a New Layer that was set to Overlay Blend Mode was added. With a large black brush set to 15% opacity, the edge of the bay was lightly painted on the water all the way to the back center. This burned in a slight contrast in the water for the eye to follow. Much better overall impact for the image.
9. The last step involved adding my SJ Thin Double Edge Frame layer style left at the default colors.
That is how I got this very Hawaiian Oil Paint feeling. Give these two plug ins a try and see what you think…..Digital Lady Syd
Digital Lady Syd Related Blogs:
Topaz Simplify and Topaz Detail Together
Artistic Daisy!

This yellow daisy has a very interesting texture by French Kiss Textures called Lakeside – she actually offers it for free at her website (she also has some great tutorials on how to use textures on her site). I was not that familiar with her textures until recently – she has some beautiful textures that have more of an artistic flair to them than most sites. This texture was actually placed behind my daisy. A Hue/Saturation Adjustment Layer was placed above the texture and the colors were changed from the blue-yellow-green to the green-purple tones by setting Hue to -117, Saturation to -41 and Lightness to -8. The daisy had been cut out as an object using Select -> Color Range and selecting just the flower and stem. The flower was processed in Topaz (see sidebar for website link) Simplify 4 using the Oil Paint Toned V preset – the Tone and Edge Sections were turned off and the color space set to RGB. The layer was set to 75% opacity to tone it down a little. A pink textured border (see my SJ PNG Borders) was placed round the image and the color was changed to light brown using another Hue/Saturation Adjustment Layer set to Hue +48, Saturation -3, and Lightness 0. A Curves Adjustment Layer was added to get the final contrast in the image. That was it. Try downloading her free texture package and see if you like them as much as I do!….Digital Lady Syd
Digital Lady Syd Related Posts:
Getting a Nice Painterly Landscape Effect with Topaz Simplify and Texture
A Little Hollywood for My Butterfly Model
Digital Lady Syd Reviews Topaz Simplify 4
Getting a Nice Painterly Landscape Effect with Topaz Simplify and Texture

An easy way to get a painterly look. This image is at the entrance to SeaWorld in Orlando, Florida, and is a great place to take a shot – very Disneyland-like colors! This look was created by doing these things:
1. Applied Topaz (see sidebar for website link) Simplify 4 using the Painting V preset set to transparency to .28
2. Next French Kisses Artiste Fauve Rainbow texture was added – although any painted texture you like could be used. A Hue/Saturation Adjustment Level was clipped to the texture layer (by ALT+clicking between the layers) and Saturation was set to -100 to desaturate the texture so it can be layered on top of the image so the color in the texture does not show up on the image. The texture blend mode was then set to Hard Light at 34%. (Try different blend modes to see which looks best on your image.)
3. A Levels Adjustment Layer was added to brighten the image as the texture tends to darken the midtones.
4. Topaz Detail 2 was applied to sharpen the image using the Creative Detail Accent preset with some adjustments to the three color sliders and the saturation slider.
That was it and you get this nice painterly effect!…..Digital Lady Syd
Digital Lady Syd’s Related Blogs:
Topaz Simplify and Lens Effects Saves an Image!
Digital Lady Syd Reviews Topaz Simplify 4
Using Topaz Simplify for That Artistic Feel!
Polly Parrot Simplified with Topaz!

Pretty basic application of Topaz (see sidebar for website link) Simplify 4 on this image. This adorable parrot image used a Simplify preset I previously applied to an ocean scene. (These are the preset settings: Simplify YCbCr; Size 0.15, Feature Boost 0, Details Strength 1.09, Details Boost 2.42 , Details Size 0.70, Remove Small 0.10, and Remove Weak 0.31; Adjustments tab: Brightness 0, Contrast 1.05, Saturation 1.70, Saturation Boost 1.20, Dynamics 0.31, Structure 0.95, and Structure Boost 1.00; No Edges; Curves Tool – Strong Contrast II; and Transparency – Overall Transparency 0.40.) ShadowHouse Creations beautiful Overlay Texture MO8-2012 was applied at Linear Dodge (Add) blend mode at 100% opacity. A Curves Adjustment Layer and a little clean up finished up the image. I love the results!…..Digital Lady Syd
Trying Out Some New Techniques!

Just thought I would try out a couple new tricks. The image was a JPG shot with my little point-and-shoot Kodak camera at Flagler Beach on a beautiful early evening. A short Lightroom video called True Grit by Michael Rather was followed to create a nice gritty effect preset. I tried it on this landscape image (he used an image of a boy’s face) and really liked the effect. Next Topaz released Simplify 4 (see sidebar for website link) so I applied this plug-in to the photo in Photoshop. This is a free upgrade for anyone that has the bundle or has bought the Simpify plug-in previously. Lots of fun here. This was basically just playing around with the settings to get to know the program and getting a nice look. In Photoshop a Hue/Saturation Adjustment Layer was added where the Red Hue slider was moved so it was not so bright. I also added a layer mask to the Simplify layer and painted back in just a little of the white wave detail using a soft, low opacity black brush in the mask. The last step is my Black and White Layer Style. …..Digital Lady Syd
Digital Lady Syd Related Blogs:
Using Topaz Simplify for That Artistic Feel!
Blue Flowers and Layer Style Frame
I Didn’t Know That! Converting Lightroom Preset to Adobe Camera Raw Preset


