
An Army Tortoise
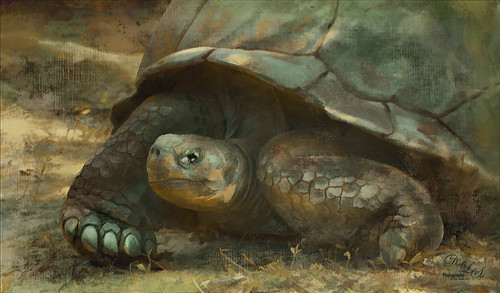
I have visited the St. Augustine Alligator Farm many times over the past few years and for some reason, these huge Galapagos Tortoises always catch my eye. They always look the same and are not particularly colorful, but for some reason this image caught my attention as it looks like he is wearing an Army camouflage helmet on his back. I just could not pass up the chance to try it out, so here my Army Tortoise – I think he really has a bit of a military expression on his face.
Just my basic workflow using Topaz Clarity to sharpen him up a bit, Topaz (see sidebar for website link) Simplify using a preset created from Serge Ramelli’s video called How To Turn a Photo into a Cartoon with Topaz Simplify 4.0, a Selective Color Adjustment Layer to turn the blue tones in his shell to green, Nik Viveza 2 to even out the edges, a Lighten and Darken Curves Adjustment Layer to slightly dodge and burn the image. 2 Lil Owls (see sidebar for website link) Mosaic Set Benoit textures was added and set to Multiply blend mode, and her Mosaic Set darcy grunge texture was set to Screen blend mode. For this texture the Blend If This Layer white tab slider was split and set to 90/128 to give the pattern effect just on the outside of the image. On a New Layer set to Overlay, a couple large round soft strokes were made to act as a spotlight on his face and part of his shell. A little clean up was done to finish up. I really think he looks so much more interesting now!….Digital Lady Syd
Bird of Paradise
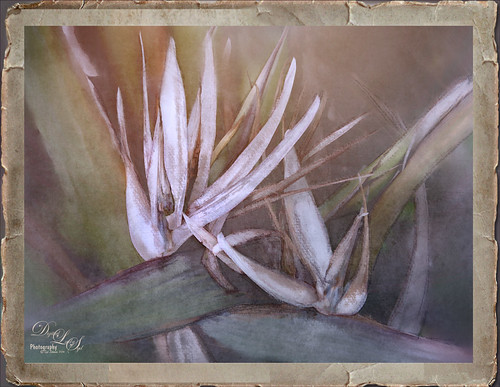
This beautiful white flowers in a Bird of Paradise in my front yard was fun to post-process. Used Topaz (see sidebar for website link) Clarity to sharpen overall, and Topaz Simplify with the Simplify Size slider set to 0.17 which removed some of the bad spots on the leaves. Painted on the flower stems and stalks to further remove bad areas and add a little texture to them. Used the Corel ParticleShop plug-in to remove the background area using Blend brush and the Blender Tool. This plug-in can be very handy! On a stamped layer (CTRL+ALT+SHIFT+E) Topaz Texture Effects 2 was used – used Fall Foliage Foggy Morning (downloaded from the Topaz Community) with a few adjustments to the Basic Adjustments section. In the Texture section, masked the texture off the focal point with the Brush tab set to a Strength of 0.66. Did some clean up and added the free Nik Viveza 2 to enhance the focal point. Added Sarah Gardner’s Frame Collection Paper Frame 05 on top that is a free download. That is all that was done for this nice vintage effect!…..Digital Lady Syd
Spotlight on the Canna Lily
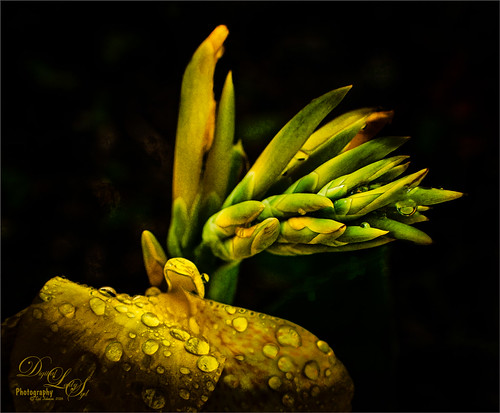
This is a macro image of a Canna Lily in my front yard taken after a recent rain. It was taken at F/2.8 with my Nikon 60 mm Macro Lens with a Bower 0.5 x High Resolution Digital Lens with Macro added to the lens.In Photoshop Topaz (see sidebar for website link) Simplify using BuzSim preset, the currently free JixiPix Spectral Art Dark Lines preset, and free Nik Viveza 2 to drive the focal point home. Last step was to add my free Cat Painting Canvas set to Overlay blend mode on top. That was it. Really simple image but I love the water drops!…..Digital Lady Syd
The Hidden Boat
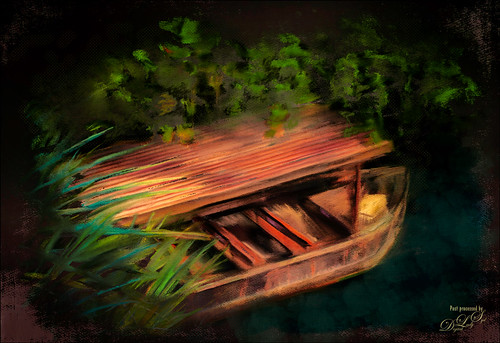
Loved this stock photo I found on pixabay.com of this boat hidden in the shade. Decided it would be a good practice painting so that is what I did. Use Topaz (see sidebar for website link) Simplify’s BuzSim preset to start as an underpainting. Still using Lori Jill’s instructions from her Turn Photographs Into Digital Paintings Using Photoshop videos and using the PS Mixer Brush Cloning Paint Setup action. A lot of painting, 3 textures and some brush clean up layers. Just a lot of fun to paint – very relaxing! …..Digital Lady Syd
Desolate Roller Coaster
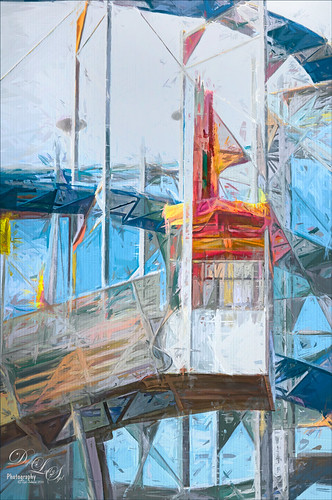
I really enjoyed doing this image – lots of structure and texture in this coaster image. Just Basic slider adjustments in Lightroom before opening up in Photoshop and duplicating the layer. Topaz (see sidebar for website link) Simplify was opened and the BuzSim preset was applied with a couple of changes (Simplify Size 0.76, Feature Boost 1, and Structure 2.38). This caused lots of webbing up in the track that really looked good – usually don’t but it made this picture more interesting. This layer was duplicated and Topaz Impression was added. I created a new preset to get this effect called SJ Illustrative Painting Effect (SJ Illustrative Painting Effect preset – Settings: Brush Type 01, Brush Size 0.70, Paint Volume 0.42, Paint Opacity 0.72, Stroke Rotation 0, Stroke Color Variation 0, Stroke Width -0.65, Stroke Length 0.20, Spill 0.48, Smudge 0 and Coverate 1.00; Color only – Red Sat 0.38 and Lightness 0.10; Orange Sat 0.75, Yellow Sat 0.68, Aqua Hue -0.15, Sat -0.47, and Litness -0.60; and Blue Hue 0.10, Sat -0.34, and Lightness 0.41; Lighting 0.25, Contrast 0.04, Vignette 0.18, Vignette Transition 0.34, Vignette Center x: 0.32 and y: -0.03; and Light Direction x: 0.59 and y: -0.01; and Texture Metal Sheet Strength 0.60, Size 0, Background Type solid white, and Background white.) A layer mask was added to remove some of the paint in areas that did not look quite right using a low opacity and flow black brush. The last step was to use Nik Viveza 2 to emphasize the focal point where the loading area is. That was it – just liked the sort of grungy painterly look that resulted. Lots of fun here!…..Digital Lady Syd
Red Fish Taking a Break from Universal Studios
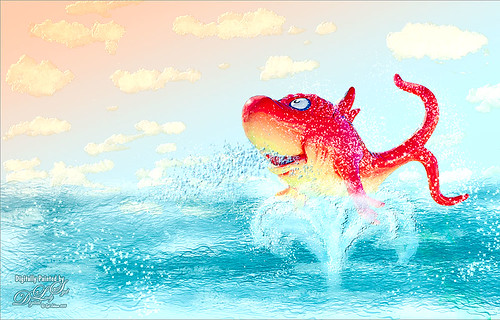
Just another image taken at the Universal Studios-Orlando, this time featuring the Red Fish at one of the Seuss Landing rides. Got a little carried here but it was a lot of fun! Basically all I did was extract the fish from the original image and paint in some elements to make him look like he was swimming in the water. Actually there were several paint layers to get the effect and Topaz (see sidebar for website link) Simplify’s Cartoon preset was applied to just the fish. Also, when done painting, a stamped layer was placed on top and Topaz Lens Effects was opened. The Toy Camera Awesomeness II was applied with the Toy Camera Aberrations sliders turned off. Adjusted some of the other sliders a little. That was it! Love how happy this guy looks!…..Digital Lady Syd
Chef Mickey!

In honor of Epcot‘s International Food and Wine Festival, this Mickey Mouse topiary greets you at the entrance. I loved this image but it presented a real problem since the trees behind Mickey were essentially the same color as the topiary. That is when I decided to use Topaz (see sidebar for website link) Impression to get Mickey to stand out. In Lightroom used Seim’s (see sidebar for website link) PW4’s Magic Harsh Sun Flare Fixer preset and then his Radispot preset (radial filter was placed on Mickey’s head) to get as much contrast as possible between the colors. On a duplicate background layer in Photoshop Topaz Impression was opened where my SJ Watercolor Background preset (started with Watercolor II preset and these were the final settings: Stroke Type 09, Brush Size 0.50, Paint Volume 0.68, Paint Opacity 0.82, Stroke Width 0.44, Stroke Length 0.38, Spill 0.09, Smudge 0, Coverage 1.00, Color Overall Saturation -0.02 and Lightness -0.04; Red Sat 0.41, Orange Sat 0.43 and Yellow Sat 0.43; Lighting Brightness 0.17, Contrast -0.29, Vignette 0, and Light Direction X0.52 and Y1.00; and Texture Strength 0.16, Size -0.68, Angled Weave and white background color) was applied. Back in Photoshop on a layer mask Mickey and his salad were lightly painted back. This layer gave the colorful background effect. This layer was duplicated and it was now opened up in Topaz Simplify and my SJ Hawaiian Landscape preset was applied (my settings are Global Adjustments: Simplify Colorspace RGB, Simplify Size 0.29, Feature Boost 0, Detail Strength 0.66, Details Boost 1.00, Details Size 0.27, Remove Small 0.06, and Remove Weak 0.10; Adjust Brightness 0, Contrast 1.00, Saturation 1.04, Saturation Boost 1.32, Dynamics 0, Structure 1.00, Structure Boost 1.00; Edges Edge Type Color Edge-Normal, Edge Strength 1.89, Simplify Edge 0.58, Reduce Weak 33.00, Reduce Small 0.20, and Fatten Edge 0.00; Did not use the Structure slider – too busy and the Dynamics slider works like Clarity and it brought the background out too much). Simplify added some extra contrast to Mickey – a black layer mask was added (hold down ALT key while clicking on the Mask icon at bottom of Layers Panel). Some clean up was done but basically this was all that was done. As I keep saying, “Got to love Mickey!”…..Digital Lady Syd
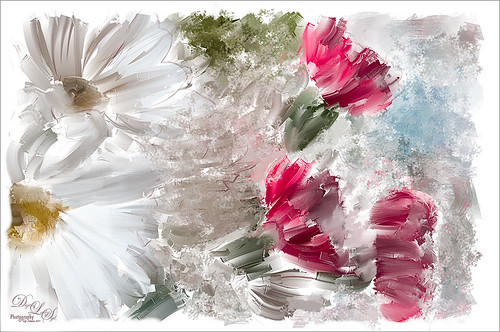
The Mighty Tulip

Just another photo of a very colorful red and yellow tulip and some pink daisies from my local grocery store. Just practicing my painting. This time using my basic workflow. Add Seim’s (see sidebar for website link) Power Workflow 4 Magic Flat Light Fixer. Next Topaz (see sidebar for website link) Detail 3 to sharpen up the image a little, and Topaz Simplify to use as a base coat to paint above. On a New Layer above, used Photoshop’s Flat Fan Single Bristle Wet Brush as a regular brush to paint over the yellow tulip and some of the greenery. French Kiss (see sidebar for website link) Atelier GA Brush created in my blog was painted on the next layer. (See my How to Paint with a Texture Brush from Your Image blog for how to make this brush.) Melissa Gallo of Painted Textures Desert Sky Canvas texture was applied twice to create two texture layers, first set to Hard Light at 56% layer opacity, and then set to Color Burn at 24%. Created a Stamped layer (CTRL+ALT+SHIFT+E) on top and then copied the Topaz Detail 3 layer and placed underneath since I had some bad places on the petals. In the stamped layer, added a white layer mask and lightly painted back part of the tulip that were not sharp enough. Then on a New Layer above, used my Chalk 60 brush as a mixer to smooth over the tulip. I decided this image needed some pizazz – it was just too yellow and bright green. On yet another New Layer took my Chalk 60 brush with the texture turned on and painted some bright colored blotches all over it in oranges and yellows and greens and pinks – kind of went crazy. Set this layer to Pin Light. Added a Curves Adjustment Layer and a Levels Adjustment Layer to add contrast. On a stamped layer, Nik Viveza 2 was opened up and Control Points were added to the yellow tulip and the purple daisy in front. Topaz ReStyle was opened on another stamped layer above. (Here are the settings: SJ Very Muted Sepia preset. Changes to preset were: Restyle Opacity 88%; Lum Primary -0.58, Third -0.36, Fourth -0.45, and Fifth 0.30; Texture 1.00; Basic Opacity 23% set to Hard Light blend mode; Color Temperature -0.11; Tone White Level 0.25; and Detail Structure 0.06 and Sharpness 0.83.) The last step involved adding the beautiful Canvas Vignette border by the wonderful Corel Master John Derry – can be downloaded from this link. This is the final image. Okay – it is a bit of workflow, but sometimes it just takes a lot of manipulation to get the look you like!….Digital Lady Syd
Christmas Flowers!
Recently I set a goal to learn how to use Corel Painter. These Christmas flowers were a perfect choice for me to practice some of my newly developing skills. I love the colors that the brushes created although I am not sure exactly which brushes I used, but several blending brushes were used. I have learned to keep a custom panel of my favorite brushes set up so I do not have to keep searching for them. (Not unlike setting up your own panels in Photoshop.) After I finished painting it, I wanted to show a few outlines for emphasizing certain area. The original image into Topaz (see sidebar for website link) Simplify and a sketch with black lines on a white background was created. Back in Photoshop, the white was removed using Color Range, and then the layer was moved into the Painter image. A layer mask was added and lines I did not like were removed and the layer was set to 51% opacity. A dark brown Solid Color Fill Adjustment Layer was clipped (ALT+click between the layers) to the lines layer. A Hue/Sat Adjustment Layer was added to make the flowers the perfect color of red. Some localized contrast was added by selecting a Curves Adjustment Layer and filling the layer mask with black. Just the areas where I wanted contrast was painted back, which was mainly the red flowers. I love the way Painter and Photoshop work together! Hope everyone is having a wonderful Holiday Season!…..Digital Lady Syd
Using photoFXlab v1.1

These sculptured fish mark the entrance to a huge breakfast buffet at the Hilton Waikoloa Village where you can have breakfast with several hundred of your closest tourist friends! Since I have been trying out Topaz photoFXlab v1.1 (see sidebar for website link), I thought I would try it out on this image that was adjusted in Lightroom first. Since it has a comical appearance to it, I thought the Topaz Simplify Cartoon preset would suit this shot. Basically some minor adjustments were made to the preset and then the Adjustments tab in photoFXlab was opened and these sliders were used: Dynamics (the Topaz Adjust HDR slider and is really a great new addition) was set to 56, Sharpness 44, Highlights 49 and Shadows -34. After application of the plug-in, a Curves Adjustment Layer was added in Photoshop along with OnOne PhotoFrame lines 04 (see sidebar for website link) with color sampled from the image. That’s it! Pretty fast and I really like it. Also it did not need any more sharpening or clean up.
Not all images work out this easy in the plug-in, but it really is nice once you start using it……Digital Lady Syd
Digital Lady Syd Related Blogs:
Digital Lady Syd’s Review of Topaz photoFXlab v1.1
Topaz Simplify and Lens Effects Saves an Image!
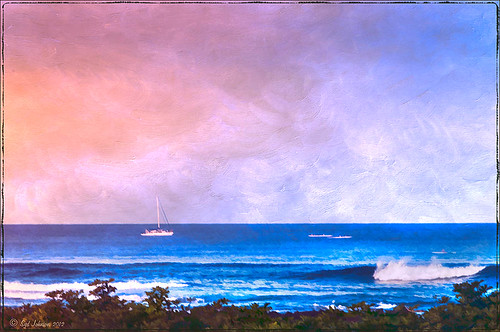 |
The catamaran is one of the whale watching boats you can take while on the Big Island in Hawaii (see Hawaii Ocean Sports for more information on this). This image was taken the day before my adventure and it was not a good at all (hover over image to see original RAW image) – but I really wanted a shot of the boat on the water. Therefore some improvisation had to be employed. After cropping and doing some RAW adjustments in Lightroom, Topaz (see sidebar for website link) came to the rescue. Topaz Simplify 3 was applied first to get rid of the focus issue – the BuzzSim preset was used as a starting point with these changes: Simplify Size slider was changed to 0.15, Brightness slider changed to 0.08, Saturation slider to 1.27, Edges: Color Edge Fine, and Edge Strength slider 1.50. Next Topaz Lens Effects was applied using the Filter Dual Tone Effect to create the warm feel in the sky with a preset I previously created called Sunrise Effect. (See below if you would like the settings for the preset.) Next Flypaper’s Paper Texture Creme Anglaise (one gorgeous texture!) was used via Russell Brown’s Paper Texture Panel for Photoshop CS5 and CS6 (see my blog Russell Brown’s Paper Texture Panel – A Real Winner!) and set to Divide Blend Mode at 100% opacity. A Curves Adjustment Layer was added to fix the contrast. Finally OnOne’s Photoframe grunge 09 was added (see sidebar for link). An image I would normally have trashed has now been turned into a beautiful picture that I really love. Give this technique a try if you own the Topaz plug-ins. The combination works great together, especially if you want to save an image!…..Digital Lady Syd
My Topaz Lens Effects Sunrise Preset contains these settings: Transition Adjustments – Region Size 0.45, Transition 0.35, and Angle 149.7; Region A Adjustments – Cyan Cast 0, Red Cast 0.20, Magenta Cast 0.01, Green Cast 0.03, Yellow Cast 0.70, and Blue Cast 0.24; Region B Adjustments – Cyan Cast 0.15, Red Cast 0.10, Magenta Cast 0.15, Green Cast 0.05, Yellow Cast 0, and Blue Cast 0.05; and Image Adjustments – Brightness 0.05, Contrast 0.08, and Saturation 0.07.
Digital Lady Syd Related Blogs:
Topaz Simplify and Topaz Detail Together
Simplifier and Simplify Filters
Russell Brown Texture Panel Landscape Image
Topaz Simplify and Topaz Detail Together

Recently I watched a video, this time for Topaz plug-ins (see sidebar for Topaz website and more blog links below), and learned a couple new things I thought I would share. If you have read my blogs before you know that I am a big fan of Topaz products – they may not be the most sophisticated, but they do some very cool effects the other major companies can’t achieve. Scott Stulberg did a lengthy video called “Memorable Travel and Stock Photography” where he covers Topaz Adjust, Detail and Simplify. I tried to incorporate a few of these tips in this image of sun-lighted grass growing on the road to Waipi’o Valley on the Big Island in Hawaii. Gosh it is hard to take a bad picture in Hawaii!
To begin with, Topaz Simplify was used. Scott suggested this plug-in is great to use on a shot that is a bit soft from a gentle breeze or a not-so-great lens – this effect can save an image and turn it into something very nice. There are two color space choices – RGB (more vivid colors) or YCbCr color space (more muted colors). This image used the YCbCr color space. Scott mainly uses the BuzSim preset – the trick is to move the Simplify Size slider to the left from the default setting (0.33) and you will see the detail return but the color stays saturated. On this image the Simplify Size slider was set to 0.05, Details Boost slider set to 0.79 (default is 1.00), and Details Size set to 0.13 (default is 0.20). It is a very similar result to using Vibrance in Photoshop but Simplify has much better color saturation. In the Adjust section, the Saturation was toned down a bit to 0.96 (default 1.31) and Saturation Boost set to 1.00 (default 1.15). He is basically lowering or turning off all the artistic settings and leaving the saturation turned on. One small problem I seem to have with Topaz products is that sometimes I have trouble retrieving the settings when using a Smart Object layer, which is supposed to retrieve the plug-in settings used on the image. Therefore, create a preset and name it something that will remind you of the image if you liked the result.
Next Topaz Detail was used. Scott feels that this plug-in makes it appear you were using a better lens than you really were. Basically you want to move the Medium Detail slider, then the Small Detail and Large Detail sliders until you get a sharper feeling image. He does very little sharpening to his photos but uses Detail to do the sharpening – it is like using the Clarity slider in a realistic way. That is how the plug-in was used for this image.
The final touch I added was a Hue/Saturation slider boosting the yellow saturation up quite a bit. Then I filled the layer mask with black (CTRL+Backspace) and painted with a very low opacity soft brush in to give just a soft yellow tone. OnOne’s Dave Cross 14 frame (see sidebar for website link) was added using a color sampled from the shot.
Sometimes it feels like I harp on all these these plug-ins, but they really are fun to use and they can take your images to a new level…..Digital Lady Syd
Digital Lady Syd Related Posts:
Simplifier and Simplify Filters
Topaz Plug-Ins – Same Image Trying Each! – this blog has many of my Topaz blog links at the bottom if you would like more information on any Topaz products


