
Being One with Nature
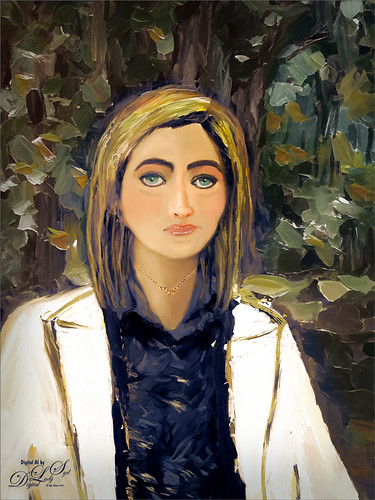
Above is another of my variations from my selfie image. These AI variations all turn out so different although in most cases the person is looking in the direction I was and the coat is somewhat similar, mine being light beige. I find that when having a problem with a face feature looking right, going back to the original selfie and copying that part onto it own layer. Then moving the layer above the variation layer and free transforming if needed works nice for getting a more accurate look – then blend into the face with a brush. My original nose is appearing in many of these AI images! In this case, the Liquify Tool was used along with Viveza and Topaz Lens Effects Reflector filter to lighten the left side of the image – it gaves the background some depth difference. For tree background, used Generative Fill prompt of “Oil painting outdoor background with trees.” Otherwise using all the same brushes as in my other blogs. It is fun to do these, and I am hoping I am getting better at drawing and painting faces!…..Digital Lady Syd
Enjoying the Day

This is another example of an image that I colorized using the steps from my How to Convert Black and White Images to Colorful Paintings with Topaz Studio 2. I did use Topaz (see sidebar for website link) Sharpen AI and of course Topaz Studio 2 using the same preset as in the my original blog except the ReMix filter was set to Colored Marker for a style. Added a Color Theme filter to get the colors just right. To get a really nice effect, Topaz Lens Effect was applied for a bit of golden feel. That was about it. So fun to do these vintage images!…..Digital Lady Syd
The Purplepassion Flower

This Purplepassion Flower image was taken at the Harry P. Leu Gardens in Orlando, Florida a while ago. It is a very beautiful bloom and there is a little bee hiding in it. Mainy did the clean up in Luminar (see sidebar for website link) Flex with their wonderful Structure, Detail Enhancer, Image Radiance, Microstructure, and HSL filters. In Photoshop used a Gradient Map tAdjustment Layer to emphasize the color a little. Then used Topaz (see sidebar for website link) Studio 2’s fabulous Impression filter – just adjusted the default settings a little to smooth out the background. Then used Mixers brushes back in Photoshop to further blend in the effect. Finally used Topaz Lens Effects Fog filter to lighten the top slightly. Viveza 2 was used to adjust the focal point and the last step was a Curves Adjustment Layer. The text is a font called Brettany ….. Digital Lady Syd
Hiding in a Palm Tree

I think this is a little Eastern Bluebird female who was helping me while I cleaned up my flower beds in my front yard. Not much was done in Lightroom, and Photoshop added Viveza 2 filter to sharpen her up a bit. The light was really dark in the palm tree, but really bright behind her so it was hard to get that looking correct. A Curves Adjustment Layer was used for this. Just a slight painterly effect was added in Topaz (see sidebar for website link) Studio 2’s Impression filter. Then in PS on a few New Layers, mainly just painted in some lines in the foreground palm fronds as they were really blurred. The Camera Raw filter was used to further tweak the color in the HSL panel. Topaz Lens Effects’ Soft Olive Green Vignette preset was added. That was it!…..Digital Lady Syd
Joyous Ornaments Lining Up for the Tree
This is just one of those crazy photos that make me laugh. It is not all that sharp but sort of exemplifies the total chaos it is for me to get all the ornaments up and hanging right! Biggest issue I had was to get this image sharper without deteriorating the quality. In Lightroom’s Develop module, used my SJ Sharply Dark LUT (created in my blog and video called How to Create Profiles in ACR from LR Presets and Some PS LUT Files) and set it to Amount 81. Then did just the normal adjustments. Radial Filters were used to help sharpen up some of the ornaments I wanted particularly in focus. Went into Topaz (see sidebar for website link) Studio from LR and used AI Clear (applied it twice to get some additional sharpness and it worked!), the Precision Contrast adjustment, Topaz Lens Effects Diffusion Adjustment to soften overall just a little and Topaz Studio Focal Blur Adjustment, placing it over the main ornaments to keep sharp. Then back to LR where it was opened up in Photoshop. Did a little clean up of some edges and used Nik Viveza 2 to emphasize the focal point on a few ornaments. That was it. I find this a really soft sort of happy image – not one that goes up on the wall but one that reminds me of Christmas!…..Digital Lady Syd
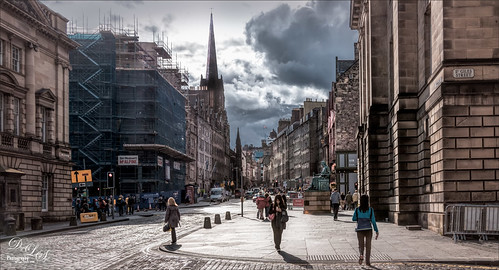
Girl Playing Erhu
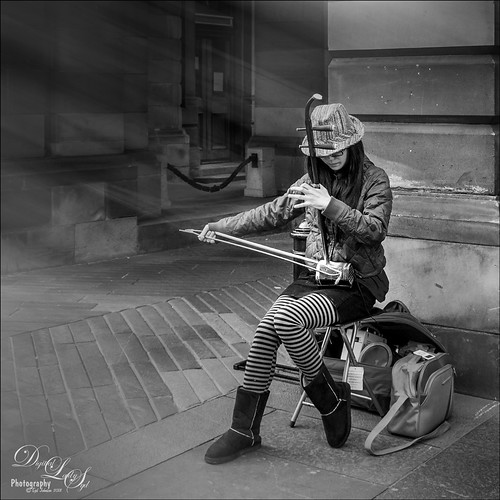
This is an image of a girl playing an Erhu, a traditional Chinese musical instrument from the Song Dynasty dating back to 1104 AD. She was playing along the Royal Mile, the main road through the historic district of Edinburgh, Scotland. This instrument has a very lovely sound and I actually bought a CD from her called Erhu by Yan Shi (unable to find a link for it as it is written mainly in Chinese). This image just seemed to need a black and white treatment so in Lightroom, one of Sergi Ramelli’s presets in his B&W pack called AA Drama Radial Circle Dark was applied and adjusted to fit. Then in Photoshop, Topaz (see sidebar for website link) Lens Effects was applied using the Streak Filter. I have never used this before, but I love the way it gave just a little light effect and added a motion feel to the bow. On a stamped layer, Nik Viveza 2 was applied to adjust the focus on her face and hand. That was basically all that was done. I wish had more images like this one. …..Digital Lady Syd
Pretty as a Postcard
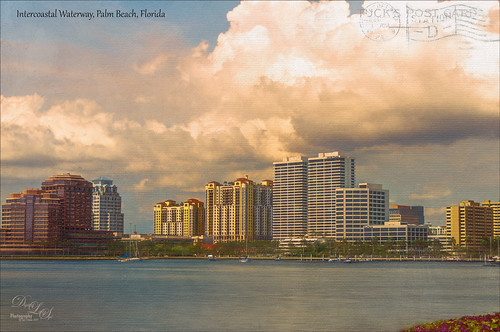
This is the Intracoastal Waterway (ICW) in Palm Beach, Florida. The skies were rather spectacular this day. Lucis Pro (now available for purchase again – see my Lucis Pro is Back!!!!! blog) was used on this image first. Then Photoshop’s Motion Blur Filter was opened and set to a Distance of 2000 pixels – once applied the far right icon on the layer was clicked and set to 63% opacity. A Selective Color Adjustment layer was applied to adjust the colors. On a stamped layer, Topaz Lens Effects (see sidebar for website link) Motion Blur was opened and 12.68 pixels was applied. Back in PS only the water was allowed to be visible in the layer mask so water looks smooth. The font Gabriola was used next. French Kiss (see sidebar for website link) Tableau Chateau was used to add texture to the image – this was done by clipping a Hue/Saturation Adjustment Layer to the image and setting the Saturation to -100. The texture was set to Hard Light at 15% layer opacity. Finally a Levels Adjustment Layer was also clipped to the texture to get the nice vintage postcard look. Nik Viveza 2 was added to add some emphasis to the buildings and a stamp from 2 Little Owls (see sidebar for website link) was added to further enhance the old look. I was love Palm Beach! …..Digital Lady Syd
Refreshing Water Lilies
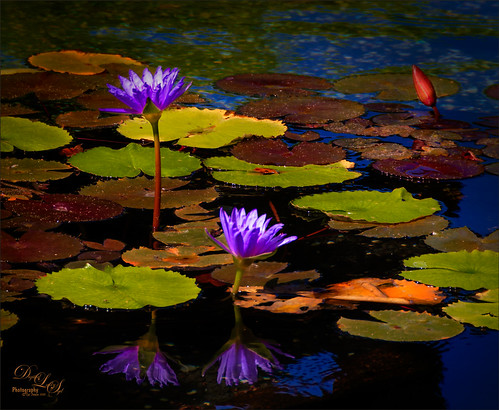
I really love water lilies and these are no exception. Taken at the Hilton Waikoloa Village a while back. I love the colors that were in this image. In Lightroom the HSL panel was adjusted to get the pretty colors. In Photoshop this image used Denny Tang’s Tone and Color Chart for Photoshop video – this worked very nicely on this image. A couple Spot Light layers were used in different colors set to Overlay blend mode to add some color focus. Topaz (see sidebar for website link) Lens Effect was used to add a soft olive Green vignette around the image. Nik Viveza 2 was used to slightly add focus to the water lilies. Not much was done to this image…..Digital Lady Syd
Storm on the Way
I decided to work on this image using an old sharpening technique I recently learned. This image was taken into Topaz (see sidebar for website link) Studio and one of my old presets was applied which is just a Precision Contrast adjustment and a HSL Color Tuning adjustment where the individual colors were tweaked. The next step was to sharpen it in Photoshop by duplicating the Topaz layer and setting it to Hard Mix blend mode. Then a Gaussian Blur was set to Radius 3 pixels and the Fill (not the opacity) slider in the Layers Panel was set to 6%. This is a great way to sharpen and does not usually cause haloing. A little dodge and burning was done and a Red Channel Luminosity Curves Adjustment Layer was added. Last step was to add a Vignette using Topaz Lens Effects’s Soft Pearl preset with a few changes to sliders. In PS it was set to 73% opacity. That was it. It looks extremely sharp I think…..Digital Lady Syd
Watching the Sky
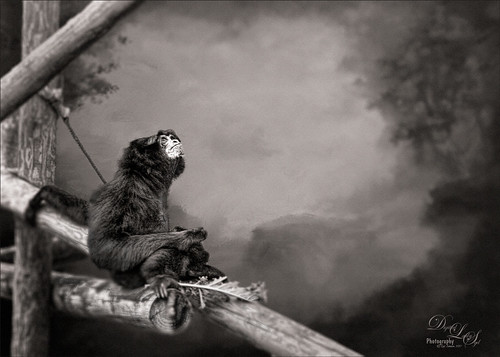
This Siamang Ape lives at the Palm Beach Zoo – he has just finished his breakfast and is getting ready to run to the top of the trees and announce the opening of the Zoo for the other animals. The technique used in this image was presented in a video by Glyn Dewis called Use Photoshop to Take a Picture from Good to Great in 5 Steps – it is based on an effected created by wildlife photographer Nick Brandt. One of my Corel Painter backgrounds was used as a background placed under the ape image. Then used a layer mask to remove the original background. Then basically sharpened the image and then blurred the image in selected areas of the image. Last step involved adding grain into the image. The video goes through most of this. This was a lot of fun to try! Thank you Glyn Dewis for showing us how to do this!….Digital Lady Syd
Enjoying a Flower
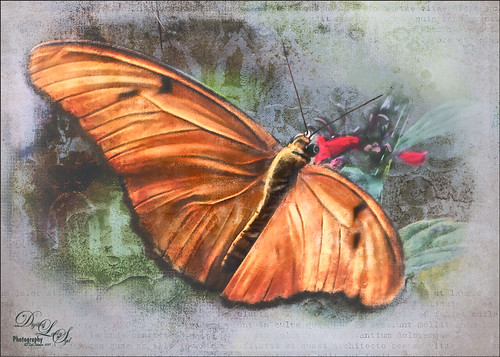
Love this Julia Longwing Butterfly – have never seen one like this around my home. The image was taken at the Palm Beach Zoo which is much further south in Florida. This male butterfly actually lives several months and loves the Passion Vine. The image was cropped way down to emphasize the butterfly. Then Lucis Pro (no longer available) was opened to sharpen up just the butterfly. On separate layers the wings were painted mainly using Gruts (see sidebar for website link) NM Pans Attic brush. 2 Lil’ Owls (see sidebar for website link) Dream freebie texture was set to Hard Light at 70% layer opacity. In a layer mask the butterfly was painted back. Kim Klassen’s 2170 with Script texture (not sure it is available anymore) was used around the butterfly. Nik Viveza 2 was applied to adjust the coloring in the image. Next Topaz (see sidebar for website link) Lens Effects’s Diffusion filter set to Moderate was applied. A black layer mask was added and just the diffusion effect was applied to the wings and flowers. A Color Lookup Adjustment Layer was added and the Crisp Winter preset was selected. It was set to Hard Light and 27% layer opacity. I decided the color palette was not quite right, so on a stamped layer Topaz Restyle was opened up. A preset was made of the image and then the colors in the palette were just slightly adjusted to get the final look. (See my How to Use a Topaz ReStyle Trick for Improving Your Image blog.) Wish these little beauties were in our local…..Digital Lady Syd
Windsor Castle
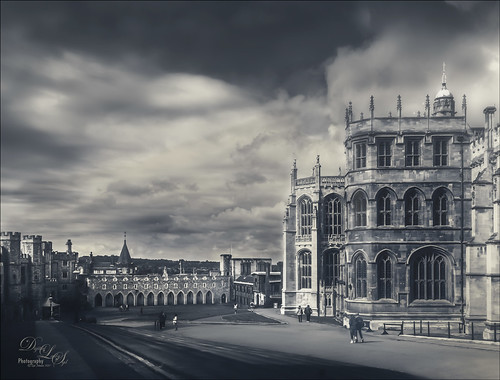
Decided to turn this image taken inside Windsor Castle‘s gates into a black and white as the sky looked really nice with the treatment. It was converted in Lightroom using the Basic Linear Radial Dark preset by Serge Ramelli. Then the Graduated Filter, Radial Filter and Adjustment Brush were all used to fine tune the effect. (He makes some really nice presets.) In Photoshop some clean up was done before a Color Lookup Adjustment Layer set to Foggy Night applied at 63% layer opacity. Nik Viveza 2 was used to even out the shadows and clouds a little. On a stamped layer Topaz Lens Effects Fog filter was added to the top of the image where the sky was still pretty dark – it also smoothed it out a little. I like the slight bluish tone that is in the image from the Lookup Adjustment Layer……Digital Lady Syd
Looking for Love
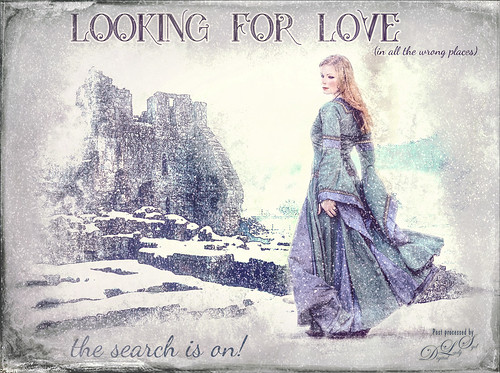
Sometimes it fun to just do something different! This actually took a lot of tweaking to get that romance novel or poster effect. Corey Barker offered one of his tutorials, Quick Hollywood – Inspired Illustrated Effect, for free so off I went. This is not quite what Corey’s poster looked like, but it still has a bit of that old movie magic. Several of the tips from his video were used which is how the illustrative look was created. The girl is called Wayra 11 from Liam Stock and the castle in ruins is called Winter Wonder stock 36 by Tigg, both at DeviantArt – must thank them for allowing the use of their images. Actually used Topaz Studio’s Basic Adjustment and Bloom Adjustment. Nik Viveza 2 was used to adjust the focal points in the image. Love the font called Star Full Inline which has eyeballs in it. The other font is called Dancing Script OT. Had to paint the face a little and added light fog on castle from Topaz Lens Effects. Used my snow effect called Snow1 Overlay and painted it off the foreground. On another layer, used Corey’s Particle Universal brush for snow on the girl and throughout. Last step was Topaz Texture Effects were the border was added. I think it is too hot right now and I am thinking of winter!…..Digital Lady Syd
Fog Rolling In
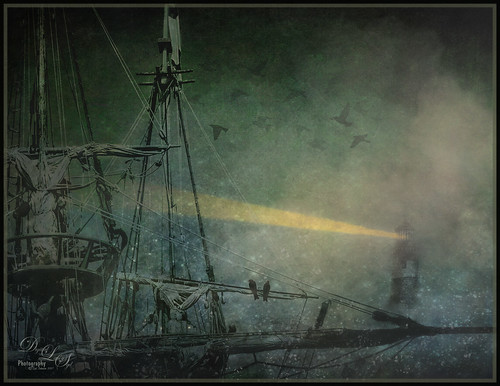
This image was created using several elements and textures – just a lot of fun to do! I have been sailing when the fog comes rolling in and I wanted that eerie feeling when it happens. The original boat element is one I took in London several years ago – it is an actual replica of the Golden Hinde – Sir Francis Drake’s galleon he sailed in 1578. In Lightroom the ship image had been converted to black and white before opening in PS. Next a New Document was created in PS and this image was loaded into it. The ship image was cropped and moved to the left side. Next Distressed Textures’s The Artist’s Palette Moody Earthtone texture was placed underneath at 25% opacity, and a Hue/Saturation Adjustment Layer was set above to make the texture less saturated and more of a blue-green tone. A Levels Adjustment Layer was clipped to the ship image (ALT+click between the layers). The lighthouse was added using some old clip-art from the Old Fashioned Nautical Illustrations book (#371). On a New Layer Obsidian Dawn’s Light Beam set Lighthouse Beam 1 was applied at 51% opacity. On another New Layer Lavender Designs Birds Nest Brush was applied – the two birds sitting on the sails. Jai Johnson’s Flybirds png2 was placed on another New Layer at 27% opacity – a layer mask was added and some of the birds were painted out. Then in the Properties Panel, the Density was set to 61% and Feather to 2.3 so the look like they are disappearing in the fog. Four Adjustment Layers were added: Hue/Sat for the yellow in the beam, Color Lookup Pastel 8 Hues set to 25% opacity, Levels to add contrast back, and another Color Lookup at 69% opacity using Blake Rudis’s preset Vintage Baby Blue. On another New Layer set to 26% opacity I used my old Cloud Text & Smoke Brush to add in more fog and haze. Using the Adobe Paper Texture Pro already supplied textures, 3 were stacked: Brush Rose set to Overlay at 67% opacity, Caspian set to Overlay 89%, and Touchtone set to Difference at 25% opacity. A Curves Adjustment Layer set to Luminosity blend mode and 61% opacity and was added to put contrast back into the image. Felt something was missing so I added 2 Lil’ Owls (see sidebar for website link) texture Cosmos 14 set to Multiply blend mode and 67% layer opacity – her star textures are some of my favorites! On a New Layer some of the spots from the texture below were painted out using my SJ Pastel 3 brush (see my How to Create My Favorite Brush blog). Topaz (see sidebar for website link) Lens Effects Fog filter was applied and set to the bottom right corner – in PS it was set to 66% layer opacity. Add a Red Channel Luminosity Curve. Then Nik Viveza 2 was opened and the final focal point was adjusted. I decided that I just did not like the way the fog looked, so with two brushes, Cloud Billoway and Cloud Heft from Gruts FX Cloud Set were both increased to a very large size and dabbed down to get the fog effect – then the layers were set to a very low layer opacity to give the dreamy fog effect. Clipping Hue/Saturation Adjustment Layers to each allowed for some color variation. In the last step I added one of my frame layer styles setting colors from the image. This turned out to be quite a project!…..Digital Lady Syd
Castillo de San Marcos
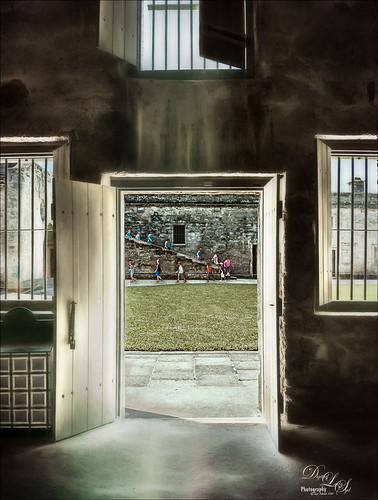
Loved how this image of the Castillo de San Marcos has such a soft feel inside the fort. The sharpness in the outside area where the kids was created using Lucis Pro 6.0.9 (no longer available, but I keep watching for everyone). The original image has the inside area looking much brighter. This was darkened down a little using Nik Viveza 2. Then to bring out the softening effect, Topaz (see sidebar for website link) Glow 2 and a preset called Room Glow by Blake Rudis was applied and set to Overlay blend mode. This preset was created using Glow 1 but works fine in Glow 2 and can be created by downloading the Topaz Labs Glow Webinar PDF file from Blake, who is a Photoshop and Topaz genius. In fact all 4 of the presets in this PDF are very useful in Glow. A Layer Mask was added to paint out the outside area in the door. On a stamped layer (CTRL+ALT+SHIFT+E) on top, Topaz Impression 2 was opened and the Fine Brush Scumble II preset was applied as is. To further add a little softness Topaz Lens Effects was opened and the Slight Diffusion preset was applied. Layer Masks were also added to these layers to keep the outside area tack sharp. Try out these filters for this soft effect…..Digital Lady Syd
The Valentine Trees

Happy Valentines Day! Just had some fun painting my Valentine Trees – started in Corel Painted and ended up in Photoshop. Lots of layers here a few filters – used Topaz (see sidebar for website link) Impression (true – used after painting the image), Topaz ReStyle, Topaz Lens Effects Reflector, and Nik Viveza 2. Lots of layers for the grass and valentines added. Overall lots of fun to do. Have a great day!…..Digital Lady Syd
The Spring in the Desert
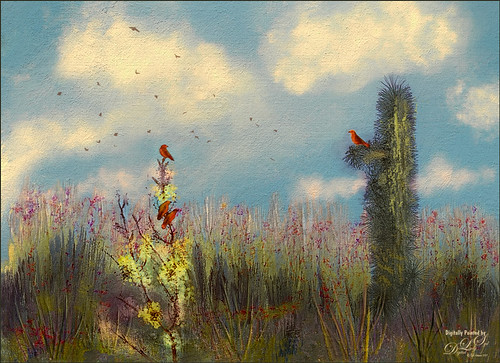
Image of what I imagine the Arizona desert looks like in the Spring after a bit of rain and before the sun gets too hot during the day for flowers to bloom on the plants. Painted the basic layout in Corel Painter and 4 layers for this. The clouds were blocked in and the plants and a few flowers using mainly Karen Bonaker’s brushes. In Photoshop created several different layers to add more plant details. Tried out the new inexpensive Flypaper Bird Brush set in this image – used the bush with the three birds on it, a single bird sitting on the cactus and the birds flying in the background. Grut 50 Photoshop Cloud brushes were used to embellish the sky more. Topaz (see sidebar) ReStyle’s silver and ivory cloak preset was added to adjust out the color a little. Nik Viveza 2 was used to add focal point emphasis. Topaz Lens Effects Graduated Neutral Density filter set to Bottom Quarter 2 stops was applied. On a New Layer above John Derry’s Impasto Smooth Light layer style was applied and with the Fill set to 0, used Grut’s OI Gypsum Slate brush painted over plants. French Kiss (see sidebar for website link) Atelier Canvas texture was added on top. A Hue/Saturation Adjustment Layer was clipped to the texture and Saturation was set to -100. Then on the texture layer, the blend mode was changed to Multiply and the layer opacity was set to 73%. A Levels Adjustment Layer was added on top to bring back the contrast. That was it……Digital Lady Syd
High Tide at the Sand Dunes
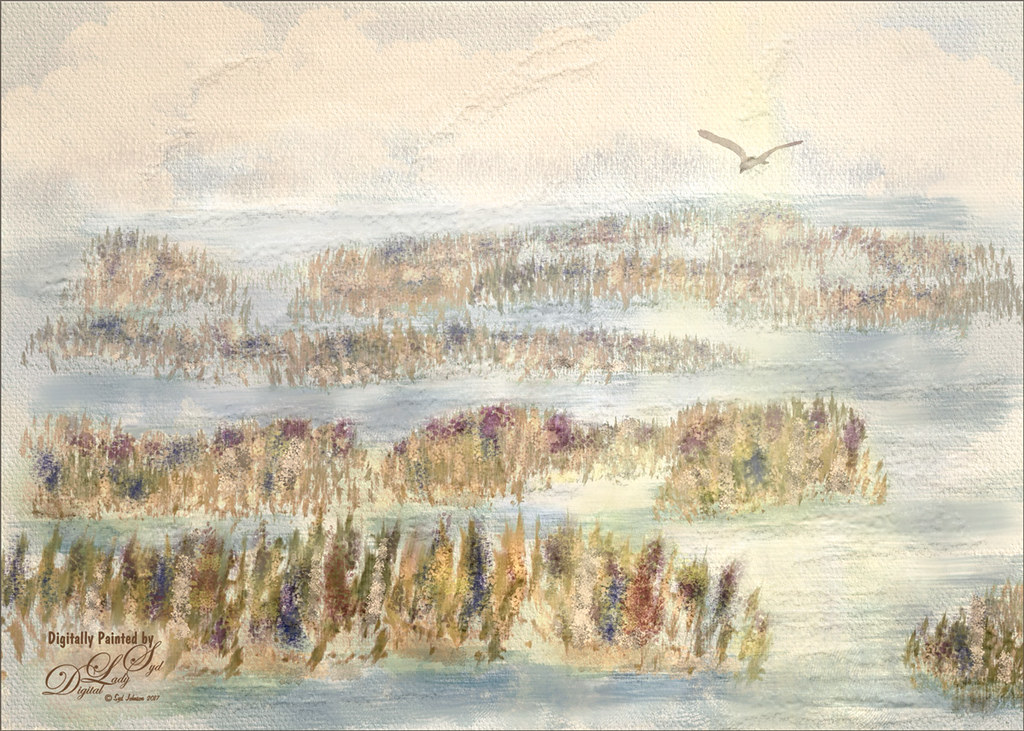
Back into my painting mode with what I envision the Sand Dunes in Indiana would look with a high tide. This image was completely painted in Photoshop using a basic white Canvas Texture as the background above my Background layer and set to the creamy cloud color using a Color Fill Adjustment. Layer. Next the ground areas were painted in using the various flower brushes, including several I created. On a layer below the flowers, the water was painted in. A bird from Obsidian Dawn was added – actually 4 birds were in the group but 3 were masked out. It looked pretty good at this point. Then Topaz (see sidebar for website link) Restyle Lavender gray preset was applied on a stamped layer on top (CTRL+ALT+SHIFT+E) to create a little bit different color palette. Duplicated the layer opened Topaz Texture Effects 2 – just added Diffusion section and used a mask to only apply the effect to the background plants; and Texture section using one of my own textures and removed effect from water with a mask. On layer above filled in a few more plants and added some color the the sky with a fog brush. To add a little warmth to the water, used a Sunbeam brush set to a low opacity. On another stamped layer, Topaz Lens Effects Fog 1 Filter was applied to soften the middle ground of image just a little. Last step was to add Kyle T. Webster’s Gentle Glaze layer style with Fill set to 0 and painted over the water areas to give a really nice painted effect in the water and sky areas. Painting in Photoshop is really fun!…..Digital Lady Syd
On a Mission
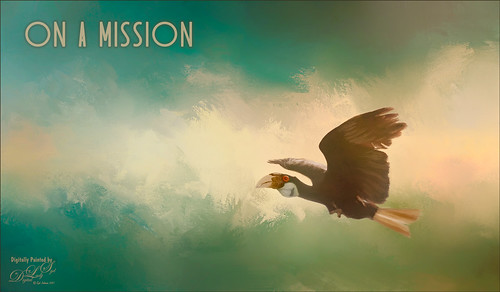
Felt like doing a bird painting – have not done one in a while. I felt a connection with this guy at the Jackonsville Zoo a while back. This Hornbill was showing off by flying back and forth in his cage for me. I think he would rather be flying free as I visualized in my painting, but he and his buddies seemed to be very happy and healthy at the Zoo. It always amazes me that a chained fence and shadows can be removed from a photo when it is painted. The bird was selected using the Select and Mask filter in Photoshop – it did a really good job. It did not hurt to have a beautiful texture to put behind him – this was a free texture from Jai Johnson called Captured Light at Sea 4 and just suited the lighting on the bird and his coloring. Some textures just did not blend well so several had to be tried. Then basically lots of blending and painting with the Mixers and the Regular Photoshop brushes. Just do a search on my blogs to find my favorite brushes. Topaz (see sidebar for website link) Lens Effects Reflector filter was added to give a more pronounced lighting effect on the right side of the image and Nik Viveza 2 was added to smooth out the whole effect. This basically was just a lot of fun to paint and very relaxing!…..Digital Lady Syd
A Wintry Florida Holiday
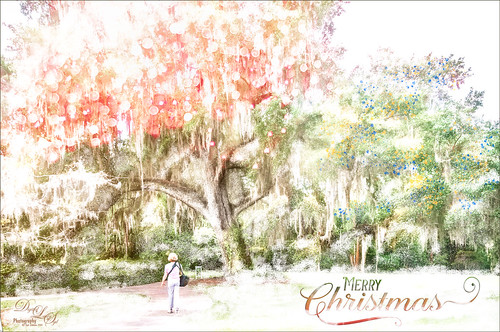
Having some Holiday fun here – spent a long time getting this beautiful entrance to the Henry P. Leu Gardens image to look like it was under the snowy spell of the Northern US. I would go over all the steps in detail, but it would end up pretty long. Just say that lots of layers were used which included: the Liquify Tool, the Clone Stamp Tool, Content-Aware Move, a couple Dodge Curve Adjustment Layers, Corel’s ParticalShop filter, Magic Dust Pretty Actions Brush layer, 100 Silver Lights Photo Overlays 16 and 17, Stroke and Spatter Dual Brush by John Derry layers, Topaz (see sidebar for website link) Impression 2 Chalk Smudge I preset, Alex Ducal’s Sketch Splatter brush layer, Pretty Actions Merry Christmas overlay, Grut’s FX Cloud Gumbo 01a brush layer, Topaz Lens Effect Reflector filter, and Nik Viveza 2 filter. Lots of fun! Have a Merry Christmas and Happy New Year!…..Digital Lady Syd
Tiger in Snooze Mode
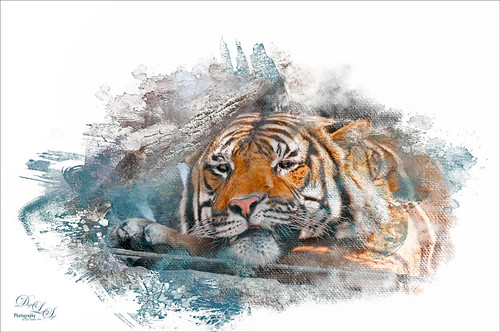
This Sumatran Tiger was trying to get a little snooze at the Jacksonville Zoo. What a cutie – guess he had to keep his eyes open a little just keep up with all the goings-on in his part of the zoo. Since he made an appearance in my 2016 Inexpensive Gifts for the Photoshop Lover on Your List Fun Photoshop Blog, I thought I would cover some of the things done to get this interesting effect. First the fencing in front of his face had to be removed and the very handy Spot Healing Brush worked wonders on this. A stamped layer (CTRL+ALT+SHIFT+E) was then placed on top. Lucis Pro 6.0.9 (no longer available) was applied. On another stamped layer, Topaz (see sidebar for website link) Lens Effects Reflector filter was used to even out only the parts of the face in the shadows. The eyes were brightened using an Exposure Adjustment Layer (see my How To Do a Quick Eye Sharpening In Photoshop blog.) All these tiger layers were grouped. Next Jai Johnson’s Unpredictable Collection Texture 25 was placed underneath this group. It was duplicated and the second one was set to Multiply blend mode at 82% layer opacity. Now, on the group on top, a black layer mask was added (CTRL+I in the mask to make it black). I just painted in white with a rough edged chalk brush the parts of the tiger I wanted to show up. A little of the free Nik Viveza 2 was added, and a canvas texture set to Soft Light blend mode at 42% layer opacity was placed on top. Love the effect of these textures by Jai…..Digital Lady Syd
A Guilded Age Bathroom
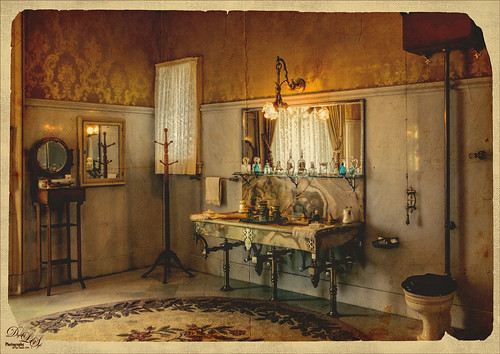
This image was taken at the Flagler Museum (Whitehall) in West Palm Beach, Florida. The image was actually post-processed without the border or vintage effect. Topaz (see sidebar for website link) Clarity, Lucis Pro (no longer available), Topaz ReStyle and Topaz Lens Effects were used to begin the process. I was actually really happy with the results, and then Adobe came out with Photoshop CC2017. If you open a New Document, now a New Document Dialog box opens – select the Photo tab at top and Templates is one of the choices. I scrolled down to Vintage Photo Effects which was downloaded and my image was placed on top. In the template I changed the background layer color and added a grunge overlay set to 47% layer opacity. I also clipped (ALT+click between the layers) a second texture under the Vintage Photo Paper. The Vintage paper texture was set to 47% layer opacity. Last step was to open up the now free Nik Viveza 2 to sharpen up the bottles and detail throughout the pix. The lighting was a little difficult to handle in this image due to the mirrors and the light coming in through a bright window off to the left. Try out Adobe’s free templates if you want a little different look……Digital Lady Syd
The Beautiful Snowbush
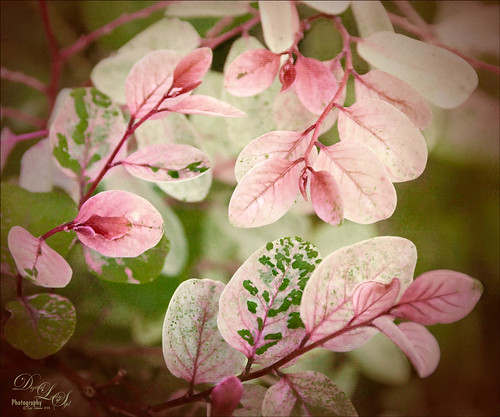
This a beautiful Snowbush growing in my front yard. I just love the colors and patterns in the leaves of this bush. Very simple post-processing here. Duplicated the layer and used Lucis Pro (no longer available) to sharpen the image. A black layer mask was added and just the leaves in the focal point were painted back. One of my Photoshop textures was applied on top (see my Get Rid of That Color! blog that used the same texture and free brush links). A Hue/Saturation Adjustment Layer was clipped (ALT+click between layers to clip) and set to a pinkish color. The texture layer was set to Soft Light blend mode at 68% layer opacity. Topaz (see sidebar for website link) Lens Effects’s Rusty Edges Vignette was applied. A Black & White Adjustment Layer was added on top using a Luminosity blend mode and the sliders were adjusted to get a nice color effect; then it was set to 64% layer opacity. It still needed a little more sharpening – I wanted a more depth in the image so Topaz Detail 3 was opened on a stamped layer on top (CTRL+ALT+SHIFT+E), and the Interior Detail I preset was applied – it looked over the top but there was just the right amount of sharpening in some places. A black layer mask was applied and just those areas that needed were painted back in white. I believe it did add that extra depth that really makes the image…..Digital Lady Syd
The Rosebud
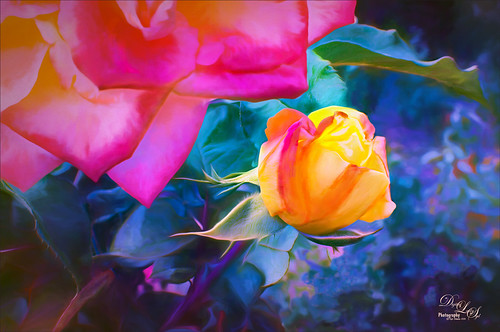
The image was taken at the Harry P. Leu Botanical Gardens in Orlando, Florida in the rose section. This is a beautiful place to photograph flowers – in this case the image was shot at F/22 with my Nikon 60 mm Macro Lens with a Bower 0.5 x High Resolution Digital Lens added to the lens. I know, odd settings but I was experimenting and loved the result. The key to getting this image effect was getting a very clear detailed shot. In Lightroom just basic changes were made and a little sharpening was applied to the bud with an Adjustment Brush set to Clarity 77 and Sharpen 83. Then in Photoshop Lucis Pro (no longer available) was set to Split Channel with Enhance sliders set to R157/G233/B59 and Green Smooth slider set to 25. On a stamped layer (CTRL+ALT+SHIFT+E) was placed above and Topaz (see sidebar for website link) Impression 2’s Georgia Okeefe II preset was applied. In a white layer mask some of the edges were painted out to keep them sharper. Next on another stamped layer Topaz Lens Effects Selective Vignette set to Olive Green preset with effect centered on the bud. Back in PS the layer opacity was set to 74%. Hope to be able to reproduce this result again!…..Digital Lady Syd


