
Dodging the Fire
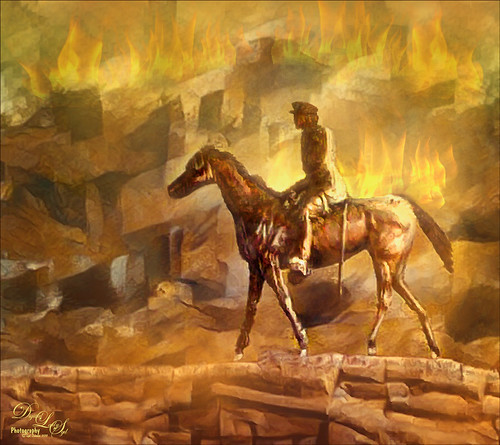
This image is a composite put together using a really bad image I took a while back of a Statue of WWI Field Marshall Earl Haig riding on a horse that was located at the entrance to Edinburgh, Scotland (it has now been relocated to outside the National War Museum inside the castle walls). As a personal challenge I decided to figure out if there was any way this major blurry image could be rescued. Surprisingly, this turned out much better than I thought was possible. First step was to try and remove some of the major blurring. The PS Shake Reduction Filter was applied and it worked just a little. Next sharpening was tried by using the Hard Mix blend mode (see my Storm on the Way Tidbits Blog) and it helped a little bit more. On a stamped layer I tried Topaz (see sidebar for website link) Infocus and it actually helped even more. Much better but still not that great. Therefore, I decided to try something different. One of my Painter backgrounds was added as a layer, and a copy of the Infocus layer was placed on top of it. A layer mask was added and just the statue was left. Next a stamped layer (CTRL+ALT+SHIFT+E) was created and Topaz Studio’s AI ReMix adjustment was added twice. (Settings were: 1st Adjustment: Style Strength Low, Row 2/Col 2 swatch, Brightness -0.17, Contrast 1.04, and Sat 0.75; and AI ReMix – 2nd Adjustment: Opacity 0.66, Style Strength Low, Row 13/Col 2, Brightness -0.55, Contrast 0.96, Sat 0.58, and Smooth Edge 0.01.) Back in PS the statue was cleaned up. The Flames Filter was opened and flames were placed in the background. Several smoke layers were created in yellow and orange tones using Grut’s FX Cloud Heft (from his fabulous cloud set) – see sidebar for website link. More flames were created in the midground area. A Pink to Beige Gradient Adjustment Layer was added to lighten up the image with some warm color – Soft Light blend mode and Linear gradient style. To finish up, a vignette was created around the rider. This was really fun to do!…..Digital Lady Syd
My Scottish “Secret Garden”
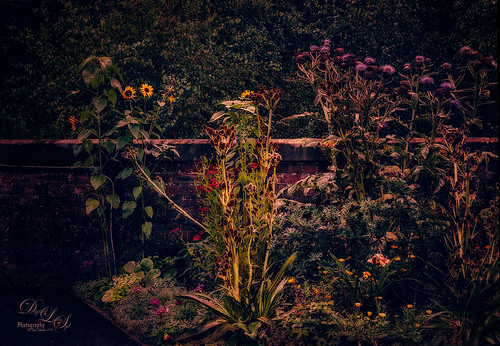
This was a pretty ugly image to start with – very light green and hardly any contrast – it was a good challenge to get something I liked from it! It was taken in some little town in Scotland that was on the way to the highlands. I actually used Topaz (see sidebar for website link) Infocus to sharpen it up a little and it did a pretty good job. This plug-in seems to be a lot like the Sharpen Shake Reduction filter in Photoshop CC. Did some clean up. Created a stamped layer (CTRL+ALT+SHIFT+E) and applied Nik Viveza 2 to the image Helped me direct the attention to the center flowers. Next Topaz ReStyle was applied TRS-Tangerine Gauze preset. (Settings were: no changes to ReStyle section; Basic Temperature 0.13, Tint -0.14, and Saturation 0.06; Tone Black Level -0.59, Midtones -0.12, and White Level 0.34; and Detail Structure -1.00. Masks paintd back the center flowers using Color Aware brush and sampling the green leaves in middle – paint with 1.00 strength and Hardness 0.62 just the center flowers, little pink flowers, and purple thistles.) On a new stamped layer Nik Color Efex Pro plug-in was opened and several filters were stacked. (The filters were: Detail Extractor with Detail set to 69%, Contrast 68% and Saturation 26% and a control point was set on just the center yellow plant; Darken/Lighten Center using Shape 1, Center Lum 39%, Border Lum -57%, and Center Size 44%; Midnight Color Set Neutral, Blur 35%, Contrast 36%, Brightness 65% and Color 77% and overall Opacity 81%; Film Efex Vintage using Film Type 16 and overall Opacity set to 31%; and Vignette Filter Shape 1, Adapt Edges 19%, Transition 38%, Size 27%, and Opacity 43% and the overall Opacity 67%.) On a New Layer did a little edge clean up using my Chalk 60 brush, a Curves Adjustment Layer to add some contrast back into the image, and the Sharpen Tool on the middle plant thistles to emphasize them a little more. This seemed to take a long time. Wanted to show you that with the Color Efex Pro filters, there is usually an overall Opacity slider after the control points section that can really help adjust the filter look the way you want it. Anyway, it was a little “Secret Garden” that I saw!…..Digital Lady Syd


