
The Neighborhood Puppy
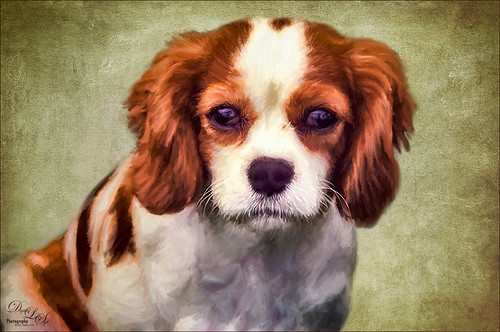
This is one of the cutest puppies I think I have ever seen. Her name is Kaila and I get to play with her every now and then when she is on one of her neighborhood walks. This time she let me take a few images of her, so I thought I would take advantage of this photo and try out a recent Topaz blog called Cartoon Your Critter – Make Your Pet a Work of Art by Taylor Seaton. I did not follow the steps exactly since my image is not really a cartoon effect, but I liked the final results. So how did I get to this point? Well I used Topaz (see sidebar for website link) ReMask, but I also tried Photoshop’s Mask and Select, which gave a great result too, just to see which is is better. (I think the results depend totally on the image IMHO, so if you do not like the results of one, try the other.) I did not like the results Topaz Simplify gave to this image, so Lucis Pro 6.0.9 (unfortunately no longer available) was applied on a duplicate layer of just the selected dog. Again the layer was duplicated and following the Topaz blog, the image was taken into Topaz Impression 2 where the Cartoon Your Critter preset was downloaded from the Community. No changes were made to it. Next Artiste Old Master texture from French Kiss (see sidebar for website link) was placed underneath the dog layer. Topaz has several nice textures in their blog that can be downloaded if a nice one is needed. Then created a stamped layer (CTRL+ALT+SHIFT+E) on top so it can be taken back into Topaz Impression 2. On separate layers above lots of painting with PS was done to add my own painting flair. On another stamped layer Nik Viveza 2 was applied and just a little bit of vignetting was added along with a little work on the nose and mouth. I really like the results. And as always, it was a lot of fun to do!…..Digital Lady Syd
Hospital Militar
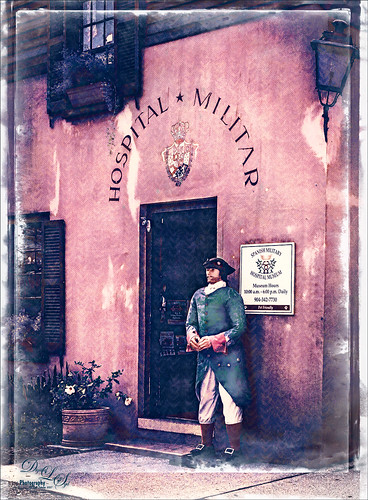
Just had some fun adding an interesting effect to this front door image of the Spanish Military Hospital Museum in St. Augustine, Florida. In PS a free action by Chris Spooner called Engraved Effect Medium was used on the whole image. If you use this action be careful-it makes your image huge. What you need to do is look in the group and decide which layers you want to apply and remove the others to control the final size of the image. I really like the engraved look and the action contains three different levels to experiment using. Then the image was taken into Topaz (see sidebar for website link) Impression 2 and applied the Abstract I preset with changes to fine tune to this image. Next a stamped layer was created (CTRL+ALT+SHIFT+E) was placed on top. Lucis Pro 6.0.9 (no longer available was applied and just the Smooth Detail slider was used. One of my PNG textures was added to the image and set to Overlay blend mode and then set to a bright blue color by clipping a Color Fill Adjustment Layer. The Foggy Night Color Lookup was added and set to 34% layer opacity. Next 2 Lil’ Owls (see sidebar for website link) Starry Night 6 was applied and set to Saturation blend mode at 46% layer opacity. The last step was to use one of Sebastian Michaels edges. It like the sort of vintage feel in the image…..Digital Lady Syd
Poising for a Portrait
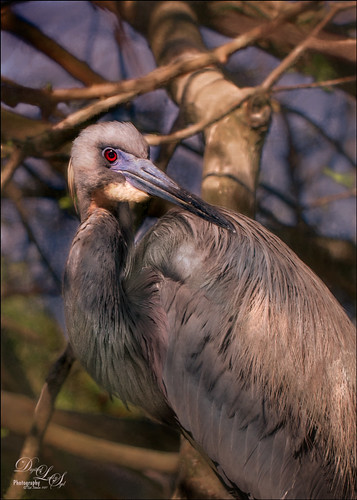
This beautiful Tricolored Heron is waiting for her mate to return to the nest with more nest ingredients. I could not believe how beautiful her eyes were! And where is her neck – how does she do this? The image had lots of shadows on her feathers that had to be removed – used both Lightroom’s Adjustment Brush set with the Saturation way down and clarity up to retain the feather structure, and then in Photoshop used a little cloning on the feathers. On a stamped layer (CTRL+ALT+SHIFT+E) Topaz (see sidebar for website link) Clarity was applied to pull out the feather details more – the background was painted out in a layer mask. (For Clarity settings, see below.) On another stamped layer Topaz Impression 2’s Jai Johnson’s Oil Glaze Light Original Color for noise removal preset was applied. (Need to try this preset if you shoot bird and wildlife photography – see her preset settings in her video In the Digital Studio January 6, 2017). Darken and Lighten Curves Adjustment Layers were created and the layer masks were filled with black. (See my How to Use Curves Adjustment Layers to Dodge and Burn an Image blog.) Areas that needed either adjustment were painted back. A Red Channel Luminosity Curve Adjustment Layer was created. (See my How to Use a Red Channel to Create a Nice Blended Image Effect blog.) Then an orange Solid Color Fill Adjustment Layer was applied at 19% layer opacity to warm up the image slightly using the mask to remove areas that were too warm. Finished up with Nik Viveza 2 to add a little vignette and drive focus to the bird’s eye. I just love the expression of this lovely lady…..Digital Lady Syd
Here are the basic Clarity settings used for my SJ Scottish Landscape: Clarity Section – Dynamics: Micro Contrast 0.73, Low Contrast 0.33, Medium Contrast 0; and High Contrast -0.34; Tone: Black Level 0.69, Midtones 0.02, and White Level -0.34; Hue/Sat/Lum Section – Hue Red 0.13, Orange 0.11, Green 0.33, and Aqua -0.36; Sat Red 0.19, Orange 0.14, Green -0.31, and Blue -0.19; and Lum Red 0.59, Orange 0.16, Yellow -0.02, and Green -0.37; all not listed colors were set to 0. For this image, changed Medium Contrast to 0.70, set all Hues to 0, and changed these Lum settings to: Orange 0.39 and Yellow -0.87.
A Bird Christmas Tree
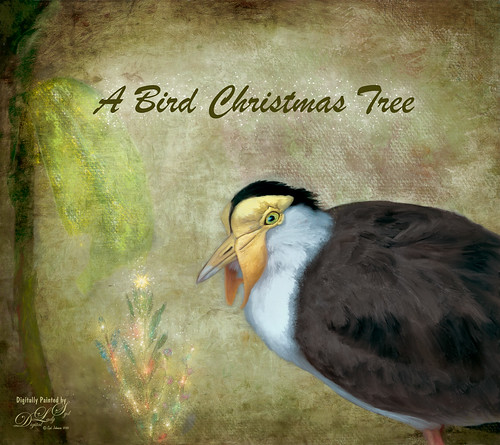
This bird is a Masked Lapwing that was photographed at the Palm Beach Zoo. I decided I needed to practice some painting so I picked this funny guy who sort of waltzed into my shot. Since the background was not too exciting, I decided to give him a little more holiday spirit by both painting and adding several filters. This image uses a lot of different filters and textures. The background texture is from Kim Klassen called Papertrio Paper and Paste (not sure it is still available but she has some beautiful textures) – applied twice, the second time set to Hard Light at 49% layer opacity. Topaz (see sidebar for website link) ReMask was used to select the bird and put him on his own layer – then used the Mixers to paint him. Used Grut’s MI Sues Hedge brush to soften and get the pretty edging between the brown and white feathers and am finding this to be a very useful mixer! Also used one of Fay Sirkis’s hair blenders. Have to find the right brushes to paint these guys! French Kiss (see sidebar for website link) Myrica Gale png was used for the plant – color was painted on a layer underneath it to add some colors. On a stamped layer (CTRL+ALT+SHIFT+E) Topaz Impression 2 was opened and Cezanne 2 preset was applied but masked out the bird to retain my painting strokes. On another stamped layer Topaz ReStyle’s Emerald preset was applied. Set the opacity to 69%. Corel’s Partical Shop was opened and used the Flame brush to paint a little color in the tree leaf and used Cluster brush to add some lights to the plant. Then used the Star brush to create the bright star on top and added a little color in by turning off the Glow and painting a little on the branches. Its Eraser brush was used to soften the effect a little. (See my Intro to Corel ParticleShop Brushes for Photoshop blog.) Back in PS, this layer looked pretty bright so lowered the opacity. Magic Dust Pretty Actions Brush was used to add a little white snow effect on tree and underneath text. Added some texture and clean up was done to finish up……Digital Lady Syd
The Rosebud
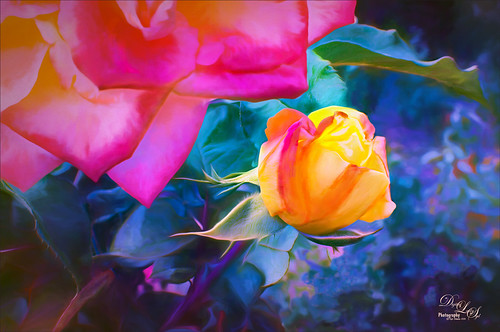
The image was taken at the Harry P. Leu Botanical Gardens in Orlando, Florida in the rose section. This is a beautiful place to photograph flowers – in this case the image was shot at F/22 with my Nikon 60 mm Macro Lens with a Bower 0.5 x High Resolution Digital Lens added to the lens. I know, odd settings but I was experimenting and loved the result. The key to getting this image effect was getting a very clear detailed shot. In Lightroom just basic changes were made and a little sharpening was applied to the bud with an Adjustment Brush set to Clarity 77 and Sharpen 83. Then in Photoshop Lucis Pro (no longer available) was set to Split Channel with Enhance sliders set to R157/G233/B59 and Green Smooth slider set to 25. On a stamped layer (CTRL+ALT+SHIFT+E) was placed above and Topaz (see sidebar for website link) Impression 2’s Georgia Okeefe II preset was applied. In a white layer mask some of the edges were painted out to keep them sharper. Next on another stamped layer Topaz Lens Effects Selective Vignette set to Olive Green preset with effect centered on the bud. Back in PS the layer opacity was set to 74%. Hope to be able to reproduce this result again!…..Digital Lady Syd


