
Hiding in a Palm Tree

I think this is a little Eastern Bluebird female who was helping me while I cleaned up my flower beds in my front yard. Not much was done in Lightroom, and Photoshop added Viveza 2 filter to sharpen her up a bit. The light was really dark in the palm tree, but really bright behind her so it was hard to get that looking correct. A Curves Adjustment Layer was used for this. Just a slight painterly effect was added in Topaz (see sidebar for website link) Studio 2’s Impression filter. Then in PS on a few New Layers, mainly just painted in some lines in the foreground palm fronds as they were really blurred. The Camera Raw filter was used to further tweak the color in the HSL panel. Topaz Lens Effects’ Soft Olive Green Vignette preset was added. That was it!…..Digital Lady Syd
The Red Lion in the Tower
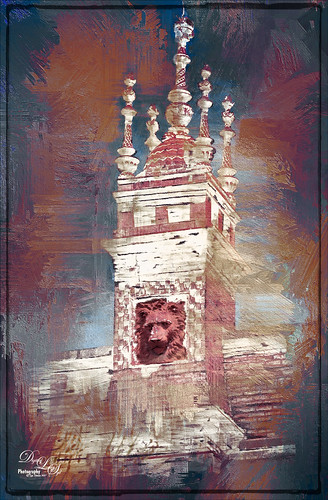
Took this image recently in St. Augustine of the back of the Alcazar Hotel (Lightner Museum) showing one of the beautiful red clay lions. Henry Flagler had these lions placed over both this hotel and the Ponce de Leon Hotel (now Flagler College) exteriors. To begin in PS, a free action by Chris Spooner called Engraved Effect Medium was used on the whole image. Lots of clean up with a mask. Then Topaz (see sidebar for website link) Impressions2 using a Van Gogh preset was applied and the effect was painted off back in PS on the lions face. Melissa Gallo’s Painted Textures Mist on the Lake (no longer available)) was applied twice – one set to Normal and one to Linear Burn at 55% layer opacity. A Hue Saturation Adjustment Layer was used to adjust the color. Then a stamped layer was created (CTRL+ALT+SHIFT+E) was placed on top and taken into Topaz ReStyle using the Cream and Plum preset (one of my favorites) was applied to the image and set to Hue blend mode at 76% layer opacity. On another stamped layer Nik Viveza2 was applied to adjust the contrast just right. Last step added just a simple line border. That was it. I love these beautiful clay lions – they are so striking!…..Digital Lady Syd
Who’s Watching Who?
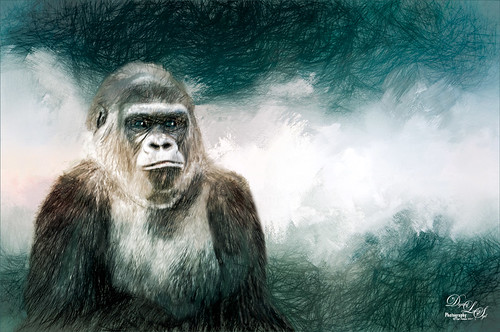
This gorilla I have used in several blogs – he was very much aware of everything going on around him and all who were watching him. I believe he was concerned for the little gorillas that were playing near him. There was a lot of clean up done to get him ready for the texture and Topaz Impression filter used in the image. The Gorilla was separated from his background using the Select and Mask Tool. It was okay that the selection was not perfect since just this layer was going to be taken into Impression. But first one of Jai Johnson’s fabulous natural textures was placed behind him – one called Daily Textures Captured Light Sea 4 (free download if you sign up for her newsletter). A Hue/Saturation Adjustment Layer was used to desaturate the texture a little and remove the warm gold color, and a Levels Adjustment Layer were used to make the yellow color even more white. Then a Color Balance Adjustment Layer was set to Highlights and Just the Yellow-Blue slider was set to +35 to add a little blue tone into the whites. After reading Jai Johnson’s Being Expressive blog, I decided to try the effect she described. On a Stamped layer (CTRL+ALT+SHIFT+E), the layer with both gorilla and texture was taken into Topaz Impression 2 where the Quick Sketch I preset was applied with these changes: Color Overall Sat -1.00 and Overall Lightness -0.52; Set to Hard Light bm at 54% layer opacity. The just some clean was done in PS and the texture was reapplied on top, set to Overlay blend mode and 52% layer opacity to add some warmth back into the fur of the gorilla. A Black and White Adjustment Layer was added and set to Luminosity to get the colors just right. Just took a lot of clean up but eventually it came out like I wanted it! I really liked the effect that Jai came up with – give it a try!…..Digital Lady Syd
Have a Good Day!

Spent a good part of Sunday going through the wonderful videos by Sebastian Michaels on Typography. They are available when you buy the Somerset Digital Studio magazine for Spring 2017 and there is lots of info on this tricky subject. The above is what I created after listening to a couple hours on how to do this – lots of fun. The number of fonts is a bit excessive but many belong to a similar class of fonts. I was mainly practicing how to incorporate different fonts with different techniques. (Some of the fonts were free and a few I own and are as listed: CF Anarchy, Dancing Script OT, Mistral, Fuse, 1942 report, DomCasual BT, Angelic War, Naive Deco Sans, Blackoak Std, Catalina Avalon Sans, Blackboard, and Trajan Pro in case you might want to download one of them.) The tree on the side is Tree-169 brush by Midnightstouch. The really nice swirl is from missm-flourishes-sample brush 2/312 size. I believe there are 37 Layers and 5 Groups in this little creation using lots of layer styles, colors, and adjustments layers, and even Topaz (see sidebar for website link) Impression 2 (Cartoon Your Critter preset). The original background texture is one I created in Photoshop using a beautiful cross-hatching effect with a brush from Just Jamee Summertime 2012 Brush Sampler 4 brush and a Bevel & Emboss layer style and using two different colors, then smoothing out parts with Gruts FX Cloud Billoway brush. Most of the fonts were obtained for free on the internet. Overall a very interesting way to spend a day!…..Digital Lady Syd
The Break Out
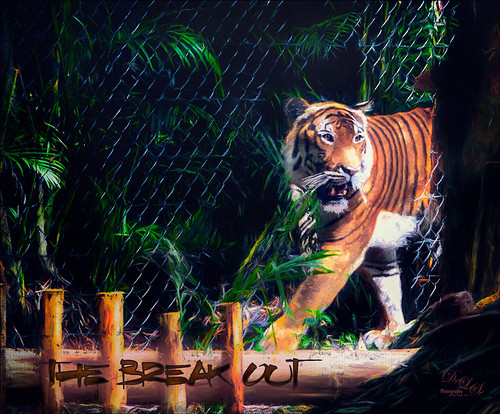
The Malayan Tiger image above was taken at the Palm Beach Zoo in Florida and he really was not trying to get out of his enclosure. He was actually checking out the tortoise in the next enclosure – apparently tigers like to eat tortoises according to his keeper. This image took an excessive amount of painting to get rid of the fence in front of his body. Luckily the eyes, nose and mouth structures were very sharp so the tiger could be reconstructed. Several paint layers were needed. Also several stamped layers (CTRL+ALT+SHIFT+E) were used for the following filters: Topaz (see sidebar for website link) Glow 2 did a great job adding a great effect on the tiger’s body using one of Blake Rudis’s wonderful presets called Room Glow set to Overlay blend mode. Topaz Impression 2 was applied at 82% layer opacity but I am not sure which preset was used to create a unique preset. Topaz ReStyle’s Tangerine Gauze preset, and Topaz Texture Effects 2 was used next. Finally Nik Viveza 2 was used to get the focal point correct. Lots of fun but lots of work……Digital Lady Syd
The King Entering his Domain
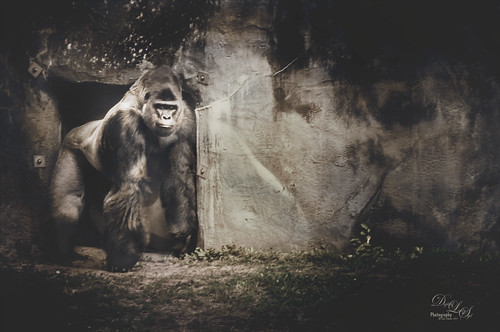
I liked this image because of the expression of the Gorilla and texture on the wall beside him. I ended up with a vintage feel as opposed to a really sharp image as the texture looks much better with the vintage tones. Topaz (see sidebar for website link) Impression 2 was opened and once again Jai Johnson’s Oil Glaze preset was used at 56% opacity (settings for preset in the video In the Digital Studio January 6, 2017). Nik Viveza 2 was used to drive focus to his face. A little spotlight effect was placed on his face. A Curves Adjustment Layer and Levels Adjustment (adjust the output tabs to get the matte feel) layer were added. That is about it since the original image did not have a lot of color in it the vintage effect could be achieved. ….. Digital Lady Syd
Finding the Shade
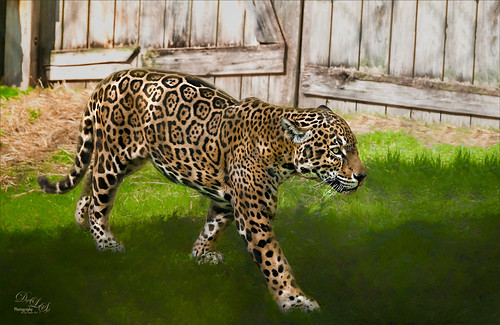
This jaguar started off as not a very pretty image at all – his lower foot was cut off, but the wood fence looked really good so I decided to process it. The image was taken at the Jacksonville Zoo behind a chain-linked fence where light shadow lines were throughout the image. In Lightroom Dave Delnea’s Backlight _Vertical_Left preset was applied and the settings adjusted. Used the Adjustment Brush to add a little Clarity and Sharpness to the just the face and ears. In Photoshop first the canvas had to be extended at the bottom and on the right side – filled some of the area using the Rectangular Marquee Tool and with Content-Aware Fill. Then the back foot was selected and copied (CTRL+J) to put on its own layer. The Free Transform Tool (CTRL+T) was used to add the bottom of this front leg and the spot Healing Brush was used to blend it all together. Topaz (see sidebar for website link) Impression 2 was used to blend some of the dark chain-linked fence shadows out and the spot Healing Brush was also used to remove them. Jai Johnson’s Oil Glaze preset (see video to create) was used and most of the jaguar was painted out on a layer mask. On a stamped layer (CTRL+ALT+SHIFT+E) Lucis Pro was opened and the Detail was set to 113. Then just parts of the jaguar were painted back in the mask to add more detail to the face. A Red Channel Luminosity Curves Adjustment Layer was added next. On another stamped layer, Nik Color Efex Pro was opened and the Pro Contrast filter with the Dynamic Contrast set to 41% and the Darken/Lighten Filter were applied. It took a bit of time to work out the problems in this image, but the results were worth it!…..Digital Lady Syd
The Road to Hana
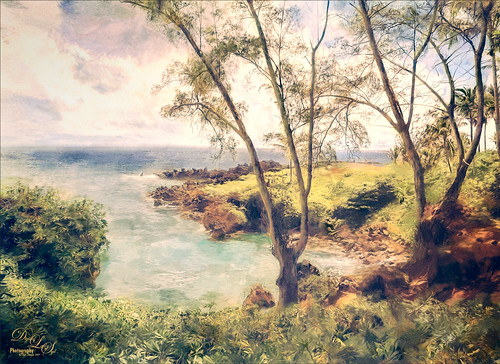
This Maui image of a little water inlet on the Hana Highway is another example of the poster look that was in my Getting That Poster Effect Fun Photoshop Blog. Used a similar workflow with Lucis Pro 6.0.9 (any sharpening filter would work), Topaz (see sidebar for website link) Impression 2 using one of my presets (I do not use the same preset for each image) – just have to use a little trial and error to find the right painting look. A layer mask was added and parts were painted out that did not look so good. The RGB luminosity layer and the brighten whites layer were also created. PS’s Poster Edges Filter was used with the same settings as my original blog. PS’s Stylized Filter using the same settings from the original blog was added. Nik Color Efex Pro 4 was opened and these filters were stacked: Glamour Glow, Reflector Efex, Film Efex Vintage using Film Type 14, and Cross Processing using Method B02 at 17% Strength – this really added to the painterly effect. On a New Layer and using my SJ Pastel Brush, some clean up and colors were added in parts of the image to create a more painterly look. A Red Channel Luminosity Curve was used to further even out the tone of the image. A Color Balance Adjustment Layer was used to get the exact warmth into the image. On a stamped layer (CTRL+ALT+SHIFT+E) Topaz (see sidebar for website link) Lens Effects Diffusion filter was opened and just a little diffusion and softness was added to the image to smooth some of the strokes. My favorite texture group from 2 Lil’ Owls (see sidebar for website link) Color Bokeh Grunge Set (these are .png files) number 3 was added to the image and set to Overlay blend mode. Last step involved taking another composite layer into Nik Viveza 2 (still my favorite plug-in ever and now it is free) and added a little vignette and lightened the focal point, which is the point at waters edge and the tree almost in the center. It did take a while to do this image, but I am always surprised at how good these poster effects come out! Each time I try it I feel I am getting a better result…..Digital Lady Syd
Castillo de San Marcos
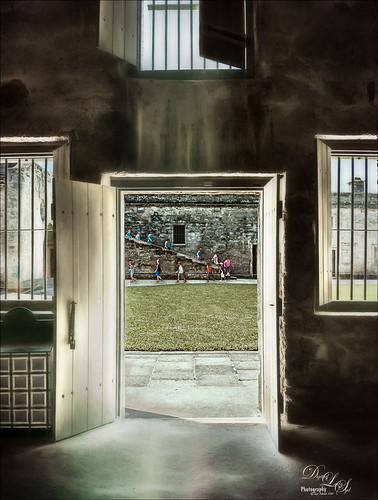
Loved how this image of the Castillo de San Marcos has such a soft feel inside the fort. The sharpness in the outside area where the kids was created using Lucis Pro 6.0.9 (no longer available, but I keep watching for everyone). The original image has the inside area looking much brighter. This was darkened down a little using Nik Viveza 2. Then to bring out the softening effect, Topaz (see sidebar for website link) Glow 2 and a preset called Room Glow by Blake Rudis was applied and set to Overlay blend mode. This preset was created using Glow 1 but works fine in Glow 2 and can be created by downloading the Topaz Labs Glow Webinar PDF file from Blake, who is a Photoshop and Topaz genius. In fact all 4 of the presets in this PDF are very useful in Glow. A Layer Mask was added to paint out the outside area in the door. On a stamped layer (CTRL+ALT+SHIFT+E) on top, Topaz Impression 2 was opened and the Fine Brush Scumble II preset was applied as is. To further add a little softness Topaz Lens Effects was opened and the Slight Diffusion preset was applied. Layer Masks were also added to these layers to keep the outside area tack sharp. Try out these filters for this soft effect…..Digital Lady Syd
Rainbow over Arizona
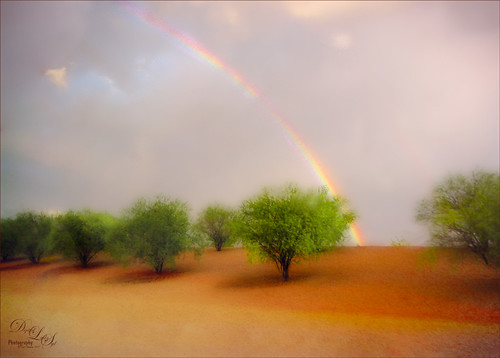
This was a snapshot taken with an old camera several years ago when in Arizona. Just had some fun with it as I loved the way the trees looked and wanted to see if I could get a nice effect with them. Applied Topaz (see sidebar for website link) Impression 2 and used a preset created from watching Jai Johnson’s Topaz Impression Oil Glaze Preset for Noise Removal video – adjusted the Red, Orange and Yellow colors in the plug-in and added a Vignette to it. The preset was not used for noise removal – just liked the effect on the image. Some clean up was done on a layer. On a stamped layer (CTRL+ALT+SHIFT+E) on top, applied Topaz Texture Effects 2 – started a new preset with the Diffusion section (set Diffusion Strength to 1.00, Softness 0.49 and Blur 0.27); Basic Adjustments section to adjust the color in the rainbow with Enabled Mask turned and inverted the mask to just paint back the rainbow; Light Leaks section using the first leak to add a little foreground color; and finally the Masking section using the Brush tab to paint out some of the effect on the foreground tree. On a new stamped layer a little Nik Viveza 2 magic was used to drive the eye to the focal point. That was it!…..Digital Lady Syd
The Valentine Trees

Happy Valentines Day! Just had some fun painting my Valentine Trees – started in Corel Painted and ended up in Photoshop. Lots of layers here a few filters – used Topaz (see sidebar for website link) Impression (true – used after painting the image), Topaz ReStyle, Topaz Lens Effects Reflector, and Nik Viveza 2. Lots of layers for the grass and valentines added. Overall lots of fun to do. Have a great day!…..Digital Lady Syd
Window Flowers
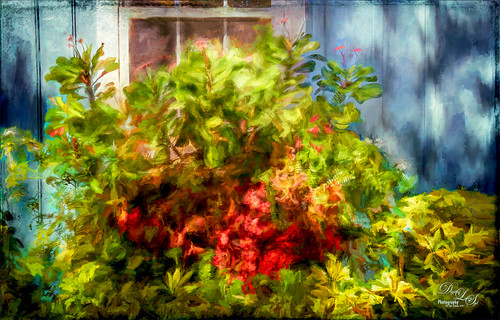
These pretty flowers were snuggling up against the window and enjoying a nice sunny January morning at the Ormond Beach Memorial Art Museum and Gardens. Just having some fun here with Topaz (see sidebar for website link)K Impression and Topaz Texture Effects. Lots of masking and painting in areas with Regular brushes and Mixers. Could have worked on this image for hours! Love the colors!…..Digital Lady Syd
Colorful Leaves
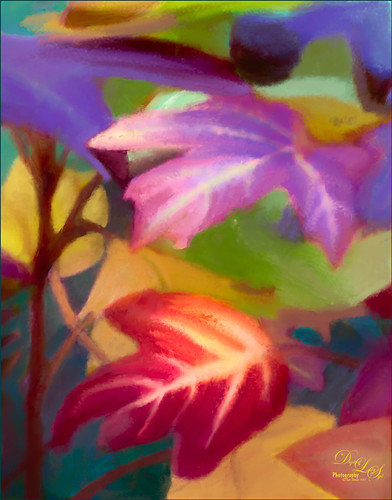
These colorful leaves were taken a year ago at the Jacksonville Zoo – near the entry way. I could not believe how colorful they were in January! Cropped in close to really emphasize the colors and not so much the details. In Photoshop Topaz (see sidebar for website link) Detail 3 was opened – used one of my presets (SJ Ldsp Underpaint2 preset: Detail Overall Small Details -1.00, Medium Details -1.00, and Large Details -1.00: Tone – Exposure 0.10, Contrast 0.24, Highlights 0.76, Blacks 0.31, Cyan-Red -0.61, Magenta-Green 0.11, and Yellow-Blue -0.16; Color – Temperature 0.16, Tint 0.21, Sat -0.27, and Sat Boost 0.19.) Instead of adding detail, the edges are all softened and the colors dominate the image for painting. Topaz Impression 2 was opened and a preset called Abstract Settings-Blake Rudis was applied as is. Back in PS the layer was set to Overlay blend mode and 50% layer opacity. The original background layer was duplicated and placed on top. A black layer mask was added (hold down ALT and click icon to add mask at bottom of Layer Panel to make black) and some of the leave’s details were painted back in. Both the Regular brushes and Mixer brushes were used to paint over all the leaves on lots of different layers – paint colors were sampled from the image. I like to use individual layers for each brush and color. Nik Viveza 2 was opened and control points were placed on the two main leaves where the focal points are. Still a few more clean up layers and that was it. I loved the abstract feel and bright colors of these leaves!…..Digital Lady Syd
A Wintry Florida Holiday
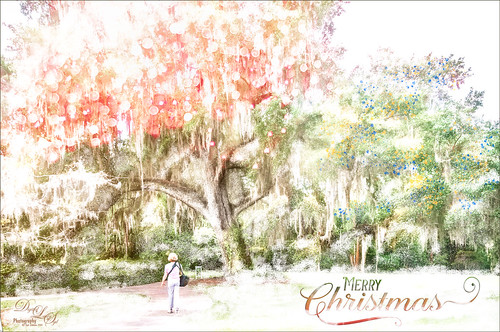
Having some Holiday fun here – spent a long time getting this beautiful entrance to the Henry P. Leu Gardens image to look like it was under the snowy spell of the Northern US. I would go over all the steps in detail, but it would end up pretty long. Just say that lots of layers were used which included: the Liquify Tool, the Clone Stamp Tool, Content-Aware Move, a couple Dodge Curve Adjustment Layers, Corel’s ParticalShop filter, Magic Dust Pretty Actions Brush layer, 100 Silver Lights Photo Overlays 16 and 17, Stroke and Spatter Dual Brush by John Derry layers, Topaz (see sidebar for website link) Impression 2 Chalk Smudge I preset, Alex Ducal’s Sketch Splatter brush layer, Pretty Actions Merry Christmas overlay, Grut’s FX Cloud Gumbo 01a brush layer, Topaz Lens Effect Reflector filter, and Nik Viveza 2 filter. Lots of fun! Have a Merry Christmas and Happy New Year!…..Digital Lady Syd
Fountain Grass
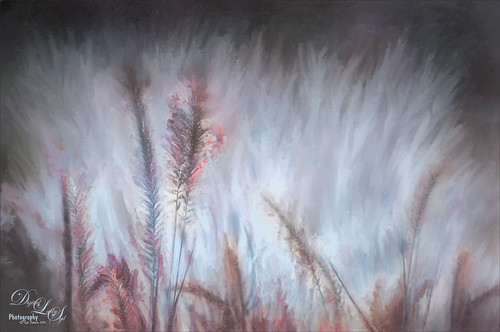
Took this image of fountain grass in my front yard. The original image shows the yard of my neighbor across the street so the first step was to blur the image to get rid of their yard. Used Photoshop’s Blur Gallery set to Iris Blur at Blur of 220 px. Individual stamped layers (CTRL+ALT+SHIFT+E) were created for each of the following filters: Topaz (see sidebar for website link) Black & White Effects was used to give a soft purplish tone, Topaz Clarity was used to sharpened just the foreground stalks, and Topaz Impression (Fine Brush Scumble II preset) was applied and the foreground stems painted back in a mask – then on a New Layer above, the Mixer Brush was used to smooth out the background. On another stamped layer Topaz ReStyle was opened and the Brown and White Pooch preset was used with adjustments – then in a white mask the foreground stem were painted back. Several mixer brush painting layers were added to give the water spray feel. The last step was to use Nik Viveza 2 to give a light vignette effect in the corners. This image was a lot of fun to paint!…..Digital Lady Syd
Beautiful Flower
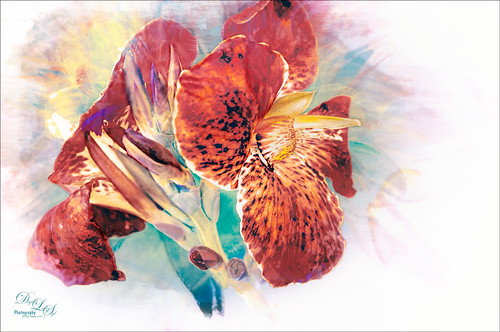
The flower in this image was an orange Canna Lily that grow really well in Florida. Topaz Detail 3 was applied to sharpen the image first in Photoshop. On a stamped layer, the Topaz (see sidebar for website link) Impression 2 preset as created in my Adding a Creative Touch in Topaz Impression 2 was applied, but this time the Coverage was set to 0.12, Coverage Transition 0.03, and Coverage Center X -0.13/Y 0.31. In the Masking section, the Spot Transition was set to 0.93 and Color Aware was set to 0.27 and the effect was placed on the center of the flower. The really bright colorful background could be controlled this way. Next a Black & White Adjustment Layer was added and set to Luminosity blend mode to get the tones correct. (See my How to Use a Black & White Adjustment Layer to See Contrast in an Image for more information on this.) On another stamped layer, Topaz ReStyle was applied a preset that used some colors from a previous image I had processed. (See my How to Use a Topaz ReStyle Trick for Improving Your Image blog to do this.) Two Curves Adjustment Layers were used to apply dodging and burning in the image. (See my How to Use Curves Adjustment Layers to Dodge and Burn an Image blog on how to do this.) On top of those, a Color Lookup Adjustment Layer was applied using the Filmstock_50.3dl filter. A light pink Color Fill Adjustment Layer was placed on top and set to Color blend mode. Last step used the now free Nik Viveza 2 plug-in to draw attention to the focal point. Lots of fun to do!…..Digital Lady Syd
The Red Bromeliad
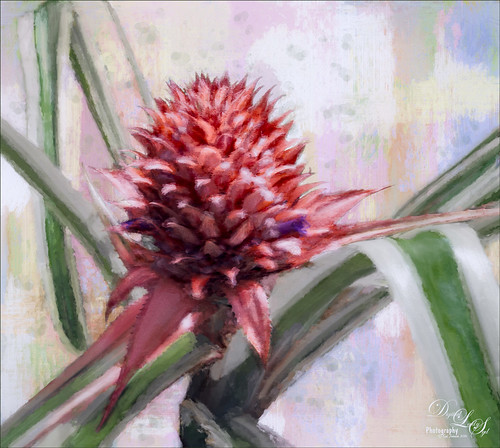
This is a red Bromeliad taken at the Harry P. Leu Gardens in Orlando, Florida. In Lightroom just basic adjustments were done on the RAW file. In Photoshop, the plant was selected using the Quick Selection Tool and then the Select and Mask Panel was used to clean up the selection. This is a wonderful addition to the latest version of CC. One of my Corel Painter textures was placed behind the the selection. Topaz (see sidebar for website link) Impression 2 was opened one of my Impressionistic textures was applied. A Brightness/Contrast and Curves Adjustment Layers were placed on top and the layer mask converted to black by CTRL+I inside the mask. Then just areas I wanted brightened or more contrast added into were painted back. On a New Layer above, a lot of painting using a regular brush to smooth out rough edges from the plug-in was used. Nik Viveza 2 was used to set the focal point in the flower and the last step was to add Topaz ReStyle to get a nice pleasing color palette. Love the final effect!…..Digital Lady Syd
Fountain Grass
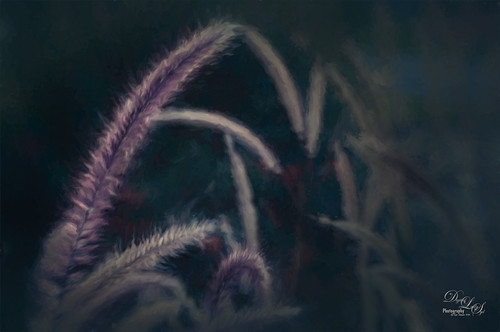
This image is of Hameln Fountain Grass that is growing in my front yard around my, of all things, dolphin fountain! This image was taken with my older Lensbaby Composer at F/4. Kim Klassen’s free Truegrit Lightroom preset was applied before bringing image into Photoshop. The Background was duplicated and Topaz (see sidebar for website link) Impression 2’s Cezanne II preset was applied as is. A layer mask was added and parts of the grass were lightly painted back to bring in some detail on the stalks. On a stamped layer, the now free Nik Color Efex Pro 4 was opened and three filters were stacked. First the Darken/Lighten Center filter, Monday Morning filter set to Color Set Neutral and overall opacity at 53%, and the Vignette Filter and sampling a darker color in the image to blend nicely. The last step involved adding a Black and White Adjustment Layer set to Luminosity to bring out the colors just right. I really like how Impression 2 is worked so well with this image!…..Digital Lady Syd
Little Fern Flowers
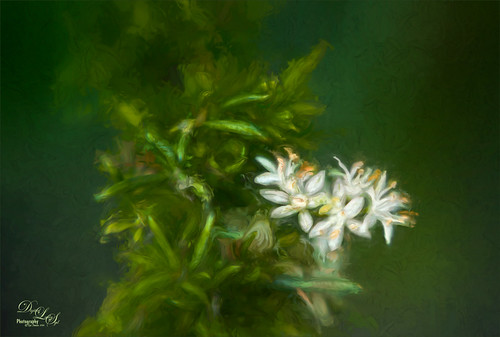
This image is of little white flowers growing out of the top of a Foxtail Fern or Asparagus Ferns in my yard. An older Lensbaby Composer was used – set to F/4 and using the Macro +10 lens. In Lightroom Seim’s (see sidebar for website link) Super Super HDR X preset was applied to the image before going to Photoshop. Used a Hue/Saturation Adjustment Layer to remove just a little haloing on the edges of the white flowers. On a stamped layer (CTRL+ALT+SHIFT+E) Lucis Pro was applied. (Settings: Assign Original Image Color 31%/69%; Enhance Red 147/Green 87/Blue 47.) See my Digital Lady Syd Reviews Lucis Pro 6.0.9 (Now Affordable!) blog for info on this. A black layer mask was added and just the white flowers were painted back. On another stamped layer Topaz (see sidebar for website link) Impression 2’s was opened and my SJ Renoir WC Look preset was applied at 71% layer opacity. (Settings: Stroke Type 13, Brush Size 0.73, Paint Volume 1.00, Paint Opacity 0.91, Stroke Rotation 0, Stroke Color Variation 0, Stroke Width 0.65, Stroke Length 0, Spill 0.79, Smudge 0.55, Coverage 0.67, Coverage Transition 0.30, Cover center X0/Y0; Color Overall Hue 0.07, Sat 0.15, and Lightness 0; Red Sat 0.50; Orange Sat 0.50; Purple Hue 0.85 and Sat 0.65; Lighting Brightness 0.08, Contrast 0.12, Vignette 0, Light Direction X-0.27/Y0.15; Texture Strength 0.11, Size 1.00, Background Type – solid white, and Background – #b25b41.) On a New Layer used the Smudge Tool to smooth some areas. On yet another stamped layer, the now free Nik Viveza 2 was applied to adjust the focal point just right. That was it! Was a lot of fun to take the shot and paint the image!…..Digital Lady Syd
A Beautiful Room
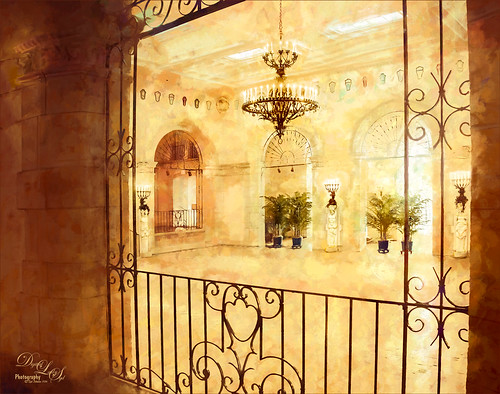
This image of the West Room is one of several beautiful areas at the Flagler Museum (or Whitehall) in West Palm Beach, Florida. It appears to be one of areas rented out for special occasions. When visiting this museum, it was a pleasant surprise to see all it contained, and with practically no other people around. A photographer’s paradise!
For post-processing, in Lightroom Trey Radcliff’s free preset called A Marshmellow Happysmell was applied – this gives it the warm colors in the image. In Photoshop, Lucis Pro 6.0.9 was applied (AOIC-0/100; R171/G155/B37) and then in a black layer mask, just areas I wanted sharpened were painted back. Created a stamped layer (CTRL+ALT+SHIFT+E) and added Topaz (see sidebar for website link) Impression 2’s Overpaint II preset as is. Next several painting and clean up layers were used to smooth out some of the rough edges. Added Nik Viveza 2 as a last step to emphasize the focal points. I like the effect this Impression preset added to the image…..Digital Lady Syd
A Peaceful Place
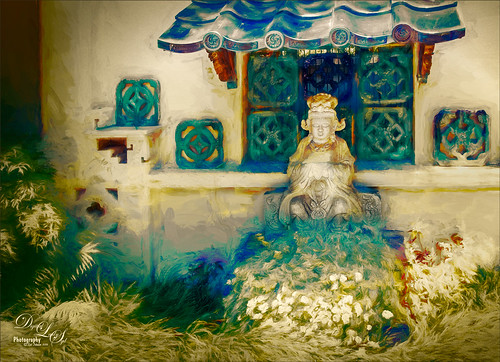
This image is a of a nice quite place at the Philip Hulitar Sculpture Garden in West Palm Beach, Florida. In Photoshop two layers were opened in Topaz (see sidebar for website link) Impression and different presets were used to get this effect. The first preset was one of mine that was based on a Colored Pencil preset. But I did not like the effect on the bottom foreground grassy area. Therefore one of Blake Rudis called Abstract Settings was used for this area by removing the effect from the top of the image in a layer mask. Then on two more different layers Topaz Lens Effects was opened using Toy Camera Soft and Dreamy preset with the Vignette and Camera Shake turned off, and a Selective Vignette using the Soft Olive Green preset. As a final step, Nik Viveza 2 was used to draw the focus to the statue a little more clearly. I really like the way the painterly effect turned out!…..Digital Lady Syd


