
Underwater Fantasy
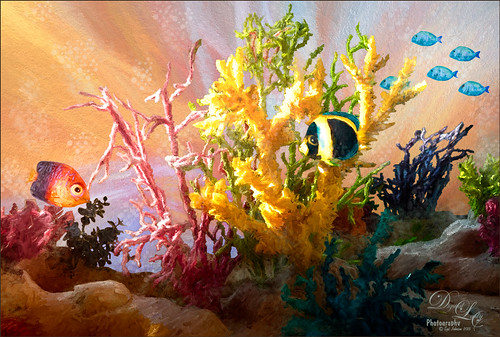
This image took a lot longer than I expected to complete – but still a lot of fun to do. I had the image of some coral in a case at a SeaWorld Orlando store and wanted to use it in an underwater adventure image. It turned out totally different from what I expected but that still is a lot of fun to just see what happens!
Basically the coral was cut from the image using Topaz (see sidebar for website link) ReMask 5. It did a fair job and a lot of touch up of the layer mask had to be done once back in Photoshop due to the complexity and similar background color to the coral in the image. My next step was to add a couple PixelSquid fish into the image (see my How To Use the PixelSquid Add-On in Photoshop blog). One of my spiral textures was used for the background and the layer was taken into Topaz Impression where the Turner Sunset II preset was applied. The fish and coral layers were grouped, duplicated and top group merged to create a single layer. This layer was then taken into Topaz Impression and Edward Hopper II preset was applied to it. Some bubbles were added using using the Glitter Brush created in my Some Christmas Cheer and Resources blog was used to add some softening effect around the coral, and on some separate layers, Fay Sirkis’s Bubble Wrap Highlights Mixer brush was used to add in the more obvious bubbles. Next the eyes were sharpened using the Exposure Adjustment Layers. On a stamped layer (CTRL+ALT+SHIFT+E), Topaz Lens Effects was opened and the Reflector filter brightening the left side of the image and the Graduated Neutral Density Filter to darken the bottom part of the image was applied. Last step used Nik Viveza 2 to direct focus to the main fish. Whew! Hope you have a wonderful holiday!…..Digital Lady Syd
Viera Wetlands
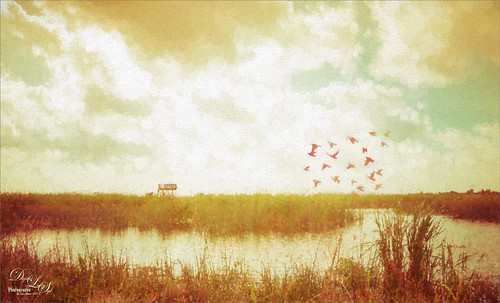
This image was taken at the beautiful Richard Grissom Memorial Wetlands (also known as the Viera Wetlands) in Brevard County, Florida. In Lightroom very little was done except to apply Trey Ratcliff’s free preset called Venice Canalman that came December 2015 preset package (scroll down) he gave away with his newsletter – I have used this preset a couple of times and really like it. The focus point could be adjusted by going to the Radial Shift that he used in the preset, and moving it a little right to include the birds.
In Photoshop Jai Johnson’s free Flying Birds png was added as a layer on top. Since the birds looked flat in the image, a Pattern Fill Adjustment Layer was clipped to the image (ALT+click between the layers) – tried several and ended up using a gold and reddish watercolor pattern, which matched the tones of the LR preset that was applied. This pattern can be dragged around in the image to make the birds look just right and the adjustment layer was set to 62% layer opacity. An Outer Glow Layer Style (double click on layer to open) was set to Normal Blend Mode, white color, Opacity of 34%, Noise 13%, Spread 8% and Size 144 Px – this softened the birds so they blended into the sky just right and the layer was set to 68% layer opacity. The last step was to apply Topaz (see sidebar for website link) Impression’s Seurat Afternoon III without any changes to the whole image. His pointillism strokes added a really interesting effect to this image. Impression is really a fantastic plug-in that can add such a beautiful effect to an image as in this case…..Digital Lady Syd
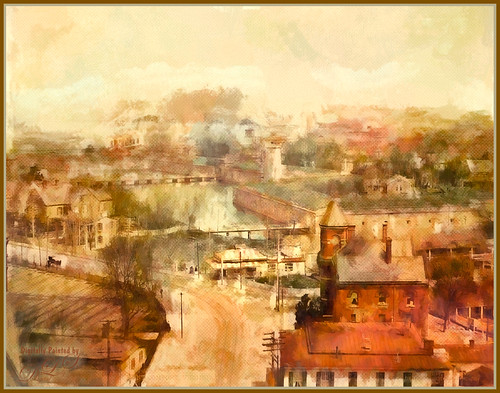
The Lemonade Cart

I have been wanting to use this image of a Lemonade Cart taken a couple years ago at the Annual Turkey Run in Daytona Beach, Florida, but it was too hard to select all the “stuff” around it. That was until Topaz (see sidebar for website link) ReMask 4/5 was released. This time, it took a little effort, but overall it came out pretty fast. Once I had the cart on its own layer, it was opened in Topaz Impression and the Renoir II preset was selected with no changes. This blended the cart nicely into my Corel Painter background. On a stamped layer (CTRL+ALT+SHIFT+E), the layer was opened in Topaz ReStyle and the Native Dancer preset was once again applied (see my How to Use a Topaz ReStyle Trick for Improving Your Image blog.) Several layers of painting with both regular and mixer brushes were used to make sure it did not look like a “canned” painting – I am very sensitive to this so I always try to add some of my own strokes if I use Impression. The bird is from Midnightstouch Egret brushes – these are great for that little extra touch – just be sure to paint them some to blend them into the image……Digital Lady Syd
Flagler Beach in the Fall
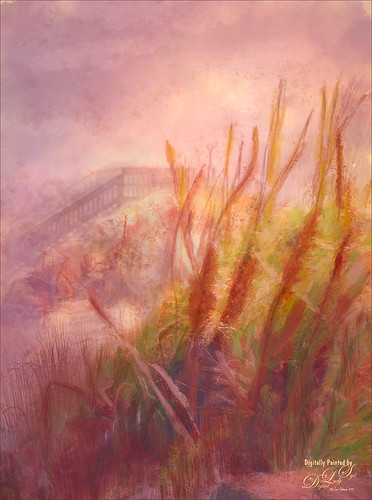
Flagler Beach, Florida, is so beautiful all the time (see blog links below for more Flagler Beach images), but this week the waves and water were really impressive. There is a bit of a fall feel in the air. These Sea Oats are everywhere along the edge of the beach. They are important for preventing beach erosion during hurricanes. I did a lot of adjustment to this image – Topaz (see sidebar for website link) Glow and Topaz Impression before painting on top. One of my Corel Painter textures was added and Photoshop’s Lighting Effects Filter were also used. It took a long time to get this the way I wanted it to look, but overall this is how I see Flagler Beach……Digital Lady Syd
Digital Lady Syd’s Related Blogs:
How to Add a Little Retro to Your Shots
Trying Out Some New Techniques!
Using Pattern Overlay Layer Style to Get a Retro Feel
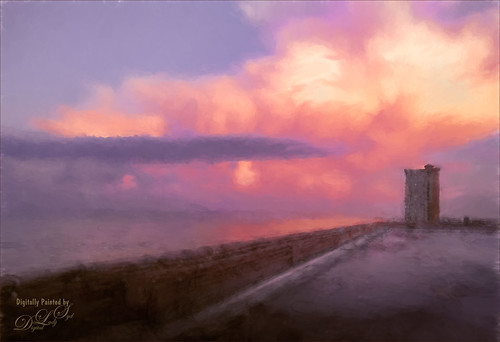
Old Comfort Point
Loved the original Pubic Domain postcard image (cc 1900) of Old Comfort Point which is now part of Hampton, Virginia, and shown in the link. There is a huge amount of history connected with this place. To process this image, one of my warm colored smooth Painter textures was placed above the original image and set to Hard Light blend mode. In its Layer Style, the Blend If This Layer white tab was split (ALT+drag) and set to 228/255 and Underlying black tab split to 0/123 which gives a nice texture effect. A Hue/Saturation Adjustment Layer was placed on top and these Master slider settings were used: Hue -26, Saturation -71, and Lightness -29. A stamped layer was placed top (CTRL+ALT+SHIFT+E) and Topaz (see sidebar for website link) Impression was opened. I created a preset to give a nice painterly result based on the Abstract Settings by Blake Rudis preset (changes made: Type 04, Brush Size 0.65, Stroke Color Variation 0.10, and Stroke Length 0.22). Created two New Layers and painted in some color and clouds in the sky using Kyle’s Real Watercolor Big Wash brush. Created another stamped layer on top and applied Photoshop’s Halftone Pattern Filter (Size 2, Contrast 50 and Pattern Type Dot), which was set to Color Burn blend mode and 14% layer opacity. A New Layer was set to Overlay blend mode and painted with a black brush set to 12% brush opacity to burn in a little to emphasize the tower in foreground. The layer was then reduced to 61% layer opacity. The last steps was just adjusting the color in the image as the yellow and green colors were over-whelming the image. Used Selective Color and Color Balance Adjustment Layers to do the color correction. It did take a lot of steps, but it was really fun to do. Try taking some of these images that are now Pubic Domain and see what you can do with them……Digital Lady Syd
Seashells on the Beach
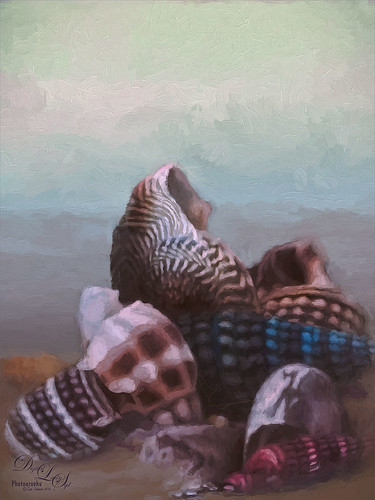
These shells were actually inside the base of a lamp – just did a close up phone image. By adding one of my Corel Painter textures and painting back in the shells in a layer mask, the busy original background could be replaced. Now for a change up – Topaz (see sidebar for website link) Impression’s Oil Painting 1 preset was applied. Next on a New Layer, some image clean up and painting was done. Last step was applying on a stamped layer (CTRL+SHIFT+ALT+E) Topaz Restyle’s Soft Sienna Veil preset with a few adjustments in the color sliders. This was the final result and I loved the colors in it whole image……Digital Lady Syd
The East Clouds in a Sunset
Just a quick phone pix I took from the penthouse at the La Playa Resort in Daytona Beach, Florida. This was taken facing east over the Atlantic Ocean while the sun was setting on the west behind the Intracoastal Waterway. Not much done here – just Topaz (see sidebar for website link) Impression applied using the Watercolor IV preset with a little color adjustment, some Mixer brush clean up, and a Selective Color Adjustment Layer to reduce the overwhelming blue effect in the image. Loved how the sunset plays off the ocean clouds!…..Digital Lady Syd
Abstract Wetlands

Felt like doing something a little different with a rather ordinary image. This was another shot from the Ritch Grissom Memorial Wetlands in Brevard County, Florida (also known as the Viera Wetlands). This image was first Merged to HDR in Adobe Camera Raw 9.0 – thought I would put it through its paces and it worked really well. I have a lot of HDR programs, but it is so nice to have all the ACR tools available to clean up the result.
Once the HDR file was created in ACR, the image was opened as a Smart Object in Photoshop CC2015 to add a few filter effects. Topaz (see sidebar for website link) Glow was using my Inter Web Variation preset set to Hard Light blend mode. (Here are the settings: Primary Glow Type Dark, Glow Strength 1.00, Effect Sharpness 0.12, Electify 1.00, Simplify Details 0.06, Edge Color 0, Detail Strength 1.00, Detail Size 0.42, Brightness 0.16, Contrast 0.18, Saturation 0.08, Line Rotation 0, and Glow Spread 0; Secondary Glow Glow Type Light, Glow Strength 0, Effect Sharpness 0.54, Electrify 0.11, Simplify Details 0, Brightness 0, and Contrast 0; Color Overall Saturation to 0.62, Red Sat to 0.44, Yellow Sat to 1.00 Yellow Lightness -0.36, Green Sat 1.00 and Lightness -0.51, Aqua Lightness -0.36, Purple Sat 1.00, and Magenta Sat 1.00 and Lightness 0.50. Set to Screen blend mode at 66% Strength; and no Finishing Touches.) On a stamped layer (CTRL+ALT+SHIFT+E), Topaz Impression’s Turner Storms II was added. It was turned into a Smart Object and Photoshop’s Camera Raw filter was opened – used Photoshop Cafe’s PS Cafe-euro model preset with some Basic adjustments and color changes. I really liked the fantasy feel I was getting. Some clean up on a New Layer was done. On another New Layer Kyle’s Real Watercolor Spatter Mixed brush was used on the foreground, a gradient overlay layer style added, and then a Guassian Blur filter set to 2.0 radius was applied to this layer. The last step was using Nik Viveza 2 to draw attention to the focal point. I really liked the results of this image….Digital Lady Syd
Soaring Spoonbill

Still enjoying the bird images I took at the St. Augustine Alligator Farm Rookery this Spring. The original image was captured with a totally light blue sky behind this Roseate Spoonbill. This made it easy to add a texture underneath the image (my painted texture created in Corel Painter called Seashore) and changing the blend mode of the bird layer to Multiply. Topaz (see sidebar for settings) Clarity and DeNoise 5 were applied to cleanup the the bird layer. On a stamped layer (CTRL+ALT+SHIFT+E), Topaz Glow’s Room Glow Blake Rudis preset was applied (check out Integrating Topaz Glow into Your Workflow for info on this). Next on a New Layer Fay Sirkis’s (from KelbyOne) Precious Oil Diamond Mixer was used to clean up the feathers and beak a little. Topaz Impression Watercolor II preset with no spill was applied. Nik Viveza 2 was used to bring out the color of the bird just perfectly and a Curves Adjustment Layer was used as a last step for overall contrast. I love my bird pix!…..Digital Lady Syd
Cattle Egret Looking for Love

Loved this beautiful Cattle Egret who was checking out a group of egret ladies (they are more colorful during this time of year) at the St. Augustine Alligator Farm. Jai Johnson’s free texture called antiquebrownlight-canvas was used on this image. Lots of painting, Topaz (see sidebar for website link) Lens Effect and Topaz Impression were used to get this final image. I really love the mystical result……Digital Lady Syd
Where Are My Eyes?
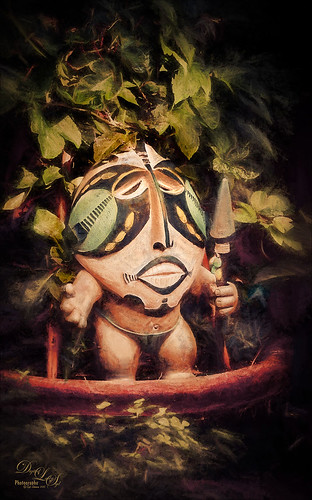
This image was taken at the St. Augustine Alligator Farm website link. I don’t know anything about it, just that it greets you when entering the attraction. Very little was done to this image. In Lightroom Trey Radcliff’s Dramatically Clean Chipmunk preset was applied. In Photoshop Topaz (see sidebar for website link) Impression’s Turner Storm II preset was applied. A white layer mask was added in PS and a little bit of the lighter areas were painted back in the face to draw some focus to it. On a stamped layer (CTRL+ALT+SHIFT+E) that was converted into a Smart Object, Nik Color Efex Pro 4 was opened. The Graduated Neutral Density filter selected (Upper Tonality -25%, Lower Tonality 7%, Blend 27%, Vertical Shift 43%, Rotation to adjust the light 158 degrees, and Highlights 1/4 of the way to right). In the same Smart Object Nik Viveza 2 was applied. A Focal Point was added to the eyes and nose area (Brightness 33%, Contrast 40%, Saturation 38% and Structure 58%). Two Curves Adjustment Layers were added – one a darken curve to separate the head from the busy leaf background, and one to add contrast to the face since an S-shape curve was used. Both layer masks were turned to black (CTRL+I inside the mask) and just localized areas were painted back with a soft white brush at 17% brush opacity. Last step involved adding a New Layer and actually painting in some color where it was needed using a very low opacity brush (12%) and sampling in the image to match areas. That was it. Lots of fun to do!…..Digital Lady Syd
Bear Checking You Out!

This image is of the bearskin that is usually at the Native American Festival in Ormond Beach, Florida, this year. In Lightroom Seim’s (see sidebar for website link) Magic Harsh Sun Fixer preset was used. In Photoshop on a duplicate layer, Topaz (see sidebar for website link) Detail was applied to overall sharpen. Topaz Impression was applied using Oil Painting by Jim Salas (light direction was changed to fit image and Texture Strength slider set to 0 since textures were added to image outside of plug-in). A couple of Flypaper Textures were applied. Then I really cropped image in to get a close up of the face. The final step involved adding my favorite filter Nik Viveza 2. Control points were placed on the nose to enhance the color and sharpen it a little to draw the eye to that part of the image. This was originally a great big image that I could not get a look I liked so the crop really made the image…..Digital Lady Syd
Beautiful Maize
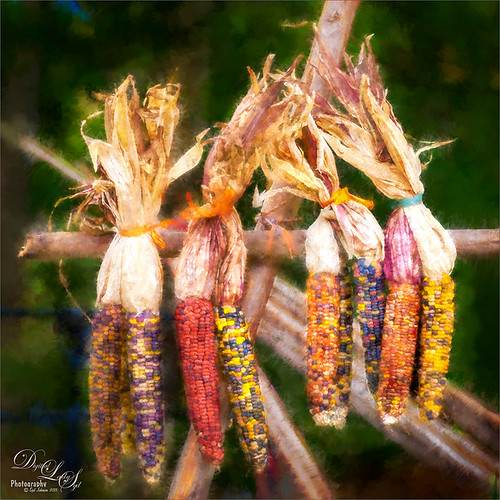
Loved this hanging batch of colorful corn or maize taken at the recent Native American Festival in Ormond Beach, Florida. In Lightroom Seim’s (see sidebar for website link) Workflow DreamScape preset was applied. Next Topaz (see sidebar for website link) Detail 3 was applied using just my basic Little Medium Large Detail preset (Medium Details 0.38, Large Details 0.16, and Contrast 0.30) where a black layer mask was added and just the corn was painted back. The background needed to remain soft. On several layers above a lot of clean up was done as the background was full of distractions. On a stamped layer (CTRL+ALT+SHIFT+E), my Topaz Impression Abstraction preset was applied (Stroke Type 12, Brush Size 1.00, Paint Opacity 0.38, Stroke Rotation 0, Stroke Color Variation 0, Stroke Width 0.85, Stroke Length -0.50, Spill 0.72, Smudge 0, and Coverage 1.00; Color Overall Hue 0.14, Sat 0.23, and Lightness 0.06; Red Lightness 0.14, Yellow Sat -0.11, and Green Lightness -0.36; Lighting Brightness 0.13, Contrast -0.23, and Vignette 0, Light direction X 0.34 and Y 0.05; and Texture Strength 0.19, Size -0.43, and Canvas I, Background type white solid and Background White). This layer was duplicated and taken back into Impression where the Ethereal Background by Blake Rudis preset was applied. A white layer mask was added and just the corn was painted out where I did not want the blurred effect to occur. This layer was set to Linear Burn at 53% layer opacity. On a new Stamped Layer, Nik Viveza 2 was applied to further enhance the focal point. It is so much fun to use the different filters to get different effects…..Digital Lady Syd
Digital Lady Syd Related Blogs:
How to Get the Most Out of Your “Not-So-Great” Images – contains link for Topaz Impression’s Ethereal Background by Blake Rudis
A Tuscan Blossom
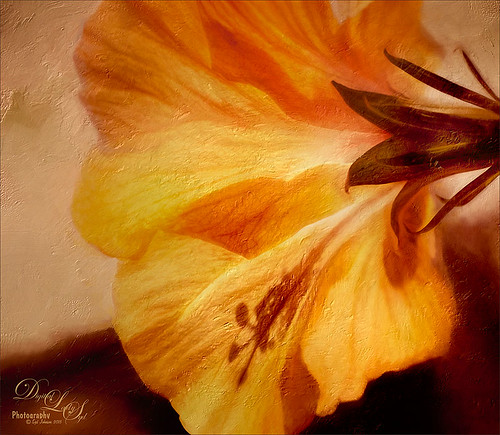
Just loved how this little Yellow Wing Hibiscus blossom image turned out. Did very little to the original image other than apply 2 Lil’ Owls (see sidebar for website link) Spring Whispers 4 preset and sharpening of the shadow stamen. On a duplicate layer of the background, Topaz (see sidebar for website link) Clarity was applied using John Barclay’s Basic Settings preset (see My Glowing Porch Flowers blog for settings). Next went into OnOne’s (see sidebar for website link) Perfect Effects 9 and applied the PE4 Vintage preset. I believe that OnOne gave it away with an earlier version, probably Perfect Effects 4. Next Topaz Impression was opened and the new preset created from Blake Rudis’s blog called Ethereal Background was applied next (see Blake Rudis video called Atmospheric Backgrounds with Topaz Impression). A New Layer and some clean up was done, especially a little Mixer Brush painting on some of the edges to smooth. Painted Textures Creamsicle texture was applied (not sure this texture is still available) set to Linear Burn blend mode at 73% opacity. A Hue/Sat Adjustment Layer was clipped to the layer and the Saturation set to -56 so there was not a lot of color added to the image, just texture. A Curves Adjustment Layer was added to add back some contrast and the last step was Nik Viveza with a control point on the focal point, or for me the stamen shadow. It was fun to experiment with my arsenal of filters!…..Digital Lady Syd
More Holiday Cheer!
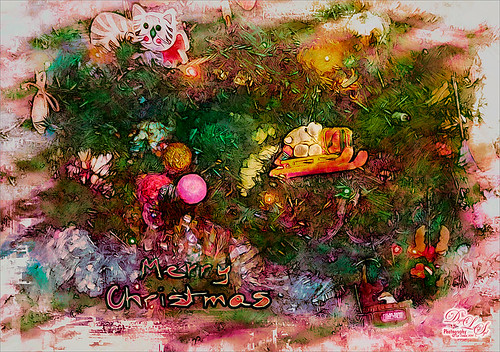
Just another Merry Christmas Card – hope all are enjoying the season. I was just adding different filters to layers to see what happens and this is what I got! Hum….. Anyway, this is what I did. Topaz (see sidebar for website link) Clarity was used to sharpen up the original tree ornament image. On a duplicate layer above, Topaz Glow’s Fur & Feather I preset was applied. Next Topaz Impression’s Abstract I preset was applied and I adjusted a couple sliders. In Photoshop the layer was set to Soft Light. Then the layer was duplicated and set to Normal blend mode at 77% layer opacity. A layer mask was added and some of the ornaments was painted back. I painted the text in Painter and placed it in as a layer with an Inner Glow layer style. On a stamped layer (CTRL+ALT+SHIFT+E) was created and taken into Smart Photo Editor. (Photo-art at a click 050; Changed Master fade to left just a little; Hue -0.298; and 2nd Hue 0.369. When brought into PS, it turned the color scheme very different but workable. Used Selective Color Adjustment Layers to get the color tweaked to where I wanted it.) The last step involved adding Nik’s Viveza 2 and adding focus on the ornaments. Just a lot of fun……Digital Lady Syd
On the Beach
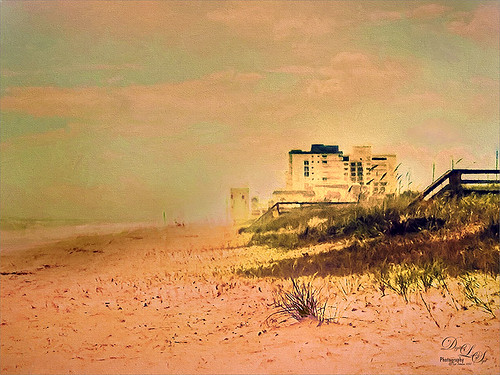
This is a nice little beach near my home called Ormond by-the-Sea. Thought I would try applying some of my new filters to this image. On a duplicate background layer in Photoshop, the Topaz (see sidebar for website link) Glow preset called Graphic III preset was applied. (Here are the adjusted settings I used: Secondary Glow: Glow Type Light, Glow Strength 0.23, Effect Sharpness 0.47, Electrify 0.17, Simplify Details 0, Brightness 0.36, Contrast 0.62, and the other two 0; Color: Red Sat 1.00, Orange Sat 0.27, Yellow Sat 0.20 and Lightness 0.09, Aqua Sat 0.78 and Lightness -0.26, and Blue Sat 0.49. Set to Multiply at 100% strength). This brought out the structure of the building very nicely. The background layer was duplicated again and placed on top. This time I used a preset I had created based on their Wonderland preset. (Here are the settings if you want to try them: Primary Glow: Glow Type Dark, Glow Strength 0.36, Effect Sharpness 0.29, Electrify 0.23, Simplify Details 0.21, Edge Color 0.13, Detail Strength 0, Brightness 0.37, Contrast 0.45, Sat 0.20, Line Rotation and Glow Spread 0; Secondary Glow: Glow Type Light, Glow Strength 0, Effect Sharpness 0.25, Electrify 0.11, Simplify Details 0, Brightness 0.77, and Contrast 0.60; Color Overall Hue -0.96, Sat 0.28, and Lightness 0; Red Sat 0.35; Orange Hue -0.46, Sat -0.34, and Lightness 0.79; Yellow Hue -0.34, Sat 0.41, Lightness 0.58; Green Hue -1.00; and Blue Sat 1.00; Finishing Touches: Effect Coverage 0, Smudge 0.05, Sharpness 0.30, Sharp Radius 0 and Vignette Size 0.) A layer mask was added and the sky and a little of the building was painted away so the first Glow preset settings appear above and the new ones below. Did a little clean up at this point using the Spot Healing Brush. A stamped layer was created on top (CTRL+ALT+SHIFT+E) and Topaz Impressions’s Dega Dancer I preset was applied as is. This really warmed up the image. Last, Nik Viveza 2 was used to add a little more focus on the large building in the distance. I believe this image is a pretty good representation of how it felt to be on the beach on a sunny early Fall day……Digital Lady Syd
Painting in a Vector Pattern
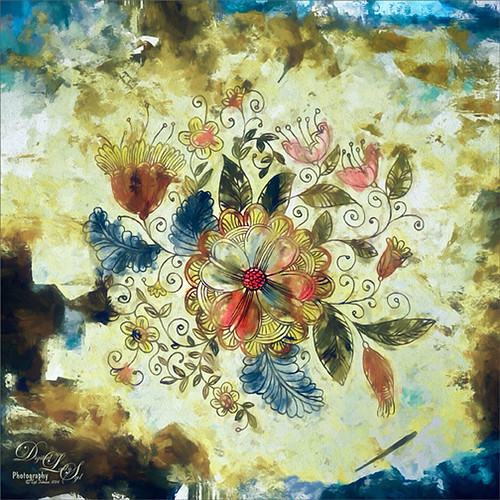
This is an image I was just having fun doing. Started with a layer that I placed a vector floral image on – Graphichive Floral vector flowers Swirls and Flowers 2 (there are some beautiful vectors on this site so check it out!). It was on a sheet with several other clip arts – had to open up the jpg, use the Rectangular Marquee Tool to select it and place on its own layer. Then select the background by going to Select -> Color Range – check Invert so that just the lines are selected and you now have transparent clip art that you can paint each flower and leaf the way you want. In this case I created a square file and copied the clip art layer over to this file. Used Free Transform (CTRL+T) and hold SHIFT key to adjust the size proportionately.
So to paint this, I used 6 different Pattern Fill Adjustment Layers – selected ones I liked, filled the Adjustment Layer masks with black (CTRL+I) inside the mask, and painted in white where I wanted that patterns to show up. If I did not like the color the pattern was, I just clipped a Solid Color Adjustment Layer set to Color Blend Mode to the Pattern Fill Adjustment Layer to change it. (ALT+Click between the layers to clip) I put all of the layers into a group by highlighting them and clicking on Create a New Group icon at the bottom of the Layers Panel. For a review of how to do this, see my Fun Photoshop Blog called How to Colorize an Old Photo. Next I placed a texture between the white background layer and the group – in this case it was Painted Textures Pilgrims’ Journey set to Pin Light blend mode. On top a Curves Adjustment Layer as added for contrast. Then because I could, Topaz (see sidebar for website link) Impression was applied using my SJ WC look on bldgs. (Settings used: started with Watercolor II preset and these were the final settings: Stroke Type 04, Brush Size 0.91, Paint Volume 0.42, Paint Opacity 0.87, Stroke Width 0.33, Stroke Length 0.89, Spill 0.23, Smudge 26, Coverage 1.00, Color Overall Hue 0.15, Saturation -0.20 and Lightness 0.06; Red Sat 0.47 and 0.14; Orange Sat 0.60 and Lightness -0.42; Yellow Sat -0.33 and Lightness 0.13; Green Sat 0.20 and Lightness -0.32; and Blue Sat 0.36; Lighting Brightness -0.04, Contrast 0.39, Vignette 0, and Light Direction X0.33 and Y0.06; and Texture Strength 0.78, Size 0.30, Canvas IV, Background Type solid white, and Background color used #d38967 – all other settings not listed at 0.) Next Topaz ReStyle using another one of my presets called SJ BW with greens – not sure how I got this one so I cannot give you the settings, but obviously I used some B&W setting in ReStyle. Last step involved Nik Viveza 2 to draw the eye to focal point, the main flower, in the image. It sounds like a lot of work, but it really was just experimenting and playing in Photoshop……Digital Lady Syd
Happy Thanksgiving from Digital Lady Syd

Just a Sand Crab wishing everyone in the U.S. a Happy Thanksgiving. I photographed him on Ormond By the Sea Beach a few weeks ago. First started in Lightroom and used Seim’s (see sidebar for website link) PW4 preset Les Miserables. In Photoshop the Shake Reduction filter was applied and then Topaz (see sidebar for website link) Impression’s Da Vinci Sketch I preset was applied (these are the adjusted settings: Strength 0.79, Stroke Brush Size 0.64, Paint Volume 0.08, Paint Opacity 0.74, Stroke Width 0.24, Stroke Length 1.00, Spill 0.24, Smudge 0.35, Coverage 0.55, and Coverage Transition 0.32; Color Orange Saturation 0.41 and Lightness -0.11; Yellow Hue 0.31, Saturation 0.70 and Lightness 0.01; and Texture Strength 0.24 Paper-1). Used a layer set to Overlay to darken the edges of the crab and an Exposure Adjustment Layer with just the eyes selected to sharpen them. Created a stamped layer (CTRL+ALT+SHIFT+E) and added Nicky Laatz,s paper 12. Painted back the crab and some of the surrounding sand. A Text Layer was added and the Architects Daughter font was used. Last step involved adding a little sharpening on the whole crab in Nik Viveza 2 by increasing the Structure and Contrast sliders……Digital Lady Syd
Vintage Post Card
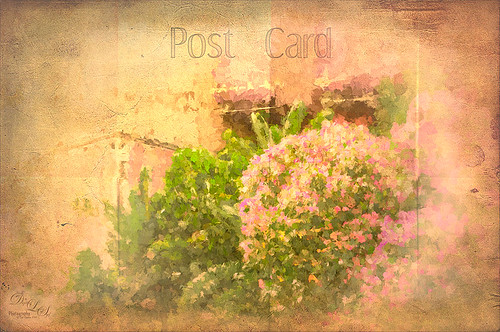
This image was taken at Epcot, Disney World, Florida. This is an example of just trying different effects to get a different look. Recently I have done several blogs on Photoshop plug-ins that give some wonderful results. Here is another example of using them together. First in Lightroom Seim’s (see sidebar for website link) Super Her X and Warm Classic presets were applied along with Delnea’s Backlight Vertical Left preset. Topaz (see sidebar for website link) Star Effect was applied and it place bright dots along the flowers to emphasize this area (Started with Jewel Sparkle I preset with these settings: Star Settings Combined, Burst Star, and Brush Size 99; Main Adjustments Threshold 0.13, Luminance 0.51, Size 0.50, Angle 70.40, Number of Points 8, and Spread 0.07; Color Adjustments Sat 0.64, Temp 0.54, Rainbow Strength 0.25, Rainbow Freq 0; and Additional Effects Secondary Points 0.01, Glow 0.26, and Ring Flare 0.) On a duplicated layer Nik’s Analog Efex Pro 2 was applied. (These are the settings for the preset I created: a Vintage Camera preset and the Basic Adjustments Detail Extraction 17%, Brightness 35%, Contrast -21% and Saturation 19%; Bokeh at 88% blur strength and Boost Highlights at 84%; Dirt & Scratches at 82% strength and 1st row/2nd texture; Photo Plate at 20% strength using 2nd row/2nd over texture; Lens Vignette set to Amount 37%, Rectangle and Size 77%; Film Type Warm 2nd line/2nd over with center Neutral to Faded, 52% strength, Grain per pixel 429 and center Soft to Hard; and Levels & Curves dragging RGB curve down in midtones were added.) Topaz Impression was applied. (Monet II preset: Paint Opacity 1.00, Stroke Width 0.14; Color Overall Lightness 0, Yellow Sat -0.50, Green Sat 0.27, and Magenta Sat 0.39; Lighting Light Direction x 0.84 and y 0.34.) On a duplicate layer Smart Photo Editor was applied. (Settings applied were: Folded paper texture by Andrew 2012 – set Master fade back just a little bit; next Vignette fade edges by Tony – Reduce Fade set a little left of center, Brightness 1.015, Contrast -0.247, Linear Contrast -0.258, and Radius 1757.) A New Layer was added and some clean up was done. Next Viveza 2 was applied with emphasis on the focal point. A Curves Adjustment Layer was added to add contrast back into the image. The last step added Shadowhouse Creations vintage postcard texture set to Hard Light at 85% layer opacity. A layer mask was added and the center was painted out so the image was not too dark in the focal point area. Whew! But overall it does have a distinct look and I really like it……Digital Lady Syd
Fall Mums
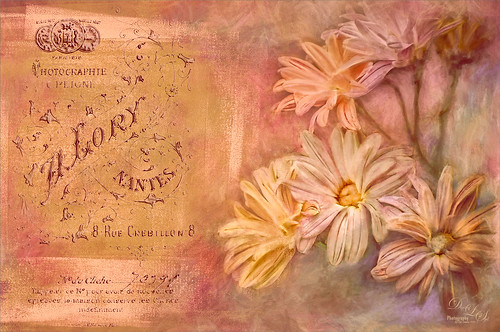
Just enjoyed playing in Photoshop with this image. Basically I put this image into Topaz (see sidebar for website link) Detail 3 to sharpen, added French Kiss (see sidebar for website link) Artiste Avril, a Feather Texture I created and set to 24%, Topaz Impression using Oil Glaze by Blake Rudis, than added two French Kiss Brayered Blocks, French Kiss Photo Studio2 Lory overlay with a Bevel and Emboss and Color Overlay layer styles, next a Curves Adjustments Layer, a New Layer with clean up painting, Nik Viveza 2 to selectively color and sharpen, another Curves Adjustment Layer, and another New Layer and paint clean up. This turned out to be quite a little project, but lots of fun to do! That’s why I love Photoshop!…..Digital Lady Syd
Topaz Impression On a Portrait

Wish I had taken this beautiful modeling image of my daughter-in-law, but at least I have it to try some nice post-processing effects on. In Lightroom the eyes were sharpened using the Adjustment Brush set to Clarity and Sharpen. Then in Photoshop I followed this nice little video that Thomas Churchwell shared called Topaz Impression Tutorial to get this final result. On a New Layer some clean up was done first. Then applied Topaz (see sidebar for website link) Impression and the Iris Blur filter in Photoshop. Used Shadowhouse Creations Old Photo 2 set to Overlay blend mode to add the little framing detail around the side and upper edges by adding a black mask and just painting back the areas I wanted. Then applied the Flypaper Raw Linen texture set to Overlay at 43% layer opacity. That was it – it does have a very old-fashioned feel to it!…..Digital Lady Syd
Digital Lady Syd Related Blogs:
Digital Lady Syd Speaks Out on Topaz Impression
Some Epcot Fun! (and More Impression)
Just a Frame Flower
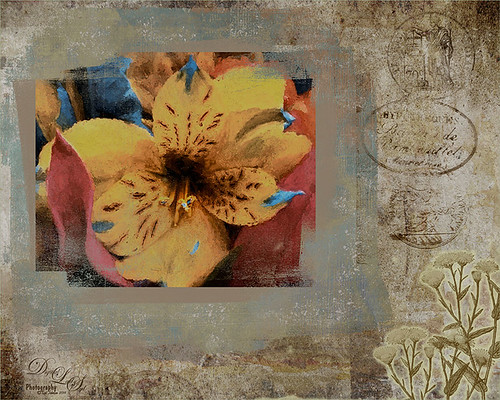
Another example of photo masks that French Kiss Collections (see sidebar for website link) sells. These block masks really make for interesting results when stacked and different textures and colors are added. I like the vintage feel of this image. Check out my Fun Photoshop Blog called How To Use a Photo Frame Mask to learn more about how to apply this cool effect. Since the process is pretty much the same as in my other blog, I will not bore you with the steps. The flowers were processed using Topaz (see sidebar for website link) Impression using a preset I created from Watercolor II. Two of French Kiss’s Brayered Blocks were used, one with a texture clipped to it and the other with a Pattern Fill Adjustment Layer clipped to it. Then just an old stamp effect and flowers were added. Not too difficult and the results are really unique!…..Digital Lady Syd
Hot Air Balloons the Disney Way
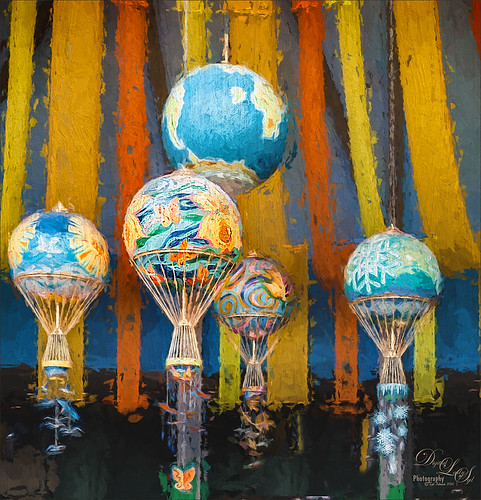
The beautiful Hot Air Balloons at Epcot in the The Land Pavilion. I always love the color and light in this pavilion. This image was processed very simply. In Lightroom Seim’s (see sidebar for website link) PW4 Clip Fixer and Gentle Blue was applied and with the Adjustment Brush, the detail was improved by using Clarity and Sharpen in the brush. In Photoshop the Shake Reduction filter was applied and then Topaz (see sidebar for website link) Impression was opened where my SJ Flower Impasto preset was applied which is based on the Impasto I preset. (These are the settings used in my preset: Stroke Brush Type 05, Brush Size 0.61, Paint Volume 0.76, Paint Opacity 0.75, Stroke Rotation 0.00, Stroke Color Variation 0.00, Stroke Width -0.34, Stroke Length 0.19, Spill 0.27, Smudge 0.18, and Coverage 1.00; Color section Overall Saturation 0.17; Lighting section Brightness 0, Contrast 0.29, and Vignette 0 – Light direction x-0.41 y-0.60; and Texture section Strength 0.30, Size 0.69, Canvas I, Background Type Solid White and Background Color #fff7eb. I changed the Spill slider to 0.20 and changed the Texture to Wood I.) Nik Viveza 2 was applied so that the focal point was emphasized, the front balloon, a little more. A Levels Adjustment Layer was applied as a last step. Lots of fun!…..Digital Lady Syd
Digital Lady Syd Related Blogs:
Digital Lady Syd Speaks Out on Topaz Impression
More Painting with Topaz Impression!
Some Epcot Fun! (And More Impression)
Chef Mickey!

In honor of Epcot‘s International Food and Wine Festival, this Mickey Mouse topiary greets you at the entrance. I loved this image but it presented a real problem since the trees behind Mickey were essentially the same color as the topiary. That is when I decided to use Topaz (see sidebar for website link) Impression to get Mickey to stand out. In Lightroom used Seim’s (see sidebar for website link) PW4’s Magic Harsh Sun Flare Fixer preset and then his Radispot preset (radial filter was placed on Mickey’s head) to get as much contrast as possible between the colors. On a duplicate background layer in Photoshop Topaz Impression was opened where my SJ Watercolor Background preset (started with Watercolor II preset and these were the final settings: Stroke Type 09, Brush Size 0.50, Paint Volume 0.68, Paint Opacity 0.82, Stroke Width 0.44, Stroke Length 0.38, Spill 0.09, Smudge 0, Coverage 1.00, Color Overall Saturation -0.02 and Lightness -0.04; Red Sat 0.41, Orange Sat 0.43 and Yellow Sat 0.43; Lighting Brightness 0.17, Contrast -0.29, Vignette 0, and Light Direction X0.52 and Y1.00; and Texture Strength 0.16, Size -0.68, Angled Weave and white background color) was applied. Back in Photoshop on a layer mask Mickey and his salad were lightly painted back. This layer gave the colorful background effect. This layer was duplicated and it was now opened up in Topaz Simplify and my SJ Hawaiian Landscape preset was applied (my settings are Global Adjustments: Simplify Colorspace RGB, Simplify Size 0.29, Feature Boost 0, Detail Strength 0.66, Details Boost 1.00, Details Size 0.27, Remove Small 0.06, and Remove Weak 0.10; Adjust Brightness 0, Contrast 1.00, Saturation 1.04, Saturation Boost 1.32, Dynamics 0, Structure 1.00, Structure Boost 1.00; Edges Edge Type Color Edge-Normal, Edge Strength 1.89, Simplify Edge 0.58, Reduce Weak 33.00, Reduce Small 0.20, and Fatten Edge 0.00; Did not use the Structure slider – too busy and the Dynamics slider works like Clarity and it brought the background out too much). Simplify added some extra contrast to Mickey – a black layer mask was added (hold down ALT key while clicking on the Mask icon at bottom of Layers Panel). Some clean up was done but basically this was all that was done. As I keep saying, “Got to love Mickey!”…..Digital Lady Syd


