
Castillo de San Marcos
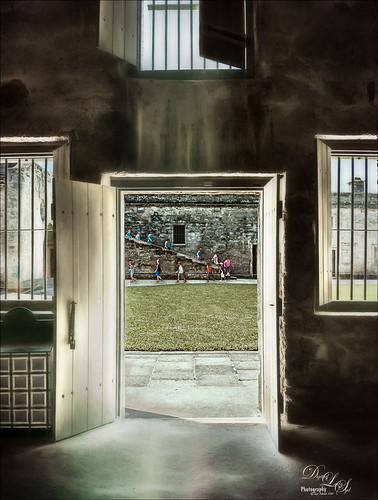
Loved how this image of the Castillo de San Marcos has such a soft feel inside the fort. The sharpness in the outside area where the kids was created using Lucis Pro 6.0.9 (no longer available, but I keep watching for everyone). The original image has the inside area looking much brighter. This was darkened down a little using Nik Viveza 2. Then to bring out the softening effect, Topaz (see sidebar for website link) Glow 2 and a preset called Room Glow by Blake Rudis was applied and set to Overlay blend mode. This preset was created using Glow 1 but works fine in Glow 2 and can be created by downloading the Topaz Labs Glow Webinar PDF file from Blake, who is a Photoshop and Topaz genius. In fact all 4 of the presets in this PDF are very useful in Glow. A Layer Mask was added to paint out the outside area in the door. On a stamped layer (CTRL+ALT+SHIFT+E) on top, Topaz Impression 2 was opened and the Fine Brush Scumble II preset was applied as is. To further add a little softness Topaz Lens Effects was opened and the Slight Diffusion preset was applied. Layer Masks were also added to these layers to keep the outside area tack sharp. Try out these filters for this soft effect…..Digital Lady Syd
Magic Kingdom Snow
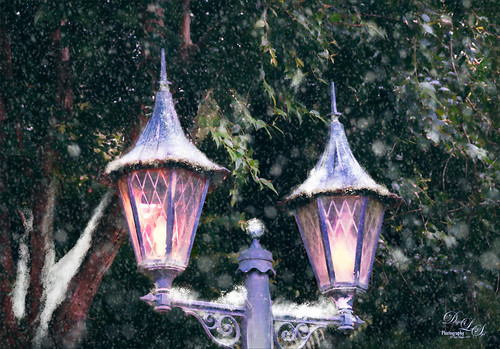
This image is of a pair of lanterns taken at the Magic Kingdom although they look like they are from Hogwarts and the Harry Potter movies. Most processing was done with Lucis Pro (which is no longer available), Topaz (see sidebar for website link) Glow 2 and Nik Viveza 2. Many painting snow layers as shown in my How to Paint in a Snow Storm blog. It is really fun to add snow into images to get a little different look……Digital Lady Syd
A Palace on Wheels
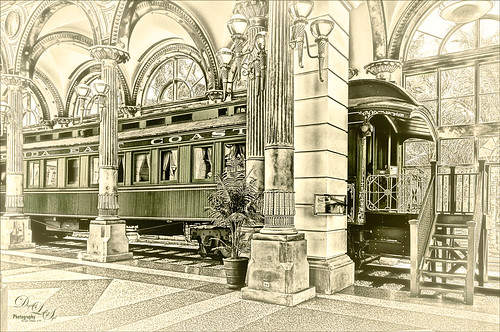
This image is of Henry Flagler’s Railcar No. 91 (see A History of Railcar for No. 91 for an interesting history lesson) or the so-called “Palace on Wheels” from the Guilded Age (CC 1912). It is available to walk through while visiting at the Flagler Museum in Palm Beach, Florida. This image was created using the exact same steps as in my recent Fun Photoshop Blog called How to Get a Great Illustrative Effect with Lucis Pro 6.0.9. First duplicated the background layer and opened up the free Nik Silver Efex Pro 2 using High Structure (Harsh) preset with a few changes for this image. This layer was duplicated and Lucis Pro was applied (Smooth 13/Enhance 97 and Mix with Original Image 81/19) and then duplicate this layer and open up Lucis Pro again with these settings (Split Channels Enhance Detail Red 159, Green 171, and Blue 177 with Smooth at 15). On top a Hue/Saturation Adjustment Layer was added and green color created (Hue 109, Saturation 11, and Lightness -41 with Colorize checked). The layer mask was turned black by CTRL+I in mask and a soft low opacity brush was used to paint back the green in the railcar and set to 44% layer opacity. Another Hue/Saturation Adjustment Layer was added (Hue 187, Saturation 8, and Lightness -7 with Colorize checked). The layer mask from below was copied (ALT+drag) and then invert the layer mask (CTRL+I in the mask). A stamped layer was created on top (CTRL+ALT+SHIFT+E) and Topaz (see sidebar for website link) Glow 2 Auto Shine preset was applied. A Gradient Map was added on the image using a cream to yellow gradient set to Color blend mode at 47% layer opacity. Last step involved another stamped layer and the also free Nik Viveza 2 was applied to adjust where the focal point is. That is it!…..Digital Lady Syd
The Perfect Plant
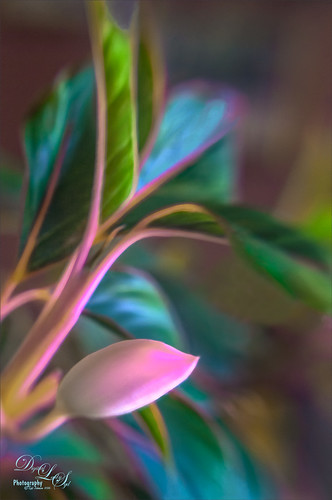
This pretty plant sits on my kitchen table and I am not sure what kind of plant it is, possibly a Sherbert Ti. It creates pod looking objects that open up into leaves. This image was taken with my old Lensbaby Composer and was set to F/4 with the +10 Macro Lens attached. On a duplicate layer in Photoshop, Topaz (see sidebar for website link) DeNoise was opened and the Overall slider was set to 0.10 and Shadows to 0.20 – not much adjustment at all. Topaz Glow 2 was applied on a stamped layer (CTRL+ALT+SHIFT+E) using Blake Rudis’s Glow for Animals Settings preset and set to Color Dodge blend mode. (To download the presets that were for Glow but work fine in Glow 2, click on his Topaz Glow Webinar.) The now free Nik Viveza 2 was opened on a stamped layer and two control points were used – one to sharpen the pod as the main focal point and one to soften the blue in the background leaf. A Luminosity Red Channel Curve Adjustment Layer was added on top. (See my How To Use a Red Channel to Create a Nice Blended Image Effect blog for more info on this.) A little clean up layer and that was about it. Love what this Lensbaby does for a macro effect!…..Digital Lady Syd


