
The Break Out
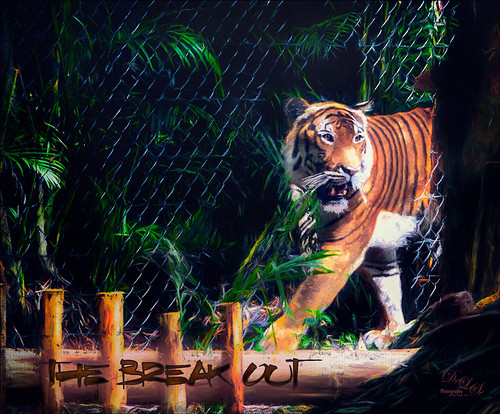
The Malayan Tiger image above was taken at the Palm Beach Zoo in Florida and he really was not trying to get out of his enclosure. He was actually checking out the tortoise in the next enclosure – apparently tigers like to eat tortoises according to his keeper. This image took an excessive amount of painting to get rid of the fence in front of his body. Luckily the eyes, nose and mouth structures were very sharp so the tiger could be reconstructed. Several paint layers were needed. Also several stamped layers (CTRL+ALT+SHIFT+E) were used for the following filters: Topaz (see sidebar for website link) Glow 2 did a great job adding a great effect on the tiger’s body using one of Blake Rudis’s wonderful presets called Room Glow set to Overlay blend mode. Topaz Impression 2 was applied at 82% layer opacity but I am not sure which preset was used to create a unique preset. Topaz ReStyle’s Tangerine Gauze preset, and Topaz Texture Effects 2 was used next. Finally Nik Viveza 2 was used to get the focal point correct. Lots of fun but lots of work……Digital Lady Syd
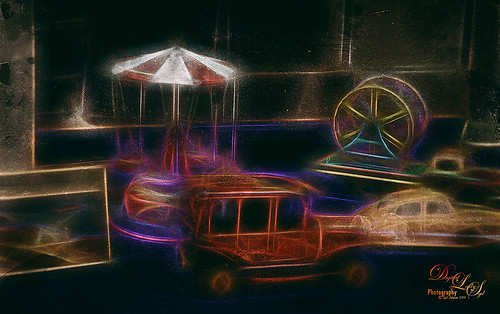
Vintage Car
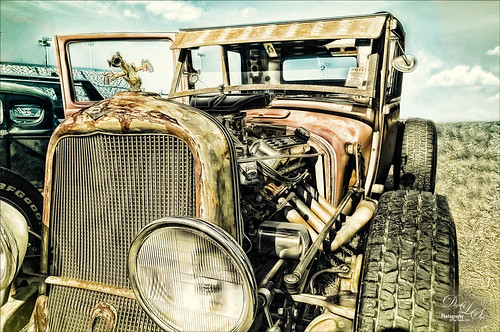
Took this image a while ago at a Turkey Run held in the infield of the Daytona International Speedway (see seats in upper left). Basically just used Lucis Pro (no longer available) set to Detail 65, then opened image in the now free Nik Silver Efex Pro 2 where the High Structure (Smooth) preset was applied. The layer was set to 37% opacity back in PS. Dodged and burned using Curves Adjustment Layers. Used On1 Photo 10 Effects (see sidebar for website link) and stacked these filters: Tone Enhancer, Color Enhancer, Glow, and Split Tone. Topaz (see sidebar for website link) Glow was then applied to a stamped layer above using the Morning Mist preset with some adjustments. It took a while to do this image but it was a lot of fun to try the different combinations of filters!…..Digital Lady Syd
Swimming in Circles
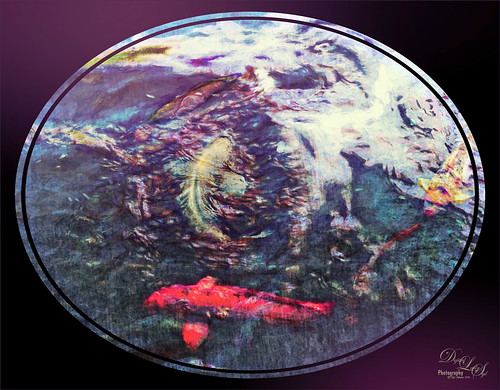
Lots of fun playing with this image of some Hawaiian fancy fish (koi) that was not that great – wanted to see what I could do with it since it had an abstract feel to begin with. In Lightroom, used the Basic Auto button, then backed off the Highlights to -12. Painted with the Adjustment Brush set to Clarity (60), Dehaze (45), and Sharpness (71) on the fish to bring them out just a little. Got to watch the Dehaze brush setting as it can overcook the results if too much is used. Topaz (see sidebar for website link) Glow Graphic Sketch II preset was applied and the layer was set to Overlay blend mode at 77%. On a duplicate layer (CTRL+J) applied Topaz Impression’s Cezanne I preset with changes to the Orange Hue and Saturation sliders. Created a New Layer and set to Overlay – used a black brush set to 12% brush opacity and burned in parts of the image where areas are blending too much together. On a stamped layer (CTRL+ALT+SHIFT+E) used Topaz Texture Effects’s Burning Effect preset. Changed the border to create the pretty oval effect. Finally applied Nik Viveza 2 (now free) to draw attention to the two middle fish. I thought it turned out to be an interesting effect…..Digital Lady Syd
Flagler Beach in the Fall
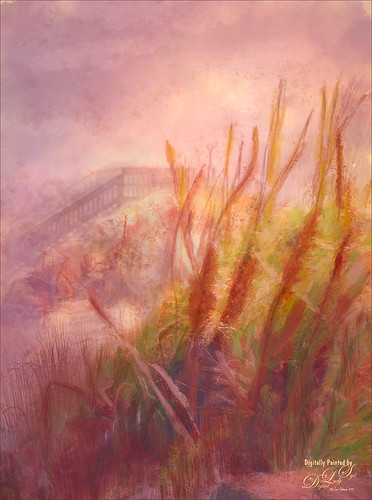
Flagler Beach, Florida, is so beautiful all the time (see blog links below for more Flagler Beach images), but this week the waves and water were really impressive. There is a bit of a fall feel in the air. These Sea Oats are everywhere along the edge of the beach. They are important for preventing beach erosion during hurricanes. I did a lot of adjustment to this image – Topaz (see sidebar for website link) Glow and Topaz Impression before painting on top. One of my Corel Painter textures was added and Photoshop’s Lighting Effects Filter were also used. It took a long time to get this the way I wanted it to look, but overall this is how I see Flagler Beach……Digital Lady Syd
Digital Lady Syd’s Related Blogs:
How to Add a Little Retro to Your Shots
Trying Out Some New Techniques!
Using Pattern Overlay Layer Style to Get a Retro Feel
Summertime!
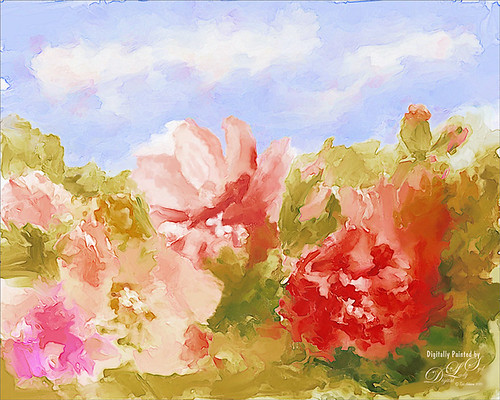
These are just some flowers I started painting in Corel Painter 2015. This used the Basic Paper with the default settings. Only an oil paint brush and a blender were used. Just a lot of fun to paint. I then brought the image into Photoshop and duplicated the background. Topaz (see sidebar for website link) Glow was opened and my SJ Mysterious II Water preset was applied. This mainly made the image more vivid. Once out of the plug-in, Grut’s O Rooster Suit brush was used in PS to smooth out uneven lines and do general clean up. Nik Viveza 2 was used to make sure the red flower was the focal point. I really enjoyed doing a little free-style painting……Digital Lady Syd
A Face in the Crowd
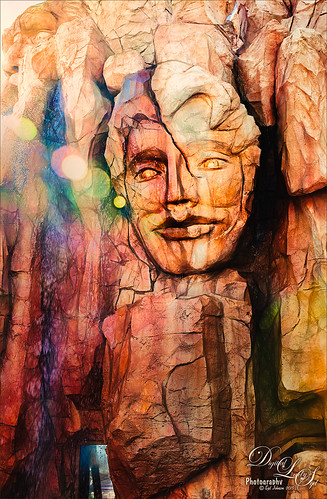
This image was taken at The Lost Continent area of Universal Studios in Orlando, Florida. It is a rather interesting engraving in the mountain. The bokeh was actually on the image I took. Not a lot was done to time, just Topaz (see sidebar for website link) Glow (my SJ Inter Web Variation preset) set to Soft Light blend mode at 50% layer opacity and Nik Viveza 2 were used to emphasize the lines and the lighting in the image. On a New Layer set to Overlay, several of the face lines were painted over to darken so you could see them more clearly. It turned out rather painterly looking!…..Digital Lady Syd
My Magical Front Yard
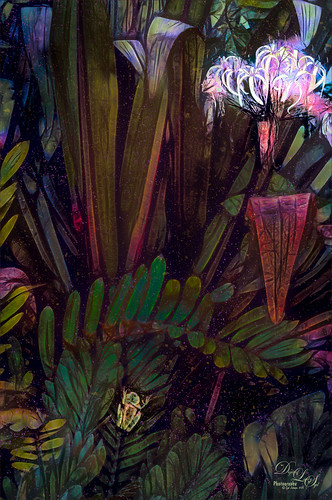
My front yard is a little crazy looking but it is a happy place, at least for the tree frog! This was just a lot of fun to do. Used Topaz (see sidebar for website link) Glow and my SJ Inter Web Variation preset set to Exclusion blend mode at 100% layer opacity. On a stamped layer (CTRL+ALT+SHIFT+E) Nik Viveza 2 was used to brighten the Tree Frog and the flower. Some painting clean up was done on a separate layer. On another stamped layer, Topaz ReStyle’s Rustic and Orange preset was applied. Another stamped layer set to Smart Object, Photoshop’s Camera Raw Radial Filter was used three times to lighten exactly where I wanted. Last step was to add some splatters more so in the dark areas to add a little more magical feel. Hope you enjoyed it!…..Digital Lady Syd
Topaz Glow Inter Web Variation preset settings: Primary Glow Type Dark, Glow Strength 1.00, Effect Sharpness 0.12, Electify 1.00, Simplify Details 0.06, Edge Color 0, Detail Strength 1.00, Detail Size 0.42, Brightness 0.16, Contrast 0.18, Saturation 0.08, Line Rotation 0, and Glow Spread 0; Secondary Glow Glow Type Light, Glow Strength 0, Effect Sharpness 0.54, Electrify 0.11, Simplify Details 0, Brightness 0, and Contrast 0; Color Overall Saturation to 0.62, Red Sat to 0.44, Yellow Sat to 1.00 Yellow Lightness -0.36, Green Sat 1.00 and Lightness -0.51, Aqua Lightness -0.36, Purple Sat 1.00, and Magenta Sat 1.00 and Lightness 0.50.
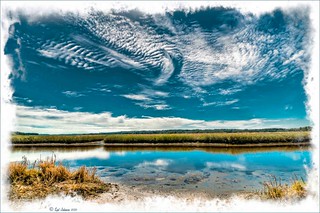
Abstract Wetlands

Felt like doing something a little different with a rather ordinary image. This was another shot from the Ritch Grissom Memorial Wetlands in Brevard County, Florida (also known as the Viera Wetlands). This image was first Merged to HDR in Adobe Camera Raw 9.0 – thought I would put it through its paces and it worked really well. I have a lot of HDR programs, but it is so nice to have all the ACR tools available to clean up the result.
Once the HDR file was created in ACR, the image was opened as a Smart Object in Photoshop CC2015 to add a few filter effects. Topaz (see sidebar for website link) Glow was using my Inter Web Variation preset set to Hard Light blend mode. (Here are the settings: Primary Glow Type Dark, Glow Strength 1.00, Effect Sharpness 0.12, Electify 1.00, Simplify Details 0.06, Edge Color 0, Detail Strength 1.00, Detail Size 0.42, Brightness 0.16, Contrast 0.18, Saturation 0.08, Line Rotation 0, and Glow Spread 0; Secondary Glow Glow Type Light, Glow Strength 0, Effect Sharpness 0.54, Electrify 0.11, Simplify Details 0, Brightness 0, and Contrast 0; Color Overall Saturation to 0.62, Red Sat to 0.44, Yellow Sat to 1.00 Yellow Lightness -0.36, Green Sat 1.00 and Lightness -0.51, Aqua Lightness -0.36, Purple Sat 1.00, and Magenta Sat 1.00 and Lightness 0.50. Set to Screen blend mode at 66% Strength; and no Finishing Touches.) On a stamped layer (CTRL+ALT+SHIFT+E), Topaz Impression’s Turner Storms II was added. It was turned into a Smart Object and Photoshop’s Camera Raw filter was opened – used Photoshop Cafe’s PS Cafe-euro model preset with some Basic adjustments and color changes. I really liked the fantasy feel I was getting. Some clean up on a New Layer was done. On another New Layer Kyle’s Real Watercolor Spatter Mixed brush was used on the foreground, a gradient overlay layer style added, and then a Guassian Blur filter set to 2.0 radius was applied to this layer. The last step was using Nik Viveza 2 to draw attention to the focal point. I really liked the results of this image….Digital Lady Syd
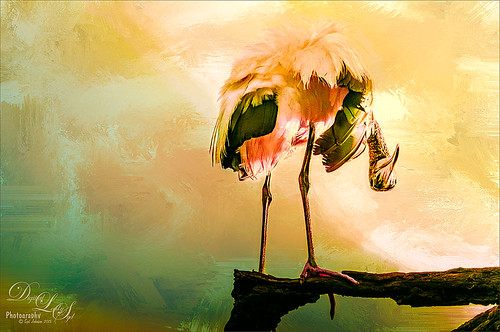
Soaring Spoonbill

Still enjoying the bird images I took at the St. Augustine Alligator Farm Rookery this Spring. The original image was captured with a totally light blue sky behind this Roseate Spoonbill. This made it easy to add a texture underneath the image (my painted texture created in Corel Painter called Seashore) and changing the blend mode of the bird layer to Multiply. Topaz (see sidebar for settings) Clarity and DeNoise 5 were applied to cleanup the the bird layer. On a stamped layer (CTRL+ALT+SHIFT+E), Topaz Glow’s Room Glow Blake Rudis preset was applied (check out Integrating Topaz Glow into Your Workflow for info on this). Next on a New Layer Fay Sirkis’s (from KelbyOne) Precious Oil Diamond Mixer was used to clean up the feathers and beak a little. Topaz Impression Watercolor II preset with no spill was applied. Nik Viveza 2 was used to bring out the color of the bird just perfectly and a Curves Adjustment Layer was used as a last step for overall contrast. I love my bird pix!…..Digital Lady Syd
A Little Scottish Architecture
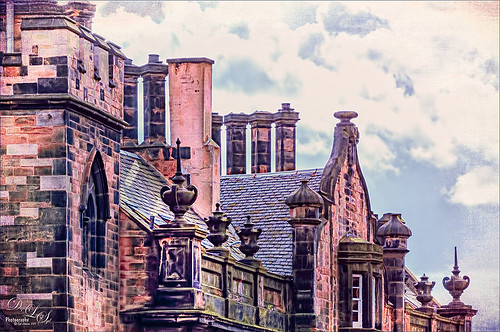
Just an image of the beautiful architecture taken near Edinburgh Castle in Scotland. The original image in Lightroom was major dark – not sure why. Used the Basic sliders to brighten up the image, but the noise was pretty bad. Therefore , in Photoshop Topaz (see sidebar for website link) DeNoise was used. Topaz Glow was used on a stamped layer above and my SJ Graph III preset was applied – layer was set to Overlay blend mode at 65% layer opacity. (Here are the settings: Primary Glow: Glow Type Dark, Glow Strength 0.17, Effect Sharpness 0.09, Electrify 0.23, Simplify Details 0.25, Edge Color 0.20, Detail Strength 18, Detail Size 0.24, Brightness 0.23, Contrast 0.17, Sat 0.01, Line Rotation 0.09, and Glow Spread 0.20; Secondary Glow: Glow Type Light, Glow Strength 0, Effect Sharpness 0.47, Electrify 0.17, Simplify Details 0, Brightness 0.36, and Contrast 0.62; Color Red Sat 1.00; Orange Sat 0.27; Yellow Sat 0.20 and Lightness 0.09; Aqua Sat 0.78 and Lightness -0.26; and Blue Sat 0.49; Finishing Touches: Effect Coverage 0, Smudge 0.00, Sharpness 0.25, Sharp Radius 0 and Vignette Size 0.) Also in the Layer Style, the sky was brought back using Blend If Underlying Layer slider and splitting the white tab (ALT+drag on tab to split) with settings of 122/145. Topaz Lens Effects Reflector filter was used to lighten up the face of the buildings (Type Golden, Strength 0.28, Transition 0.31, Position 0.49, and Angle 208.5). By adding a layer mask, the sky was painted black so the effect only applied to the buildings. Next on a stamped layer used Nik Color Efex Pro using Tonal Contrast, Brilliance/Warmth, and Vignette Lens. A vintage frame was added on top and set to Overlay blend mode. I love working on images from Scotland!…..Digital Lady Syd
Courting Herons
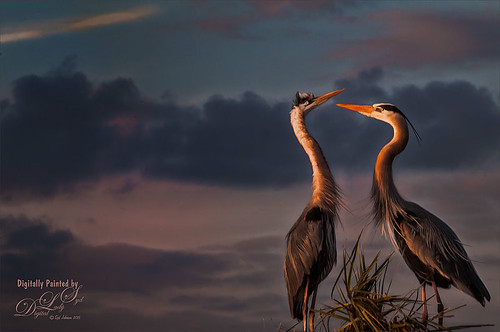
These two beautiful Great Blue Herons were in the middle of a mating ritual in their new nest on top of a palm tree during a recent visit to the Ritch Grissom Memorial Wetlands in Brevard, Florida (also known as the Viera Wetlands). Image was painted with the Mixer Brush – mainly just blending. Since the bird on the left was missing an eye, I had to copy the one from the right over, flip and adjust into the eye socket. Topaz Glow’s Room Glow preset by Blake Rudis (check out Integrating Topaz Glow into Your Workflow for info on this) was applied and set to Multiply blend mode at 48% layer opacity. Nik Viveza 2 was used on the background to even it out just a little. Since the lighting was perfect, there was little else that needed to be done. What beautiful birds!…..Digital Lady Syd
Digital Lady Syd Related Blogs:
How to Get the Soft Glow in Topaz Glow
Here’s Looking At You
I really love these big gentle birds. This wood stork was giving everybody some serious eyeball at the St. Augustine Alligator Park recently. In Lightroom just did the Basic Slider adjustments and applied Dave Delnea’s Backlit Vertical Right and Custom Tone 002 presets. In Photoshop Topaz (see sidebar for website link) Detail 3 was applied next for overall sharpening. Topaz Glow was applied on a stamped layer. A Selective Color Adjustment Layer was added where just the Yellows were changed. Nik Viveza 2 was opened on a stamped layer and a control point was placed on the head to add more detail. Painted Textures Sunrise Canvas texture was set to Linear Burn at 50%. In the Layer Style the Blend If white tab was set and split to 190/212. Some clean up layers were added throughout to sharpen up various areas. I really liked the artsy look this bird ended up having!…..Digital Lady Syd
Singing Spoonbill Duet Takes Rookery by Storm!

Recently our Photo Club took a trip to the St. Augustine Alligator Farm’s Rookery to check out the birds. What a riot, as usual. I had never gone quite this early so the birds were doing a lot of mating and nest building, but not a lot of babies yet. It was total craziness and the Roseate Spoonbills were in all their splendor. I had never had a chance to see this many at one time and they were practically tame! They would get so close you could hardly focus your camera. Needless to say, it was a great time. These two birds were either doing mating clacking song, or totally entertaining the photographers. I was less than 5 feet from them and they were there all morning.
This image was mainly just sharpened up a bit and the basic tonal correction was done in Lightroom. In Photoshop Topaz (see sidebar for website link) Clarity using John Barclay basic settings preset (Micro Contrast 0.36, Low Contrast 0.20, Medium Contrast -0.11, and High Contrast -0.23) was applied. On a stamped layer (CTRL+ALT+SHIFT+E) Topaz Glow was applied using my SJ Mysterious II Water preset (Primary Glow: Glow Type Dark, Glow Strength 0.30, Effect Sharpness 0.63, Electrify 0.14, Simplify Details 0.17, Edge Color 0.28, Detail Strength -0.06, Detail Size 0.20, Brightness -0.56, Contrast 0.44, Saturation 0.00, Line Rotation 0.00, and Glow Spread 0.00; Secondary Glow: Glow Type Light, Glow Strength 0.00, Effect Sharpness 0.22, Electrify 0.03, Simplify Details 0.00, Brightness 0.45, and Contrast 0.64; Color Overall – all set to 0; Red RedSat 0.34; Orange Sat 0.33; Yellow Sat 0.03 and Lightness -0.29; Blue Sat 0.42 and Lightness -0.43; and Magenta Sat 0.75 and Lightness -0.35) set to Strength 64% and Overlay blend mode in the plug-in. A clean up layer was placed on top to clone out a few distracting bush edges and that was it. This was a really fun image to take!…..Digital Lady Syd
Hiding Out with a Red-Winged Blackbird

This beautiful bird was hiding in the brush at the Ritch Grissom Memorial Wetlands in Brevard County, Florida. I had not seen one in a long time. Not that much post-processing on this one. In Lightroom applied Seim’s (see sidebar for website link) Classic Holga preset. Opened in Photoshop and Topaz (see sidebar for website link) Detail 3 was used to give the photo a little more depth of field feel and the bird was painted out in a layer mask. The Sharpen Tool was used on the bird. Added Topaz Glow set to Soft Light. Nik Viveza 2 was used on the bird and Photoshop’s Camera Raw Radial filter was used to get the pretty vignette. Pretty standard workflow here……Digital Lady Syd
Sunset at Viera Wetlands
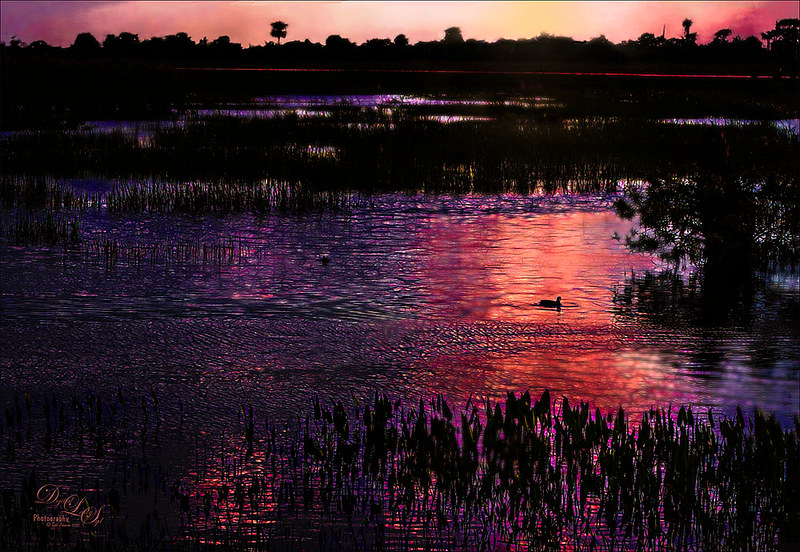
This image was not near as interesting in its Raw version. Had to add some filters and was pleasantly surprised at what a pretty sunset effect could be achieved. In Lightroom Seim’s (see sidebar for website link) PowerWorkflow Super HDR X preset was applied. Once opened in Photoshop Topaz (see sidebar for website link) Clarity’s Color and Contrast Boost II was applied. I like to use Clarity when dealing with nature scenes – sometimes it gives better results than Detail. On a duplicated layer, Topaz Glow filter was added – used my SJ Mysterious II Water preset and set the layer to Hard Light blend mode – this is how I got all the beautiful colors in the image. (Here are the preset settings if you are interested: Primary Glow: Glow Type Dark, Glow Strength 0.30, Effect Sharpness 0.63, Electrify 0.14, Simplify Details 0.17, Edge Color 0.28, Detail Strength -0.06, Detail Size 0.20, Brightness -0.56, Contrast 0.44, Saturation 0.00, Line Rotation 0.00, and Glow Spread 0.00; Secondary Glow: Glow Type Light, Glow Strength 0.00, Effect Sharpness 0.22, Electrify 0.03, Simplify Details 0.00, Brightness 0.45, and Contrast 0.64; Color Overall – all set to 0; Red RedSat 0.34; Orange Sat 0.33; Yellow Sat 0.03 and Lightness -0.29; Blue Sat 0.42 and Lightness -0.43; and Magenta Sat 0.75 and Lightness -0.35.) A clean up layer was created and layer to add some yellow sun glow. On a stamped version (CTRL+ALT+SHIFT+E) placed on top, Photoshop’s Iris Blur filter was centered around the duck with the blur set to only 2 pixels. A black layer mask was added so just a few areas that I wanted softened could be back with a white brush. That is basically how this image was post-processed, and the Glow filter made it into something quite nice!…..Digital Lady Syd
Wetlands Getting Ready for Spring

Just another quick snap I took while at the Ritch Grissom Memorial Wetlands in Viera, Brevard County, Florida recently. It really did feel like Spring is on its way which I am really glad to see. I took this image because I thought the water looked interesting where it intersects the reeds. It turned out to be a lot of fun since I got to paint a sky in using Fay Sirkis’s Photoshop brushes to make it. (These brushes can be downloaded from KelbyOne if you are a member – just go to her Four Seasons webinars.) Used a couple Cloud Highlighter brushes and a Cloud blender. Created several layers and put them in a group which was set to Multiply blend mode at 35% group layer opacity. Also used Topaz (see sidebar for website link) Glow and my SJ Inter Web Variation preset (see Image 4 Information for settings at my How to Get the Soft Glow In Topaz Glow blog). This layer was set to Overlay Blend Mode at 61% layer opacity. Since it almost wiped out my sky, I copied my painted sky group on top to add it back in again with the same layer settings. Nik Viveza 2 was used to even out the image and add a focal point in the center of the image. Obsidian Dawn’s Flying Birds Grouping 1 was added just because the image needed them – the layer was set to Multiply at 77% opacity. On a New Layer above lightly painted in white to get a water bird look to the birds. Next 2 Lil’ Owls Studio (see sidebar for website link) Color Bokeh Grunge Set 1 was added and set to Color Dodge blend mode at 72% layer opacity. The last step was a Curves Adjustment Layer to bring back the contrast. Totally fun to do!…..Digital Lady Syd
My Glowing Porch Flowers!
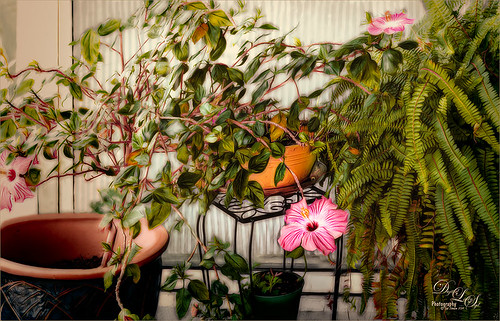
These are more flowers on my porch – Painted Lady Hibiscus and a Boston Fern. Clean up was done, Topaz (see sidebar for website link) DeNoise set to Overall 0.09, and Topaz Clarity (My John Barclay Basic Settings preset-Micro Contrast 0.36, Low Contrast 0.20, Medium Contrast -0.11, and High Contrast -0.23; then Tone Level Black Level 0.14, Midtones -0.30, and White Level -0.20; Hue Yellow -0.58 and Green -0.19; Sat Green 0.27 and Blue -0.34; and Lum Red -0.08, Orange -0.52, Green 0.11, and Blue -0.42). On a stamped layer (CTRL+ALT+SHIFT+E) Topaz (see sidebar for website link) Glow was applied. (SJ Painterly Wonderland preset-Set to Overlay. Primary Glow change Effect Sharpness to 1.00, Electrify 0.38, Secondary Effect Sharpness 0.48, Brightness 0.23, and Contrast -0.01; Color – Overall Hue -0.29, Orange Sat 0.43, Yellow Hue 0.14 and Lightness 0.50, Green Sat -0.77 and Lightness -0.44, Aqua Sat -1.00, and Blue Sat -0.50. Set back to Normal to take into PS – then adjust there.) Topaz Black and White Effects was applied. (SJ Soft Color Effect preset – Conversion section – Basic Exposure Contrast 0.04 and Brightness 0.05; Adaptive Exposure 0.24, Regions 16, Detail 0.98 and Detail Boost 1.05; Creativity Effects Diffusion Softness 0.71, Diffusion 0.67, and Diffusion Transition 0.56; Finishing Touches section – Silver and Paper Tone Tonal Strength 0.85, Balance 0.22, Silver Hue 27.00, Silver Tone Strength 0.61, Paper Hue 45.00, and Paper Tone Strength 0.42; Quad Tone Color Region 1 black set to 7.46, Color Region 2 set to Color (R67/G48/B32) and 77.12, Color 3 Region to Color (R173/G148/B104) and 181.6, and Color Region 4 set to white and 255.0; Vignette Strength -0.28, Vignette Size 0.61, Vignette Transition 0.83, and Vignette Curvature 0.83; and Transparency Overall 1.00. In Local Adjustments set to Detail – Brush Size 254, Opacity 0.25, Hardness 0.05 and Edge Aware to 0.50 – painted back the front flower and the orange colored dish so that it was a focal point. The Overall Strength was set to 1.00. Set same brush to Color and painted back the pink flowers. Vignette Strength set to -0.32, Vignette Size to 0.68, Vignette Transition to 0.63, and Vignette Curvature 0.82 – center vignette on just above the center pink flower. Changed Overall Transparency to 0.75.) On another stamped layer the Camera Raw Filter Radial filter was applied to adjust the focus on the orange pot and center pink flower. That was it. Lots of Topaz on this one!…..Digital Lady Syd
Using Topaz Glow to Add Color

Thought I would do a quick before and after on an image that Topaz (see sidebar for website link) Glow was applied to. Below is the original as I first processed it as an HDR image with a very wide angle lines.
I like both renditions – they are just very different. You can see what mainly the color sliders can do to an image in Glow. Essentially that is all I did with this image. I did do a little painting on a New Layer on top just to make it look like I wanted it to look – used my Chalk 60 brush (with Angle set to 19%). (Here are the Glow settings if you would like them – TG-SJ Secondary Webbing preset are Primary Glow: Glow Type Light, Glow Strength 0.00, Effect Sharpness 0.00, Detail Strength 0.87, Detail Size 0.20, Brightness 0.03, Contrast 0.47, and Saturation 0.96; Secondary Glow: Glow Type Light, Glow Strength 0.56, Effect Sharpness 0.46, Electrify 0.00, Simplify Details 0.02, Brightness -0.13, Contrast 0.24, Line Rotation Rotation 0.00, and Glow Spread 0.26; Color: Yellow Saturation 0.20 and Yellow Lightness 0.34; and Finishing Touches: Effect Coverage 1.00, Coverage Transition 1.00, and the rest 0.00. Note you need to change this to Soft Light before the settings make any sense. Then here are the settings used to change it to the above: Added Orange Sat 0.78; Green Sat 0.40 and Lightness -0.41; and Blue Hue 0.18, Sat -0.27, and Lightness 0.26; and changed Yellow Sat 1.00 and Lightness 0.88. In Photoshop the layer was set to Overlay blend mode.) I find this transformation rather amazing!…..Digital Lady Syd
HDR Tree
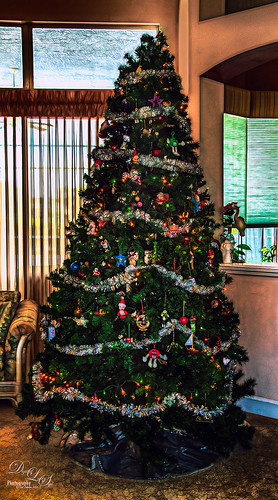
One last Christmas post this year. Someone said to take some HDR bracketed shots of your Christmas Tree and it will look really good – so that is what I tried here. As usual I get carried away with my favorite filters and started adding in some things, but I did process the three bracketed images in Nik HDR Efex Pro 2 using its Dark preset. Then in Lightroom Seims PW4 (see sidebar for website link) Super HDR and his Tint Warming 81A presets were applied before opening in Photoshop. Duplicated the Background layer and opened it up Topaz (see sidebar for website link) Glow – applied my SJ GrapIII Beach preset (settings listed at bottom) – this plug-in really added to the overall tone and color of the image, then set the blend mode to Color Dodge in Photoshop and the Fill to 74%. (Note: With Color Dodge blend mode, adjusting the Fill slider keeps the effect more pronounced than adjusting Opacity slider, which creates a more dull look). Did some clean up and applied Viveza 2 to add a slight vignette feel to the corners (could have used the Radial Filter in ACR). Next Topaz ReStyle was opened and the Dark Ecru preset was applied (these changes were done: ReStyle Opacity 73% and Texture Strength 0.44; Basic Color -0.31; Tone Black Level 0.11, Midtones -0.25, and White Level 0.08; Detail Structure -0.37 and Sharpness 0.56.). A Curves Adjustment Layer was used to add back a little contrast as the last step. It was a lot of fun to do an HDR – have not done this in a while…..Digital Lady Syd
(My SJ GrapIII Beach Topaz Glow settings: Primary Glow: Glow Type Dark, Glow Strength 0.17, Effect Sharpness 0.09, Electrify 0.23, Simplify Details 0.25, Edge Color 0.20, Detail Strength 18, Detail Size 0.24, Brightness 0.23, Contrast 0.17, Sat 0.01, Line Rotation 0.09, and Glow Spread 0.20; Secondary Glow: Glow Type Light, Glow Strength 0, Effect Sharpness 0.47, Electrify 0.17, Simplify Details 0, Brightness 0.36, and Contrast 0.62; Color Red Sat 1.00; Orange Sat 0.27; Yellow Sat 0.20 and Lightness 0.09; Aqua Sat 0.78 and Lightness -0.26; and Blue Sat 0.49; Finishing Touches: Effect Coverage 0, Smudge 0.00, Sharpness 0.25, Sharp Radius 0 and Vignette Size 0. For this image these changes were made to this preset: Changed Secondary Glow to Dark. Changed Red Sat to 0, Orange Sat to 0.79, Aqua Sat 0; and Green Hue 0.32, Sat 0.45, and Lightness -0.27.)
More Holiday Cheer!
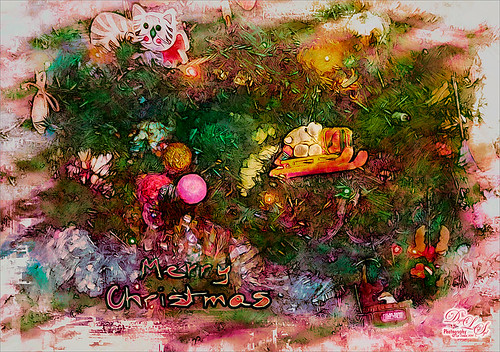
Just another Merry Christmas Card – hope all are enjoying the season. I was just adding different filters to layers to see what happens and this is what I got! Hum….. Anyway, this is what I did. Topaz (see sidebar for website link) Clarity was used to sharpen up the original tree ornament image. On a duplicate layer above, Topaz Glow’s Fur & Feather I preset was applied. Next Topaz Impression’s Abstract I preset was applied and I adjusted a couple sliders. In Photoshop the layer was set to Soft Light. Then the layer was duplicated and set to Normal blend mode at 77% layer opacity. A layer mask was added and some of the ornaments was painted back. I painted the text in Painter and placed it in as a layer with an Inner Glow layer style. On a stamped layer (CTRL+ALT+SHIFT+E) was created and taken into Smart Photo Editor. (Photo-art at a click 050; Changed Master fade to left just a little; Hue -0.298; and 2nd Hue 0.369. When brought into PS, it turned the color scheme very different but workable. Used Selective Color Adjustment Layers to get the color tweaked to where I wanted it.) The last step involved adding Nik’s Viveza 2 and adding focus on the ornaments. Just a lot of fun……Digital Lady Syd
On the Beach
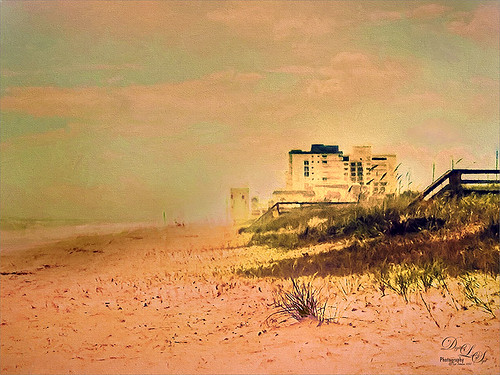
This is a nice little beach near my home called Ormond by-the-Sea. Thought I would try applying some of my new filters to this image. On a duplicate background layer in Photoshop, the Topaz (see sidebar for website link) Glow preset called Graphic III preset was applied. (Here are the adjusted settings I used: Secondary Glow: Glow Type Light, Glow Strength 0.23, Effect Sharpness 0.47, Electrify 0.17, Simplify Details 0, Brightness 0.36, Contrast 0.62, and the other two 0; Color: Red Sat 1.00, Orange Sat 0.27, Yellow Sat 0.20 and Lightness 0.09, Aqua Sat 0.78 and Lightness -0.26, and Blue Sat 0.49. Set to Multiply at 100% strength). This brought out the structure of the building very nicely. The background layer was duplicated again and placed on top. This time I used a preset I had created based on their Wonderland preset. (Here are the settings if you want to try them: Primary Glow: Glow Type Dark, Glow Strength 0.36, Effect Sharpness 0.29, Electrify 0.23, Simplify Details 0.21, Edge Color 0.13, Detail Strength 0, Brightness 0.37, Contrast 0.45, Sat 0.20, Line Rotation and Glow Spread 0; Secondary Glow: Glow Type Light, Glow Strength 0, Effect Sharpness 0.25, Electrify 0.11, Simplify Details 0, Brightness 0.77, and Contrast 0.60; Color Overall Hue -0.96, Sat 0.28, and Lightness 0; Red Sat 0.35; Orange Hue -0.46, Sat -0.34, and Lightness 0.79; Yellow Hue -0.34, Sat 0.41, Lightness 0.58; Green Hue -1.00; and Blue Sat 1.00; Finishing Touches: Effect Coverage 0, Smudge 0.05, Sharpness 0.30, Sharp Radius 0 and Vignette Size 0.) A layer mask was added and the sky and a little of the building was painted away so the first Glow preset settings appear above and the new ones below. Did a little clean up at this point using the Spot Healing Brush. A stamped layer was created on top (CTRL+ALT+SHIFT+E) and Topaz Impressions’s Dega Dancer I preset was applied as is. This really warmed up the image. Last, Nik Viveza 2 was used to add a little more focus on the large building in the distance. I believe this image is a pretty good representation of how it felt to be on the beach on a sunny early Fall day……Digital Lady Syd
Simply Glowing!
This an image of some vintage toys taken at a local antique show. The new Topaz (see sidebar for website link) Glow plug-in was applied to get this rather classic application of the plug-in. In Lightroom Seim’s (see sidebar for website link) Crosslight Warm preset was applied before bringing the photo into Photoshop. The layer was duplicated and Photoshop’s Shake Reduction filter was applied. This layer was duplicated and this time Topaz Glow’s filter was opened and Fractals II preset was used. Next Nik’s Analog Efex Pro 2 was applied and my SJ Wet Plate preset was selected. (Settings for this plug-in included: Basic Adjustments with 6 individual control points placed on each item to set the Detail Extraction, Brightness, Contrast and Saturation for each – this creates the darker background in the image; Photo Plate Strength 82% set to Corroded using the middle plate; Lens Vignette Amount -22, Middle between Circle and Rectangle, and Size 83%; Film Type Subtle 1st row/4th down set toward Faded, Strength 89%, Grain per pixel 500, and Soft/Hard in the middle; and Levels & Curves slight S-curve in Luminosity channel.) This is the really interesting final look that happened by combining these plug-ins. I do like the new Glow filter and am still learning how to use it to get some new effects. Just love trying new filters out – totally fun!…..Digital Lady Syd


