
The Golden Dragon
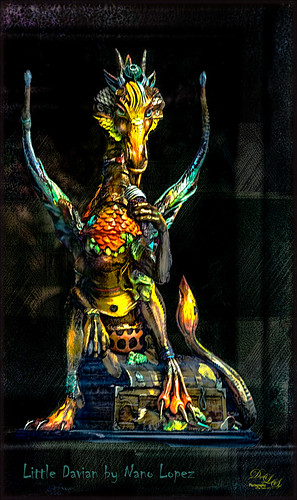
I had never seen a Nano Lopez sculpture until my recent visit to St. Augustine where the James Coleman Gallery had it displayed- this piece is called Little Davian. I shot this beauty through the front window in bright daylight so it took a lot of cleaning up to get rid of the reflections . I thought that the dragon was singing into a microphone but he is actually eating a “Dragon Berry” ice cream cone! Need to check out all Nano’s work – it is amazing! I will give you a quick run down of what was done to the image, but many steps were involved to get an effect I liked. First the dragon was run through Lucis Pro (no longer available) to get the edges defined better – it does not really sharpen but gives a similar look. Then PS Select and Mask command was used to extract the dragon from the background. To get the interesting cyan texture on the right side, a grunge type object created in Corel Painter was placed behind the extracted dragon, set to Soft Light and 52% layer opacity. A Hue/Sat Adjustment Layer was clipped to the layer and set to a Cyan color. A Darken/Lighten 50% gray layer was added. Nik Viveza 2 was used to adjust the color and tone throughout the image – this helped fix the glass reflection problem. Topaz (see sidebar for website link) Clarity was used on just the dragon. A Spotlight Layer set to Overlay blend mode was used on the dragon head. 4 Light Leaks were used on the edges – top and bottom set to a little dark red color, right side cyan and left side a warmish orange. 2 Lil’ Owls (see sidebar for website link) Color Bokeh Grunge Set – overlay 6 was set to Divide blend mode at 40% layer opacity to darken the edge of image. The font is called Chiller. Last step involved adding Topaz Detail 3 – just gave the overall image some sharpening and emphasized the background texture. Obviously my image does not do justice to the actual beautiful piece created by the artist, but it was a joy to work on the image!…..Digital Lady Syd
Hitching a Ride

This image was taken at the Jacksonville Zoo – this little guy was hitching a ride across the large field for the Lowland Gorillas. The image was first processed in Lightroom using Seim’s Magic – Harsh Sun Fixer preset and then adding Dave Delnea’s Backlight 002 Horiz preset to it to give the interesting lighting effect. Dave’s preset was adjusted before sending the image to Photoshop. Adding this kind of lighting can really pop a boring image. In Photoshop Topaz (see sidebar for website link) Detail 3 was applied using my Little Med Large Detail preset – added a black layer mask and painted back the detail just on the back of the gorilla and the little gorilla. On a stamped (CTRL+ALT+SHIFT+E) layer, Nik Color Efex Pro 4 was added using these filters: Darken/Lighten Center, Color Effex: Vintage set to Film Type 2 and 82% overall opacity, Brilliance/Warmth set only to Warmth at 32%, and Glamour Glow to soften the image a little. Nik Viveza 2 was used to adjust the lighting on the gorillas. I love post processing and painting images from the zoo!…..Digital Lady Syd
A Pink Orchard
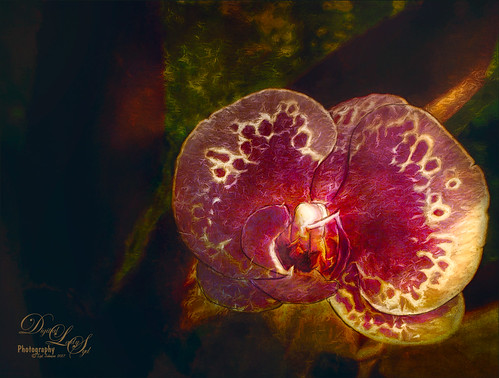
This orchard image was taken at the Harry P. Leu Gardens in Orlando, Florida – a wonderful place to take flower images if you are in the area. This image was started several weeks ago so I am not completely sure what I wanted as an end result. This flower began as a purple orchard, but Topaz (see sidebar for website link) Texture Effects 2 was opened and the Citronella Lily was applied with several adjustments. On a stamped layer (CTRL+ALT+SHIFT+E) Topaz Impression’s Fine Brush Scumble was applied. On another stamped layer, Topaz Detail 3 was applied, another composite layer and Lucis Pro was applied, and finally on yet another stamped layer, Topaz ReStyle’s Rustic Red and Orange preset. Sort of amazing all the Topaz effects in this little flower! I used my favorite line brush, Grut’s Ink Pin Clinger – to actually draw around just a little around the petals. Two textures were added: Kim Klassen’s August Trio Traverse blend mode set to Vivid Light at 18% and her Fav Collection Cinnamon set to Multiply blend mode at 65% layer opacity. A couple Curves Adjustment Layers and a Color Lookup Adjustment Layer set to Foggy Night at 55% layer opacity. Another stamped layer was created and Nik Viveza 2 was used to adjust the lighting in the image. A Red Channel Luminosity Curve was applied as a final step. Lots going on here……Digital Lady Syd
Beautiful Flower
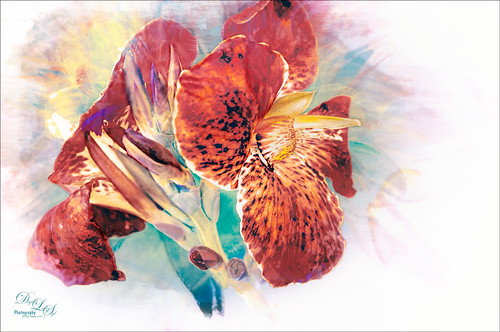
The flower in this image was an orange Canna Lily that grow really well in Florida. Topaz Detail 3 was applied to sharpen the image first in Photoshop. On a stamped layer, the Topaz (see sidebar for website link) Impression 2 preset as created in my Adding a Creative Touch in Topaz Impression 2 was applied, but this time the Coverage was set to 0.12, Coverage Transition 0.03, and Coverage Center X -0.13/Y 0.31. In the Masking section, the Spot Transition was set to 0.93 and Color Aware was set to 0.27 and the effect was placed on the center of the flower. The really bright colorful background could be controlled this way. Next a Black & White Adjustment Layer was added and set to Luminosity blend mode to get the tones correct. (See my How to Use a Black & White Adjustment Layer to See Contrast in an Image for more information on this.) On another stamped layer, Topaz ReStyle was applied a preset that used some colors from a previous image I had processed. (See my How to Use a Topaz ReStyle Trick for Improving Your Image blog to do this.) Two Curves Adjustment Layers were used to apply dodging and burning in the image. (See my How to Use Curves Adjustment Layers to Dodge and Burn an Image blog on how to do this.) On top of those, a Color Lookup Adjustment Layer was applied using the Filmstock_50.3dl filter. A light pink Color Fill Adjustment Layer was placed on top and set to Color blend mode. Last step used the now free Nik Viveza 2 plug-in to draw attention to the focal point. Lots of fun to do!…..Digital Lady Syd
The Beautiful Snowbush
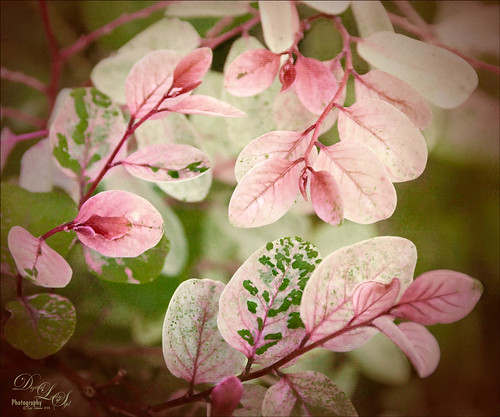
This a beautiful Snowbush growing in my front yard. I just love the colors and patterns in the leaves of this bush. Very simple post-processing here. Duplicated the layer and used Lucis Pro (no longer available) to sharpen the image. A black layer mask was added and just the leaves in the focal point were painted back. One of my Photoshop textures was applied on top (see my Get Rid of That Color! blog that used the same texture and free brush links). A Hue/Saturation Adjustment Layer was clipped (ALT+click between layers to clip) and set to a pinkish color. The texture layer was set to Soft Light blend mode at 68% layer opacity. Topaz (see sidebar for website link) Lens Effects’s Rusty Edges Vignette was applied. A Black & White Adjustment Layer was added on top using a Luminosity blend mode and the sliders were adjusted to get a nice color effect; then it was set to 64% layer opacity. It still needed a little more sharpening – I wanted a more depth in the image so Topaz Detail 3 was opened on a stamped layer on top (CTRL+ALT+SHIFT+E), and the Interior Detail I preset was applied – it looked over the top but there was just the right amount of sharpening in some places. A black layer mask was applied and just those areas that needed were painted back in white. I believe it did add that extra depth that really makes the image…..Digital Lady Syd
The Dressing Table
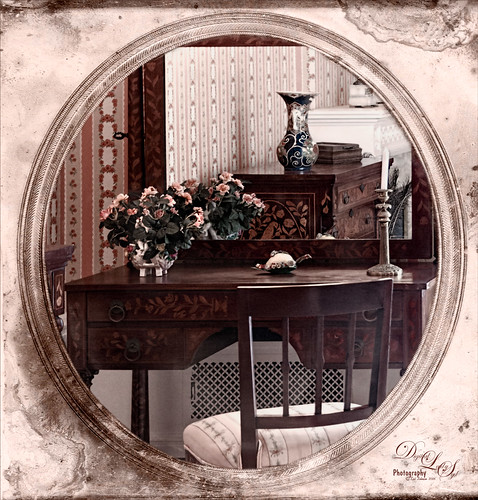
This is an image of a dressing table in one of several bedrooms at the Flagler Museum (Whitehall) in Palm Beach Florida. I really loved the effect of the furniture in the mirror – real vintage flavor here! Basically this image used several filters to get this result. Started with Lucis Pro 6.0.1 (AOIC 0/100; Red 207, Green 207, and Blue 79) (See my Fun Photoshop Digital Lady Syd Reviews Lucis Pro 6.0.9 (Now Affordable!) blog.); Topaz Detail 3 to sharpen it up a bit; the now free Nik Color Efex Pro 4 using Film Efex Vintage Film Type 11, Pro Contrast, and Midnight using Color Set Neutral and overall opacity at 64%. Darken and Lighten Curves Adjustment Layers were added. (See my Fun Photoshop How To use Curves Adjustment Layers to Dodge and Burn an Image blog.) Then on top a Vintage Film was used for the old frame opening. A Pattern Adjustment Layer was clipped to the frame (ALT+click between layers) and set to Color blend mode and a Solid Color Fill Adjustment Layer set to a brown tone was also clipped. Last step was to add a Luminosity Curves Adjustment Layer. (See my Fun Photoshop How To use a Red Channel to Create a Nice Blended Image Effect blog.) That was it – it was a lot of fun to do!…..Digital Lady Syd
Red-Winged Bug on a White Flower
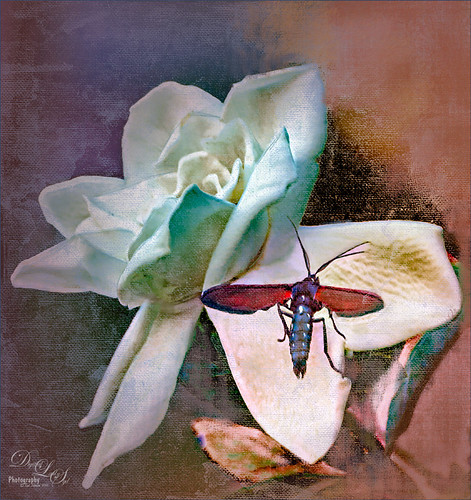
This was just a fun image to do – loved the colors in the bug. Just used my basic workflow – used Lucis Pro 6.0.9, Topaz (see sidebar for website link) Detail 3, Black and White Adjustment Layer, Topaz Lens Effects Reflector and Vignette filters, and Red Channel Curves Adjustment Layer along with lots of clean up. Used a Hatch Brush on lost of this image. Lots of fun to do!…..Digital Lady Syd
Texture Everywhere!
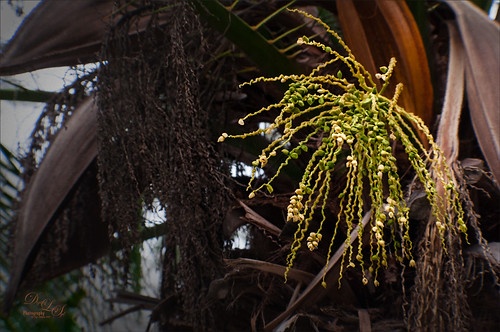
I love this image because of all the textures in it. These are symbiotic plants growing in the Palm, but I am not really sure what kind – the brown plant appears to be a type of Spanish Moss. The light was pretty nice on the green plant so it created a nice contrast in the image. In Lightroom just Seim’s (see sidebar for website link) Kodrachrome preset was applied to the image. In Photoshop Topaz (see sidebar for website link) Detail 3 was used to sharpen up the plant and the moss – a black mask was applied and just those areas were painted back. A Black and White Adjustment Layer was used to adjust the values in the image to emphasize the focal point, then switched its blend mode to Luminosity and kept the adjustment. (See my How To See if You Captured the Focal Point blog.) A Camera Raw filter was applied on a Composite Layer (CTRL+ALT+SHIFT+E) using the Radial Tool and adding just a little Exposure (+o.35) and Yellow Temperature (+70) to the image. This tip I learned from Matt Kloskowski Lightroom Tip: Relighting a Scene with the Radial Filter. On a new Composite Layer, Topaz Lens Effects Vignette Selective filter using the Medium Vignette preset with slider adjustments and Opacity set to 61.39 was applied. That was it. The texture is what I really like with these adjustments…..Digital Lady Syd
Here’s Looking at You!
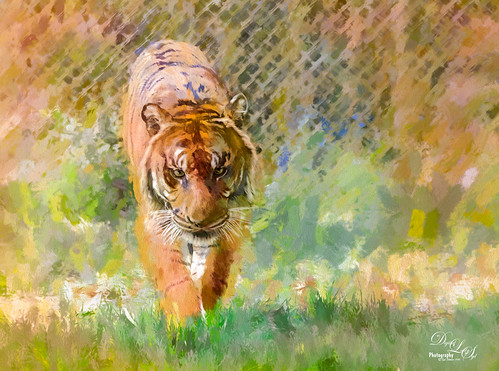
This beautiful tiger decided to saunter towards a window I was standing behind, so I had to take a few shots at the Jacksonville Zoo. This time I did not hand paint him, although it would have been fun to paint, but instead added several Topaz (see sidebar for website link) filters to get this effect. First used Detail 3 to sharpen image all over. Then on a stamped layer used Topaz Impression and applied and my SJ WC like effect on bkgds preset with just some color adjustments (see settings below). Used a 50% Gray Fill Layer set to Overlay blend mode to dodge and burn in some details to separate his ears and eyes from the colors behind. On another stamped layer (CTRL+ALT+SHIFT+E), Lens Effects’ Neutral Density filter was used to darken foreground slightly, Reflector filter Gold Left preset to lighten his side a little, and a light orange Vignette. Did a couple clean up layers and a Camera Raw filter in PS to soften the background. I really like the way he looks!…..Digital Lady Syd
Preset settings for Topaz Impression: Stroke: Brush Type 04, Brush Size 0.91, Paint Volume 0.42, Paint Opacity 0.87, Stroke Rotation 0, Stroke Color Variation 0, Stroke Width 0.33, Stroke Length 0.89, Spill 0.23, Smudge 0.26, and Coverage 1.00; Color: Overall Hue 0.15, St -0.20, and Lightness 0.06; Red Sat 0.47 and Lightness 0.14; Orange Sat 0.60 and Lightness -0.42; Yellow Sat -0.33 and Lightness 0.13; Green Sat 0.20 and Lightness -0.32; and Blue Sat 0.36; Lighting: Brightness -0.04, Contrast 0.39, and Light Direction x0.33 and y0.06; and Texture: Strength 0.78, Size 0.30, Canvas IV, Background Type Solid, and Background #d38967 (soft melon color).
Deserted Roller Coaster
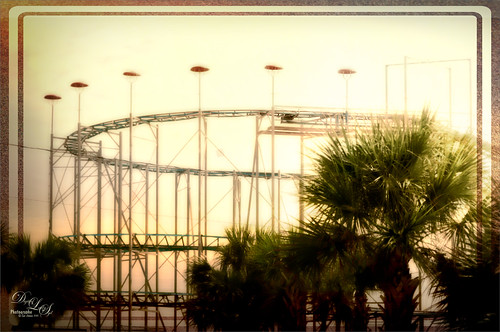
I guess this image definitely indicates winter is on its way – very desolate looking Roller Coaster at the beach in Daytona Beach, Florida. Wanted to show another example of Topaz (see sidebar for website link) Texture Effects using the preset I created and uploaded onto the Community site. (See my Digital Lady Syd Reviews Topaz Texture Effects Fun Photoshop Blog.) In Lightroom Dave Delnea’s Custom Tone oo2 was used and the DeHaze slider in the Adjustment Brush added a little foggy effect at the top of this image. In Photoshop Topaz Detail 3 was applied to darken and soften the image a little. Then on a stamped layer, Topaz Texture Effects was opened and my SJ Soft Pastel Effect preset with some changes (Basic Adjustments turned off; Diffusion – in Mask brushed out the center of the large palm and part of the wood structure in top of the roller coaster with brush Strength of 55. Vignette – Strength 0.42, Size 0.01, Transition 0.32, Roundness 0.18, Color Black and set Center towards the right; Split Tone – removed; Border second row first border – Size 1.09 with Keep Aspect Ratio on No.) I am starting to really enjoy this plug-in!…..Digital Lady Syd
Beautiful Maize
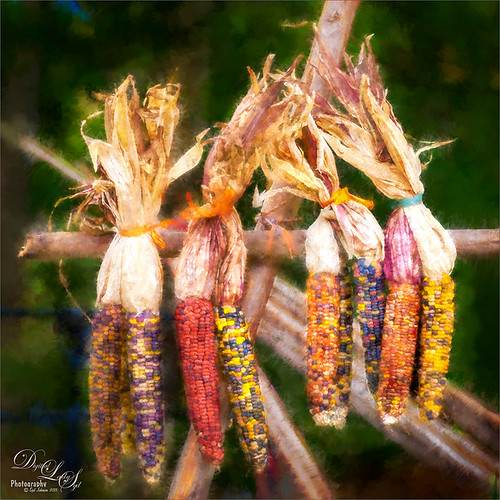
Loved this hanging batch of colorful corn or maize taken at the recent Native American Festival in Ormond Beach, Florida. In Lightroom Seim’s (see sidebar for website link) Workflow DreamScape preset was applied. Next Topaz (see sidebar for website link) Detail 3 was applied using just my basic Little Medium Large Detail preset (Medium Details 0.38, Large Details 0.16, and Contrast 0.30) where a black layer mask was added and just the corn was painted back. The background needed to remain soft. On several layers above a lot of clean up was done as the background was full of distractions. On a stamped layer (CTRL+ALT+SHIFT+E), my Topaz Impression Abstraction preset was applied (Stroke Type 12, Brush Size 1.00, Paint Opacity 0.38, Stroke Rotation 0, Stroke Color Variation 0, Stroke Width 0.85, Stroke Length -0.50, Spill 0.72, Smudge 0, and Coverage 1.00; Color Overall Hue 0.14, Sat 0.23, and Lightness 0.06; Red Lightness 0.14, Yellow Sat -0.11, and Green Lightness -0.36; Lighting Brightness 0.13, Contrast -0.23, and Vignette 0, Light direction X 0.34 and Y 0.05; and Texture Strength 0.19, Size -0.43, and Canvas I, Background type white solid and Background White). This layer was duplicated and taken back into Impression where the Ethereal Background by Blake Rudis preset was applied. A white layer mask was added and just the corn was painted out where I did not want the blurred effect to occur. This layer was set to Linear Burn at 53% layer opacity. On a new Stamped Layer, Nik Viveza 2 was applied to further enhance the focal point. It is so much fun to use the different filters to get different effects…..Digital Lady Syd
Digital Lady Syd Related Blogs:
How to Get the Most Out of Your “Not-So-Great” Images – contains link for Topaz Impression’s Ethereal Background by Blake Rudis
A Reflecting Wood Stork
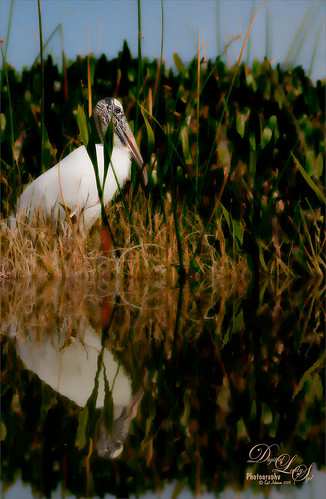
I guess this is what birds do when they are reflecting on their lives. Hum… Anyway, just the different iteration of an image I posted in my Fun Photoshop Blog recently (see How to Get the Most Out of Your “Not-So-Great” Images blog). I wanted to show how interesting it can be to change up an image just by running the same filter effect twice on the it. I used the same settings from my linked blog for the Flaming Pear Flood filter and Topaz (see sidebar for website link) Detail 3 using the same Soft Leaves preset. But this time the same Detail filter was applied twice using the same preset to get this sort of dreamy, natural effect. It gave the image a totally different feel. So this is just another example of how to change the ordinary to extra-ordinary!…..Digital Lady Syd
M&M’s Getting Their Last Breath of Air
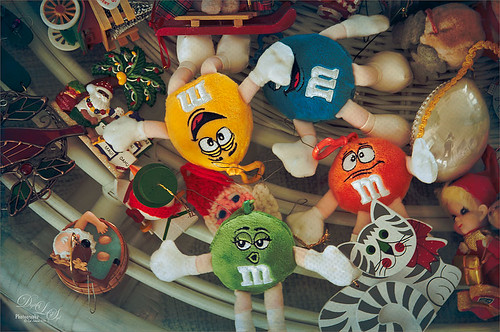
Sunday it was time to take down the Christmas ornaments. These adorable M&M ornaments my sister got me a few years ago are some of my favorites. In Lightroom 2 Lil’ Owls (see sidebar for website link) Fresh Color 7 preset was applied and then a couple adjustment brushes were used, one with Clarity and Sharpness increased and painted in the faces, and one with a little yellow color to draw the eye more towards the yellow M&M. In Photoshop Topaz (see sidebar for website link) Detail 3 with my Little Med Large Details preset applied (Detail Overall Medium Details 0.38 and Large Details 0.16 and Tone Contrast 0.30 and Shadows -0.01). Back in Photoshop a black layer mask (CTRL+I in regular layer mask) was added and just faces were sharpened again. A stamped layer was created (CTRL+ALT+SHIFT+E) and Topaz Adjust’s French Countryside preset (my favorite Adjust preset) was applied. This time a regular layer mask was added back in Photoshop and the bodies were slightly painted back with a 30% opacity black brush. The layer was set to Linear Burn blend mode at 40% layer opacity. I just wanted a touch of the Adjust in the image to soften the background area. Next R Gough’s Watercolour on Canvas Overlay was added. This overlay was in the a wonderful free holiday pack from Design Cut. A blue Solid Color Fill Adjustment Layer was clipped (ALT+click between layers to clip) to add a pretty bluish vignette. The last step was a Curves Adjustment Layer. That was it. This was a lot of fun to do a very traditional treatment to the photo!…..Digital Lady Syd
Fall Mums
Just enjoyed playing in Photoshop with this image. Basically I put this image into Topaz (see sidebar for website link) Detail 3 to sharpen, added French Kiss (see sidebar for website link) Artiste Avril, a Feather Texture I created and set to 24%, Topaz Impression using Oil Glaze by Blake Rudis, than added two French Kiss Brayered Blocks, French Kiss Photo Studio2 Lory overlay with a Bevel and Emboss and Color Overlay layer styles, next a Curves Adjustments Layer, a New Layer with clean up painting, Nik Viveza 2 to selectively color and sharpen, another Curves Adjustment Layer, and another New Layer and paint clean up. This turned out to be quite a little project, but lots of fun to do! That’s why I love Photoshop!…..Digital Lady Syd
Painting a Painter
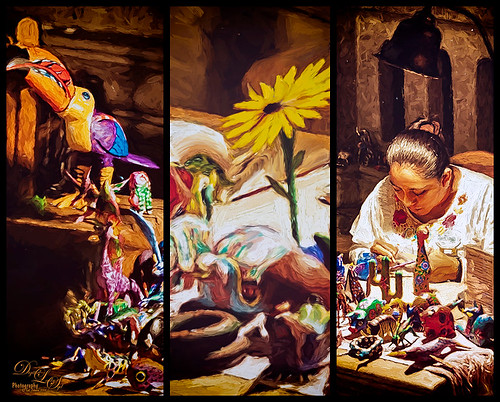 This wonderful lady was diligently painting away on the gorgeous wooden figures in her display at the Mexico Pavilion in The World Showcase at Epcot, Disney World Orlando. Seim’s (see sidebar for website link) Magic Ugly Shade Fixer was used in Lightroom on the image and set to 46% opacity by using The Fader Lightroom add on. (Can download for free to use on the packaged Lightroom presets, and for a $25 registration fee it will work on all presets – I find it very handy at times.) Then in Photoshop Topaz (see sidebar for website link) Detail 3 was applied only adjusting the medium and large details a little bit (Detail Overall Medium Details 0.38 and Large Details 0.16 and Tone Contrast 0.30 and Shadows -0.01). The new Topaz Impression plug-in was opened and the Oil Painting II preset was applied with no changes. Then because I can, Nik’s Analog Pro 2 plug-in was opened and Detail Adjustments, Light Leaks, Film Type and Multilens were applied. Just thought the Multilens was interesting for a change. A Color Balance Adjustment Layer was added and a 2 Lil’ Owls Studio (see sidebar for website link) texture Confetti 13 was added and set to Color blend mode at 32% layer opacity – just needed to counteract the overwhelming yellow tones naturally. Some Mixer Brush clean up was done on a New Layer using my Chalk Brush as a mixer. And that was it. Not really that difficult – I liked the Oil Painting II preset from Impression. By just painting over some of the rough edges with a Mixer, I got the look I wanted. Anyway, it was fun to do!…..Digital Lady Syd
New Impression of Octopus and Seahorse
These cute octopus and seahorse were located at the The Seas with Nemo and Friends Pavilion in Epcot, Disney World Orlando. Been having fun trying out Topaz (see sidebar for website link) Impression so thought I would try the plug-in out on a different type of image. This turned out to be a lot of fun to do! In Lightroom Seim’s (see sidebar for website link) Power Workflow 4 Harsh Sun Fixer and Tint Golden Sepia presets were applied, then one by CV Delnea called Backlit Horizontal Right. In Photoshop a New Layer was added and some clean up was done. On a stamped layer (CTRL+ALT+SHIFT+E) Topaz Detail 3 was opened to apply just a little sharpening to the medium and large size details. A New Stamped Layer was created on top and duplicated (CTRL+J). The bottom new stamped layer was highlighted and Topaz Impression was opened. The Cave Dweller II preset was applied with no changes. On the top stamped layer, my SJ Colored Pencil preset was applied. (What’s in my SJ Colored Pencil preset? It was based on the Colored Pencil II preset and these are my settings: Stroke: Type 07, Brush Size 0.90, Paint Volume 0.77, Paint Opacity 0.20, Stroke Width -0.82, Stroke Length -0.25, Spill 0.26, Smudge 0.16, and Coverage 1.00; Color: Overall Saturation 0.37, Red Hue 0.70, Red Saturation 0.32, and Red Lightness 0.00 – this turns the reds cyan and gives the preset an ugly color so don’t change these sliders if it is not a look you need; Lighting Brightness 0.21, Contrast -0.40, and Light Direction x1.00 y1.00; and Texture: Strength 0.33 Size 0.00, Texture Paper I, and Background color white. For this image these changes were made my preset: only Color Section changes to Red sliders all set back to 0; Orange Saturation to 0.27; and Aqua Hue -0.37.) A layer mask was added to this layer and areas I wanted showing from the layer below were painted in with a soft round black brush set to 30% brush opacity (mainly the eyes and the seahorse needed some additional definition and extra texture to the leg in the air). Three New Layers were added above. With my regular chalk brush (Photoshop’s Chalk 60 with Shape Dynamics Angle Jitter at 19%), the octopus body was clean up with a pink color. Then on the next layer the same brush as a Mixer to add some color to the octopus head. (These settings were used in the Mixer to get the effect shown on the octopus head – in the Brush Panel the Scatter section was turned on and Scatter set to 133%, check both axis, and Count 1; Texture turned on and a Canvas texture set to 160% and inverted with Mode set to Color Burn, Depth 100 and Jitter Depth 59%; and Wet Edges turned on.) and on top layer painted in some color to the octopus leg in the air and reduced the layer opacity to 61%. A Sponged Edge border from French Kiss (see sidebar for website link) with a green Solid Color Adjustment Layer clipped to it (ALT+click between the layers) and a Curves Adjustment Layer were added. That was it and I really liked the results. I especially liked the way the background greenery came out. Give this plug-in a try if you have a minute……Digital Lady Syd
Digital Lady Syd Related Blogs:
Digital Lady Syd Speaks Out on Topaz Impression
A Quiet Evening At the Marina
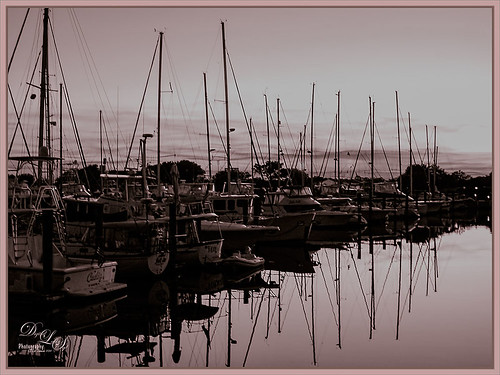
This is a beautiful image of the boats in Camanchee Cove in St. Augustine, Florida, at sunset. In Lightroom I applied David duChemin’s B-W Kathmandu Neutral preset, and then adjusted the HSL tweaking and some slight Split Toning to get this look. Opened in Photoshop and Topaz (see sidebar for website link) Detail 3 was applied using my Small Medium Large Detail preset (Medium Details 0.38, Large Details 0.16, and Contrast 0.30), and then in a layer mask the sky was painted out so that the clouds did not look too crisp. On a New Layer there were a few highlight areas that needed to be painted over. A Levels Adjustment Layer was added on top and set the Output Levels to 0 and 165 – first time I have ever moved the white tab left on this slider, but it just slightly darkened down the image the way I wanted it to look. A stamped layer was created (CTRL+ALT+SHIFT+E) and SJ B&W Border Frame from my free Double Edge Frames Photoshop Layer Style was added with colors sampled from the image. Hope you enjoy the photo!…..Digital Lady Syd
Squirrel Resident at Universal Studios

This was probably not the greatest image but I loved the way the squirrel’s tail looked so I had to do some processing on this photo. This shot was actually taken once again at Universal Studios Orlando. I wanted a painterly look, but I did not want to spend a lot of time painting it since it was not the best original image. Trey Radcliff‘s Gradient Endless Weekend Lightroom preset was applied. The photo was opened in Photoshop CC and the Shake Reduction Filter was used. Next Topaz (see sidebar for website link) Detail 3 was used to overall sharpen the image. A black layer mask was added and just the squirrel and the closer plants were painted back. A stamped layer (CTRL+ALT+SHIFT+E) was created and turned into a Smart Object where Alien Skin’s Snap Art 4 was opened. I used a preset I had created in Snap Art 3 based on the Historic Oil Paint preset (settings were Background – Brush Size 14, Photorealism 23, Paint Thickness 77, Stroke Length 63, Color Variation 0, and Bristle Brush Brush Style; Detail Masking – on Squirrel, Effect Detail, Brush Size -10, Photorealism 100, Paint Thickness -40, Stroke Length -49, Color Variation 36 and Brush Style Bristle Brush; and on mid-back leaves, Effect Detail Brush Size 23, Photorealism -59, Paint Thickness 73, Stroke Length 79, Color Variation 85, and Brush Style Bristle Brush; and Colors Brightness -38, Contrast -14, Saturation 33, and Temperature 36; Lighting – Default; and no other settings used). Using Photoshop’s Flat Fan Single Bristle Wet Edge brush as a Mixer, the overly bright spots were blended in on a separate layer. Next Topaz ReStyle Rustic Red and Orange preset was used (the settings used are ReStyle Color Style Lum Third -0.48 and Fifth -0.39; Texture Strength 1.00; Basic Tone Black Level 0.11, Midtones -0.31, and White Level 0.30; and Detail Structure 0.11 and Sharpness 0.73). This turned the image color palette into a bit warmer feel. Nik Viveza 2 was added to add a little more tonality to just the squirrel and add some blue into the sky. The last step was to use Photoshop’s Radial Filter in Camera Raw on just the squirre to draw further attention to him. It was a lot of steps but always fun to do……Digital Lady Syd
The Mighty Tulip

Just another photo of a very colorful red and yellow tulip and some pink daisies from my local grocery store. Just practicing my painting. This time using my basic workflow. Add Seim’s (see sidebar for website link) Power Workflow 4 Magic Flat Light Fixer. Next Topaz (see sidebar for website link) Detail 3 to sharpen up the image a little, and Topaz Simplify to use as a base coat to paint above. On a New Layer above, used Photoshop’s Flat Fan Single Bristle Wet Brush as a regular brush to paint over the yellow tulip and some of the greenery. French Kiss (see sidebar for website link) Atelier GA Brush created in my blog was painted on the next layer. (See my How to Paint with a Texture Brush from Your Image blog for how to make this brush.) Melissa Gallo of Painted Textures Desert Sky Canvas texture was applied twice to create two texture layers, first set to Hard Light at 56% layer opacity, and then set to Color Burn at 24%. Created a Stamped layer (CTRL+ALT+SHIFT+E) on top and then copied the Topaz Detail 3 layer and placed underneath since I had some bad places on the petals. In the stamped layer, added a white layer mask and lightly painted back part of the tulip that were not sharp enough. Then on a New Layer above, used my Chalk 60 brush as a mixer to smooth over the tulip. I decided this image needed some pizazz – it was just too yellow and bright green. On yet another New Layer took my Chalk 60 brush with the texture turned on and painted some bright colored blotches all over it in oranges and yellows and greens and pinks – kind of went crazy. Set this layer to Pin Light. Added a Curves Adjustment Layer and a Levels Adjustment Layer to add contrast. On a stamped layer, Nik Viveza 2 was opened up and Control Points were added to the yellow tulip and the purple daisy in front. Topaz ReStyle was opened on another stamped layer above. (Here are the settings: SJ Very Muted Sepia preset. Changes to preset were: Restyle Opacity 88%; Lum Primary -0.58, Third -0.36, Fourth -0.45, and Fifth 0.30; Texture 1.00; Basic Opacity 23% set to Hard Light blend mode; Color Temperature -0.11; Tone White Level 0.25; and Detail Structure 0.06 and Sharpness 0.83.) The last step involved adding the beautiful Canvas Vignette border by the wonderful Corel Master John Derry – can be downloaded from this link. This is the final image. Okay – it is a bit of workflow, but sometimes it just takes a lot of manipulation to get the look you like!….Digital Lady Syd
The Archaeologist
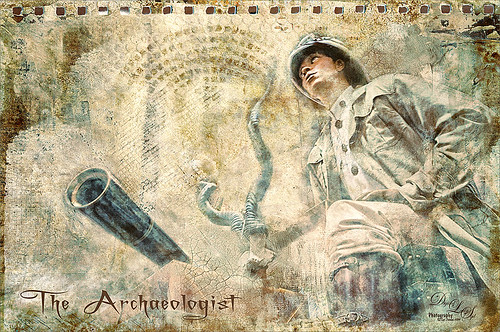
This is part of a really interesting display in one of the gift shops at Universal Studios Orlando. I shot the image up at a rather life-like mannequin and really liked the results. Seims (see sidebar for website link) Power Workflow 4 Magic Flat Light Fixer preset was used in Lightroom. In Photoshop the Shake Reduction Filter and Topaz (see sidebar for website link) Detail 3 was used to sharpen up the whole image. Kim Klassen‘s Autumn Burst was applied on top and a layer mask was added. Using my Chalk 60 brush in the mask at 30% brush opacity, the man and objects were lightly painted back so they show through the texture. Kim’s 1402 magic texture was placed on top and set to Soft Light at 32% layer opacity. Next 2 Lil’ Owls (see sidebar for website link) Ultimate Texture Collection’s Jewel Chalks was set to Divide at 33% layer opacity – this gives the bluish colors in the image. Next a Text layer was added using the font called A Charming Font Superexpanded at 70 pt. On a New Layer the Sharpen Tool was used on the person’s face. Nik’s Viveza 2 was used to sharpen up the face even a little more and to add a slight vignette effect in the corners of the image. That was about it. It turned out to be a really different image and the Difference blend mode turned an ordinary image into something quite interesting……Digital Lady Sydf
Red Carnations on a Bright Sunny Texture
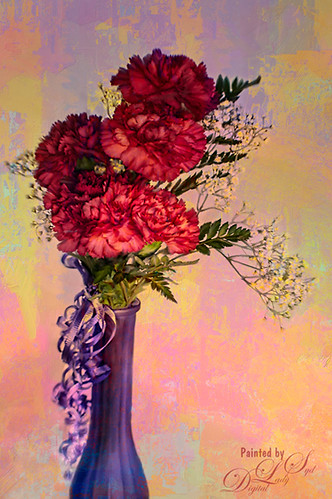
Just doing a little painting on some beautiful red carnations my daughter-in-law got for her birthday. Used Topaz (see sidebar for website link) Detail 3 to do an overall sharpening up of the image. Used Photoshop’s default brush Pastel Medium Tip as both a mixer and regular brush on this image and loved the brush strokes. Stacked two of Melissa Gallo of Painted Textures textures – August Copper set to Hard Light at 76% layer opacity and Spring Sky at Hard Light 78%. Last step was using Nik Viveza 2 to highlight the flowers in the center where I wanted the focus to be. It is a little bright, but I kind of like it – that is what is fun about stacking textures, you get some unexpected results! …..Digital Lady Syd
A Dr. Seuss Topiary

This image is another one of the adorable topiaries growing at Universal Studios-Orlando in Dr. Seuss Land. This photo was just a fun image to work on – loved the colors. An an old Trey Radcliff preset called Cross-Into the Sky from his Lightroom Presets Volume 1was applied first – liked the slightly vintage look it had. In Photoshop Topaz (see sidebar for website link) Detail 3 was selectively applied where the Highlights were emphasized and shadows were weakened. A black layer mask was added and only the edges of the topiary and the eyes were left sharpened. A Curves Adjustment Layer with the mask converted to black (CTRL+I in mask) was placed on top to the lower part of the topiary. Next Topaz DeNoise 5 set to Overall 73 and Highlights 69 (these are the highest settings I have ever used in this program) were set and on a white layer mask only the lower topiary and the eyes were painted out to keep them sharp. On a New Layer the Sharpen Tool was used again on just the eyes. A Levels Adjustment Layer was added and applied to lower part of the topiary by painting in a black layer mask. Finished up created a stamped (CTRL+ALT+SHIFT+E) layer and added my free SJ Double Edge Frame layer style – sampled an outside color from the image for the frame. Really love this part of the park – very colorful and fun!…..Digital Lady Syd
Digital Lady Syd’s Rule No. 11: Keep Practicing!
Just wanted to practice a little more painting so I found this image taken with my phone at the local grocery store recently. I have found that if I do not keep practicing on images, I lose some of my creative ability. That’s because I have to keep looking up how to do so things I forgot how to do! So this image was just one I decided to practice using my Photoshop skills to add a lovely painterly look to these flowers. Used Topaz (see sidebar for website link) Detail 3 to sharpen the total image a little – I wanted the center of the flower, the focal point, to be as sharp as I could get it. I added a texture I created in Corel Painter using three brushes including a nice chalk brush to get some interesting texture. Added a New Layer on top and used in Blur’s Good Brush 5.1 Pro set (a wonderful huge free download of all kinds of Photoshop brushes including several really nice Mixer brushes!) Circles 混凝土 – 1 brush. On another New Layer added some color into the image using a Pastel Mixer Brush – be sure you are set to add color in your options bar to get this to work. Next the Sharpen Tool was used in another layer. The last step was adding a Color Balance Adjustment Layer and a Levels Adjustment Layer. I just love painting in Photoshop and I do not even mind practicing this!…..Digital Lady Syd
Where Am I?
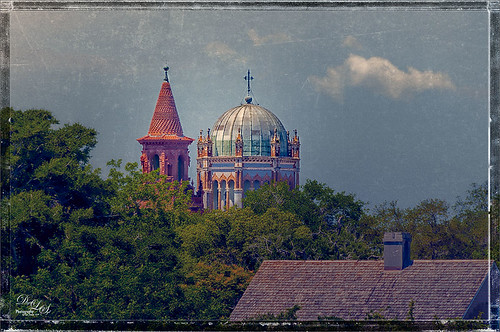
This beautiful skyline image was taken from the Castillo de San Marcos National Monument in St. Augustine, Florida. This is a spire from Flagler College (the old Ponce de Leon Hotel) and the cupola on the Flagler Memorial Presbyterian Church. In Lightroom did just basic changes and sharpened up the spire and cupola slightly. In Photoshop the first thing I did, and do a lot, is go into Topaz (see sidebar for website link) Detail 3- this time applied the Soft and Dreamy III preset to smooth out the leaves that were overly sharp and to reduce the detail in the close up roof. I changed the Cyan-Red, Magenta-Green and Yellow-Blue sliders (similar to the Color Balance Adjustment Layer) to get better colors. Some of my clouds (see my free Cloud Brushes) were added softly in the sky at 69% layer opacity. Kim Klassen Cloth & Paper Reign texture was used to add interest in the sky. Next Topaz ReStyle’s Warm Sand Dune Wash preset was applied to pop the colors a little. On a stamped layer (CTLR+ALT+SHIFT+E) the Camera Raw filter ‘s Radial Filter was applied to focus in on the spire and cupola. On another stamped layer OnOne (see sidebar for website link) Perfect Effects 8 was opened and a Blue-Yellow Split Tone set to a Balance of 81 was added, some detail painted back on the spire and cupola, and the Martha Border was the last step before saving back in Photoshop. I love beautiful St. Augustine!…..Digital Lady Syd
Digital Lady Syd Related Blogs:
OnOne’s Perfect Mask Works Great!
Some of My Favorite Plug-Ins
Loving Both Filters!


