
Stately Portrait
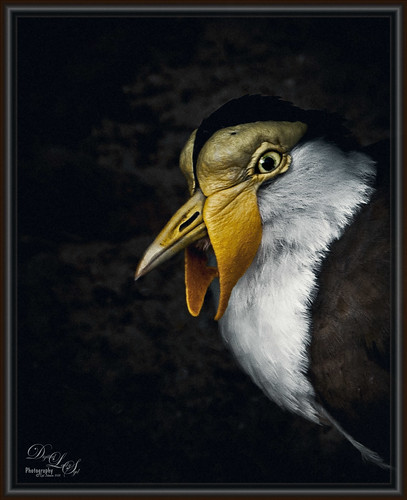
Loved the way this bird looks so stately. I actually started this image in Lightroom using Serge Ramelli’s Black and White Contrast Contrast yellow orange-light photo preset from his Urban Look set . I am major hooked on On1 Photo Raw 2018 (see sidebar for website link) Effect’s Dramatic Contrast filter used with the Sharpening filter. On both filters used a layer mask so only the bird was affected. Back in PS used a Red Channel Luminance Curves Adjustment Layer. (See my How To use a Red Channel to Create a Nice Blended Image Effect blog.) Next a Color Lookup Adjustment Layer using the Foggy Night preset set to 32% was added. On a stamped layer (CTRL+ALT+SHIFT+E) used Topaz (see sidebar for website link) DeNoise 6 and painted in areas that needed attention, mainly around the face. An Exposure Adjustment Layer was used on the eye and set to 88%. (See my The Eyes Have It – How to Make Them Pop in an Image blog.) A Digital Grain Layer was added over the whole image. Last step was to finish up with one of my frames (see my How to Create a Quick Layer Style Border or Frame blog). I love my birds!…..Digital Lady Syd
Native American Bottles, Pots and Dishes
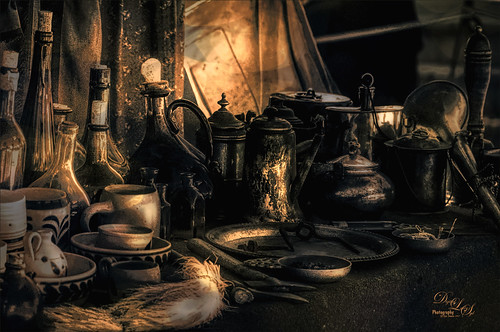
This image taken at the Ormond Beach Native American Festival was actually turned into a black and white in Lightroom. Painting in the highlights with an adjustment brush really made the light pop in the final iteration. In Photoshop, to remove a bit of noise, especially in the shadows, Topaz DeNoise 6 was used to remove it (used the Overall and Shadow sliders). Then Lucis Pro was opened to sharpen the details a little. It was set to Difference blend mode at 24% layer opacity and the Blend If sliders were used to further pull in the details. A Curves Adjustment Layer was used to add contrast. For color a Hue/Saturation Adjustment Layer was set to Colorize and a teal color effect was selected. Next another Hue/Saturation Layer was opened and a yellow-orange was applied to just the Highlights of the image. At this point the image looked really flat, but kind of old and vintage looking. I rather liked it. On a stamped layer (CTRL+ALT+SHIFT+E), Topaz ReStyle was opened and the Rustic Red and Orange preset was applied with a few adjustments and set to 74% layer opacity. On another stamped layer Topaz Texture Effects 2 was opened and A Little Dingy preset was applied. The Texture section was changed to a gold and black bokeh which enhanced the lighting effect. That was all that was done……Digital Lady Syd
Tiny Red Berries
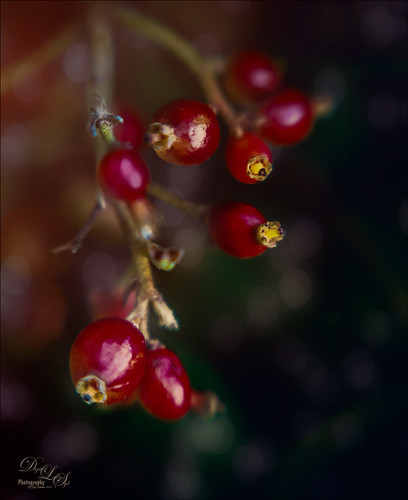
These little red berries were found growing on a shrub in my yard – they appear after some tiny white flowers fall off of it. This strand was only about 1 inch long and the image was taken with my Lensbaby Composer at F/4 using a Macro +4 Lens. In Lightroom a Scott Kelby Trendy High Contrast Look preset was applied and a lot of time was spent to sharpen the berries using the Adjustment Brush. This image had a lot of noise in the image so the Detail Sharpening Amount and Noise Reduction Luminance sliders were set to 0 so it could be removed more effectively in Photoshop. Once in Photoshop Topaz (see sidebar for website link) DeNoise 6 using the Raw Moderate preset was applied and did a much better job of removing the noise. This layer was duplicated and Topaz Texture Effects 2 was opened where the Fantasy Land II preset was added. A bokeh texture was inserted into the preset for the 2nd Texture section. In the Masking Enabled part of the Texture section, a black brush set to a Strength of 0.43 was used to lightly remove any bokeh effect from the berries. The Texture Effects layer opacity was set to 91%. On another duplicated layer, Topaz ReStyle was opened and the Swam and Sherpa Blue preset was applied and set to 50% opacity and Screen blend mode in the plug-in and once applied, the overall layer opacity was set to 85%. Just finished up with the Black & White Adjustment Layer set to 56% layer opacity pop the colors and set to Luminosity blend mode, a Red Channel Luminosity Curve Adjustment Layer to tone down highlights, and Nik Viveza 2 to adjust the focus and add a little vignetting. Pretty much my regular workflow. …..Digital Lady Syd
Contemplating Life
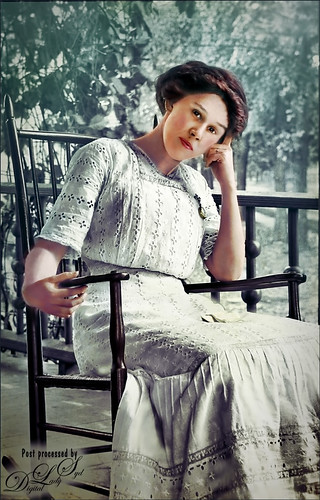
This was a black and white image from one of my favorite websites, Shorpy’s Historic Picture Archive (click on link to see original image). This image just sort of struck me as one I would really like to colorize. The first step was to sharpen up the image using the now free Nik Silver Efex Pro 2 to add some natural contrast to the overall image. Next I used two different methods in this image, although I probably should have stayed with just one, but here are links to my blogs on these techniques: How To Hand Tint a Vintage Image and Create a Brush To Do This blog and How To Colorize an Old Photo blog. A Red Channel Luminosity Curves Adjustment Layer was used to add in more contrast. (See my How To Use a Red Channel To Create a Nice Blended Image Effect blog.) On a stamped layer above (CTRL+ALT+SHIFT+E), opened Topaz (see sidebar for website link) Texture Effects 2. My Crisp Morning Run preset was run (this used the original Topaz Crisp Morning Run preset and switched out the Texture to a bright turquoise one half-way down the list and the Opacity was set to 0.29; also changed Vignette Strength set to 0.60 and Size 0.53.) Then in Light Leaks section, the Enable Masking was turned on. Brush tab was selected, and the woman was painted out with a brush around the head area (brush settings: Radius 0.50, Strength 0.59, and Hardness 0.30). In the Split Tone section, used the Enable Masking feature with the Spot tab to just hide the face area – set sliders to Transition 0.84 and Color Aware 0.86. Nik Viveza 2 (also free) was used to sharpen up the texture on her dress using a Control Point and the Structure slider. Added a Black and White Adjustment Layer set to Luminosity blend mode to balance the contrast. (See my How To Use a Black & White Adjustment Layer To See Contrast in an Image blog.) I just did not like the way her arm and hand on the chair looked too large so the Liquify Filter was used to adjust. Frooze the dress sleeve and chair behind and under the arm, then reduced the size and straightened the arm with Forward Warp Tool set to Size 300, Density 50, Pressure 100, and Rate 0 – just moved a little. Next PS’s Liquify Pucker Tool was set to Size 200, Density 50, Pressure 1 and Rate 80 – dabbed on hand a couple times. To enlarge the eyes just slightly, used the Bloat Tool set to Size 70, Density 50, Pressure 1, and lowered Rate to 32. Clicked once on each eye to just gently enlarge. Now all I could see was the red moire in the shadows of her arm skin and around eyes. Used Topaz DeNoise 6 set to overall Strength of 0.14, adjust Shadow 0.37, and adjust Color Red 0.69 to remove – set this layers opacity to 87%. I could paint these old vintage images all day long – really relaxing to do!…..Digital Lady Syd


