
Beautiful Scottish Sky
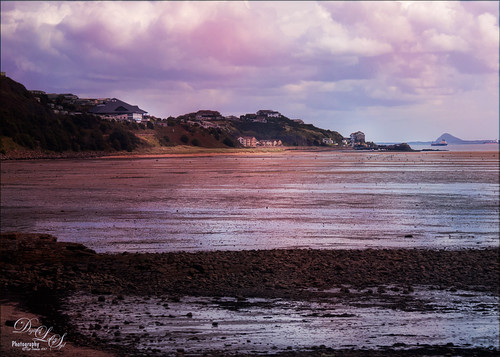
This image was taken somewhere in Scotland from a train. It was not particularly a pretty area with all the brown rocks and rather low lying water – it may have been low tide. Thought I would do just a quick post showing a trick I learned from Steve Arnold in his video called How To Infuse a Dull, Gray Landscape Photo with a Splash of Color (from his e-mail newsletter) to add some beautiful highlights to the sky and bit in the water. Basically a pink and blue overlay set to Overlay blend mode and a low opacity was used to add the colors. Then a layer mask is added to paint out where the color should not be. This can be created using the same process as for making Light Leaks (see my How to Create Light Leaks to Use Over Again blog.) Check out Steve and this wonderful technique.
I probably will not be blogging for a while with Hurricane Irma coming our way. Will try to get back up as soon as I can…..Digital Lady Syd
The Golden Dragon
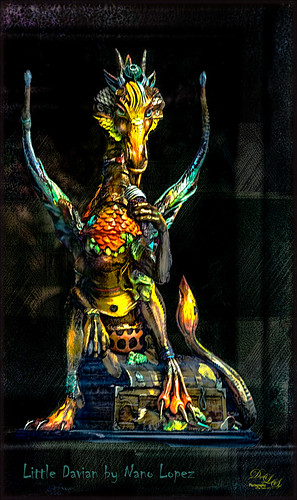
I had never seen a Nano Lopez sculpture until my recent visit to St. Augustine where the James Coleman Gallery had it displayed- this piece is called Little Davian. I shot this beauty through the front window in bright daylight so it took a lot of cleaning up to get rid of the reflections . I thought that the dragon was singing into a microphone but he is actually eating a “Dragon Berry” ice cream cone! Need to check out all Nano’s work – it is amazing! I will give you a quick run down of what was done to the image, but many steps were involved to get an effect I liked. First the dragon was run through Lucis Pro (no longer available) to get the edges defined better – it does not really sharpen but gives a similar look. Then PS Select and Mask command was used to extract the dragon from the background. To get the interesting cyan texture on the right side, a grunge type object created in Corel Painter was placed behind the extracted dragon, set to Soft Light and 52% layer opacity. A Hue/Sat Adjustment Layer was clipped to the layer and set to a Cyan color. A Darken/Lighten 50% gray layer was added. Nik Viveza 2 was used to adjust the color and tone throughout the image – this helped fix the glass reflection problem. Topaz (see sidebar for website link) Clarity was used on just the dragon. A Spotlight Layer set to Overlay blend mode was used on the dragon head. 4 Light Leaks were used on the edges – top and bottom set to a little dark red color, right side cyan and left side a warmish orange. 2 Lil’ Owls (see sidebar for website link) Color Bokeh Grunge Set – overlay 6 was set to Divide blend mode at 40% layer opacity to darken the edge of image. The font is called Chiller. Last step involved adding Topaz Detail 3 – just gave the overall image some sharpening and emphasized the background texture. Obviously my image does not do justice to the actual beautiful piece created by the artist, but it was a joy to work on the image!…..Digital Lady Syd
Poising for a Portrait
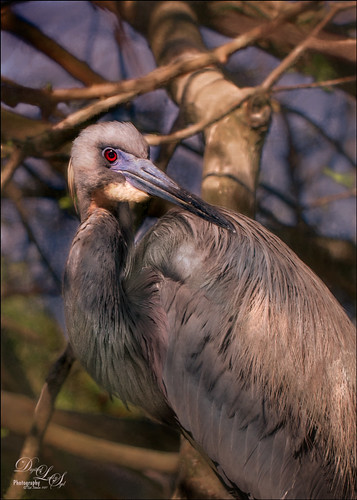
This beautiful Tricolored Heron is waiting for her mate to return to the nest with more nest ingredients. I could not believe how beautiful her eyes were! And where is her neck – how does she do this? The image had lots of shadows on her feathers that had to be removed – used both Lightroom’s Adjustment Brush set with the Saturation way down and clarity up to retain the feather structure, and then in Photoshop used a little cloning on the feathers. On a stamped layer (CTRL+ALT+SHIFT+E) Topaz (see sidebar for website link) Clarity was applied to pull out the feather details more – the background was painted out in a layer mask. (For Clarity settings, see below.) On another stamped layer Topaz Impression 2’s Jai Johnson’s Oil Glaze Light Original Color for noise removal preset was applied. (Need to try this preset if you shoot bird and wildlife photography – see her preset settings in her video In the Digital Studio January 6, 2017). Darken and Lighten Curves Adjustment Layers were created and the layer masks were filled with black. (See my How to Use Curves Adjustment Layers to Dodge and Burn an Image blog.) Areas that needed either adjustment were painted back. A Red Channel Luminosity Curve Adjustment Layer was created. (See my How to Use a Red Channel to Create a Nice Blended Image Effect blog.) Then an orange Solid Color Fill Adjustment Layer was applied at 19% layer opacity to warm up the image slightly using the mask to remove areas that were too warm. Finished up with Nik Viveza 2 to add a little vignette and drive focus to the bird’s eye. I just love the expression of this lovely lady…..Digital Lady Syd
Here are the basic Clarity settings used for my SJ Scottish Landscape: Clarity Section – Dynamics: Micro Contrast 0.73, Low Contrast 0.33, Medium Contrast 0; and High Contrast -0.34; Tone: Black Level 0.69, Midtones 0.02, and White Level -0.34; Hue/Sat/Lum Section – Hue Red 0.13, Orange 0.11, Green 0.33, and Aqua -0.36; Sat Red 0.19, Orange 0.14, Green -0.31, and Blue -0.19; and Lum Red 0.59, Orange 0.16, Yellow -0.02, and Green -0.37; all not listed colors were set to 0. For this image, changed Medium Contrast to 0.70, set all Hues to 0, and changed these Lum settings to: Orange 0.39 and Yellow -0.87.
Teasing the Bird Paparazzi
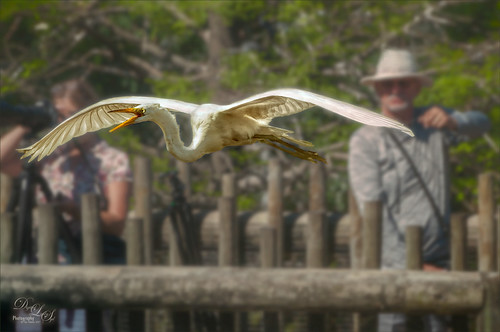
This beautiful snowy egret looks like he is having a great time showing off in front of the large group of photographers trying to get him centered in the cameras. I thought this was one of the funniest images I have taken at the St. Augustine Alligator Farm Rookery. Added Gaussian Blur to the whole image at Radius 12.5 and painted back the bird. The whole background was just too busy and the photographers way too distinct. On just the bird a little Topaz Clarity was used to bring out the detail in the bird’s wings especially. Used an Exposure Adjustment Layer to sharpen the eye. Then Topaz ReStyle’s First Steps preset was applied. Used Nik Viveza 2 to balance out the color in the image and on the birds wings. A Red Channel Luminosity Curves Adjustment Layer finished up the image. It was a little tricky to not over-sharpen the bird to keep it from looking like a composite. I had to spend a lot of time just toning down the edges to blend into the overall background. Still like the image…..Digital Lady Syd
Purring Tiger
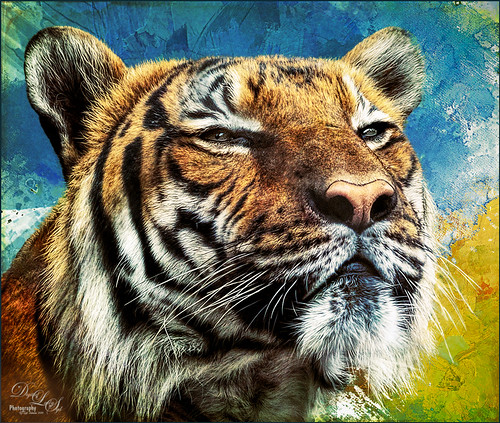
This image is of a Malaysian Tiger at the Palm Beach Zoo – I think he was actually purring – I sort of connected with him. I tried a couple different plug-ins on this guy. Started with Topaz (see sidebar for website link) Clarity, then Topaz Clean’s Cartoon preset where a black layer mask was added and just the whiskers were painted back to give the sharp effect. First time I have used this plug-in so it was really good to see the results. Used PS’s Select and Mask panel and then followed up with a Defringe of 1 px to get rid of the gray edging. Used two of Jai Johnson’s new Unpredictable Textures for the interesting painted look behind him. On a stamped layer (CTRL+ALT+SHIFT+E) and applied Topaz Texture Effects 2 – one of Blake Rudis’s from a while ago (check out his videos on Topaz Labs). On another stamped layer Nik Viveza 2 was applied and that was it. It has a bit of an engraved feeling to it and was a lot of fun to try…..Digital Lady Syd
Bird of Paradise
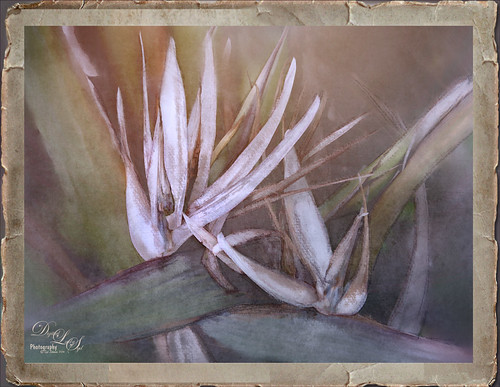
This beautiful white flowers in a Bird of Paradise in my front yard was fun to post-process. Used Topaz (see sidebar for website link) Clarity to sharpen overall, and Topaz Simplify with the Simplify Size slider set to 0.17 which removed some of the bad spots on the leaves. Painted on the flower stems and stalks to further remove bad areas and add a little texture to them. Used the Corel ParticleShop plug-in to remove the background area using Blend brush and the Blender Tool. This plug-in can be very handy! On a stamped layer (CTRL+ALT+SHIFT+E) Topaz Texture Effects 2 was used – used Fall Foliage Foggy Morning (downloaded from the Topaz Community) with a few adjustments to the Basic Adjustments section. In the Texture section, masked the texture off the focal point with the Brush tab set to a Strength of 0.66. Did some clean up and added the free Nik Viveza 2 to enhance the focal point. Added Sarah Gardner’s Frame Collection Paper Frame 05 on top that is a free download. That is all that was done for this nice vintage effect!…..Digital Lady Syd
Flowers Enjoying the Day
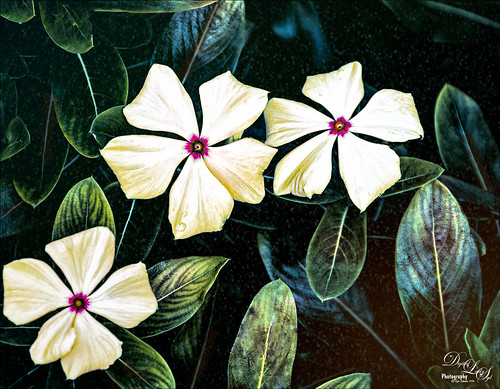
These cute little flowers are Crepe Jasmine, I believe, and are growing in my front yard. Not a whole lot post-processing on this image. Topaz (see sidebar for website link) Clarity was used to sharpen up the overall image. On a duplicate layer Lucis Pro (unfortunately no longer available) was set to Enhance (R161/G169/B67). Duplicated the layer again and applied Topaz Texture Effects’ Winter Wilderness preset. On yet another duplicated layer, Nik Viveza 2 (now free) was applied to darken the corners slightly and sharpen the focal point at the center of the flowers. Finally, a New Layer was opened on top. Used a soft round brush to paint with black at a very low opacity to reduce the brightness of the stems of the flowers and leaves. Applying the Lucis Pro plug-in gave the very well defined effect on the leaves and flowers. This image was a lot of fun to do!…..Digital Lady Syd
A Guilded Age Bathroom
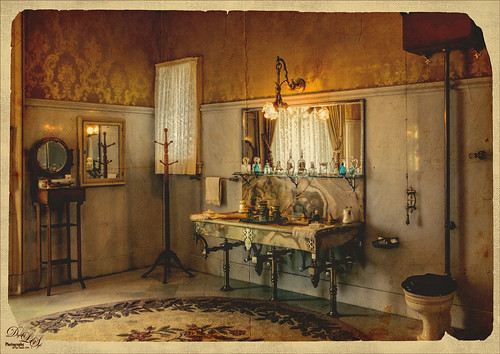
This image was taken at the Flagler Museum (Whitehall) in West Palm Beach, Florida. The image was actually post-processed without the border or vintage effect. Topaz (see sidebar for website link) Clarity, Lucis Pro (no longer available), Topaz ReStyle and Topaz Lens Effects were used to begin the process. I was actually really happy with the results, and then Adobe came out with Photoshop CC2017. If you open a New Document, now a New Document Dialog box opens – select the Photo tab at top and Templates is one of the choices. I scrolled down to Vintage Photo Effects which was downloaded and my image was placed on top. In the template I changed the background layer color and added a grunge overlay set to 47% layer opacity. I also clipped (ALT+click between the layers) a second texture under the Vintage Photo Paper. The Vintage paper texture was set to 47% layer opacity. Last step was to open up the now free Nik Viveza 2 to sharpen up the bottles and detail throughout the pix. The lighting was a little difficult to handle in this image due to the mirrors and the light coming in through a bright window off to the left. Try out Adobe’s free templates if you want a little different look……Digital Lady Syd
Just a Flower
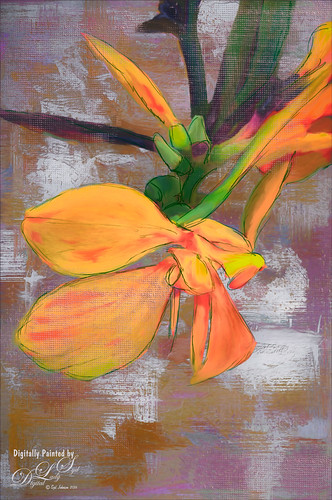
Had some fun painting this Canna Lily growing in my front yard. Used Topaz (see sidebar for website link) Clarity and ReMask (to select the flower) before adding one of my textures behind it. Then on a New Layer above, just painted the lily using Jack Davis’s Wow C Oil Blender 2 Mixer Brush that can be downloaded from his Facebook page. Topaz ReStyle was used to soften the color a little using a preset called Cotton Cloud set to Luminosity blend mode at 38% layer opacity. Some lines were added on a layer above and the last step was to add some texture using Just Jaimee Summer 2012 Brush Sampler 4 with a Bevel & Emboss layer style. It was set to Pin Light Blend Mode at 64% layer opacity. Last step used Nik Viveza 2 to emphasize the focal point. Pretty simple and lots of fun!…..Digital Lady Syd
Fountain Grass
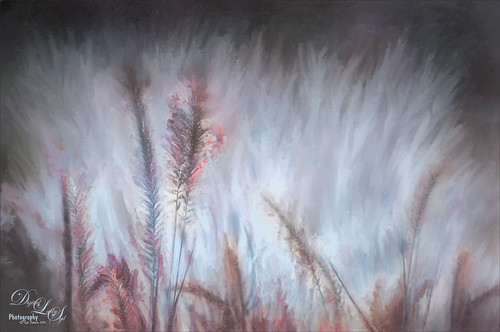
Took this image of fountain grass in my front yard. The original image shows the yard of my neighbor across the street so the first step was to blur the image to get rid of their yard. Used Photoshop’s Blur Gallery set to Iris Blur at Blur of 220 px. Individual stamped layers (CTRL+ALT+SHIFT+E) were created for each of the following filters: Topaz (see sidebar for website link) Black & White Effects was used to give a soft purplish tone, Topaz Clarity was used to sharpened just the foreground stalks, and Topaz Impression (Fine Brush Scumble II preset) was applied and the foreground stems painted back in a mask – then on a New Layer above, the Mixer Brush was used to smooth out the background. On another stamped layer Topaz ReStyle was opened and the Brown and White Pooch preset was used with adjustments – then in a white mask the foreground stem were painted back. Several mixer brush painting layers were added to give the water spray feel. The last step was to use Nik Viveza 2 to give a light vignette effect in the corners. This image was a lot of fun to paint!…..Digital Lady Syd
Screaming On the Coaster!
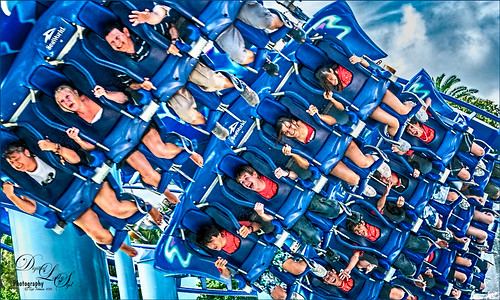
This image definitely represents that so recognizable Lucis Pro look. Loved all the expressions on the riders – the older group on the top row and youngsters having a blast below! This was taken a few years ago of the Manta Roller Coaster at SeaWorld, Orlando, Florida – short video of actual ride. Lots of filters here – Topaz (see sidebar for website link) Adjust on just the sky edge, Topaz Clarity on the people, Lucis Pro 6.0.9 for overall sharpness, Topaz Detail for a final sharpening, and the now free Nik Viveza 2 to reinforce the focal point. Lots of fun here!…..Digital Lady Syd
Reflection of Blue Trees

This is what I consider is a rather unusual image of tree trunks and branches painted blue on several trees at the Jacksonville Zoo’s Asian Bamboo Gardens. There was a lot of bamboo around, but not in this reflection shot. This image took a while for me to figure out what I wanted to do with it as I really wanted to give that beautiful reflection justice in the image. Did basic adjustments in Lightroom, then in Photoshop added Topaz (see sidebar for website link) Clarity’s Sunny Day Blue Sky preset. Next the Spot Healing brush was used to clean up a lot of little bits of stuff floating in the water. On a stamped layer (CTRL+ALT+SHIFT+E) the Topaz Black and White Effects plug-in was opened. What made this different is that the Transparency was set to 0.89 so almost 50% of the image in color through the black and white setting. In the Creative Effects section, Simplify as is and Diffusion set to a fairly high setting of 0.97. In PS a layer mask was added and the effects were painted out gently over the reflection which was soft and diffused already. On another stamped layer Topaz Impression’s Palette Knife II preset was added with no texture. In a layer mask, once again the reflection was painted out so it applied only to the top portion of the image. On a New Layer the Mixer brush was used to blend some of the harsh edges in the top part of the image – this evened out the colors a little. On yet another stamped layer, Nik Viveza 2 was used to draw the eye to the blue tree area. Two textures were added on top – one of mine that is a lot of light yellows painted in Painter and was set to Multiply at 70% layer opacity and one of Jai Johnson, Soulful Sea Breeze, set to Set to Multiply at 70% layer opacity. On top texture a layer mask was added and the top area was painted out so a vignette feel was created at the top. That was it. Just a lot of experimenting!…..Digital Lady Syd
All Aboard the Bumble Bee Express!

Had to post this wonderful Bumble Bee Express pix (the link is a pretty lame short clip of a zombie riding the train) before the holidays are too far gone! This wonderful train runs every day at the Volusia Mall in Daytona Beach, FL, for all the kids to ride. When I was 5, I wanted one of these as they had one at the local park where I grew up – I got a Lionel Train set instead and was extremely disappointed.
This image used Topaz (see sidebar for website link) Clarity to sharpen it up first, then the train was removed from the background using Topaz ReMask. One of my Corel Painter backgrounds was added – it was stretched out and turned to fit the train, and a couple Hue/Saturation Adjustments Layers were linked to it to get the colors I wanted in the image. Next on a stamped layers (CTRL+ALT+SHIFT+E) Topaz Glow was opened and my Mysterious II preset was applied with just a change to Red, Orange and Yellow Lightness sliders to adjust the color and set to Normal at 80% layer opacity. (The settings are listed in my Happy New Year With Some Topaz Tricks blog.) Two more stamped layers were created, and Topaz Impression’s Ethereal Background by Blake Rudis preset was applied and set to Normal at 100% layer opacity on the first layer. Then on the top layer Topaz Impression’s same preset was applied except the Blue Lightness slider was set to 0.45 to calm the blue in the sky down some. The layer mask created using ReMask was copied (ALT+drag up to this layer) and inverted (CTRL+I in the layer mask). This layer was then set to Normal with the layer opacity adjusted to 41%. A text layer was applied using the free Playbill Regular font,and the letters were stretched up some (vertical scale set to 152%) and spread out (tracking set to 80). A yellow watercolor Pattern Overlay was added in the Layer Style for the text to make the colors pop. A Black and White Adjustment Layer set to Luminosity blend mode was added on top to get the color tones just right. Totally fun and brought back a lot of memories!…..Digital Lady Syd
Showing Off My New Hairdo
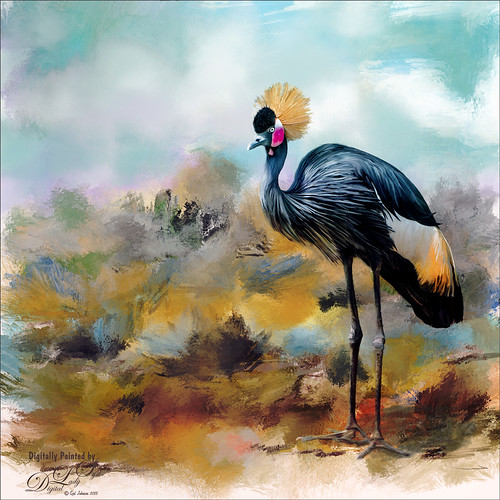
Just enjoying painting another beautiful bird. They are so much fun to do! This is a West African Crowned Crane taken a while ago at the St. Augustine Alligator Farm and is one of the regular exhibits so he can be seen anytime. He just sort of match this Corel Painter texture I had made, so there he is. In his document Topaz (see website link in sidebar) Clarity, Detail, and ReMask were used to adjust the bird itself. Then the ReMask layer was moved into the texture to place it where I wanted him to be. After that just painted the bird on several different layers using the Mixer Brush. Used two different Exposure Adjustment Layers, one for the eye and one for the beak to bring out some sharpness. Then duplicated the original texture twice and set on top – set one to Color Burn at 46% layer opacity and the other to Soft Light at 32%. Created a stamped layer (CTLR+ALT+SHIFT+E) on top and added the Topaz Lens Effects’ Toy Camera filter set to Awesomeness I preset with changes. Back in Photoshop that was set to 39% layer opacity. The last step was to add Nik Viveza 2 to really drill in on the birds face and head feathers. Hope you enjoyed my little bird painting…..Digital Lady Syd
Hogwarts at Halloween
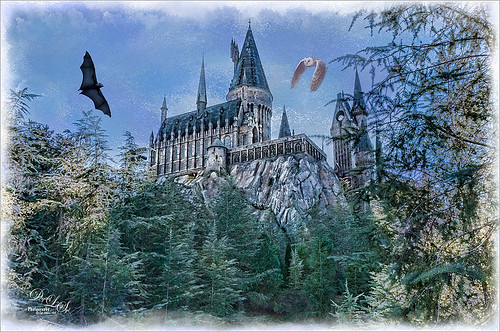
This image of Hogwarts School of Witchcraft and Wizardry at Universal Studios-Orlando was used to show how to get a bit of an illustrative look to an image using Topaz (see sidebar for website link) Adjust and Clarity and a Watercolor Texture for the sky. I actually just followed a really great tutorial by Leslie Nicole at French Kiss Textures (see sidebar for website link) that gave the exact steps and layers used. See her Before and After – Using a Watercolor Texture to see how it was done. (And check out her textures while visiting.) Both birds were by Midnights Touch – To the Bat Cave collection and Who Gives a Hoot collection to add a little holiday effect. I also added a watercolor border painted using my SJ WC Salt Brush set to 69 px to create. Lot of fun here and I really like the results!…..Digital Lady Syd
Soaring Spoonbill

Still enjoying the bird images I took at the St. Augustine Alligator Farm Rookery this Spring. The original image was captured with a totally light blue sky behind this Roseate Spoonbill. This made it easy to add a texture underneath the image (my painted texture created in Corel Painter called Seashore) and changing the blend mode of the bird layer to Multiply. Topaz (see sidebar for settings) Clarity and DeNoise 5 were applied to cleanup the the bird layer. On a stamped layer (CTRL+ALT+SHIFT+E), Topaz Glow’s Room Glow Blake Rudis preset was applied (check out Integrating Topaz Glow into Your Workflow for info on this). Next on a New Layer Fay Sirkis’s (from KelbyOne) Precious Oil Diamond Mixer was used to clean up the feathers and beak a little. Topaz Impression Watercolor II preset with no spill was applied. Nik Viveza 2 was used to bring out the color of the bird just perfectly and a Curves Adjustment Layer was used as a last step for overall contrast. I love my bird pix!…..Digital Lady Syd
Singing Spoonbill Duet Takes Rookery by Storm!

Recently our Photo Club took a trip to the St. Augustine Alligator Farm’s Rookery to check out the birds. What a riot, as usual. I had never gone quite this early so the birds were doing a lot of mating and nest building, but not a lot of babies yet. It was total craziness and the Roseate Spoonbills were in all their splendor. I had never had a chance to see this many at one time and they were practically tame! They would get so close you could hardly focus your camera. Needless to say, it was a great time. These two birds were either doing mating clacking song, or totally entertaining the photographers. I was less than 5 feet from them and they were there all morning.
This image was mainly just sharpened up a bit and the basic tonal correction was done in Lightroom. In Photoshop Topaz (see sidebar for website link) Clarity using John Barclay basic settings preset (Micro Contrast 0.36, Low Contrast 0.20, Medium Contrast -0.11, and High Contrast -0.23) was applied. On a stamped layer (CTRL+ALT+SHIFT+E) Topaz Glow was applied using my SJ Mysterious II Water preset (Primary Glow: Glow Type Dark, Glow Strength 0.30, Effect Sharpness 0.63, Electrify 0.14, Simplify Details 0.17, Edge Color 0.28, Detail Strength -0.06, Detail Size 0.20, Brightness -0.56, Contrast 0.44, Saturation 0.00, Line Rotation 0.00, and Glow Spread 0.00; Secondary Glow: Glow Type Light, Glow Strength 0.00, Effect Sharpness 0.22, Electrify 0.03, Simplify Details 0.00, Brightness 0.45, and Contrast 0.64; Color Overall – all set to 0; Red RedSat 0.34; Orange Sat 0.33; Yellow Sat 0.03 and Lightness -0.29; Blue Sat 0.42 and Lightness -0.43; and Magenta Sat 0.75 and Lightness -0.35) set to Strength 64% and Overlay blend mode in the plug-in. A clean up layer was placed on top to clone out a few distracting bush edges and that was it. This was a really fun image to take!…..Digital Lady Syd
Very Busy Snowy Egrets
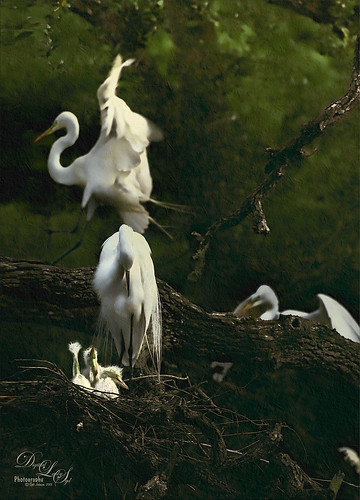
This is one of the shots I got at the St. Augustine Alligator Farm rookery. This is such a fun place to visit this time of year – the birds are totally distracted and let you take really great photos. The above is of the beautiful Snowy Egrets – at this time only a few baby birds were seen, most were nest building and mating.
Here is a quick run-down of what was done to this image: In Lightroom Seim’s (see sidebar for website link) Super HDR X preset and Dave Delnea’s Develop Preset Forestwalks Look 03 were used before bringing photo into Photoshop. A little clean up and then a stamped layer was created (CTRL+ALT+SHIFT+E) on top. Topaz (see sidebar for website link) Clarity was used to do an overall sharpening – this time I wanted a little more of an artsy look so my SJ Artsy with Highlights preset was used. (Settings: Clarity Dynamics Micro Contrast -0.86, Low Contrast -0.86, Medium Contrast 0.63, and High Contrast 0.94; Tone Level Black Level -0.19, Midtones -0.36, and White Level 0.19; HSL Filter Hue – no changes; Sat Orange 0.06, Yellow 0.63, Green 0.13, Blue 0.25 0.25, and Overall -0.45; and Lum Orange 0.36, Yellow -0.34, Green -0.42, Blue 0.61, Purple 0.11, Magenta 0.75, and Overall -0.27 – all other colors were 0.00.) A layer mask was added and the birds were faces and beaks were painted out to maintain the sharpness since this preset smooths out colors. Nik Viveza 2 was used to draw focus to the babies and help remove a bit of yellow in the bird feathers. A Levels Adjustment layer was added to add back some contrast into the image. On another stamped layer, John Derry’s Varnish-Matte-Light layer style was used to apply a little painterly feel to the whole image. That was it. I love working on these bird images!…..Digital Lady Syd
What the Worm Saw
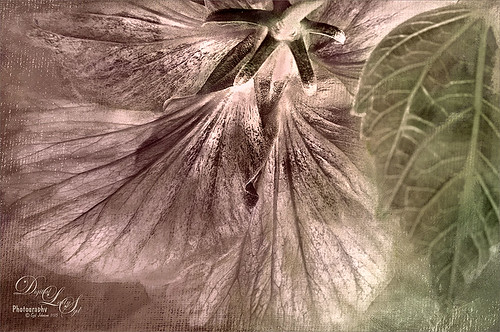
This was a macro image I took for a Photo Club Theme called What the Worm Saw. I did not submit it (got a little over creative actually and tried something not so great). This is the underside of a Red Hibiscus bloom and I just liked the result. Used Topaz (see sidebar for website link) Clarity to sharpen it overall. Used Nik Silver Efex Pro 2 to turn it to black and white. Next a Color Balance Adjustment Layer was used to add a little green in the Midtones. Painted Textures Trees in May texture was added next with a layer mask and the bloom and leaf were painted back in the mask. A Nik Viveza 2 filter was added to emphasize the focal point of the image. To get the pinkish tone on the flower, a light pink gradient layer was placed on top. The last step was a Curves Adjustment Layer to get back a little contrast. Something a little different for me…..Digital Lady Syd
A Tuscan Blossom
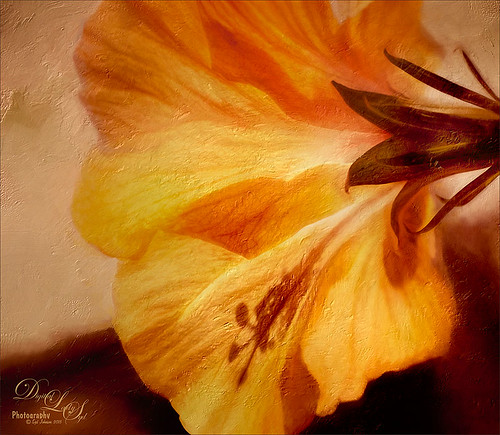
Just loved how this little Yellow Wing Hibiscus blossom image turned out. Did very little to the original image other than apply 2 Lil’ Owls (see sidebar for website link) Spring Whispers 4 preset and sharpening of the shadow stamen. On a duplicate layer of the background, Topaz (see sidebar for website link) Clarity was applied using John Barclay’s Basic Settings preset (see My Glowing Porch Flowers blog for settings). Next went into OnOne’s (see sidebar for website link) Perfect Effects 9 and applied the PE4 Vintage preset. I believe that OnOne gave it away with an earlier version, probably Perfect Effects 4. Next Topaz Impression was opened and the new preset created from Blake Rudis’s blog called Ethereal Background was applied next (see Blake Rudis video called Atmospheric Backgrounds with Topaz Impression). A New Layer and some clean up was done, especially a little Mixer Brush painting on some of the edges to smooth. Painted Textures Creamsicle texture was applied (not sure this texture is still available) set to Linear Burn blend mode at 73% opacity. A Hue/Sat Adjustment Layer was clipped to the layer and the Saturation set to -56 so there was not a lot of color added to the image, just texture. A Curves Adjustment Layer was added to add back some contrast and the last step was Nik Viveza with a control point on the focal point, or for me the stamen shadow. It was fun to experiment with my arsenal of filters!…..Digital Lady Syd
Sunset at Viera Wetlands
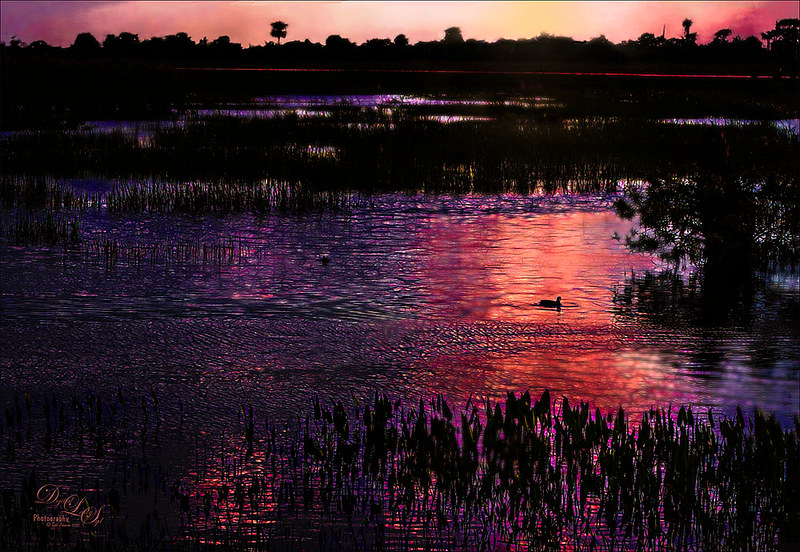
This image was not near as interesting in its Raw version. Had to add some filters and was pleasantly surprised at what a pretty sunset effect could be achieved. In Lightroom Seim’s (see sidebar for website link) PowerWorkflow Super HDR X preset was applied. Once opened in Photoshop Topaz (see sidebar for website link) Clarity’s Color and Contrast Boost II was applied. I like to use Clarity when dealing with nature scenes – sometimes it gives better results than Detail. On a duplicated layer, Topaz Glow filter was added – used my SJ Mysterious II Water preset and set the layer to Hard Light blend mode – this is how I got all the beautiful colors in the image. (Here are the preset settings if you are interested: Primary Glow: Glow Type Dark, Glow Strength 0.30, Effect Sharpness 0.63, Electrify 0.14, Simplify Details 0.17, Edge Color 0.28, Detail Strength -0.06, Detail Size 0.20, Brightness -0.56, Contrast 0.44, Saturation 0.00, Line Rotation 0.00, and Glow Spread 0.00; Secondary Glow: Glow Type Light, Glow Strength 0.00, Effect Sharpness 0.22, Electrify 0.03, Simplify Details 0.00, Brightness 0.45, and Contrast 0.64; Color Overall – all set to 0; Red RedSat 0.34; Orange Sat 0.33; Yellow Sat 0.03 and Lightness -0.29; Blue Sat 0.42 and Lightness -0.43; and Magenta Sat 0.75 and Lightness -0.35.) A clean up layer was created and layer to add some yellow sun glow. On a stamped version (CTRL+ALT+SHIFT+E) placed on top, Photoshop’s Iris Blur filter was centered around the duck with the blur set to only 2 pixels. A black layer mask was added so just a few areas that I wanted softened could be back with a white brush. That is basically how this image was post-processed, and the Glow filter made it into something quite nice!…..Digital Lady Syd
My Glowing Porch Flowers!
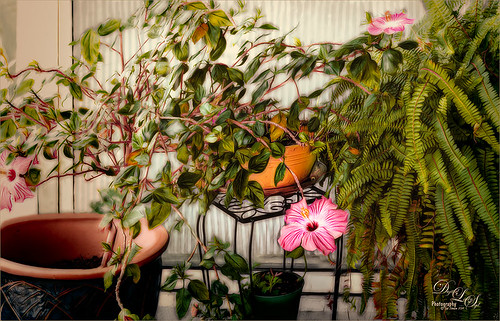
These are more flowers on my porch – Painted Lady Hibiscus and a Boston Fern. Clean up was done, Topaz (see sidebar for website link) DeNoise set to Overall 0.09, and Topaz Clarity (My John Barclay Basic Settings preset-Micro Contrast 0.36, Low Contrast 0.20, Medium Contrast -0.11, and High Contrast -0.23; then Tone Level Black Level 0.14, Midtones -0.30, and White Level -0.20; Hue Yellow -0.58 and Green -0.19; Sat Green 0.27 and Blue -0.34; and Lum Red -0.08, Orange -0.52, Green 0.11, and Blue -0.42). On a stamped layer (CTRL+ALT+SHIFT+E) Topaz (see sidebar for website link) Glow was applied. (SJ Painterly Wonderland preset-Set to Overlay. Primary Glow change Effect Sharpness to 1.00, Electrify 0.38, Secondary Effect Sharpness 0.48, Brightness 0.23, and Contrast -0.01; Color – Overall Hue -0.29, Orange Sat 0.43, Yellow Hue 0.14 and Lightness 0.50, Green Sat -0.77 and Lightness -0.44, Aqua Sat -1.00, and Blue Sat -0.50. Set back to Normal to take into PS – then adjust there.) Topaz Black and White Effects was applied. (SJ Soft Color Effect preset – Conversion section – Basic Exposure Contrast 0.04 and Brightness 0.05; Adaptive Exposure 0.24, Regions 16, Detail 0.98 and Detail Boost 1.05; Creativity Effects Diffusion Softness 0.71, Diffusion 0.67, and Diffusion Transition 0.56; Finishing Touches section – Silver and Paper Tone Tonal Strength 0.85, Balance 0.22, Silver Hue 27.00, Silver Tone Strength 0.61, Paper Hue 45.00, and Paper Tone Strength 0.42; Quad Tone Color Region 1 black set to 7.46, Color Region 2 set to Color (R67/G48/B32) and 77.12, Color 3 Region to Color (R173/G148/B104) and 181.6, and Color Region 4 set to white and 255.0; Vignette Strength -0.28, Vignette Size 0.61, Vignette Transition 0.83, and Vignette Curvature 0.83; and Transparency Overall 1.00. In Local Adjustments set to Detail – Brush Size 254, Opacity 0.25, Hardness 0.05 and Edge Aware to 0.50 – painted back the front flower and the orange colored dish so that it was a focal point. The Overall Strength was set to 1.00. Set same brush to Color and painted back the pink flowers. Vignette Strength set to -0.32, Vignette Size to 0.68, Vignette Transition to 0.63, and Vignette Curvature 0.82 – center vignette on just above the center pink flower. Changed Overall Transparency to 0.75.) On another stamped layer the Camera Raw Filter Radial filter was applied to adjust the focus on the orange pot and center pink flower. That was it. Lots of Topaz on this one!…..Digital Lady Syd
Painted Apples
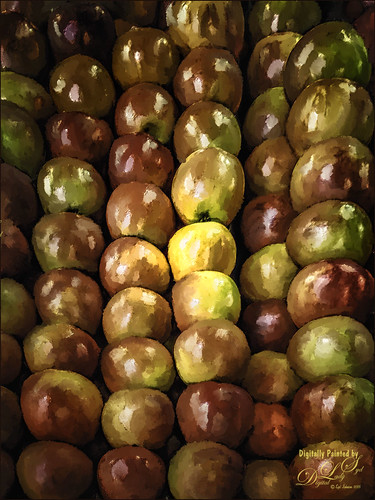
Not sure what inspired me to paint these apples from image taken at the local grocery store, but I did. The image was first opened in Lightroom where the basic image was adjusted, then in Photoshop. After some clean up, a stamped layer was created on top (CTRL+ALT+SHIFT+E) where Topaz (see sidebar for website link) Clarity was applied using the Landscape III preset. Next on a duplicate layer, Nik Color Efex Pro 4 was used (used Cross Processing Method L05 at Strength 27%; Darken/Lighten Center set to Shape 1, Center Luminosity 73%, Border Luminosity -46%, and Center Size 24%; Low Key Glow 0%, Standard Low Key 6%, Dynamics Low Key 0%, Sat 56%, Whites 3%, and Contrast 72%; and Detail Extractor 22%, Contrast 14%, Sat 25%, Shadow under ow, and Highlights under hl). On a New Layer above, used a Blender Mixer brush using property bar settings of Wet 100%, Load 1%, Mix 100%, and Flow 100% and set to Sample All Layers – turn off Load Brush After Each Stroke so it will just be a blender and mix the colors underneath. I am not sure which brush I used, but any brush you like should be a nice blender with the above settings. On a new Stamped Layer, Nik Viveza 2 was used to add focus to the center area. Last step was a Curves Adjustment Layer. I also painted this in Corel Painter and got a much more abstract look. Will probably show that version in a later post. Anyway, love the Photoshop Mixer Brush effect on these apples!…..Digital Lady Syd
Just a Little Hibiscus

Image of my pink Painted Lady Hibiscus on my porch – they are such beautiful blooms! Thought I better practice painting a little in Photoshop as I had not done anything recently so here it is. In Lightroom and Dave Delnea’s Backlight 002 vertical preset was applied, and the middles of the flower was sharpened. The image was brought into Photoshop and Topaz (see sidebar for website link) Clarity using John Barclay’s Basic settings (Micro Contrast 0.36, Low Contrast 0.20, Medium Contrast -0.11, and High Contrast -0.23 – then my settings of Red Sat 0.22; and Lum Red -0.17 and Green 0.72). Next Topaz Black & White Effects plug-in was applied using a plug-in I call SJ Church (Conversion Basic Exposure Contrast 0.06 and Brightness 0.05; Quad Tone Color 1 Region Color (R7/G0/B7) and slider 9.95, Color 2 Region Color (R59/G51/B53) and slider 69.66), Color 3 Region Color (R158/G143/B146) and slider 150.6, and Color 4 Region Color (R255/G253/B216) and slider 255.0: and Transparency 0.58 – in the Mask, painted detail on stem and pistal using Brush Opacity 0.25/Hardness 0/Edge Aware 0.50 brush. Using same brush set to a small size 73, selected Burn and painted in the pistil shadow and some detail in the flower top. Used Color adjustment and painted in a little on flower tips. Dodges the left side of pistil and stem.) On a layer above, Jai Johnson’s beautiful free Spring Blush Canvas texture was added and a layer mask was added. Used my SJ Pastel 11 brush (I used Pastel 11 in SDW Pastel Brushes-this comes in as a huge 2130 px brush! I made it a 70 px brush – added Shape Dynamics and Texture to make a nice painting brush) set to 29% or less brush opacity, the flower was gently painted back in the layer mask. Text was added and a Levels Adjustment Layer was used to add back some contrast. That was it!…..Digital Lady Syd


