
Five Flowers and Plants
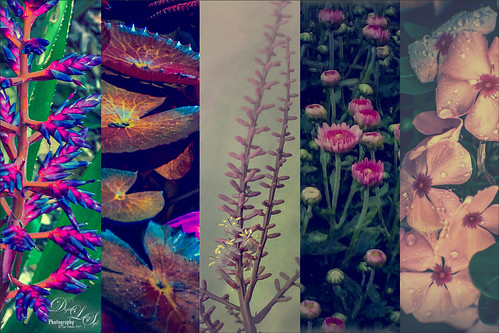
Had a lot of fun putting this template together with some of my favorite flowers and plants from this year. If you would like the full instructions on how to do this, check KelbyOne Insider’s blog called Down & Dirty Tricks: Five-Up Photo Layout by Scott Kelby (I am hoping you can access this link). This is not a video so just follow the steps as they appear to make the template and then it can be used over with different images. Once I created and filled the template, just added a Curves Adjustment Layer to give more of a vintage feel. Very simple but fun to do…..Digital Lady Syd
The Polaroid Photo Look

I really researched for what kind of flowers these are and could not figure it out – the image was taken while at the Hawaiian Tropical Botanical Garden on the Big Island in Hawaii. In Lightroom the image was processed using the standard sliders to get a nice image. Once in Photoshop, the image was set to a square size with a blank area created on the right side using the Crop Tool (or Canvas Size command). The flowers were selected, the selection inverted (CTRL+SHIFT+I), and in the Channels Panel, the New Channel icon was selected to make a new Alpha Channel. Now back in the Layers Panel, Content-Aware Scale was applied. First check Protect Alpha 1 channel in Options Bar before dragging the right side handle out – this keeps the flower from distorting, but just the background area. Topaz (see sidebar for website link) Detail 3 was used to sharpen the flowers a little. Next three of Kim Klassen‘s textures were added: Cloth & Paper Venice Texture at Soft Light at 100%, same texture set to Multiply at 27%, and UggLove Texture set to Soft Light at 75%. A Hue/Saturation Adjustment Layer was used to desaturate the background just a little and the flower and stem were painted back in a layer mask. A Levels Adjustment Layer was also applied using the same flower layer mask used. A composite was made. The frame used above is one Kim suggested using from fuzzimo, but there are numerous other free downloads if you do a search for Polaroid templates. Once the frame was opened, the center was selected and put on its own layer (CTRL+J) A composite of the image was brought into the frame and clipped (ALT+click between the layers to clip) to the center area of the frame. With a little adjusting and adding some text and it was finished. This image used Quilted Butterfly and Batik Regular fonts. Really nice vintage feel to the image…..Digital Lady Syd
Digital Lady Syd Related Blogs:
Using a Template to Create Your Own Unique Valentine
Five Image Template Creates Beautiful Collection!
Five Image Template Creates Beautiful Collection!

I have not been following all my favorite websites like I should. There is one I had not visited in quite a long time so I checked in. The CoffeeShop Blog was offering this wonderful Web Storyboard 6 for 5 pictures as a free download so I thought I would give it a try. I was really pleased with the final result. Her template is very easy to use – just clip (highlight image and go to Layer -> Create Clipping Mask) the each image you bring into the Photoshop file she provides to the location you want. Use Free Transform to adjust the size to fit. The background color was changed by clicking on the Background Color layer thumbnail and choosing whatever color you want. On the Frames layer, a Gradient Overlay Layer Style was added and reversed using Muted Gradient Muted 5 from Graphix1 set with a Radial Style, angle set to 90 degrees, and Scale set to 149% to get the pretty reddish gold colors on the frames.
Both The CoffeeShop Blog and Graphix1 websites offer some of the best free resources for the Photoshop fanatic like me. Take a minute to check out their websites – both have great blogs too (just click on their Home buttons).
It is really fun to put a collection of your images together! Give it a try!….Digital Lady Syd
Calendar Template for 2012

Above is another example of using the calendar template I created last year – the instructions are very easy to follow. Link over to my “Free Calendar Template” blog to download my calendar template and the calendar pdf file, and follow the easy steps. It prints out on an 8 1/2 inch X 11 inch sheet. (On Friday I will post how to do this in Elements – the same process except for copying the layer mask which is a copy and paste effort.)
For this calendar, I added a light colored gradient background instead of using a solid color. This was done by adding a New Layer on top and selecting the Gradient Tool. In the Options Bar, select your gradient, in this case it was from Muted Gradients Graphix1 – Muted 8, click first icon Linear, use Normal Mode at 100% opacity with Dither and Transparency checked. Copy the Layer Mask from the Color Fill 2 layer by clicking on the layer mask and ALT + Drag up to the top gradient layer. The bird image was taken at the St. Augustine Alligator Farm Zoological Park’s Rookery, one of the best places to take pictures of birds in the Spring, and a texture from Ash was used (not sure they are available anymore, but click on the Textures category on right to find many more wonderful texture sites). A 3 stroke gray line was added around the inside and outside of the template by adding a Layer Style to the top gradient layer.
This calendar template makes for a great present. It can also give you a chance to show off your latest artistic endeavor. Give it a try!…..Digital Lady Syd
Digital Lady Syd Related Blogs:
Free Calendar Template
Free Calendar Template for Use with Elements
Create Calendar Photoshop Templates
Colorful Blown Out Look Lightroom and Adobe Camera Raw Preset
Digital Lady Syd’s Free Christmas Card Template Using Photoshop Elements

This template was processed completely in Photoshop Elements. Same steps as with the regular Photoshop program. Open up your other image(s), CTRL+A to select the whole image, and CTRL+C to copy the image. (These are both images I took last Christmas.) Switch to the template file, highlight the layer(s) that indicates where the photo(s) should be placed, and press CTRL+V to place the image above that layer. Then use the Move Tool to scale, rotate, and move the image(s) to place it. The Background Image layer was changed to 73% opacity. That’s it. Below is an image of the layers as they appear in the finished image above.

Note the Text Layer has a 1 pixel Stroke layer style set to Black and Outside. The Frame Layer has an Outer Glow layer style set to Blend Mode Screen at 75% opacity and Size 16 pixels to make the frame stand out a little. To find the Layer Styles in Elements, highlight your layer to add effect to, go to Menu -> Layer -> Layer Style -> Style Settings. I painted a little beige color over the white flakes to make the lettering stand out better. The white snowflakes and frame snowflakes brushes are Design by Firgs Snowflake Brush 6. (Firg’s Snowflake Shape Pack is not free but now are for sale. To try a different option download Obsidian Dawn’s free Snowflakes Photoshop Custom Shapes.)Font is Fantaisie Artistique – if you do not have it on your computer, your computer will substitute a different font or you can download it (right click on it after downloading to add to font list) and it will appear correct.
****DOWNLOAD LINK TO MY BASIC HOLIDAY CARD TEMPLATE****
This is pretty simple and you should be able to get lots of different looks. See my blog for other examples on how to use this template. Have a good time and enjoy!…..Digital Lady Syd
Digital Lady Syd’s Related Blogs:
Digital Lady Syd’s Free Christmas Card Template
Free Christmas Card Templates-Part 2
Free Christmas Card Vectors and Brushes
Some Holiday Cheer
Digital Lady Syd’s Free Christmas Card Template

I have been wanting to create a versatile card template that could easily be used with your own images and background. Here is what I have come up with for a basic template for any kind of card. (Download at bottom.) It is set to 8 1/2 inches X 5 1/2 inches, one of the standard sizes for cards (and fits an 8 1/2 inch X 11 inch sheet). On the above image, the kids picture is one of mine that I scanned – it turned out pretty nice considering how old it is. The beautiful bokeh-like background is from ibJennyjenny Magical textures set 3, texture 3 with a Hue/Saturation Adjustment layer added to make color more greenish. I love the Christmas Toy Train font (look at the text file to learn how to use it if you download it) – it replaced the Fantaisie Artistique font in the template.
The file below is exactly how the card should look when using the downloaded template (with my images added). The one above has the “Place Your Photo Above” layer and the “Frame Snowflake 6…” layers turned 90 degrees. This is where the flexibility is – almost all elements can be swapped out and changed and you still have the basic template to follow.

To help you understand how to use the layers, below is a copy of the Layers Panel for the downloaded Basic Template and on the right is the Layers Panel for the image above to show you how it was created.


The type font can be easily changed by highlighting the type layer and double-clicking on the T icon to activate the editing mode for the layer. (The template and the above photo both use my favorite free font Fantaisie Artistique – when you open the template, if you do not have this font on your computer, one from your hard drive will be substituted or download this one, right click on the file and load to your computer.) Layer styles can be added to all the layers, like the Snowflake 6 brush (from Design by Firg’s Snowflake Shape Pack) layer with the White Inner Glow and Outer Glow. Firg’s Snowflake Shape Pack is not free but now are for sale. To try a different option download Obsidian Dawn’s free Snowflakes Photoshop Custom Shapes. All the snowflakes used in this image are the same brush. Need to give credit to the people who create these wonderful free resources on the internet: the tree image was created using a Winter Tree brush by Mels Brushes, Gorjuss Snowflake brushes for tree branches, and Snow Drops brush by FROSTBO for the pretty colored small snowflakes.
……

This image uses exactly the same template with a generic free family image (downloaded from stock.xchng). The Bitstream font is Freehand 575 BT. The same background is used from ibJennyjenny Magical textures set 3, texture 3, as used as above. The ornament is from Photoshop Free Brushes Christmas Balls set – painted a yellow ball on a layer, painted it in, then changed colors and painted it in a reddish color on top to make the design show through.
****DOWNLOAD LINK TO MY BASIC HOLIDAY CARD TEMPLATE****
To create the inside page, just turn off the photo image layers, make your text larger and create a little saying. Friday I will do a short example for my Photoshop Elements friends as this template works fine for this program also also. Have fun using the template and Happy Holidays!…..Digital Lady Syd
Digital Lady Syd’s Related Blogs:
Digital Lady Syd’s Free Christmas Card Template Using Photoshop Elements
Free Christmas Card Templates-Part 2
Free Christmas Card Vectors and Brushes
Some Holiday Cheer
Some Free Christmas Overlays to Spice Up Your Christmas Cards


