
My Happy Firecracker Plant

No matter what weather is down here in Florida, this plant is blooming and always healthy. It gets huge every year and needs to be cut back. I paid $.75 for it in the damaged plant section of Lowe’s – now it is repaying me with great health! I guess I wish all my plants were like this. Anyway, this Firecracker Plant macro image was processed pretty much with just the same ole workflow that I always follow. I did use it to try out Blake Rudis’s Video for getting the best detail out of a photo – it is called Don’t Use Clarity – Use This Instead and involves using the High Pass Filter. Actually I felt it did a little better adding detail in this image compared to Topaz Sharpen. A small highlight was added on a few of the blooms where the focal point have been more pronounced. A Color Lookup Adjustment Layer set to the Foggy Night preset at 71% Layer Opacity and Luminosity Blend Mode was added. On a stamped layer The Smart Photo Editor filter was used to add a final effect. Fun to get back to my flower photography again!…..Digital Lady Syd
Two Rough-Housing Grizzlies
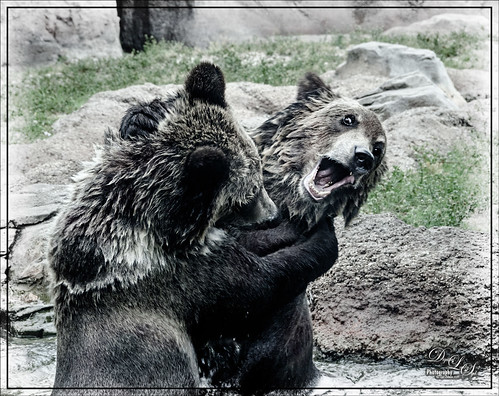
This image of what appears to be two Grizzlies going at each other in the Alaskan wilderness, but is actually just two bears playing in the water on a hot afternoon at the West Palm Beach Zoo, according to the Zookeepers. Definitely pretty exciting to watch though! In Lightroom Kim Klassen’s free Lightroom Sampler Dark 1 preset was applied and the eyes and teeth were sharpened with an Adjustment Brush. Opened image in Photoshop and Lucis Pro 6.0.9 was used to get that classic Lucis look (settings: Enhance Details Red Channel 161/Green 183/Blue 129 and Assign Original Image Color 0/100). (See my Digital Lady Syd Reviews Lucis Pro 6.0.9 (Now Affordable!) blog.) Did a little dodging and burning on eyes and teeth. Used a Black and White Adjustment Layer to fine-tune the focal point. Added the border using Smart Photo Editor‘s Brighten Border by Tony. (See my Digital Lady Syd Reviews Smart Photo Editor Photoshop Plug-In blog.) Then decided it had a little too much cyan in the fur so used a Color Balance Adjustment Layer to add a little dab of red to the Midtones and Shadows. Enjoyed how this image turned out – rather natural looking and just like I remember it. These bears were not making any loud noises, really just having fun!……Digital Lady Syd
Vintage Post Card
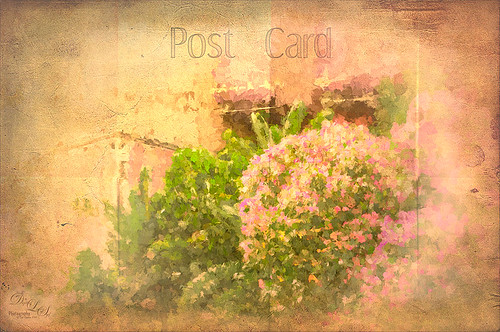
This image was taken at Epcot, Disney World, Florida. This is an example of just trying different effects to get a different look. Recently I have done several blogs on Photoshop plug-ins that give some wonderful results. Here is another example of using them together. First in Lightroom Seim’s (see sidebar for website link) Super Her X and Warm Classic presets were applied along with Delnea’s Backlight Vertical Left preset. Topaz (see sidebar for website link) Star Effect was applied and it place bright dots along the flowers to emphasize this area (Started with Jewel Sparkle I preset with these settings: Star Settings Combined, Burst Star, and Brush Size 99; Main Adjustments Threshold 0.13, Luminance 0.51, Size 0.50, Angle 70.40, Number of Points 8, and Spread 0.07; Color Adjustments Sat 0.64, Temp 0.54, Rainbow Strength 0.25, Rainbow Freq 0; and Additional Effects Secondary Points 0.01, Glow 0.26, and Ring Flare 0.) On a duplicated layer Nik’s Analog Efex Pro 2 was applied. (These are the settings for the preset I created: a Vintage Camera preset and the Basic Adjustments Detail Extraction 17%, Brightness 35%, Contrast -21% and Saturation 19%; Bokeh at 88% blur strength and Boost Highlights at 84%; Dirt & Scratches at 82% strength and 1st row/2nd texture; Photo Plate at 20% strength using 2nd row/2nd over texture; Lens Vignette set to Amount 37%, Rectangle and Size 77%; Film Type Warm 2nd line/2nd over with center Neutral to Faded, 52% strength, Grain per pixel 429 and center Soft to Hard; and Levels & Curves dragging RGB curve down in midtones were added.) Topaz Impression was applied. (Monet II preset: Paint Opacity 1.00, Stroke Width 0.14; Color Overall Lightness 0, Yellow Sat -0.50, Green Sat 0.27, and Magenta Sat 0.39; Lighting Light Direction x 0.84 and y 0.34.) On a duplicate layer Smart Photo Editor was applied. (Settings applied were: Folded paper texture by Andrew 2012 – set Master fade back just a little bit; next Vignette fade edges by Tony – Reduce Fade set a little left of center, Brightness 1.015, Contrast -0.247, Linear Contrast -0.258, and Radius 1757.) A New Layer was added and some clean up was done. Next Viveza 2 was applied with emphasis on the focal point. A Curves Adjustment Layer was added to add contrast back into the image. The last step added Shadowhouse Creations vintage postcard texture set to Hard Light at 85% layer opacity. A layer mask was added and the center was painted out so the image was not too dark in the focal point area. Whew! But overall it does have a distinct look and I really like it……Digital Lady Syd


