
Using Topaz Adjust 5 and Color Efex Pro 4 with Photoshop Elements
Since I began showing some of the things you can do in Photoshop Elements, I thought I would show how you can get really great results adding plug-ins to the program. They work the same in Photoshop CS5 and Elements. This is a really good deal for Elements users since it gives you some features you cannot do in the program itself. For example, Topaz Adjust 5 has a Curve Tool where tonal contrast can be added to image there is you need it.
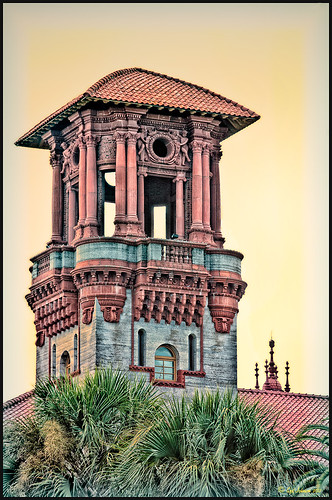 |
The image is one of the towers of the old Hotel Alcazar (now St. Augustine’s City Hall and Lightner Museum). Hover over the picture to see the original shot. To begin with, I was not happy with the washed out sky – not a hint of color in it!
1. Once in Photoshop Elements, you can immediately go into NIK Color Efex Pro 4 because this plug-in creates its own layer to make changes to. Go to Filter -> NIK – > Color Efex Pro 4. After lots of experimentation (which is really nice since if you mess up, there is a History panel on the left so you can go back to where you started), a new Flagler Tower recipe was created stacking these 5 filters: High Key, Film Efex: Vintage (using Film Type 7), Brilliance/Warmth, Vignette, and Detail Extractor in this order. Not a lot of changes were made to the sliders.
2. Duplicate this layer and name Topaz Adjust 5.
3. Open the Filter the same way as above. In Adjust a preset created in an earlier version was applied that was called Sunset on Building. I cannot tell you how it was created since it was done some time ago in an earlier version. Unfortunately it is very hard to tell which preset you started with in Topaz (as opposed to NIK) – you just have to save what you like. I did use the Curve Tool in the Global Adjustments section to make the contrast in the image better.
4. Back in Photoshop the layer was changed to the Darken Blend Mode.
Do take the time to check out these two plug-ins, especially the Topaz Adjust 5 plug-in (see right sidebar for Topaz Adjust 4 to link to website) – it was the first one I bought and I have not regretted it. Topaz is known for their reasonable prices in the plug-in world and once you buy their plug-ins, you get their upgrades for free! No one does that! And NIK’s Color Efex Pro 4 may be the best plug-in ever developed! And do not forget to try the combinations of your plug-ins – sometimes the results are incredible!
I hope this gives everyone an idea on how easy it is to use plug-ins, and most plug-ins compatible with Photoshop CS5 are also compatible with Elements. They usually have reasonable trial periods so you should see if this will take your Photoshop expression to a new level. I know it does for me!…..Digital Lady Syd
Digital Lady Syd’s Related Blogs:
Digital Lady Syd’s Review of Topaz Adjust 5
Topaz Adjust 5 is Here! First Look!
The New Film Efex-Vintage Filter From NIK CEP 4
NIK Color Efex Pro 4 – Digital Lady Syd’s Review!
Combining Plug-ins – Double the Effect!
Psuedo HDR Using NIK Color Efex Pro!
Why I Love Topaz Adjust!
Black and White Photo or Not? Give It a Try on That Difficult Image
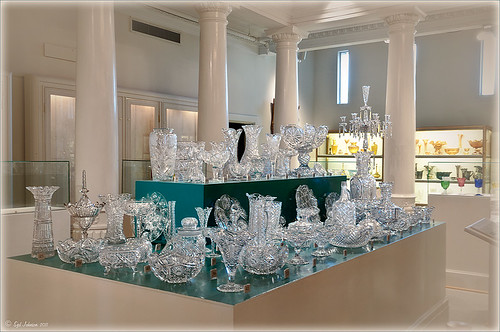 |
This image is of the beautiful cut glass display at the Lightner Museum located in the old Alcazar Hotel in St. Augustine. As you can see it is a very nice collection and I wanted to find out if the color in the image was distracting from actually seeing the ornate cut glass. See the black and white conversion by hovering over the color image. As I discovered, this image turned out to be a difficult choice to process no matter which effect you want.
Color Version
The top image was processed using the NIK Color Efex Pro 4 (CEP4) plug-in on a Smart Object layer (right click image and select “Convert to a Smart Object” since CEP4 will keep your settings and control points in case you want to adjust the results later) and stacking several filters including from top to bottom: Tonal Contrast, Darker/Lighten Center, Vignette, Glamour Glow, and Pro Contrast. Various control points were added to selectively choose areas for some of these effects. In Photoshop the cut glass edges were selectively sharpened using the Sharpen Tool on it own layer, and a final Curves Adjustment layer was added to get the correct contrast. Overall, this image is attractive since the blue-green sets off the glassware nicely.
Since there are some bright colors in the background that might be distracting from the main focus point, and the museum walls and columns have what I consider to be a rather bland creamy color to it, a black and white conversion might be appropriate to tone down some of the distraction and get rid of the creamy tones.
Black and White Version
I duplicated the cleaned up image layer and turned it into a Smart Object as above. Once in the NIK silver Efex Pro 2 (SEP2} plug-in, from the side preset panel the o14 Grad ND (EV -2) preset was selected and it really made the glass pop out clearly. In Photoshop the Sharpen Tool was used to bring out some of the glass edges (again, do this on a New Layer above the image) and the opacity of this layer is reduced so artifacts are not viewed. A final Adjustment Curve is added to give just the right amount of contrast. The items on the back wall initially appear to be more distracting than in the color image but the creamy tones did convert to the white tones nicely.
Conclusion
The image may not work as a black and white and the only way to figure this out is to try it. In this case SEP2 was used to convert the image to black and white, but the conversion can be done in lots of ways – in Adobe Camera Raw or Lightroom using a preset, or in Photoshop using a Black and White Adjustment Layer or Channels, as just a couple examples. NIK’s SEP2 is an excellent way to find out quickly since the presets allow you to glance over many black and white variations – if the image is really not going to look good as a black and white, you will know it.!
I am on the fence about which version I like best. The image was not the best choice to process to begin with and the glass creates a huge challenge just to get enough contrast to make the it stand out. Still it was good practice and I like the picture because I liked the cut glass collection. Just remember sometimes the image you want to process is not that great and does not work – but at least try a couple different effects including black and white and maybe there is a good shot hidden in there!…..Digital Lady Syd
Related Digital Lady Syd Blogs:
NIK’s Champion Plug-in – Silver Efex Pro 2
Topaz B&W Effects vs. Nik’s Silver Efex Pro
Topaz B&W Effects Plug-In – A Real Winner!
Topaz B&W Effects vs. Nik’s Silver Efex Pro
I did a blog on my Fun Photoshop Blog called “Topaz B&W Effect Plug-in – A Real Winner!” that touched on some of the differences of Topaz’s new plug-in and the great black and white standard plug-in by Nik called Silver Efex Pro 2.0. I thought I would just mention a few other things I noticed that are definitely different about the two programs.
Below is one of my favorite images for trying out new effects (the original has some basic flaws so I can see if the product will correct it) and was taken from the London Eye. Topaz B&W Effects was applied (hover over or click on image to see the Nik version).
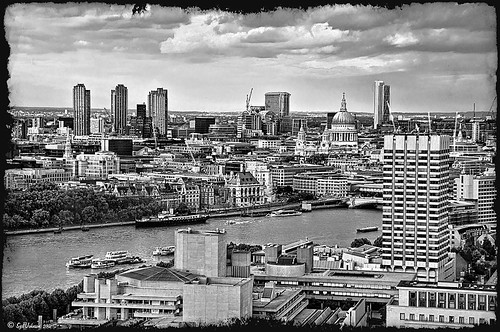 |
This is as close as I could get to making the two plug-ins look alike. The sky and some of the buildings’ contrast and detail are slightly different, but overall the results are pretty much the same. I am not sure which version I like best.
The image below I also used Topaz B&W Effects.

In this case, I could not duplicate the results in either NIK Silver Efex Pro 2.0 or Color Efex Pro 3.0. I liked the results and was surprised how nice the image turned out. By the way, I created for the Topaz plug-in a SJ-Cityscape preset for use in the Traditional Collection for both of the Topaz images – it can be downloaded here.
My final thought is to say that I think there is a place for both black and white plug-ins. Nik’s black and white plug-in is considered the best and I am not sure Topaz has created a better one, but it is very close. Topaz B&W Effects is definitely a great product since it does several things the other plug-in cannot do – and I really like that.
Well I hope you have fun (I sure am) trying out both of these excellent products. I plan on experimenting more with Topaz’s B&W Effects and will post more on it later……Digital Lady Syd
PS. Be sure to download the 30 day trial for Topaz B&W Effects – it is a fully functional trial to try out!


