
Meeting a Belarusian Horse!

This beautiful horse was in a field outside an old wooden windmill in Belarus. I had forgotten I had taken his pix. Since I did a blog called Can You Get a Painting Look With a Photoshop Action? Jack Davis Can!, this image was processed in Lightroom using his Wow! Antique 03 preset, which included the framing. Check out my other blog for downloading info of his Lightroom presets. The image was taken into Photoshop and the Burn and Dodge Tools were used directly on a duplicate copy of the background. I would never have tried this if I had not watched a short video on Lynda.com called Black and White with Lightroom and Photoshop by Bryan Hughes O’Neill, Adobe Photoshop Senior Product Manager who really knows what all the sliders do in these programs. It was very interesting and I learned to use these tools. The main thing to remember is to keep Protect Tones checked. With the Dodge Tool set to Shadows at 50% Exposure, the horses eyes were painted over to make them pop. Burning Tool was used to separate his face from the field using Midtones and Highlights selected. A New Layer was created for the Sharpen Tool – therefore be sure to check Sample All Layers and Protect Detail in Options Bar. The Strength was set to 12% and the effect was built up slowly where sharpening needed to be added. It does not introduce a lot of artifacts this way. A Curves Adjustment Layer was added on top and dragged down in image to get a little more contrast. That was all that was done to get this lovely effect. What a beautiful creature!…..Digital Lady Syd
Digital Lady Syd Related Blogs:
Using Old Wallpaper for a Vintage Look
My Favorite Adobe Lightroom 5 Features
I Didn’t Know That! Converting Lightroom Preset to Adobe Camera Raw Preset
 |
I occasionally come across a need to take a Lightroom preset and use it as a preset in Adobe Camera Raw. This is not as complicated as it seems. Below are the steps required to accomplish this task.
1. Apply the preset in Lightroom and make sure you know which panels and sliders you used. (If preset not already created, to save preset in Lightroom, on left side of Presets line, click (+) for “Create New Preset.” Name preset.)
2. Right click on image in Lightroom and select Edit in -> Open as Smart Object in Photoshop. The image is opened in Photoshop with the Smart Object icon on bottom right of thumbnail in Layers Panel.
3. Double click on thumbnail and it opens up into Adobe Camera Raw. Go to Presets panel (9th icon over on righthand side under the histogram) and the click folder icon at the bottom of the panel to open the New Preset dialog. Name and click the items you want included in the preset, then click OK. Your new preset shows up in the Presets panel.
You can now use your Lightroom preset anytime you want in Adobe Camera Raw also. I usually start my personal preset names off with an SJ so I know they are mine. It is easy to get presets from many different sources as time goes on so it helps to know which are yours.
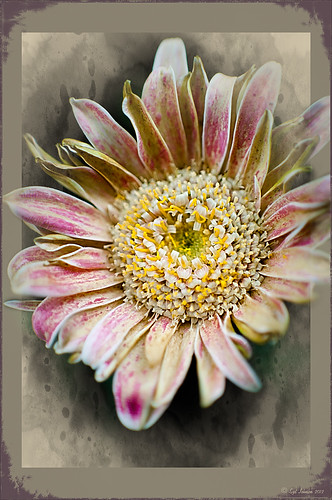
The image above is of a miniature mum in my yard. Hover over the image to see how the image looked with just a Lightroom preset I created called Dark Vignette – it makes the background very dark behind the flower. For information on how to create this preset and how the image was finished, see bottom of blog for details.
Hope this helped you get a little more organized…..Digital Lady Syd
To create this preset, changes were made to: the Tone Curve set to Highlights -24, Lights +41, Darks -56, and Shadows -54; HSL – Luminance sliders set to Red -41, Orange -9, Purple -2, Magenta -50 and all others 0, and Saturation sliders set to Red -2, Purple +32, Magenta +59 and all others set to 0; Effects Post-Crop Vignetting Style set to Highlight Priority with Amount -61, Midpoint 33 Feather 0 and others set to 0. To finish, image was sharpened and OnOne PhotoFrames (see sidebar for website link) acid burn controlled 15 was added and reduced in size in the plug in, and then grunge 12 was added on top – in Photoshop petals were painted over frame edge using a layer mask on first acid burn frame.
Digital Lady Syd Related Blogs:
Colorful Blown Out Look Lightroom and Adobe Camera Raw Preset
Settings for Vivid Drawing Look ACR/Lightroom Preset and NIK Color Efex Pro 4 Pseudo HDR Recipe
Topaz Simplify and Lens Effects Saves an Image!
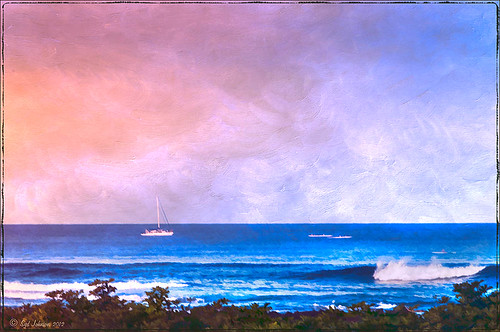 |
The catamaran is one of the whale watching boats you can take while on the Big Island in Hawaii (see Hawaii Ocean Sports for more information on this). This image was taken the day before my adventure and it was not a good at all (hover over image to see original RAW image) – but I really wanted a shot of the boat on the water. Therefore some improvisation had to be employed. After cropping and doing some RAW adjustments in Lightroom, Topaz (see sidebar for website link) came to the rescue. Topaz Simplify 3 was applied first to get rid of the focus issue – the BuzzSim preset was used as a starting point with these changes: Simplify Size slider was changed to 0.15, Brightness slider changed to 0.08, Saturation slider to 1.27, Edges: Color Edge Fine, and Edge Strength slider 1.50. Next Topaz Lens Effects was applied using the Filter Dual Tone Effect to create the warm feel in the sky with a preset I previously created called Sunrise Effect. (See below if you would like the settings for the preset.) Next Flypaper’s Paper Texture Creme Anglaise (one gorgeous texture!) was used via Russell Brown’s Paper Texture Panel for Photoshop CS5 and CS6 (see my blog Russell Brown’s Paper Texture Panel – A Real Winner!) and set to Divide Blend Mode at 100% opacity. A Curves Adjustment Layer was added to fix the contrast. Finally OnOne’s Photoframe grunge 09 was added (see sidebar for link). An image I would normally have trashed has now been turned into a beautiful picture that I really love. Give this technique a try if you own the Topaz plug-ins. The combination works great together, especially if you want to save an image!…..Digital Lady Syd
My Topaz Lens Effects Sunrise Preset contains these settings: Transition Adjustments – Region Size 0.45, Transition 0.35, and Angle 149.7; Region A Adjustments – Cyan Cast 0, Red Cast 0.20, Magenta Cast 0.01, Green Cast 0.03, Yellow Cast 0.70, and Blue Cast 0.24; Region B Adjustments – Cyan Cast 0.15, Red Cast 0.10, Magenta Cast 0.15, Green Cast 0.05, Yellow Cast 0, and Blue Cast 0.05; and Image Adjustments – Brightness 0.05, Contrast 0.08, and Saturation 0.07.
Digital Lady Syd Related Blogs:
Topaz Simplify and Topaz Detail Together
Simplifier and Simplify Filters
Russell Brown Texture Panel Landscape Image
Topaz Black and White Effects Quad Tones Are Great!

Just another day in paradise! This is beach front at the Waikoloa Beach Marriott Resort and Spa on the Big Island in Hawaii. I was having trouble finding some way to make the image really pop and look like it looked to me when I was there. I ended up going into Topaz’s Black and White Effects (see sidebar for website link) thinking it might look good as a black and white image. In Topaz plug-ins, you have to reset your settings or the last one used shows up on the image. Well the last effect I had used was my Old Vintage Effect Preset and it gave this image exactly what it needed. To create this preset, see my blog “Quad Tones in Topaz Black and White Effects Plug-in” to get the basic information to create the quad tone colors required for this warm sunny feel. I did increase the Adaptive Exposure slider from 0.18 to 0.41 to get more of an HDR look, checked Process Details Independently because of a little haloing around the tree trunks, and selected a light Vignette for this image instead of a Border. In Photoshop I had to remove a little noise. No sharpening or curve adjustments were needed. OnOne (see sidebar for website link) PhotoFrame Taufer Texture 12 was added. I really like this combination of colors and have used it many times. Try the settings if you want to get that warm feel…..Digital Lady Syd
Digital Lady Syd Related Blogs:
Sunny Preset for Topaz Black and White Effects
The Art Corner: Painting and Sculpture by Tassaert
Topaz Plug-Ins – Same Image Trying Each!
Topaz B&W Effects Plug-In – A Real Winner!


