
Christmas at SeaWorld Orlando

These “floating” trees were in the pond area at SeaWorld Orlando in October and they looked really strange. I decided to spruce them up a bit and give them that holiday feel – these must have been the first decorations they put up. I have said it before and I will say it again – whenever I cannot figure out something interesting to do with an image, OnOne’s (see website link on sidebar) Perfect Effects usually has the answer. In this case two effects were stacked: Nicely Toasted preset from the Vintage group – set to Hard Light at 74% opacity and Warm Vintage also from the Vintage Group with a few changes to Brightness (-45), Contrast (-40), and Darken Blend Mode with Strength 58. A Composite Channel Curve was set (In157/Out 138). My free Snow1 Overlay was added along with my free Merry Christmas PNG Overlay using an Outer Glow layer style set to a bluish color (Blend Mode Normal, Opacity 39%, Spread 8%, and Size 215 px) – use this trick to to make your text and overlays stand out if on a busy background. Added text layer for my name, and added French Kiss Glorious Grunge Edging Only with the grunge erased from the middle. All of these overlays used a Solid Color Adjustment Layer set to a soft cream color sampled from the roof of the building. (Layer -> New Fill Color -> Solid Color and check Use Previous Layer to Create Clipping Mask for each overlay). The text layer used the same color. A Curves Adjustment Layer was added and the mask filled with black – with a 30% opacity white soft brush, the areas I wanted affected were painted back in the mask. That was it. Hope you can use a few of these tricks to make some nice cards…..Digital Lady Syd
Digital Lady Syd Related Blogs:
Where to Find Those Cool Free Christmas Card Templates?
Free Christmas Card Vectors and Brushes
Beautiful Christmas Flowers
Some Free Christmas Overlays to Spice Up Your Christmas Cards
Where Am I?

I have not posted a Where Am I in a while, so here goes. This weekend while watching the Scottish Open at Castle Stuart Golf Links, I started reminiscing about my trip to Scotland a few years ago and what a beautiful county it is. This particular day it was raining, rather typical late summer weather in this region. I am standing at the top of the beautiful Urquhart Castle which overlooks Loch Ness. We were on a tour that arrived by boat and it was beautiful in spite of the ugly weather. This is a great castle to visit and explore if you get in this part of the world.
This image was processed in Lightroom on two different virtual copies – one to bring the sky in nicely, and one for the castle and surrounding grounds. The copies were selected and opened in Photoshop by going to Edit In -> Open as Layers in Photoshop so they were in one file. The castle layer was placed on the bottom and the sky layer on top. Added a layer mask to the sky layer and used a Black to Transparent linear gradient so only the sky still showed from the top layer. A composite was made and in Nik’s Color Efex Pro 4, the Detail Extractor filter was applied using the Detail slider at 42% and (-) control points applied to the sky and water, a Darken/Lighten Center filter was applied, and a dark Vignette filter. There was quite a bit of noise in the sky so Imagenomics Noiseware was applied at Stronger Luma Noise (I recently bought this plug-in as I found it to be very good.) The Sharpen Tool was used to bring back a little detail in the hillside foliage and the people after applying the noiseware – very subtle change here. A Curves Adjustment Layer was added and Nik’s Viveza 2 – just added that pop in parts of the castle stonework with layer set to 63%.
The results came out very nice and how I remember it – to be honest I think it really was a lot drearier than it appears here but this is how I want to remember it!…..Digital Lady Syd
Digital Lady Syd Related Blogs:
Can a Pseudo HDR Image be as Good as the Real Thing? (Part Two)
Using photoFXlab v1.1

These sculptured fish mark the entrance to a huge breakfast buffet at the Hilton Waikoloa Village where you can have breakfast with several hundred of your closest tourist friends! Since I have been trying out Topaz photoFXlab v1.1 (see sidebar for website link), I thought I would try it out on this image that was adjusted in Lightroom first. Since it has a comical appearance to it, I thought the Topaz Simplify Cartoon preset would suit this shot. Basically some minor adjustments were made to the preset and then the Adjustments tab in photoFXlab was opened and these sliders were used: Dynamics (the Topaz Adjust HDR slider and is really a great new addition) was set to 56, Sharpness 44, Highlights 49 and Shadows -34. After application of the plug-in, a Curves Adjustment Layer was added in Photoshop along with OnOne PhotoFrame lines 04 (see sidebar for website link) with color sampled from the image. That’s it! Pretty fast and I really like it. Also it did not need any more sharpening or clean up.
Not all images work out this easy in the plug-in, but it really is nice once you start using it……Digital Lady Syd
Digital Lady Syd Related Blogs:
Digital Lady Syd’s Review of Topaz photoFXlab v1.1
Blue Flowers and Layer Style Frame

This image is actually of my pink and white Jazze Rose Frost Alestroemeria (see my blog Magnificent Macros with Nik Plug-Ins) but the colors were changed to purple and blue. I first tried this in a blog called Purple Lily Pads! using a slightly different technique with similar results. Just couldn’t resist posting again how easy it was to do this. First I applied the Topaz (see website link in sidebar) Simplify filter to get the soft petal look. I used a Simplify Size of .85 and Feature Boost of .78 to get a really painterly feel. In Nik’s Viveza (my favorite overall plug-in), the color sliders were changed to get the blue and purple colors. Control Points were added to adjust the background and parts of the flowers to get good detailed structure. The frame was created by just making a Photoshop Layer Style. In the Stroke tab the Size was set to 54 pixels, Inside Position, and Fill Type Pattern – just select any pattern that fits your image colors. I am using a pattern from Victorian Dreams by Princess of Shadows – texture 10 at a Scale of 1000. In the Inner Shadow tab set the Size t0 70. It is very easy to make frames for your images this way since there are so many patterns available to use. Anyway, it was a lot of fun to do!…..Digital Lady Syd
Pseudo HDR Using an Old Image

I am not in the habit of using other peoples images but I just had to try a little “pseudo HDR” on this image from a junkyard in 1942. Shorpy Historical Photo Archive – Vintage Fine Art Prints has the best historical images you will ever see, including this recent one. They obtain most of their images from the Library of Congress (I searched for salvage depot and found other interesting images like the above). Shorpy’s website is on my list to visit on a daily basis. Most of his older images are not in color, but they are always interesting.
For this example the low res jpg image was used. Nik’s Color Efex Pro 4 with these filters were stacked: Detail Extractor, Film Efex Nostalgic Film Type 4 at 68% strength, Midnight using the Neutral Color Set and Blur at 4% and Overall Strength set to 50%, Vignette, and Image Borders. This image does not have any restrictions for use according to the Library of Congress so I feel comfortable showing it. It was fun trying different effects on this image. Go to either resource and see what you can find!…..Digital Lady Syd
Digital Lady Syd Related Blogs:
Little Green Frog’s Makeover Using Nik’s Color Efex Pro 4!
White Daisies! Using Color Efex Pro Midnight Filter
Nik CEP4’s Film Efex Faded for an Illustrative Look

Had fun working on this little Hawaiian ‘Elepaio bird that was living with a bunch of his buddies at the Palace Tower in the Hilton Waikoloa Village. For very small birds they really make a racket, especially around sunrise and sunset – very busy, busy, busy birds! To create this sketch-like effect, he was processed in Nik Color Efex Pro 4 stacking just two filters – the Detail Extractor and Film Efex Faded set to Film Type 11 and an overall opacity of 71%. A Curves Adjustment Layer was added to add contrast and OnOne PhotoFrame (see sidebar for website link) Dave Cross 02 to finish the image. Very simple but I really loved the illustrative look of the bird. These new Film Efex filters in Color Efex Pro 4 give some great results but you have to play around with them to achieve it sometimes. Here is a link that shows what the Film Efex Faded filter will do from their website – Nik is currently presenting a filter each week and showing how it can be used. Really good stuff here!…..Digital Lady Syd
Digital Lady Syd’s Related Blogs:
Nik Color Efex Pro 4 Just Does It Right!
The New Film Efex-Vintage Filter From NIK CEP 4
Little Green Frog’s Makeover Using Nik’s Color Efex Pro 4!

This little guy was hiding between a couple Queen Emma Lily leaves during a rather heavy rainstorm. Had to get his picture! He is a Green Treefrog and is one of the reasons I don’t get a good night’s sleep this time of year, but his coloring is beautiful!
I tried several different effects before settling on a recipe of Nik’s Color Efex Pro 4 filters. These filters were stacked as follows: Detail Extractor set to an Overall Opacity of 50%; Midnight using Neutral Color Set, the Blur slider reduced to 8%, and Overall Opacity of the filter set to 80%; Vignette Lens centered on frog and Overall Opacity set to 53%; and Image Borders – just a plain Type 13. This is a reminder that you don’t have to use the filter effect at 100% – just open up the Control Points panel at bottom of each filter panel and an Opacity slider appears that can be adjusted for the amount you want. Back in Photoshop, I used the LAB Sharpening technique to sharpen up just his body a little (see my blog Unsharp Mask Filter in LAB Mode). A Curves Adjustment Layer was added to increase contrast just a little and that was it. He has no idea how handsome he is!…..Digital Lady Syd
Digital Lady Syd Related Blogs:
NIK Color Efex Pro 4 – Digital Lady Syd’s Review!
Pseudo HDR Using NIK Color Efex Pro 4
White Daisies! Using Color Efex Pro Midnight Filter
Nik Color Efex Pro 4 Just Does It Right!
Whale Watching with Nik’s Color Efex Pro 4 & Viveza 2

One of the many photos of a great whale watching trip on the Big Island in Hawaii. (See Hawaii Ocean Sports for information on whale watching boat trip.) This image used one of the workflows I like to use for quick processing of my images. The RAW file was adjusted in Lightroom where the Highlights, Shadows, Whites and Blacks sliders were moved. Next the Exposure and Contrast sliders were adjusted, and finally it was straightened and cropped. The image was brought into Photoshop and opened in Nik’s Color Efex Pro where five filters were added in this stack order: B&W Conversion (Dynamic Contrast), Photo Stylizer (Cool Silver – Style 1), Low Key, Darken/Lighten Center, and Detail Extractor applied just to background area with Control Points. Not sure how I came up with this combination, but I really liked the final result. Nik’s Viveza 2 was used to sharpen up the whale and water blowing up behind him. OnOne PhotoFrame acid controlled 12 (see sidebar for website link) was added using a matching color from image. That was it!
The combination of Color Efex Pro and Viveza is a pretty powerful combination. I do not process any image now without at least going into Viveza – it is a fabulous finishing plug-in…..Digital Lady Syd
Digital Lady Syd Related Blogs:
Nik’s Viveza 2 Plug-In – A Hidden Gem!
Detail Pop Using Nik Color Efex Pro and Viveza
Using NIK’s Color Efex Pro 4 and Viveza Together
Nik Color Efex Pro 4 Just Does It Right!

Loved the beautiful old puppets on display in one of the walkways at the Hilton Waikoloa Village on the Big Island in Hawaii. It seemed like a perfect time to once again add the Nik Color Efex Pro 4’s new Film Efex – Vintage filter. The Colorize Filter, Midnight Filter, and Image Border were then stacked on top. Finally a little Nik Viveza 2 to sharpen the elephant a bit and that was it! Love the results!…..Digital Lady Syd
Digital Lady Syd Related Blogs:
The New Film Efex-Vintage Filter From NIK CEP 4
Beautiful Daisies with Film Efex: Vintage in Nik Color Efex Pro 4
Unsharp Mask Filter In LAB Mode
(Here are my settings for the filters: Film Efex-Vintage – Saturation 10%, Warmth 79, Vignette 63, Brightness -2, Grains per pixel 500, Film Strength 80%, and Film Type 13; Colorize – Method 6, Color R143G209B219, Strength 5%; Midnight – Color Set Neutral, Blur 0, Contrast 30, Brightness 60, Color 57, Shadows 20, and Overall 78%; and Image Border – Type 3, Size 60%, and Spread 98%.)
Another Soft Hawaiian Landscape

Image was taken at Lapakahi Historical State Park of one of the homes the early Hawaiians lived in roughly 600 years ago on the western side of the Big Island.
For this image, the steps used were from my my blog Using Color Efex Pro and Texture for a Warm Hawaiian Landscape Effect for the second image. Same Lightroom preset, same textures (using Russell Brown’s Texture Panel (see my blog Russell Brown’s Paper Texture Panel Updated!), and same adjustment layers. Image was sharpened and a New Layer was added on top where a paint brush set to yellow at 20% opacity was used to paint in the blown out highlights on the roof of the house. (See my blog Getting Rid of Those Blown Out Areas in Your Image on how to do this.) A different OnOne PhotoFrame was added – Taufer_Texture_12. (See sidebar for website link.)
Not very realistic but definitely has that Hawaiian feel and that is okay!…..Digital Lady Syd
Topaz Simplify and Lens Effects Saves an Image!
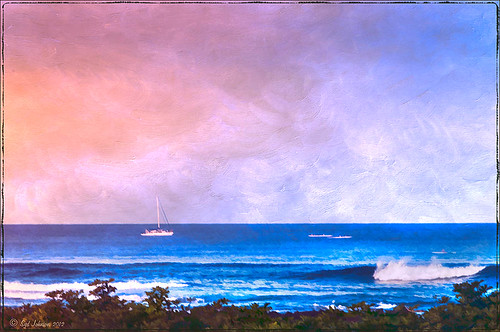 |
The catamaran is one of the whale watching boats you can take while on the Big Island in Hawaii (see Hawaii Ocean Sports for more information on this). This image was taken the day before my adventure and it was not a good at all (hover over image to see original RAW image) – but I really wanted a shot of the boat on the water. Therefore some improvisation had to be employed. After cropping and doing some RAW adjustments in Lightroom, Topaz (see sidebar for website link) came to the rescue. Topaz Simplify 3 was applied first to get rid of the focus issue – the BuzzSim preset was used as a starting point with these changes: Simplify Size slider was changed to 0.15, Brightness slider changed to 0.08, Saturation slider to 1.27, Edges: Color Edge Fine, and Edge Strength slider 1.50. Next Topaz Lens Effects was applied using the Filter Dual Tone Effect to create the warm feel in the sky with a preset I previously created called Sunrise Effect. (See below if you would like the settings for the preset.) Next Flypaper’s Paper Texture Creme Anglaise (one gorgeous texture!) was used via Russell Brown’s Paper Texture Panel for Photoshop CS5 and CS6 (see my blog Russell Brown’s Paper Texture Panel – A Real Winner!) and set to Divide Blend Mode at 100% opacity. A Curves Adjustment Layer was added to fix the contrast. Finally OnOne’s Photoframe grunge 09 was added (see sidebar for link). An image I would normally have trashed has now been turned into a beautiful picture that I really love. Give this technique a try if you own the Topaz plug-ins. The combination works great together, especially if you want to save an image!…..Digital Lady Syd
My Topaz Lens Effects Sunrise Preset contains these settings: Transition Adjustments – Region Size 0.45, Transition 0.35, and Angle 149.7; Region A Adjustments – Cyan Cast 0, Red Cast 0.20, Magenta Cast 0.01, Green Cast 0.03, Yellow Cast 0.70, and Blue Cast 0.24; Region B Adjustments – Cyan Cast 0.15, Red Cast 0.10, Magenta Cast 0.15, Green Cast 0.05, Yellow Cast 0, and Blue Cast 0.05; and Image Adjustments – Brightness 0.05, Contrast 0.08, and Saturation 0.07.
Digital Lady Syd Related Blogs:
Topaz Simplify and Topaz Detail Together
Simplifier and Simplify Filters
Russell Brown Texture Panel Landscape Image
Some of My Favorite Plug-Ins
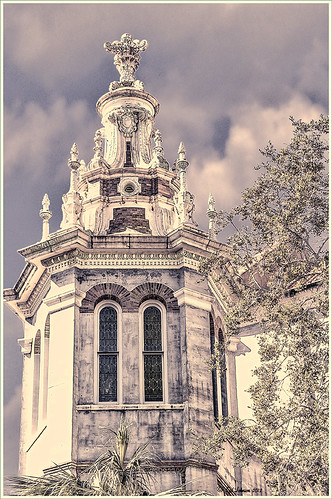 |
I am starting to sort through all the plug-ins that are out there and slowly figuring out what really works for my workflow. This is a really hard process since there are so many great plug-ins and some of them give very similar results. I have blogged on this many times showing how the same images look with the various plug-in effects.
I started working on this image – not one I was totally in love with, but the old Flagler Presbyterian Church is so beautiful to look at that I wanted to create that sensation in the image. I began by manipulating the file in Topaz Adjust 5 (see link to website in sidebar) and hit the “Get Lucky” button just for the heck of it – and this really cool illustrated look appeared that I was not sure what to do with it. (Hover over image to see the Topaz 5 illustrated image.) I decided it needed a new sky so I opened up OnOne’s Perfect Mask (see website link in sidebar) and added a sky I had placed below the image. This plug-in is the best one I have found for replacing skies quickly – check out the little holes in the trees where the sky peaks through. Next several different effects were tried but none made me go “Wow” — that is until I decided to go into the Topaz Black and White Effects plug-in (see link to website in sidebar). It took no time at all – in fact I started with the same settings from my “My Office Friend Ted” image which was a totally different type of image. A few things were adjusted but it still was not quite right. Back in Photoshop a Color Balance Adjustment Layer was added to bring out the blues in the sky a bit more to get the right look. Now it looks like I remember it – but it took some effort. Luckily, I had a plug-in that gave me a great start.
I guess I can honestly say I still love both Topaz Adjust and Black and White Effects – they do have that versatility to turn an okay image around. Definitely great plug-ins and reasonably priced too! And OnOne Perfect Mask is the best for skies – still figuring this plug-in out for other types of selections. I hope to have a page set up soon on which plug-ins have made it into my workflow……Digital Lady Syd
Digital Lady Syd Related Blogs:
Topaz Plug-Ins – Same Image Trying Each!
Same Image – Different Plug-In
Another OnOne Perfect Effects Pix – Got to Love It!
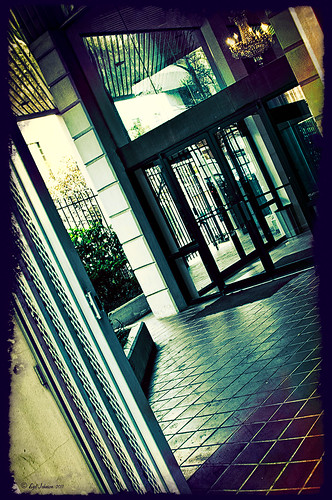 |
I discovered I really liked this image of an entryway into a building in Jackson, Mississippi, that was completely empty. Really sad to see such a nice space and nothing in it. Anyway, when I took the picture there was some vertical distortion (hover over image to see original) that I was not able to get rid of easily. While inside the Lens Correction Filter trying to straighten up these bowing lines, I discovered that the image looked really neat twisted – so that is how this picture started out.
The image was still a little flat so I decided to experiment some more in the updated plug-in from OnOne called Perfect Effects (see sidebar for website link). This image has three effects stacked – in Black & White tab, Roadie filter was chosen and set to Overlay blend mode at 73%; in Movie Looks, Urban Sickness set to Color blend mode at 78%; and in Vintage, Nicely Toasted set to Darken blend mode at 100%. The layer was duplicated and rasterized (right click layer and select rasterize to get rid of smart object) and the Sponge Tool was applied to the yellow leaves in the background to color them a bit more. On a duplicate layer a High Pass filter set to 9.1 was to sharpen the image and set to Soft blend mode. A final Curves Adjustment Layer was added for contrast and OnOne.s PhotoFilter acid burn controlled frame. That is it and I love the results!
This is how I like to experiment – just try different things as you go into the various parts of Photoshop – it can be amazing what you come up with. I did not imagine this image as a diagonal, but it really does the image justice. I hope this will give you some inspiration to try this technique on some of your pictures – it can be quite interesting…..Digital Lady Syd
Digital Lady Syd’s Related Blogs:
Digital Lady Syd’s Review of OnOne Perfect Effects
Pseudo HDR in OnOne Perfect Effects
First Try – OnOne’s Perfect Effects 3
Where Am I?

What I think turned out kind of nice is the application of the free Adobe Pixel Bender plug-in using the favorite Oil Paint effect. It is very easy to figure out the 5 sliders. I did this awhile ago and thought it shows one of my best results. A layer mask was used to remove the effect from certain parts of the image.
Okay – guess you could tell this was in a beautiful tropical place. This is an image of the Ka’anapali Beach Club in Maui, Hawaii.
Go ahead and download Pixel Bender if you have not tried it already and take a whirl at something quite different and fun to do!…..Digital Lady Syd.
NIK Color Efex Pro 4 – First Try!
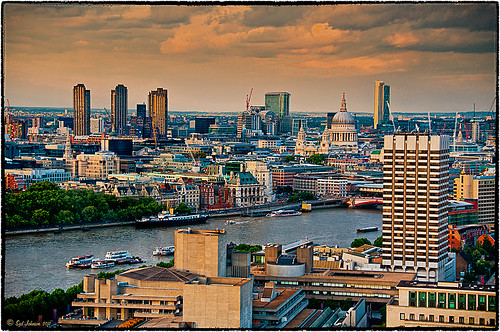 |
Well, here is my old standby image from the London Eye used as an example of what the long-awaited NIK Color Efex Pro 4 upgrade will do. Hover over image to see original. I am still sorting through all the new features they have added to this wonderful plug-in. Check out my Fun Photoshop Blog “Nik Color Efex Pro 4 – Digital Lady Syd’s Review” for a more in depth discussion.
One of the major new features allows you to stack any number of filters and save the whole group as a preset to use again. I really stacked up this image just to see what results I could get. The filters in the order they are stacked are: Tonal Contrast, Brilliance/Warmth, Vignette: Lens (a new filter), Contrast Color Range, Remove Color Cast (Plus Control Point set on faded green trees on left – click to see original problem area), Graduated Filter, and Image Borders.
I believe the final result is quite striking. In the meantime I will still be playing with the filters and trying different stacks to see what really looks good. If you get a chance, go download the trial version and see what you think…..Digital Lady Syd
Just a Tree!
Sometimes I find that combining recent effects I have learned in Photoshop can create something that is quite unique. Obviously not all things I create are that great, but even so, I am learning something about how all the different elements go together. This image is an example of this type of creativity. Just had fun putting together some of my favorite brushes and filters and came up with this tree.

The tree is one of Mels Winter Tree Brushes placed on a layer above the background, and on the next layer foliage was added using several of Gorguss Grunge Again (click on upper right – Photoshop Brushes) brushes. Both brush sets are favorites of mine. Two of ShadowHouse Creation Textures (5 Assorted Textures Set and Vintage Oil Painting Texture Set-2) were stacked underneath. A composite layer was made (CTRL+SHIFT+ALT+E) and opened up in Topaz B&W Effects plug-in (see sidebar for link) – a Cyanotype Collection preset was used to get the bluish appearance, and the Transparency was lowered so some of the colors showed through. Back in Photoshop a new layer was created on top and using Texturemate’s Rough Sand Texture brush 9 in blue on top at 70% opacity. That was it. I really like the effect.
It can really be a lot of fun to mix and match – give it a try!…..Digital Lady Syd


