
Using photoFXlab v1.1

These sculptured fish mark the entrance to a huge breakfast buffet at the Hilton Waikoloa Village where you can have breakfast with several hundred of your closest tourist friends! Since I have been trying out Topaz photoFXlab v1.1 (see sidebar for website link), I thought I would try it out on this image that was adjusted in Lightroom first. Since it has a comical appearance to it, I thought the Topaz Simplify Cartoon preset would suit this shot. Basically some minor adjustments were made to the preset and then the Adjustments tab in photoFXlab was opened and these sliders were used: Dynamics (the Topaz Adjust HDR slider and is really a great new addition) was set to 56, Sharpness 44, Highlights 49 and Shadows -34. After application of the plug-in, a Curves Adjustment Layer was added in Photoshop along with OnOne PhotoFrame lines 04 (see sidebar for website link) with color sampled from the image. That’s it! Pretty fast and I really like it. Also it did not need any more sharpening or clean up.
Not all images work out this easy in the plug-in, but it really is nice once you start using it……Digital Lady Syd
Digital Lady Syd Related Blogs:
Digital Lady Syd’s Review of Topaz photoFXlab v1.1
Where Am I?

What I think turned out kind of nice is the application of the free Adobe Pixel Bender plug-in using the favorite Oil Paint effect. It is very easy to figure out the 5 sliders. I did this awhile ago and thought it shows one of my best results. A layer mask was used to remove the effect from certain parts of the image.
Okay – guess you could tell this was in a beautiful tropical place. This is an image of the Ka’anapali Beach Club in Maui, Hawaii.
Go ahead and download Pixel Bender if you have not tried it already and take a whirl at something quite different and fun to do!…..Digital Lady Syd.
Quad Tones in Topaz Black and White Effects Plug-in
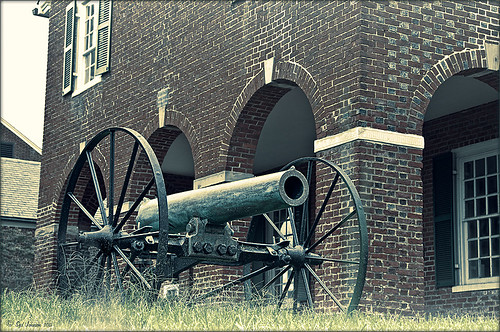 |
This image is of an old cannon on the grounds of the Historic Fairfax County Courthouse in Virginia. I do love NIK’s new Color Efex Pro 4 plug-in, but I keep going back to Topaz’s new Black and White Effects plug-in. (Hover over image to see original shot.)
The Topaz Black and White Effects preset I created gives a really nice sunny vintage feel and I think it is great for that historic look. To create the preset, select the Van Dyke Brown Collection Effect and Chamoisee Cyan preset as a starting point. The trick to getting this look is to set up in Finishing Touches the Quad Tones using these settings: Color 1 Region (R1 G1 B12) – 15.08; Color 2 Region (R63 G78 B85) – 143.9; Color 3 Region (R216 G211 B129) – 227.5; and Color 4 Region (R255 G254 B237) – 225.0. The sliders will need to be adjusted depending upon the image used. The Transparency setting was set to 1.00. For this image a small light Edge was added. Also, I was able to brush away the distortion over the back part of the left wheel using the Burn tool with a large brush and lightly clicking a few times, then using a smaller brush to run over the details just a bit. It totally disappeared! These brushes work wonders! To bring out the cannon a little more, back in Photoshop the image was sharpened using a High Pass Filter set to 9.1 Radius, a black mask was added to cover up the effect, and then by painting just the cannon on the mask, only it becomes sharp.
I really like the Quad Tone effect in this plug-in. Topaz has created a very nice video on how to use this section called “Quick Tip – Quad Toning Explored.” This may be the key to why it is hard to reproduce this look in other plug-ins.
For more information on this plug-in, see these related posts:
Fun Photoshop Blog: “Topaz B&W Effects Plug-In-A Real Winner!”
Tidbits Blog: “Topaz B&W Effects vs. Nik’s Silver Efex Pro”
Tidbits Blog: “Just Another Topaz Black and White Effect Example“
The New Film Efex-Vintage Filter From NIK CEP 4
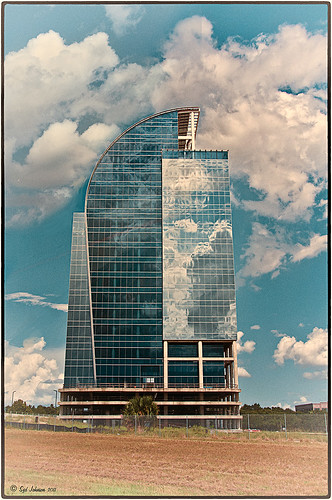 |
I love this image – the clouds reflecting in this building on I-4 in Orlando were beautiful! Hover over image to see original image. The stack contains these filter effects: Darken/Lighten Center, Brilliance/Warmth, Tonal Contrast, Image Borders, Dark Contrasts, and Film Efex: Vintage (another one of the new filters that has so many different film types that it is hard to choose one). Below is what the Film Efex: Vintage screen looks like to give you an idea of how many choices you have just for this one new filter.

In this NIK interface image, you can see how all the filter effects stack. For just this filter there are 29 film types to choose from – the one showing is Type 17 but I actually ended up using Type 11. There are so many sliders to adjust to get just the look you want. (In case you cannot read them, from top to bottom they are: Saturation, Warmth, Vignette, Brightness, Grain per Pixel, Film Strength, Film Type (drop down list) and Opacity. The Opacity slider at the bottom will do a final effect amount so the image does not look overdone. Below is another example of what a nice effect this filter will give. Only this filter with Film Type 16 was applied and it brought out the texture of the wall very nicely.

Just using this one filter and trying out different effects will be a lot of fun! Definitely give this filter a second look – much more than it appears at first glance!…..Digital Lady Syd
PS: Check out my Fun Photoshop Blog “NIK Color Efex Pro – Digital Lady Syd’s Review” and my Tidbit Blog “NIK Color Efex Pro 4 – First Try!” for more information on this great plug-in from NIK.


