
Digital Lady Syd’s Free Christmas Card Template Using Photoshop Elements

This template was processed completely in Photoshop Elements. Same steps as with the regular Photoshop program. Open up your other image(s), CTRL+A to select the whole image, and CTRL+C to copy the image. (These are both images I took last Christmas.) Switch to the template file, highlight the layer(s) that indicates where the photo(s) should be placed, and press CTRL+V to place the image above that layer. Then use the Move Tool to scale, rotate, and move the image(s) to place it. The Background Image layer was changed to 73% opacity. That’s it. Below is an image of the layers as they appear in the finished image above.

Note the Text Layer has a 1 pixel Stroke layer style set to Black and Outside. The Frame Layer has an Outer Glow layer style set to Blend Mode Screen at 75% opacity and Size 16 pixels to make the frame stand out a little. To find the Layer Styles in Elements, highlight your layer to add effect to, go to Menu -> Layer -> Layer Style -> Style Settings. I painted a little beige color over the white flakes to make the lettering stand out better. The white snowflakes and frame snowflakes brushes are Design by Firgs Snowflake Brush 6. (Firg’s Snowflake Shape Pack is not free but now are for sale. To try a different option download Obsidian Dawn’s free Snowflakes Photoshop Custom Shapes.)Font is Fantaisie Artistique – if you do not have it on your computer, your computer will substitute a different font or you can download it (right click on it after downloading to add to font list) and it will appear correct.
****DOWNLOAD LINK TO MY BASIC HOLIDAY CARD TEMPLATE****
This is pretty simple and you should be able to get lots of different looks. See my blog for other examples on how to use this template. Have a good time and enjoy!…..Digital Lady Syd
Digital Lady Syd’s Related Blogs:
Digital Lady Syd’s Free Christmas Card Template
Free Christmas Card Templates-Part 2
Free Christmas Card Vectors and Brushes
Some Holiday Cheer
Photoshop Elements Scene Cleaner
Since I am new to Photoshop Elements, I was surprised by the accolades Elements is receiving for their PhotoMerge capabilities, especially Scene Cleaner. It is something that cannot be done nearly as easily in Photoshop CS5 but has been in Elements since version 7. (For Photoshop CS5 people, Mike Hale’s Stack Mode Panel at Russell Brown’s website does have a panel that can be added to do this very thing.)

The image above is of a street corner in St. Augustine, Florida. Both the Scene Cleaner and the Saturated Slide Show effect were applied to this image. Here is how this was done:

1. For Scene Cleaner there must be at least two shots of the same image with the moving objects in different positions. In this case, it was the guy on the bicycle that road into my view while I was photographing. If lots of tourists are in your image, you will need several shots which you probably will have anyway if you shoot in bursts like most people do, especially if using a DSLR camera. If not, remember to do this when taking a picture of a famous place with lots of people around – this technique will save your picture!
2. Open Photoshop Elements and adjust all images at once in Adobe Camera Raw, trying to get their exposures as close as possible. (See my Tidbits Blog “Adobe Camera Raw – Not So Obvious in Photoshop Elements 10” on how to do this.) Click Open Image button and open all images up into Photoshop Elements. Do the adjustments this way so you do not have a bunch of layers to merge down before doing the next step.
3. Make sure the Project Bin at bottom is open (double click on the words Project Bin to toggle between open and closed) so all three images show up in it.
4. Go to Edit tab on right and select Guided, then PhotoMerge section, and finally Scene Cleaner. The program is now aligning the images. One of the images will appear in the left image box called the Source.
5. Need to look at all your images and decide which one is exposed the best for the final image. In the bin click and drag this image into the right Final image location. In the case above, the bottom image was used as the Final image and top image was the Source image. If more images had been available, different images can be changed out as the source image by just clicking on each one in the bottom bin.
6. Select a Source image that has an area cleared of any object or tourist that is ruining the other image. Select the pencil tool and set the brush size to about 35 pixels. This is key to getting this to work – Paint roughly in the Source image in the area where you think the interfering object is in the Final image – the object magically disappears in the other Final image. It may not be a perfect removal, but it does a pretty good job! A second image can be selected as a Source and marked up to remove other problem areas in the Final if needed. If you get lost, follow the Guide notes – they even have some advanced tips. The Show Regions box can be checked to see how each image is affecting the final result. Click Done to apply.
7. Use Crop Tool to cut away any mismatched white areas around Final image.
8. The image above still showed a bit of a hand. Therefore a Clone Layer was added and the hand blended out.
9. For the concrete shadow color issue (can see the different colors between the two images used above), the Lasso Tool was used to select the bad colored cement and it was placed on its own layer (with selection active, click CTRL+J). A Hue/Saturation Adjustment Layer was opened and the Colorize box was checked (these settings were set: Hue 210, Saturation 14, and Lightness -28) to match the cements.
10. The final step involved going to Edit -> Guided -> Saturated Slide Show Effect. It was applied 6 times to get the over-saturated look I liked.
This sounds like it was hard to do, but in reality it was really simple. The biggest issue is getting two or more shots that have different enough views to be able to remove the moving objects. Everyone says the Scene Cleaner is really a great addition and personally I wish they had it in Photoshop CS5. It has been fun learning a new technique in Elements. Give it a try!…..Digital Lady Syd
Using Topaz Adjust 5 and Color Efex Pro 4 with Photoshop Elements
Since I began showing some of the things you can do in Photoshop Elements, I thought I would show how you can get really great results adding plug-ins to the program. They work the same in Photoshop CS5 and Elements. This is a really good deal for Elements users since it gives you some features you cannot do in the program itself. For example, Topaz Adjust 5 has a Curve Tool where tonal contrast can be added to image there is you need it.
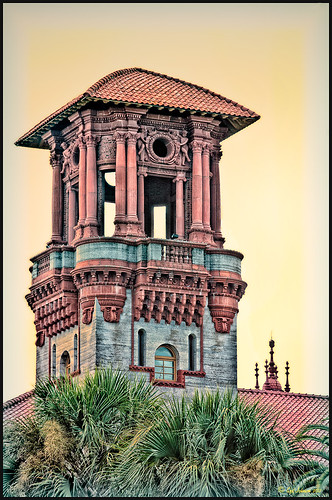 |
The image is one of the towers of the old Hotel Alcazar (now St. Augustine’s City Hall and Lightner Museum). Hover over the picture to see the original shot. To begin with, I was not happy with the washed out sky – not a hint of color in it!
1. Once in Photoshop Elements, you can immediately go into NIK Color Efex Pro 4 because this plug-in creates its own layer to make changes to. Go to Filter -> NIK – > Color Efex Pro 4. After lots of experimentation (which is really nice since if you mess up, there is a History panel on the left so you can go back to where you started), a new Flagler Tower recipe was created stacking these 5 filters: High Key, Film Efex: Vintage (using Film Type 7), Brilliance/Warmth, Vignette, and Detail Extractor in this order. Not a lot of changes were made to the sliders.
2. Duplicate this layer and name Topaz Adjust 5.
3. Open the Filter the same way as above. In Adjust a preset created in an earlier version was applied that was called Sunset on Building. I cannot tell you how it was created since it was done some time ago in an earlier version. Unfortunately it is very hard to tell which preset you started with in Topaz (as opposed to NIK) – you just have to save what you like. I did use the Curve Tool in the Global Adjustments section to make the contrast in the image better.
4. Back in Photoshop the layer was changed to the Darken Blend Mode.
Do take the time to check out these two plug-ins, especially the Topaz Adjust 5 plug-in (see right sidebar for Topaz Adjust 4 to link to website) – it was the first one I bought and I have not regretted it. Topaz is known for their reasonable prices in the plug-in world and once you buy their plug-ins, you get their upgrades for free! No one does that! And NIK’s Color Efex Pro 4 may be the best plug-in ever developed! And do not forget to try the combinations of your plug-ins – sometimes the results are incredible!
I hope this gives everyone an idea on how easy it is to use plug-ins, and most plug-ins compatible with Photoshop CS5 are also compatible with Elements. They usually have reasonable trial periods so you should see if this will take your Photoshop expression to a new level. I know it does for me!…..Digital Lady Syd
Digital Lady Syd’s Related Blogs:
Digital Lady Syd’s Review of Topaz Adjust 5
Topaz Adjust 5 is Here! First Look!
The New Film Efex-Vintage Filter From NIK CEP 4
NIK Color Efex Pro 4 – Digital Lady Syd’s Review!
Combining Plug-ins – Double the Effect!
Psuedo HDR Using NIK Color Efex Pro!
Why I Love Topaz Adjust!
Elements & CS5 Friday: Adding a Texture for a Totally New Look to an Image
Friday blogs are going to be for Adobe Photoshop Elements along with some techniques crossing over with Adobe Photoshop CS5. I realize there is a huge group of digital fanatics out there using the quite capable little sister to CS5. So let’s start.
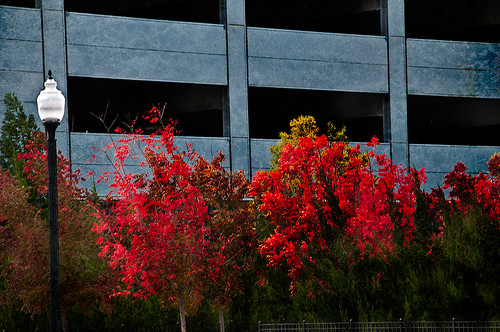 |
Unfortunately these beautiful trees are in a very run-down part of the city and located in front of a parking garage. I guess my point is that just because something is not in a gorgeous settng, it can make a really nice image with just a little effort. Hover over the image to see what the original image looked like.
To achieve this nice effect, all that was done is to add an interesting texture image as a layer on top of your basic picture. In this case, a really grungy looking texture creates this wonderful effect on the building and in the tree colors. This free texture is from Shadowhouse Creations and is called You’d Be Surprised – download it here. This is one of the best texture sites I have found on the internet – beautiful textures all for free!
Here are the steps required to create this look:
1. Open your image in Photoshop Elements (or CS5).
2. Clean up any areas that need to be touched up using the Clone Stamp Tool or Content Aware Healing Brush.
3. Go to File -> Open and navigate to the downloaded texture, in this case You’d Be Surprised, to open in Elements (or CS5) as a separate image.
4. Select image (CTRL + A), copy (CTRL + C) and then go to the original image and paste (CTRL +V) into the file which now puts the new image on top of your image. Close the texture image without saving.
5. Since the texture is probably too small to cover your image, we will use a Free Transform (CTRL+T) to expand the image – just drag the corners out to completely cover the original layer underneath.
6. Change the texture layer to Overlay Blend Mode at the top of the Layers Panel (click on down arrow to the right of Normal).
7. (Optional Step) If certain areas would look better without the texture, highlight this layer and click the Add a Mask icon (2nd icon over from left at bottom of the Layers Panel). This adds a white layer mask – click on it in the Layers Panel and paint with a black soft brush set to 50% opacity. Paint into areas you do not want the texture affecting.
For this image, the lamppost and light were painted out in black along with a little bit of the red leaves in the trees to increase the color range in the leaves, and some of the dark green bushes to add some lighter highlights for interest.
8. (Optional Step) To sharpen parts of the image to make certain areas stand out, click on the Create a New Layer icon (1st icon at the bottom of the Layers Panel and 6th icon from left for CS5). Select the Sharpen Tool (it is nested with the Blur Tool and Smudge Tool – 3rd icon from the bottom on the Tool Bar or 11 from bottom for CS5) and leave the top options set to the default settings except check Sample All Layers. On this new layer, with a soft edged brush paint over the objects you want to sharpen – since the brush is set to a default Strength of 50%, go over the object a few times to build up a really sharp effect. Watch out for artifacts if too much is applied. The nice thing is, since this sharpening is on its own layer, it can be deleted and started over or the opacity can be reduced if too much is added.
In the image above, just the lamppost and light and a few of the top red and yellow leaves were sharpened.
You are done! And this texture creates a very beautiful look. Look at some of the other images Shadowhouse Creations used with this texture at the download site link above.
Well I hope you enjoyed this blog – I did. I love working with textures and this workflow can be used over and over again to achieve some beautiful results using any texture. Have Fun Creating!…..Digital Lady Syd


