
Lightner Museum’s Unusual Chandelier

Sometimes you just like an image and that is what this is. The shot was taken at the Lightner Museum in St. Augustine, Florida and I am having trouble finding any information about the chandelier. Very simple processing using Nik Color Efex Pro 4 filters stacking Tonal Contrast, Darken/Lighten Center, Detail Extractor, and Vignette. Next Nik Viveza 2 was applied to bring out the color a little more on the green grapes and a couple of the glass flowers. Imagenomics Noiseware was applied at Full Noise Reduction preset as the image was quite noisy due to the high 1250 ISO value needed to shoot in the museum. The last step added the OnOne PhotoFrame Vincent Versace photo wide frame (see sidebar for website link). I got a chance to play around with some of my favorite plug-ins!…..Digital Lady Syd
Digital Lady Syd Related Blogs:
Little Girl Statue at Lightner Museum – contains all my other Lightner links at bottom of blog
Another Soft Hawaiian Landscape

Image was taken at Lapakahi Historical State Park of one of the homes the early Hawaiians lived in roughly 600 years ago on the western side of the Big Island.
For this image, the steps used were from my my blog Using Color Efex Pro and Texture for a Warm Hawaiian Landscape Effect for the second image. Same Lightroom preset, same textures (using Russell Brown’s Texture Panel (see my blog Russell Brown’s Paper Texture Panel Updated!), and same adjustment layers. Image was sharpened and a New Layer was added on top where a paint brush set to yellow at 20% opacity was used to paint in the blown out highlights on the roof of the house. (See my blog Getting Rid of Those Blown Out Areas in Your Image on how to do this.) A different OnOne PhotoFrame was added – Taufer_Texture_12. (See sidebar for website link.)
Not very realistic but definitely has that Hawaiian feel and that is okay!…..Digital Lady Syd
Pseudo HDR in OnOne Perfect Effects
Since I have tried this in other plug-ins, I thought I would give it a shot in OnOne’s new Perfect Effects plug-in (see sidebar for link to OnOne’s website) to see if I could get a similar effect. Just as I thought – no problemo!
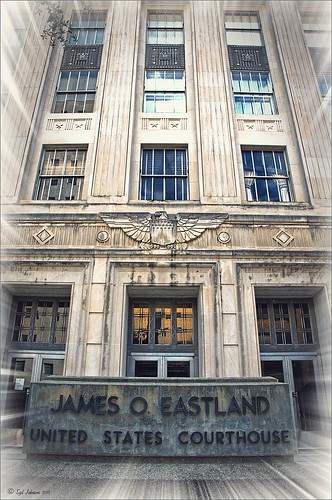 |
This is a rather unremarkable image except I liked the carved eagle engraved on the building. Hover over the image to see the original. By using Perfect Effects, I was able to get that pseudo HDR effect easily. These are the effects used in this image stacked bottom to top: Black and White preset set to Roadie in Multiply Blend Mode at Strength 100; Color Enhancer (Open up Effect Options and select Color Enhancer) and Color Range Orange was chosen to bring out the Orange color by adjusting the Hue set to 37, Saturation set to 77 and Lightness set to 94 sliders; another Color Enhancer layer was added to adjust the Blue Color Range – Saturation to 92 and Lightness to -35; and another Color Enhancer layer set to Aqua Color Range – Saturation 46 and Lightness 18; next the Golden Hour Enhancer preset in the Landscape section at Strength 63; Vignette created in the Blending Options drop-down with Brightness set to -68, Midpoint 58, Feather 80 and Roundness 5 and Normal Mode; and finally Katy preset in Vintage section set to Strength 100. It sounds hard, but once done, just create a preset to recreate it anytime – very easy to apply. To finish up the image in Photoshop, on a New Layer the Sharpen Tool was used to selectively sharpen the Eagle and some of the window lines. Finally the OnOne’s PhotoFrames zoom_19 frame was applied.
NOTE: After applying each layer preset or effects settings, be sure to click the Add button under the Strength slider to set the changes. To toggle the original and current views, press CTRL+P.
Well once again this was lots of fun and pretty easy to do. Give it a try and see if you like what you see. If you are interested in the pseudo HDR look, check some of my related posts below……Digital Lady Syd
Digital Lady Syd’s Related Blogs:
Digital Lady Syd’s Review of OnOne Perfect Effects
First Try – OnOne’s Perfect Effects 3!
Pseudo HDR Using NIK Color Efex Pro 4
Another Pseudo HDR Image with NIK CEP4 – Got to Love the Effect!
With One Good Photo – Try the Pseudo HDR Effect


