
Visiting the Country
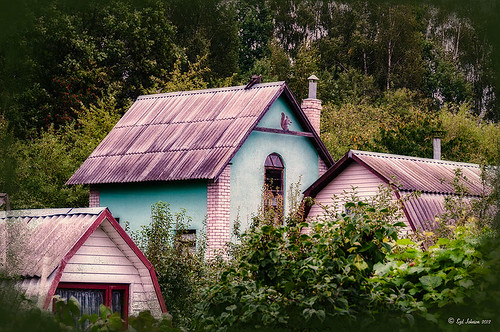
This is an image of several dachas in the countryside outside the City of Minsk in Belarus. This image had very little processing done to it – just three filters stacked in Nik Color Efex Pro 4 (Brilliance/Warmth, Midnight using the Neutral Color Set, and Detail Extractor). A Curves Adjustment Layer was added and several power lines were removed following my Get Rid of Those Power Lines Fast – with Paths and Spot Healing Tool! blog. The overlay is the same one created for the top image in the blog linked below, and was added with a dark green Color Fill Layer clipped (ALT+click between the layers) to it so it looks dark. See my How to Create an Overlay Out of a Texture blog on how to create this overlay. I like the soft diffused effect the filters created…..Digital Lady Syd
Where Am I?

May have figured this out already since I have posted very similar photos – but this is at Fortunato Park in Ormond Beach, Florida – and is one of my favorite places. The above is the rooftop cupola from the old Hotel Ormond – the only remaining part from a beautiful old hotel that was torn down in 1992. It was in such a bad condition that it could be restored – what a shame!
Okay – I am a huge Photoshop plug-in fan – I love to be able to do something with a photo that I could not do just in Photoshop or Lightroom alone. Nik plug-ins really made this image! Basically Nik’s Viveza 2 (my very FAVORITE plug-in – can’t beat it for fixing any problem in an image) was applied to the image to add detail and contrast to localized areas of the image (detail in the orange roof, saturation and color to sky in middle of cupola, and detail to the interesting lines on the building). That in itself added a huge improvement to the image. Next Nik’s Color Efex Pro 4 was added and three filters stacked: Bleach Bypass, Detail Extractor, and Film Efex Vintage using Method 14 and setting the Overall Opacity slider to 52% – did not want to overdo the vintage feel. I use the Film Efex Vintage often – lots of versatility in just this one filter! (See related blog links below for other examples.) Next Shadowhouse Creations Scratch Box frame layer was applied – this is from the Scratch & Frame Box Overlay.PSD file he supplies. (Check these out – some great borders just in the PSD file!) I created a PNG file of just the frame by following the steps in my blog How To Make Frames or Borders – scroll down to the section called “To save the frame you created as an overlay to use again” and follow steps. I used an off white color sampled from the image in a Color Adjustment Layer clipped (ALT+click between layers) for the frame. That was all I did and I love the slightly vintage effect – goes nice with historic buildings. Next time I will show you a totally different look for this same image (see A Fairytale Gazebo)……Digital Lady Syd
Digital Lady Syd Related Blogs:
Digital Lady Syd Reviews Nik HDR Efex Pro 2
Little Red Corvette
Yellow Dogface Butterfly in her Glory!
The New Film Efex-Vintage Filter From NIK CEP 4
Musical Daisies

My musical flower image basically started out by my experimenting with some inexpensive French Kiss Brushes I recently bought. The background is from Shadowhouse Creations – Old Paper Texture 4. My flower image was added and a layer mask applied so that only a few daisies were showing. Once done, the layer mask was applied to the image (right click on layer mask and choose Apply Mask). A Color Balance Adjustment Layer was added and sliders in the Midtones (0, +13, -18), Highlights (), +11, -12), and Shadows (-31, +4, _32) were set to change the flower color somewhat. (I am listing the settings just to give you a feel for how these can be adjusted.) All the following brush layers were added underneath the image but above the texture layer – that way the brush strokes look like they are part of the texture and do not cover the image. It is also now easier to adjust the layer opacity and color. French Kiss Watercolor Spots 1_14 PNG brush file was applied on a New Layer and a bright pink Color Fill Adjustment Layer was clipped to it (ALT+click between the two layers to clip). Next a layer with one French Kiss Spatter4_14 brush PNG file stroke was applied and a purplish Color Fill Adjustment Layer was clipped to it. Another new layer and French Kiss Spatter 2_04 was applied with a deeper purple and set to 51% opacity. I seem to like adjusting a PNG file over the actual painted stroke – it seems easier to me but I am not sure it makes that much difference whether you actually stroke the image or use an overlay PNG stroke. French Kiss Vintage French Music in a set called French Kiss Vintage French Brushes 2 was added on top at 82% opacity, and a brown Color Fill Adjustment Layer was clipped to the layer. The music was painted off the flowers by using a layer mask. (Not sure why I placed it above the image – it would have been easier below.) The last step was a Curves Adjustment Layer to lighten up the image overall. This actually was not as hard as it sounds. Mainly just a lot of paint being spattered! What fun!…..Digital Lady Syd
Christmas at SeaWorld Orlando

These “floating” trees were in the pond area at SeaWorld Orlando in October and they looked really strange. I decided to spruce them up a bit and give them that holiday feel – these must have been the first decorations they put up. I have said it before and I will say it again – whenever I cannot figure out something interesting to do with an image, OnOne’s (see website link on sidebar) Perfect Effects usually has the answer. In this case two effects were stacked: Nicely Toasted preset from the Vintage group – set to Hard Light at 74% opacity and Warm Vintage also from the Vintage Group with a few changes to Brightness (-45), Contrast (-40), and Darken Blend Mode with Strength 58. A Composite Channel Curve was set (In157/Out 138). My free Snow1 Overlay was added along with my free Merry Christmas PNG Overlay using an Outer Glow layer style set to a bluish color (Blend Mode Normal, Opacity 39%, Spread 8%, and Size 215 px) – use this trick to to make your text and overlays stand out if on a busy background. Added text layer for my name, and added French Kiss Glorious Grunge Edging Only with the grunge erased from the middle. All of these overlays used a Solid Color Adjustment Layer set to a soft cream color sampled from the roof of the building. (Layer -> New Fill Color -> Solid Color and check Use Previous Layer to Create Clipping Mask for each overlay). The text layer used the same color. A Curves Adjustment Layer was added and the mask filled with black – with a 30% opacity white soft brush, the areas I wanted affected were painted back in the mask. That was it. Hope you can use a few of these tricks to make some nice cards…..Digital Lady Syd
Digital Lady Syd Related Blogs:
Where to Find Those Cool Free Christmas Card Templates?
Free Christmas Card Vectors and Brushes
Beautiful Christmas Flowers
Some Free Christmas Overlays to Spice Up Your Christmas Cards
Using a Couple of My Textures

Just thought I would post a little link to how my textures can work together. These are my miniature mums on my back porch – they were processed in Lightroom using my workflow (see How to Use Adobe Camera Raw (ACR) or Lightroom 4 Quickly). Once in Photoshop clean up was done first on some of the petals, and a High Pass Filter set to radius 8 and Soft Light blend mode to sharpen the flowers. Next my free Pastel Watercolor Texture set to Hard Light, and Cat Painting Texture set to Hard Light at 40% opacity. Last a couple of French Kiss Splatter brushes were added and my French Photography Overlay I created (see How to Create Personal Overlays for Your Images). That is all that was involved. Enjoy!…..Digital Lady Syd
The Textured Flower Look!

Really enjoying processing the beautiful little white mums still blooming on my back porch. I recently found yet another wonderful texture site and decided to give it a try. The flower image was first processed in Lightroom – a preset called Summer Haze by Matt Kloskowski (one of the Photoshop guys at NAPP) was first applied and it turned everything into this soft warm summery feeling. With the Basic sliders a few tweaks were added to increase Exposure and open up the Shadows a little, and then a couple adjustment brushes were created to add sharpening and clarity to the flower centers. Once in Photoshop some blown out highlights were softened (see Getting Rid of Those Blown Out Areas in Your Image and a little Burning was done to bring out some of the flower lines. Next a beautiful Kim Klassen Texture called Organic was added and set to Hard Light blend mode at 92%. (Join her site and get lots of her beautiful textures for free including this one!) A Levels Adjustment Layer was added to increase the contrast a little. Next I added one of my own overlays I created (see How to Create Personal Overlays for Your Images) and used a layer mask to remove part of it – just wanted a little showing. I also used a small splatter brush at 15% opacity to reduce parts of the lettering without reducing all of it. The last step involved adding my favorite French Kiss Glorious Grunge Edging Overlay – a free overlay that can be downloaded at her site. That was it!…..Digital Lady Syd
A Vintage Butterfly Postcard Effect

My butterflies certainly get around. This lovely lady is checking out my yellow and pink lantanas in my front yard. I had fun creating this antique post card effect. Not sure why I did it but it was fun. Thought I would share how I got this final result as it involves using overlays, which add such an interesting look to an image. The original butterfly image was processed using Nik Color Efex Pro 4‘s Detail Extractor filter and then Film Efex Nostalgic Film Type 1 filter. This gave a very solid looking, almost illustrative look, butterfly and flowers to work with. I added a black layer mask and painted back the parts I wanted to use for the image. Underneath this layer ShadowHouse Creations PC8 (Post Card) texture was added and a Solid Color Adjustment Layer clipped to the texture (CTRL+Click between the layers) using a lighter color to brighten it up. Two layers were created and light blue and pink were painted around the butterfly and flowers. Three of French Kiss’s overlays were added: 1904 for the writing, Grungy Flourish for the upper left corner design, and Stamp 2 – all from the French Script No 1 brush collection, and Glorious Grunge Edging for the outside of the postcard (this is free on her website and a really nice overlay effect). Also on a New Layer a single brush stroke of Paper Scratch Brush in Paper Damages Brush Set on Adobe Exchange was used to get the folds. This just sort of developed and it was fun to do. Got to love Photoshop!…..Digital Lady Syd
Digital Lady Syd Related Posts:
Artistic Daisy!


