
Lightner Museum’s Unusual Chandelier

Sometimes you just like an image and that is what this is. The shot was taken at the Lightner Museum in St. Augustine, Florida and I am having trouble finding any information about the chandelier. Very simple processing using Nik Color Efex Pro 4 filters stacking Tonal Contrast, Darken/Lighten Center, Detail Extractor, and Vignette. Next Nik Viveza 2 was applied to bring out the color a little more on the green grapes and a couple of the glass flowers. Imagenomics Noiseware was applied at Full Noise Reduction preset as the image was quite noisy due to the high 1250 ISO value needed to shoot in the museum. The last step added the OnOne PhotoFrame Vincent Versace photo wide frame (see sidebar for website link). I got a chance to play around with some of my favorite plug-ins!…..Digital Lady Syd
Digital Lady Syd Related Blogs:
Little Girl Statue at Lightner Museum – contains all my other Lightner links at bottom of blog
Another Soft Hawaiian Landscape

Image was taken at Lapakahi Historical State Park of one of the homes the early Hawaiians lived in roughly 600 years ago on the western side of the Big Island.
For this image, the steps used were from my my blog Using Color Efex Pro and Texture for a Warm Hawaiian Landscape Effect for the second image. Same Lightroom preset, same textures (using Russell Brown’s Texture Panel (see my blog Russell Brown’s Paper Texture Panel Updated!), and same adjustment layers. Image was sharpened and a New Layer was added on top where a paint brush set to yellow at 20% opacity was used to paint in the blown out highlights on the roof of the house. (See my blog Getting Rid of Those Blown Out Areas in Your Image on how to do this.) A different OnOne PhotoFrame was added – Taufer_Texture_12. (See sidebar for website link.)
Not very realistic but definitely has that Hawaiian feel and that is okay!…..Digital Lady Syd
Hyacinths and OnOne PhotoFrames

I recently did a blog called My Favorite Photo Frame Plug-In – OnOne PhotoFrames (hum!) on the really nice OnOne PhotoFrames (see sidebar for website link) that I use on many of my images. Here is another nice example of their beautiful frames. (This frame is the Taufer Frame 08 using a light beige color – Russell Brown’s Paper Texture Panel was used on this image – see my Fun Photoshop Blog Russell Brown’s Paper Texture Panel – A Real Winner!)
Give these frames a try – they are easy to use and can really enhance your final image. You can download a 30-day free trial at their website or while in website go to the Products header -> Free Products and select Edge and Framing Effects where you can download 30 frames to use for free! Give it a try! ….Digital Lady Syd
Topaz Star Effects on a Wildflower?

I found these beautiful wildflowers on the side of an overlook just outside of Hilo on the Big Island in Hawaii. It was no larger than my thumbnail. For those of you who like to identify flowers, I believe this is called a Sensitive Briar, Littleleaf Sensitive-briar – Mimosa microphylla, a member of the pea family and the leaves will close up when touched. Here is a great description of these little flowers that I am not sure I was supposed to find in Hawaii.
To process this image, a Nik Color Recipe Detail + Vignette by Matt Kloskowski was used and a Classical Soft Focus filter was added at the bottom. Then it was processed in Viveza to sharpen the center and soften the green leaves in the background (move the Structure slider to the left to soften the edges). Next the image was taken into Topaz Star Effects where my SJ Small Stars preset was applied. (To create these tiny stars the following settings were used: Traditional Star Type; Main Adjustments – Threshold 0, Luminance 0.10, Size 0.20, Angle 75, Number of Points 12, and Spread 0.20; Color Adjustments – Saturation 0.80, Temperature 0.69 and others at 0; and Additional Effects – Glow 0.64 and others 0 – I like to start with effect a lot when using this plug-in.) The stars were hidden around everything but the flower tips. I was surprised how it really made the points of the flower pop. Finally OnOne PhotoFrame toner scratch 21 in a dark purple was added. Wow – once again I used many of my favorite plug-ins to get a really sharp pretty image!…..Digital Lady Syd
Combining Plug-ins for More Image Interest

Took this image of a red bloom from the hibiscus tree in my front yard – I love hibiscus flowers! A 60 mm Nikkor macro lens was used at F/6.7 for 1/60 sec. A Bower 0.5 x High Resolution Digital Lens with Macro was added to the lens. The camera raw shot was adjusted in Lightroom and brought into Photoshop. Some of the distracting background was cloned out, the image sharpened a bit, then Nik’s Color Efex Pro 4’s Darken/Lighten Center filter effect was applied. The image was taken into Nik’s Viveza 2 where the structure on the pistil and stamen was increased, and the background softened a little by setting the structure to -100. ShadowHouse Creations texture 5AT-2 was added and set to Soft Light at 62%. Next the new Topaz Star Effects plug-in was applied to the tips of the stigma to make it sparkle and a bit to the yellow anthers (see sidebar for Topaz’s website link). Finally OnOne PhotoFrame’s Taufer Texture 12 was applied to finish off the image (see sidebar for OnOne’s website link).
This is a good example of how several different effects can create more interest – it also helps to have a great color combination to work with too!…..Digital Lady Syd
Digital Lady Syd Related Blogs:
Trying Out Topaz Star Effects
Using NIK’s Color Efex 4 and Viveza Together
Photoshop CS5 and Elements: Hand-Tinting the Easy Way
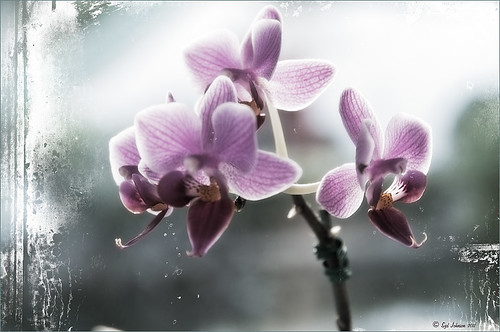 |
The above purple orchard was on the table at the Ming Court Restaurant in Orlando, Florida (one of our favorite restaurant in Orlando). I was not really happy with the original image (hover over image to see) – the flowers came out a little soft to my liking. I was pleased to see this hand-painting technique saved a beautiful flower image and gave it a soft painterly feel.
The steps to create this look are easy and could probably be put in an action. The process was taken from an article in Mastering Digital Photo Processing Magazine from the Fall 2008 issue. Here are the basic steps to creating this image:
1. Do any exposure adjusting in Lightroom or Adobe Camera Raw.
2. In Photoshop, create two copies of the original layer and turn off the top layer.
3. On middle layer convert image to black and white – I used the Black and White Adjustment Layer to get a nice conversion. There are so many ways to do this – choose your favorite. For Elements users, go to Enhance -> Convert to Black and White and select one of the canned styles as a starting point – then adjust the sliders, especially the contrast slider.
4. Turn on the top layer and add a Gaussian Blur filter with a Radius set to 18. Change blend mode to Overlay (or try others if you do not like the effect) and lower the opacity to get the pleasing hand-painted look. The opacity for the above was 61%.
Optional Step – Can add a Photo Filter Adjustment Layer. Choose a color using the Color swatch and adjust the Density slider. The magazine suggested this can “increase the sense of oils being applied over a black-and-white print.” I did not do this here, but it did give an interesting look with the default Warming Filter (85) color.
5. At this point a New Layer was created and the Sharpen Tool was used to show definition more clearly between the flower petals.
6. A Curves Adjustment Layer was added for contrast. Elements users add Levels Adjustment Layer.
7. To add a border or layer style, create a Composite Layer on top (CTRL+ALT+SHIFT+E). OnOne’s PhotoFrame Taufer_Texture_10 was added to give the frosted window effect – one of my favorite looks. (See sidebar for OnOne’s website link.)
That’s it! A pretty easy workflow and it gives a beautiful soft look. Hope you enjoy trying this short and sweet workflow – until next time…..Digital Lady Syd
Using the Hue/Saturation Adjustment Layer Temperature Slider for Color Change
 |
I tend to shoot HDR when I am at home photographing my flowers. I like having the different exposure options to choose from even if I do not create an HDR image. In this case an AF Micro Nikkor 60 mm lens at F/3.2, 180 sec, ISO 200 with a Bower 0.5 x High Resolution Digital Lens with Macro was used to shoot 5 exposures set to exposure compensations of -2, -1, 0, +1, +2. These five images were processed in CS5 using Photoshop’s Merge to HDR program – click on the image to see the original Photoshop HDR composite. (Here are the HDR settings used: Radius 350, Strength 1.86, Gamma 2.03, Exposure -0.45, Details 228, Shadow 100, Highlight -86, Vibrance 75, and Saturation -26 – a curve was created with points at Input 25 Output 43 and Input 58 and Output 65. I saved this down as a preset to use again.)
To get a little different look, I decided to use the red-green dynamic color combination. A Hue/Saturation Adjustment Layer was used to change the Reds to Hue +32, Saturation +33 and Lightness -7. To get the center green, while still in the Reds, I moved the temperature tabs on the slider at the bottom of the adjustment layer – see settings below. The center color totally popped! In Magentas the Saturation was set to +14. That was all it took change the colors to something really dynamic!

The final steps involved adding a few control points in Nik’s Viveza 2 for contrast and detail and a Sharpen Tool layer to emphasize the center. OnOne PhotoFrame Taufer Texture 07 was applied (see sidebar for website link). The background was changed to a darkish green to give more color contrast.
Once again, by just playing around in Photoshop and trying a few filters and different colors, you can make an ordinary image into something quite spectacular. Go try out the Hue/Saturation Adjustment Layer temperature slider too – it gives some very interesting results…..Digital Lady Syd
Pseudo HDR in OnOne Perfect Effects
Since I have tried this in other plug-ins, I thought I would give it a shot in OnOne’s new Perfect Effects plug-in (see sidebar for link to OnOne’s website) to see if I could get a similar effect. Just as I thought – no problemo!
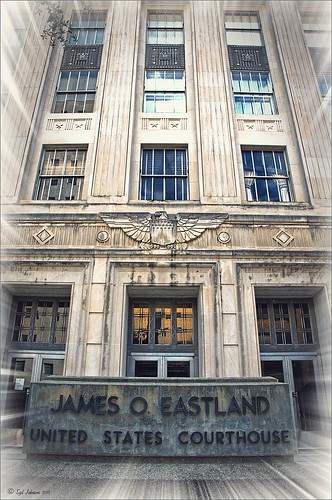 |
This is a rather unremarkable image except I liked the carved eagle engraved on the building. Hover over the image to see the original. By using Perfect Effects, I was able to get that pseudo HDR effect easily. These are the effects used in this image stacked bottom to top: Black and White preset set to Roadie in Multiply Blend Mode at Strength 100; Color Enhancer (Open up Effect Options and select Color Enhancer) and Color Range Orange was chosen to bring out the Orange color by adjusting the Hue set to 37, Saturation set to 77 and Lightness set to 94 sliders; another Color Enhancer layer was added to adjust the Blue Color Range – Saturation to 92 and Lightness to -35; and another Color Enhancer layer set to Aqua Color Range – Saturation 46 and Lightness 18; next the Golden Hour Enhancer preset in the Landscape section at Strength 63; Vignette created in the Blending Options drop-down with Brightness set to -68, Midpoint 58, Feather 80 and Roundness 5 and Normal Mode; and finally Katy preset in Vintage section set to Strength 100. It sounds hard, but once done, just create a preset to recreate it anytime – very easy to apply. To finish up the image in Photoshop, on a New Layer the Sharpen Tool was used to selectively sharpen the Eagle and some of the window lines. Finally the OnOne’s PhotoFrames zoom_19 frame was applied.
NOTE: After applying each layer preset or effects settings, be sure to click the Add button under the Strength slider to set the changes. To toggle the original and current views, press CTRL+P.
Well once again this was lots of fun and pretty easy to do. Give it a try and see if you like what you see. If you are interested in the pseudo HDR look, check some of my related posts below……Digital Lady Syd
Digital Lady Syd’s Related Blogs:
Digital Lady Syd’s Review of OnOne Perfect Effects
First Try – OnOne’s Perfect Effects 3!
Pseudo HDR Using NIK Color Efex Pro 4
Another Pseudo HDR Image with NIK CEP4 – Got to Love the Effect!
With One Good Photo – Try the Pseudo HDR Effect
Loving Both Filters!
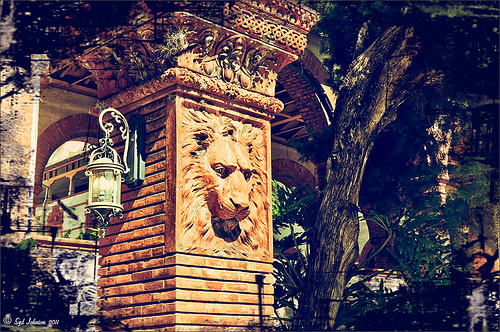 |
The above image is one of the beautiful Lion Posts outside Flagler College in St. Augustine, Florida, which used to be the Ponce de Leon Hotel built in 1887. Absolutely beautiful building. Cannot miss it if you go to this wonderful historic city.
Wow – all I can say is that I cannot decide which program I like best – NIK Color Efex 4 or Topaz Black and White Effects. So different and so much alike! I keep trying the same image in each program and get totally different looks but both are really nice! What to do, what to do!
The top image was processed with NIK Color Efex Pro 4 using the Film Efex: Vintage filter on Film Type 14; Detail Extractor filter; and Brilliance/Warmth filter. I used the Sharpening Tool in Photoshop to sharpen the eyes and mane of the Lion. Then Grunge 03 OnOne PhotoFrame was applied in a dark navy. I loved how it became very artsy and colorful. And the background detail is incredible!
Topaz Black and White Effect produced a very different feel that can be seen by hovering over the image. Same exact image from Lightroom except this time I wanted to see what how this image would look as a black and white. I used the new Platinum Collection – Platinum VI as a starting point. What really improved this image was using the Local Adjustment Dodge brush and Detail brush on the shadows in the face and the lamp. This really brought the eyes out very clearly. Using the Color brush, the lights was added back into the lamp. A black border, dark edge exposure, and dark vignette was added. In Photoshop the Sharpen Tool was used on the eyes a little more and the mane. Overall a very different feel to the same image.
I really love both filters and I do not believe I can recommend one over the other. Both totally great. Give the trials a try and see what you think!…..Digital Lady Syd
Related Digital Lady Syd Blog Links:
Topaz B&W Effects Plug-in – A Real Winner!
NIK Color Efex Pro 4.0 – First Try!
The New Film Efex-Vintage Filter from NIK CEP 4
Quad Tones in Topaz Black and White Effects Plug-in
Sunny Preset for Topaz Black and White Effects
NIK Color Efex Pro 4 – Digital Lady Syd’s Review!
The Art Corner: Painting and Sculpture by Tassaert
Pseudo HDR Using NIK Color Efex Pro 4
Tree Brushes and a Little Grunge
Having some Lightroom and Photoshop CS5 interface problems today so I am just going to post a little more tree fun I had a few days ago. I guess with the Fall coming upon us, I think about the trees losing their leaves and winter around the corner.


Both these images use tree brushes from Winter Trees by Melbrushes and Trees from c4grfx brushes. The first image used a texture from Shadow Creations Old Canvas 4 and the Glitter Brush Set by Obsidian Dawn. The bottom background was created using Paper Damaged brushes, Gorguss Grunge Again 3 and 9 (click upper right hand corner for link), my SJ-Basic Soft White Cloud Brush (for dark area behind trees), and the plug-ins: Topaz Effects Black and White plug-in (see sidebar for link) , a Nik Color Efex Pro 3.0 Bi-color filter plug-in, and an OnOne PhotoFrame plug-in (see sidebar for link). Check out my Tidbits blog called “Just a Tree!” for another example.
Hopefully I will be back up and running with both my programs by next week. Until then, try downloading some of these brushes and play around a bit. You can get some pretty interesting looks!…..Digital Lady Syd


