
Just a “Big Scoop”
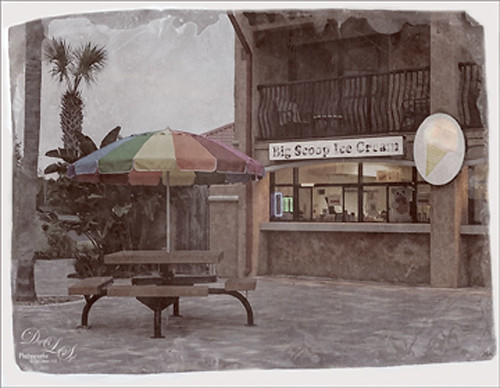
Loved the vintage result of my favorite local ice cream place. This was a phone image processed using OnOne Photo Suite 9.5 (see sidebar for website link) – used B&W Effects and Perfect Effects to get this look. The original layer was converted to a Smart Object so I could tweak later the results. In B&W Effects, the Daguerreotype Clean preset was selected with adjustments to its settings. In Perfect Effects the Bleach Bypass preset was set to Lighter. With the Lighten Paintbrush, the umbrella was painted and with the Detail Paintbrush, the inside of building and picnic table were painted. Since the B&W effect was too strong, I clicked the little icon on the right edge of the Perfect BW layer in Photoshop and the opacity was changed to 75%. Then a layer was added on top to paint back in solid white border where needed. Last step was to distort the letters as they totally draw the eye whenever letters appear in an image. Just painted over with a little grunge brush. Enjoyed creating this vintage look!…..Digital Lady Syd
A Tuscan Blossom
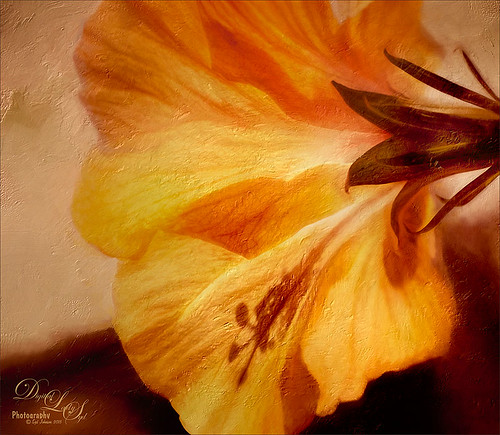
Just loved how this little Yellow Wing Hibiscus blossom image turned out. Did very little to the original image other than apply 2 Lil’ Owls (see sidebar for website link) Spring Whispers 4 preset and sharpening of the shadow stamen. On a duplicate layer of the background, Topaz (see sidebar for website link) Clarity was applied using John Barclay’s Basic Settings preset (see My Glowing Porch Flowers blog for settings). Next went into OnOne’s (see sidebar for website link) Perfect Effects 9 and applied the PE4 Vintage preset. I believe that OnOne gave it away with an earlier version, probably Perfect Effects 4. Next Topaz Impression was opened and the new preset created from Blake Rudis’s blog called Ethereal Background was applied next (see Blake Rudis video called Atmospheric Backgrounds with Topaz Impression). A New Layer and some clean up was done, especially a little Mixer Brush painting on some of the edges to smooth. Painted Textures Creamsicle texture was applied (not sure this texture is still available) set to Linear Burn blend mode at 73% opacity. A Hue/Sat Adjustment Layer was clipped to the layer and the Saturation set to -56 so there was not a lot of color added to the image, just texture. A Curves Adjustment Layer was added to add back some contrast and the last step was Nik Viveza with a control point on the focal point, or for me the stamen shadow. It was fun to experiment with my arsenal of filters!…..Digital Lady Syd
The Old and the New
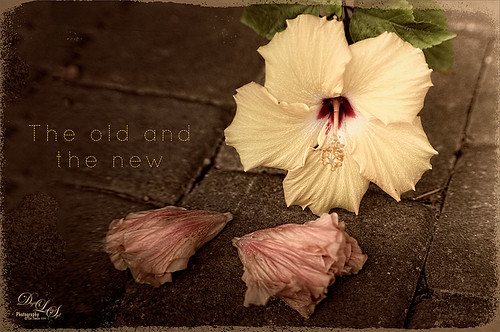
Just a set up image of my beautiful yellow hibiscus blossom and two spent Painted Lady pink blossoms. In Lightroom using Seim’s Power 4 Workflow (see sidebar for website link) Dreamscape preset and Dave Delnea’s LR Develop Custom Tone 002 preset were applied before going into Photoshop. The image size was extended using the Crop Tool: then the Magic Wand Tool to select extra canvas: then Select -> Modify -> Expand 4 pixels; and finally Edit -> Content Aware Fill. Got pretty good results! Used Topaz (see sidebar for website link) Detail 3 to overall sharpen the image, and then OnOne (see sidebar for website link) Perfect Effects 8 and Nicol S. Young’s Daydream preset set to 68% layer opacity. The text font is Quicksand. Just a little grunge frame added on top. I love the soft pastel colors of the blooms……Digital Lady Syd
“But we can have lots of good fun that is funny!”
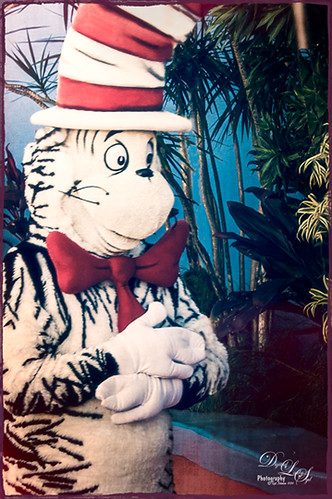
This fun shot is of the Cat in the Hat character in Dr. Seuss Land at Universal Studios Orlando. (Title quote from The Cat in the Hat book.) In Lightroom Seim Effects (see sidebar for website link) Super HDR X and Dave Delnea‘s Backlit Vertical Left presets were applied – these are probably the best sets of Lightroom presets I own! In Photoshop some basic clean up was done before OnOne’s (see sidebar for website link) Perfect Effects 8 plug-in was opened and Jacob Lucas Old Mans Chair preset (supplied by OnOne and one of my favorite Perfect Effects presets) was applied. Back in Photoshop the Sharpen Tool was used on the eyes and hands. Last a basic thin grunge border was applied using a dark purple Color Fill Adjustment Layer clipped to it (ALT+click between the layers to clip). That was it! Such a cute character in this fun part of the theme park……Digital Lady Syd
Beware of Snoozing Cat!
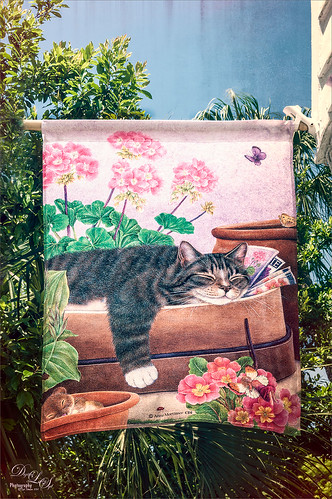
Loved this banner by Anne Mortimer CDI (she does great cat images) outside a darling upstairs cat boutique in St. Augustine, Florida, called City Cat County Cat. (No website so here is their store address: 72B St. George Street, St. Augustine, FL 32084 – definitely worth a stop if you love cats!) If I had a cat, I would buy this! Just basic changes in Lightroom before going into Photoshop. This time I used the Adaptive Lens Filter to straighten up the edges of the banner just a little. On a duplicate layer, OnOne (see sidebar for website link) Perfect Effects was opened and Jason Lucas’ preset Old Man’s Chair (from an OnOne give-away set when you own the suite) was applied and the top Texturizer layer’s opacity was reduced for less Light Leak effect. A Detail Adjustment Layer was added on top in the plug-in and just the cat’s face was sharpened. Back in Photoshop the layer opacity was set to 73%. I created a stamped or composite layer on top (CTRL+ALT+SHIFT+E) and the Sharpen Tool was used just a little bit on the cat’s face and the mouse. That was it – very simple and I really like the preset by Jason – gave a great vintage effect!…..Digital Lady Syd
Digital Lady Syd Related Blogs:
How to Use the Adaptive Wide Angle Lens Filter
Where Am I?
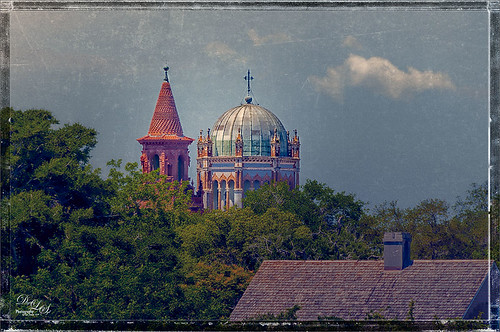
This beautiful skyline image was taken from the Castillo de San Marcos National Monument in St. Augustine, Florida. This is a spire from Flagler College (the old Ponce de Leon Hotel) and the cupola on the Flagler Memorial Presbyterian Church. In Lightroom did just basic changes and sharpened up the spire and cupola slightly. In Photoshop the first thing I did, and do a lot, is go into Topaz (see sidebar for website link) Detail 3- this time applied the Soft and Dreamy III preset to smooth out the leaves that were overly sharp and to reduce the detail in the close up roof. I changed the Cyan-Red, Magenta-Green and Yellow-Blue sliders (similar to the Color Balance Adjustment Layer) to get better colors. Some of my clouds (see my free Cloud Brushes) were added softly in the sky at 69% layer opacity. Kim Klassen Cloth & Paper Reign texture was used to add interest in the sky. Next Topaz ReStyle’s Warm Sand Dune Wash preset was applied to pop the colors a little. On a stamped layer (CTLR+ALT+SHIFT+E) the Camera Raw filter ‘s Radial Filter was applied to focus in on the spire and cupola. On another stamped layer OnOne (see sidebar for website link) Perfect Effects 8 was opened and a Blue-Yellow Split Tone set to a Balance of 81 was added, some detail painted back on the spire and cupola, and the Martha Border was the last step before saving back in Photoshop. I love beautiful St. Augustine!…..Digital Lady Syd
Digital Lady Syd Related Blogs:
OnOne’s Perfect Mask Works Great!
Some of My Favorite Plug-Ins
Loving Both Filters!
The Red-Roofed Barn

Here is a good example of what not to do – I have no real idea how I post-processed this image of a red-roofed barn in Jackson, Mississippi, last week on my laptop, as it got saved accidentally as a flattened .psd file. I really like the results so I am going to guess. I believe that I placed a sepia version on top of a regular version by bring in two versions from Lightroom. With the sepia layer on top, I lowered the opacity a little on the sepia toned layer, and then back more of the the beautiful red roof and light green foreground. Usually I w0uld have removed all the wires, signs, and telephone lines, but in this case, it seems to really be how to the image actually looked. A stamped version (CTRL+ALT+SHIFT+E) was created on top of the layers, and a fairly strong vignette was added in OnOne (see sidebar for website link) Perfect Effects 8 along with some sharpening. This software does a really nice job on landscapes like this. Anyway, I liked the photo so I thought I would post it……Digital Lady Syd
More Border Fun!
 Creating the Border: Completed this border using a tutorial I learned from PhotoshopLayers.com called Photographic Edges in Photoshop. It is basically a very simple process and uses the Photoshop Sprayed Strokes Brush Stroke Filter to create the border. I changed the settings and maxed out the Stroke Length to 20, the Spray Radius to 25, and Stroke Direction to Horizontal to get a more pronounced edge. Then the frame was saved down as png file. This was done using my the little known Script called Save Layers to File. (See my blog How To Make Frames or Borders on how to do this.) To use this new border easily on other pictures, just drag it into your document. Use a Solid Color Adjustment Layer to change the color of the frame. In this case, I changed it to a light pink, then used a Layer Style to add a soft gradient, a white texture, and Outer Glow. Using a Layer Style on borders can create a very subtle but nice effect.
Creating the Image: These Alestroemeria flowers were actually captured at the local grocery store with my little point-and-shoot Kodak camera. Not much processing was required. I followed the Lightroom processing steps from my blog How to Use Adobe Camera Raw (ACR) or Lightroom 4 Quickly. In Photoshop I applied OnOne Perfect Effects (see sidebar for website link) stacking Tonal Contrast, Rice Paper Light Texture, and Hollywood Glow at 50% opacity. A Curves Adjustment Layer was added to add back just a little overall contrast. A composite was created on top (CTRL+ALT+SHIFT+E) and duplicated. The top layer was set to Multiply Blend Mode and on a layer mask using a large soft black brush at 100% opacity, one dot was placed on where I wanted people to look first. Next the border .png was placed on top with a Solid Color Adjustment Layer set to light pink. Finally a Layer Style was added to the border using a light pink to pink Gradient Overlay (Blend Mode Normal, Opacity 48%, Linear Style, Angle 81 degrees, and Scale of 150%), Pattern Overlay (Blend Mode Normal, Opacity 66%, Pattern set to Normal Blend Mode, Opacity 66%, Pattern from Photoshop’s Watercolor Patterns – bockingford_rough at Scale 55%), and an Outer Glow set to its default settings.
Try creating this border – it really easy and fun to make!…..Digital Lady Syd
Christmas at SeaWorld Orlando

These “floating” trees were in the pond area at SeaWorld Orlando in October and they looked really strange. I decided to spruce them up a bit and give them that holiday feel – these must have been the first decorations they put up. I have said it before and I will say it again – whenever I cannot figure out something interesting to do with an image, OnOne’s (see website link on sidebar) Perfect Effects usually has the answer. In this case two effects were stacked: Nicely Toasted preset from the Vintage group – set to Hard Light at 74% opacity and Warm Vintage also from the Vintage Group with a few changes to Brightness (-45), Contrast (-40), and Darken Blend Mode with Strength 58. A Composite Channel Curve was set (In157/Out 138). My free Snow1 Overlay was added along with my free Merry Christmas PNG Overlay using an Outer Glow layer style set to a bluish color (Blend Mode Normal, Opacity 39%, Spread 8%, and Size 215 px) – use this trick to to make your text and overlays stand out if on a busy background. Added text layer for my name, and added French Kiss Glorious Grunge Edging Only with the grunge erased from the middle. All of these overlays used a Solid Color Adjustment Layer set to a soft cream color sampled from the roof of the building. (Layer -> New Fill Color -> Solid Color and check Use Previous Layer to Create Clipping Mask for each overlay). The text layer used the same color. A Curves Adjustment Layer was added and the mask filled with black – with a 30% opacity white soft brush, the areas I wanted affected were painted back in the mask. That was it. Hope you can use a few of these tricks to make some nice cards…..Digital Lady Syd
Digital Lady Syd Related Blogs:
Where to Find Those Cool Free Christmas Card Templates?
Free Christmas Card Vectors and Brushes
Beautiful Christmas Flowers
Some Free Christmas Overlays to Spice Up Your Christmas Cards
A Little OnOne Perfect Effects Vintage Look

This beautiful Scottish Church was taken from a train going from Edinburgh to St. Andrews. This is a wonderful way to capture some of the countryside. I am surprised how sharp this image was since the train was moving – my settings using a 18-200mm Nikon lens were F/13, 1/200 sec, ISO 400 using a 45 mm lens. For post-processing, the first thing done was to create three Virtual Copies in Lightroom and set them at different exposure settings – one to about -2, one using the original, and one set to +1. This is a way to get an HDR look using a single image. The first two where then taken individually into Topaz DeNoise 5 (see sidebar for website link) and adjusted for noise issues. The +1 just used a little adjustment in Lightroom since the over-exposed image did not have a lot of noise. All three images were then selected in Lightroom and right-clicked to get menu – Open In -> Merge to HDR in Photoshop. That is how the bottom layer was created. Next by applying OnOne Perfect Effects (see sidebar for website link), the image took on a great look. This plug-in can do interesting things to images – usually when I just can’t put my finger on what I need for a photo, Perfect Effects has a solution. This image uses these filters presets stacked: Black and White->Warm Gray with colors swapped in Effects Options, Detail->Texture Booster, and Borders->Russell with Scale set to 4 in Effect Options. Back in Photoshop Nik’s Viveza 2 was applied to add a little soft color in the sky, sharpen the cupola, and add a little brightness to the front of the church. Then Topaz DeNoise 5 was applied one more time to get rid of some noise created by the plug-in application – this time it was targeted to the sky and water using an Overall Strength setting of .11, and for the lighter areas, Adjust Highlights set to .28. Recover Detail was set to .30 and Reduced Blur to .13. This sounds like it was a lot of effort, but it really was very quick to apply. The hardest part was adjusting the noise in the three virtual copies in Lightroom. …..Digital Lady Syd
Digital Lady Syd Related Blogs:
Can a Pseudo HDR Image be as Good as the Real Thing? (Part One)
Can a Pseudo HDR Image be as Good as the Real Thing? (Part Two)


