
More Border Fun!
 Creating the Border: Completed this border using a tutorial I learned from PhotoshopLayers.com called Photographic Edges in Photoshop. It is basically a very simple process and uses the Photoshop Sprayed Strokes Brush Stroke Filter to create the border. I changed the settings and maxed out the Stroke Length to 20, the Spray Radius to 25, and Stroke Direction to Horizontal to get a more pronounced edge. Then the frame was saved down as png file. This was done using my the little known Script called Save Layers to File. (See my blog How To Make Frames or Borders on how to do this.) To use this new border easily on other pictures, just drag it into your document. Use a Solid Color Adjustment Layer to change the color of the frame. In this case, I changed it to a light pink, then used a Layer Style to add a soft gradient, a white texture, and Outer Glow. Using a Layer Style on borders can create a very subtle but nice effect.
Creating the Image: These Alestroemeria flowers were actually captured at the local grocery store with my little point-and-shoot Kodak camera. Not much processing was required. I followed the Lightroom processing steps from my blog How to Use Adobe Camera Raw (ACR) or Lightroom 4 Quickly. In Photoshop I applied OnOne Perfect Effects (see sidebar for website link) stacking Tonal Contrast, Rice Paper Light Texture, and Hollywood Glow at 50% opacity. A Curves Adjustment Layer was added to add back just a little overall contrast. A composite was created on top (CTRL+ALT+SHIFT+E) and duplicated. The top layer was set to Multiply Blend Mode and on a layer mask using a large soft black brush at 100% opacity, one dot was placed on where I wanted people to look first. Next the border .png was placed on top with a Solid Color Adjustment Layer set to light pink. Finally a Layer Style was added to the border using a light pink to pink Gradient Overlay (Blend Mode Normal, Opacity 48%, Linear Style, Angle 81 degrees, and Scale of 150%), Pattern Overlay (Blend Mode Normal, Opacity 66%, Pattern set to Normal Blend Mode, Opacity 66%, Pattern from Photoshop’s Watercolor Patterns – bockingford_rough at Scale 55%), and an Outer Glow set to its default settings.
Try creating this border – it really easy and fun to make!…..Digital Lady Syd
Another OnOne Perfect Effects Pix – Got to Love It!
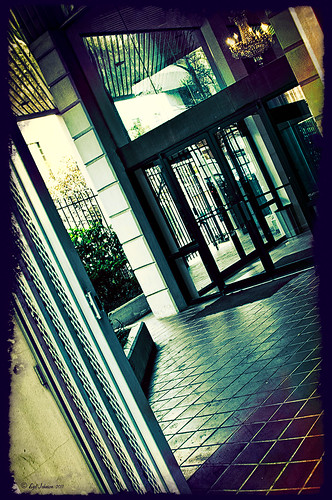 |
I discovered I really liked this image of an entryway into a building in Jackson, Mississippi, that was completely empty. Really sad to see such a nice space and nothing in it. Anyway, when I took the picture there was some vertical distortion (hover over image to see original) that I was not able to get rid of easily. While inside the Lens Correction Filter trying to straighten up these bowing lines, I discovered that the image looked really neat twisted – so that is how this picture started out.
The image was still a little flat so I decided to experiment some more in the updated plug-in from OnOne called Perfect Effects (see sidebar for website link). This image has three effects stacked – in Black & White tab, Roadie filter was chosen and set to Overlay blend mode at 73%; in Movie Looks, Urban Sickness set to Color blend mode at 78%; and in Vintage, Nicely Toasted set to Darken blend mode at 100%. The layer was duplicated and rasterized (right click layer and select rasterize to get rid of smart object) and the Sponge Tool was applied to the yellow leaves in the background to color them a bit more. On a duplicate layer a High Pass filter set to 9.1 was to sharpen the image and set to Soft blend mode. A final Curves Adjustment Layer was added for contrast and OnOne.s PhotoFilter acid burn controlled frame. That is it and I love the results!
This is how I like to experiment – just try different things as you go into the various parts of Photoshop – it can be amazing what you come up with. I did not imagine this image as a diagonal, but it really does the image justice. I hope this will give you some inspiration to try this technique on some of your pictures – it can be quite interesting…..Digital Lady Syd
Digital Lady Syd’s Related Blogs:
Digital Lady Syd’s Review of OnOne Perfect Effects
Pseudo HDR in OnOne Perfect Effects
First Try – OnOne’s Perfect Effects 3
Pseudo HDR in OnOne Perfect Effects
Since I have tried this in other plug-ins, I thought I would give it a shot in OnOne’s new Perfect Effects plug-in (see sidebar for link to OnOne’s website) to see if I could get a similar effect. Just as I thought – no problemo!
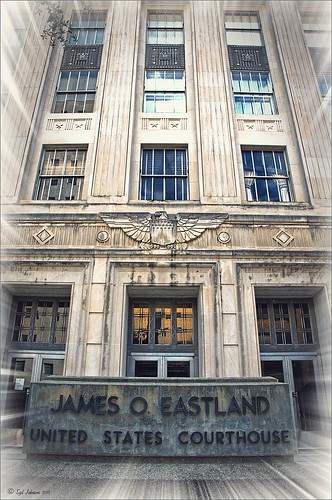 |
This is a rather unremarkable image except I liked the carved eagle engraved on the building. Hover over the image to see the original. By using Perfect Effects, I was able to get that pseudo HDR effect easily. These are the effects used in this image stacked bottom to top: Black and White preset set to Roadie in Multiply Blend Mode at Strength 100; Color Enhancer (Open up Effect Options and select Color Enhancer) and Color Range Orange was chosen to bring out the Orange color by adjusting the Hue set to 37, Saturation set to 77 and Lightness set to 94 sliders; another Color Enhancer layer was added to adjust the Blue Color Range – Saturation to 92 and Lightness to -35; and another Color Enhancer layer set to Aqua Color Range – Saturation 46 and Lightness 18; next the Golden Hour Enhancer preset in the Landscape section at Strength 63; Vignette created in the Blending Options drop-down with Brightness set to -68, Midpoint 58, Feather 80 and Roundness 5 and Normal Mode; and finally Katy preset in Vintage section set to Strength 100. It sounds hard, but once done, just create a preset to recreate it anytime – very easy to apply. To finish up the image in Photoshop, on a New Layer the Sharpen Tool was used to selectively sharpen the Eagle and some of the window lines. Finally the OnOne’s PhotoFrames zoom_19 frame was applied.
NOTE: After applying each layer preset or effects settings, be sure to click the Add button under the Strength slider to set the changes. To toggle the original and current views, press CTRL+P.
Well once again this was lots of fun and pretty easy to do. Give it a try and see if you like what you see. If you are interested in the pseudo HDR look, check some of my related posts below……Digital Lady Syd
Digital Lady Syd’s Related Blogs:
Digital Lady Syd’s Review of OnOne Perfect Effects
First Try – OnOne’s Perfect Effects 3!
Pseudo HDR Using NIK Color Efex Pro 4
Another Pseudo HDR Image with NIK CEP4 – Got to Love the Effect!
With One Good Photo – Try the Pseudo HDR Effect
First Try – OnOne’s Perfect Effects 3!
I love OnOne’s PhotoFrames (see sideboard to access OnOne’s site) – not sure anyone can beat this plug-in for its versatility and choices for adding borders onto an image. I use this plug-in probably 90% of the time. It surprised me how handy it is and how much I use it.
That said, I have not been as big a fan of PhotoTools 2.6 – still a very versatile plug-in but it was a lot harder for me to use than PhotoFrames. Therefore I did not use it near as much as many of the other plug-ins I have covered here in my Tidbits Blog and in my Fun Photoshop Blog. I have been waiting anxiously for the newer version of PhotoTools to be release and it is finally here in the form of a new name – Perfect Effects 3 – and interface. The whole suite of plug-ins (which these are two of the plug-ins in the Suite) has been re-engineered into an interface that can be opened from one place in the new OnOne Perfect Photo Suite 6.0.

The above image is of a beautiful clock in the historic district of St. Augustine. Not much was done with the sliders – I was just trying out the interface and getting around. This image has three effects stacked in this order: Texturizer section – Itchy preset; Vignette section – Grunge Vignette Dark; and Borders – Russell preset. Before applying the first preset, the clock was masked with the Masking Brush (Show Mask set to Overlay and Painting Mode to Paint Out) so the texture would not cover it.
It is nice to see some interesting borders included with this plug-in. The interface is improved but I still am learning how to get around it completely yet. I have just done a longer review at my Fun Photoshop Blog “Digital Lady Syd’s Review of OnOne Perfect Effects.” Download a trial version yourself – there is a 30-day fully functional trial period. Have fun experimenting…..Digital Lady Syd
Related Digital Lady Syd’s Blogs:
Same Image-Different Plug-in
Adding a Texture for Flair!
Dual Tone Plug-in Comparison


