
White Abstract Flowers
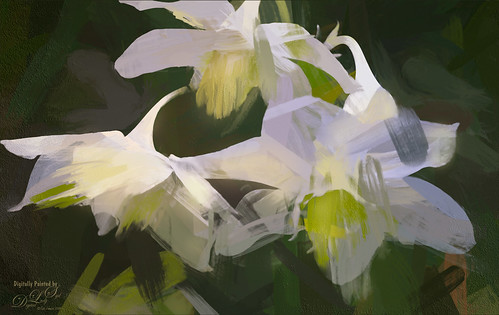
Love the results of this abstract applied to a rather ordinary grouping of white flowers. Applied a basic Topaz (see sidebar for website link) Impression Abstract preset to the flowers to remove the details. Then took the image into Corel Painter to paint in more of the flowers. Saved as a PSD file and opened up in Photoshop to further paint in details with Mixer Brushes. To get the interesting texture effect, added a rather light edged painted border in white and in the layer style, set the Bevel & Emboss to one created by John Derry. At this point I could not find a link where these can be purchased (I got them several years ago) but try playing around with this layer style effect. The opacity of this layer was set to 44% and the Fill amount set to 5% to get the interesting painting look. Used Nik Viveza 2 and added some color for lighting effect……Digital Lady Syd
Emily the Pig
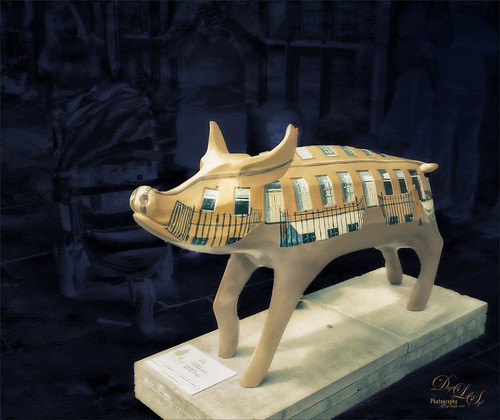
This little pig has the same story as another pig image I took way back in 2008 when the Town of Bath in England was having a public art event to celebrate Bath’s origins and artists. (See my King Bladud’s Pig blog.) King Bladud’s (cc 863 BC) pig, named Emily and painted by Charlotte Moore, is one of 106 pigs that were on display all over the city (I only saw a few) and they were sold at auction to raise money for the benefit of Bath’s Two Tunnels Project. Not a lot was done with this image. The pig was selected and a texture was placed behind her and set to Difference blend mode – that is why you can see the people behind her but not real clearly. Then Luminar was opened and one of my favorite presets by Joel Grimes was applied (Soft and Desaturated) – these preset can still be downloaded from Luminar for free from inside the program. Back in Photoshop a New Layer was opened and just a bit of black was added to darken the bright areas a little more. Last step used Nik Viveza 2 to emphasis the focal point a little more. That was it!…..Digital Lady Syd
Oahu Landscape
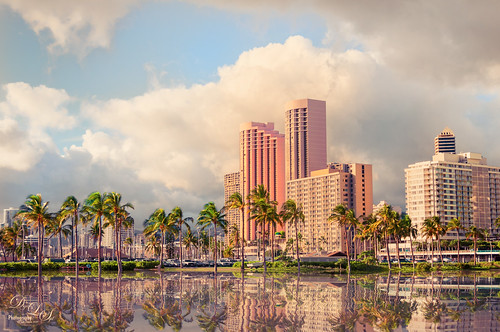
Had some fun with this image of some of the hotels and buildings along the beach of Waikiki. This image actually has a big pool of water in front with a large sandy beach and people swimming. Instead I added the Flaming Pear’s Flood Filter to create a beautiful reflection of the palm trees along the edge of the original water. A Channel Mixer Adjustment Layer was added to brighten up the colors – ran a free action by Sparklestock called Ultimate Vibrance. In a black layer mask the buildings and trees were painted back. On a stamped layer Nik Viveza 2 was applied to sharpen up the hotel fronts and add a subtle vignette around the edges. The last step involved going into the PS Camera Raw and applying a favorite preset from David duChemin’s older “Refining Your Vision in Adobe Photoshop Lightroom” book (all his books are great) named Classic India Split Tone (here are the very simple settings: use Split Toning section either in Lightroom or Camera Raw and set Highlights Hue to 50, Sat 60, Balance 0, Shadows Hue 266, and Sat 35). That was it. I loved the pinkish tones which this preset brings out…..Digital Lady Syd
Girl Playing Erhu
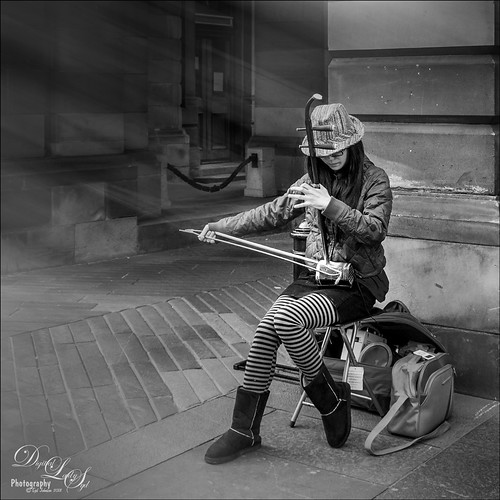
This is an image of a girl playing an Erhu, a traditional Chinese musical instrument from the Song Dynasty dating back to 1104 AD. She was playing along the Royal Mile, the main road through the historic district of Edinburgh, Scotland. This instrument has a very lovely sound and I actually bought a CD from her called Erhu by Yan Shi (unable to find a link for it as it is written mainly in Chinese). This image just seemed to need a black and white treatment so in Lightroom, one of Sergi Ramelli’s presets in his B&W pack called AA Drama Radial Circle Dark was applied and adjusted to fit. Then in Photoshop, Topaz (see sidebar for website link) Lens Effects was applied using the Streak Filter. I have never used this before, but I love the way it gave just a little light effect and added a motion feel to the bow. On a stamped layer, Nik Viveza 2 was applied to adjust the focus on her face and hand. That was basically all that was done. I wish had more images like this one. …..Digital Lady Syd
Tiny Bubbles
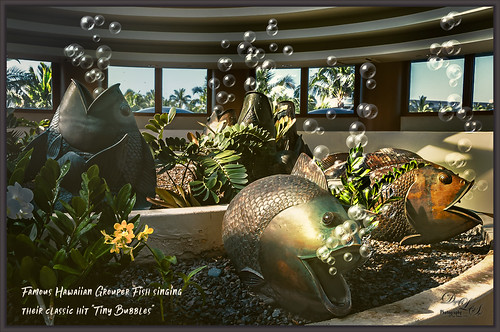
Been thinking about Hawaii’s Big Island getting hit by a hurricane and knowing how awful that is. Decided to post an image taken at the Hilton Waikoloa Village a while back at the Waters Edge Breakfast Buffet. These bubble blowers may not be grouper fish, but they are pretty close. It was a lot of fun to a do something with a little humor in it. This image was post processed using On1 (see sidebar for website link) Photo Raw 2018 Effects using the Dynamic Contrast, Sharpening, HDR Look, and Color Enhancer filters – I can really see improvements with this program. Some bubbles were created using a Lisa Cagney trick. Nik Viveza 2 was used so all the bubbles would show up. PS Color Lookup Table using the Foggy Night preset at 33% layer opacity was applied. Then a Gradient Fill Adjustment Layer beige to tan gradient at 36% layer opacity was applied. A couple Spotlight Effect layers were used to apply a little lightening and darkening effect. The text is Soak Up the Sun Script Bold. That was it. These guys always made me smile when we went to breakfast!…..Digital Lady Syd
Umbrellas Galore!
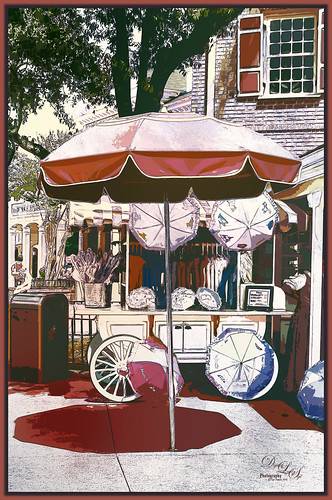
Love the color at the Magic Kingdom – total “eye candy” for the camera! This is one of my favorite images of the Umbrella Cart on Mainstreet USA. This time a sketch effect was added. I am one of those people that really like the sketch look. And although I have a couple actions and Topaz Simplify has some very good outline programs, it is hard to find one that fits all images. This technique did not work well on all my images, but for bright non-people images, it seems to be perfect. I learned this technique from a recent video called Creating a Realistic Pencil Sketch Effect in Photoshop at Davrophotofx. It was done using Elements, but it works fine in regular Photoshop since the filters are all the same. Biggest problem I had was that the Photo Copy Filter was not working correctly until I realized I had the foreground swatch set to white – it should be at the default black and white to look correct. Otherwise very simple steps. A couple of my textures were added and Nik Viveza 2 was used to adjust the color somewhat. Used a layer style for the border and that was it. Lots of fun to do this kind of image …..Digital Lady Syd
Pretty as a Postcard
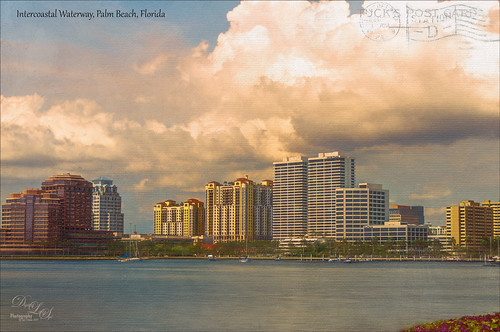
This is the Intracoastal Waterway (ICW) in Palm Beach, Florida. The skies were rather spectacular this day. Lucis Pro (now available for purchase again – see my Lucis Pro is Back!!!!! blog) was used on this image first. Then Photoshop’s Motion Blur Filter was opened and set to a Distance of 2000 pixels – once applied the far right icon on the layer was clicked and set to 63% opacity. A Selective Color Adjustment layer was applied to adjust the colors. On a stamped layer, Topaz Lens Effects (see sidebar for website link) Motion Blur was opened and 12.68 pixels was applied. Back in PS only the water was allowed to be visible in the layer mask so water looks smooth. The font Gabriola was used next. French Kiss (see sidebar for website link) Tableau Chateau was used to add texture to the image – this was done by clipping a Hue/Saturation Adjustment Layer to the image and setting the Saturation to -100. The texture was set to Hard Light at 15% layer opacity. Finally a Levels Adjustment Layer was also clipped to the texture to get the nice vintage postcard look. Nik Viveza 2 was added to add some emphasis to the buildings and a stamp from 2 Little Owls (see sidebar for website link) was added to further enhance the old look. I was love Palm Beach! …..Digital Lady Syd
Backwater in St. Augustine
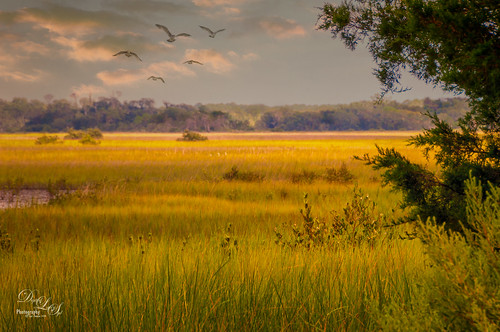
This is an image of the backwater area behind the ICW (Intracoastal Waterway) in St. Augustine and taken from the back side of Camachee Cove. Just had fun creating this image. Added a new sky from KelbyOne to the plain sky and a Curve Adjustment Layer to get the lighting just right. Also added some seagulls birds from a Pixabay image and softened them so they were not so sharp edged using the Blur Tool set to 30% Strength. Two Curves Adjustment Layers were added – one for darkening and one for lightening the image (filled masks with black and painted back where it needed to be adjusted). On a New Layer added a yellow light effect by setting the layer to Overlay blend mode and brush to 9% opacity. On a stamped layer (CTRL+ALT+SHIFT+E) applied Nik Analog Efex Pro 2 (Basic Adjustment, Lens Vignette, and Levels & Curves, especially the Luminosity Curve. It was set to 59%. The last step was to use Nik Viveza 2 to further sharpen the focal point of the flower-weeds sticking up. I love the warm feeling of this image…..Digital Lady Syd
Camachee Cove Yacht Harbor
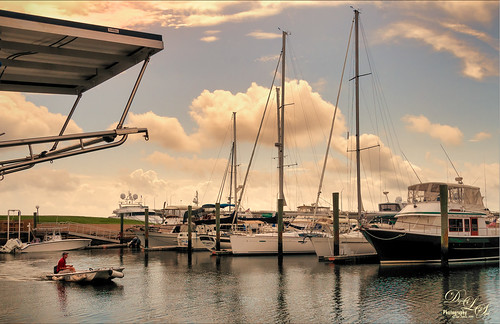
One of my favorite places to visit and take photos is at Camachee Cove Yacht Harbor in St. Augustine, Florida. If you’re a sailor, this is one of the best places to keep your boat along the whole East Coast of the U.S. Anyway, just wanted to prove that you can take a good image even in really bright light. This image was taken at around 11:00 AM and it was just fine. I know, it does not happen all the time, but it does happen! Not a lot needed to be done to it either. In Lightroom a Crisp Warm Soft profile was used from the free Matt Kloskowski Profile Sampler (same settings as the LUT file in Photoshop). Then just the same Basic slider changes. In Photoshop, Luminar 2018 (see sidebar for website link) was applied using just the AI Filter and the Brilliance/Warmth Filter – that was all and it looked incredible! Next my favorite Nik Viveza 2 was opened and the focal point was sharpened a bit – the guy in the boat and back of the boats. There was a blown out spot that was colored (yes you can do this in Viveza) to color in the effect. The last step was a Curves Adjustment Layer where just a small S-curve was used. That was it. What a beautiful day it was!…..Digital Lady Syd
Distant View of a St. Andrews Golf Course
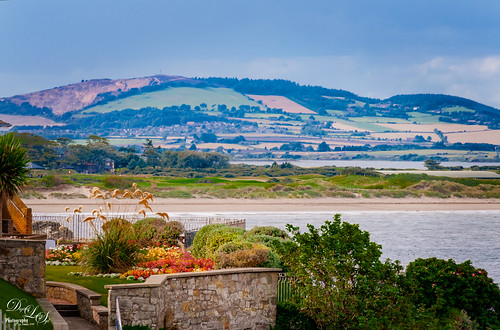
Wish I was at Carnoustie in Scotland to see the British Open, but at least I did have a chance to go to St. Andrews several years ago. (There are seven courses at St. Andrews now and this one is probably showing the Castle Course, but I am not sure.) Would love to live in this house! Not much done to this image – just some adjustments in Lightroom (used the Modern 07 profile) before doing clean up in Photoshop. Some spotlight effect on the flowers and a little darkening in the bushes. Used Nik Viveza to draw focus to the flowers and emphasize the plants sticking up. Added a slight vignette and that was it! Love Scotland in the summer!…..Digital Lady Syd
Refreshing Water Lilies
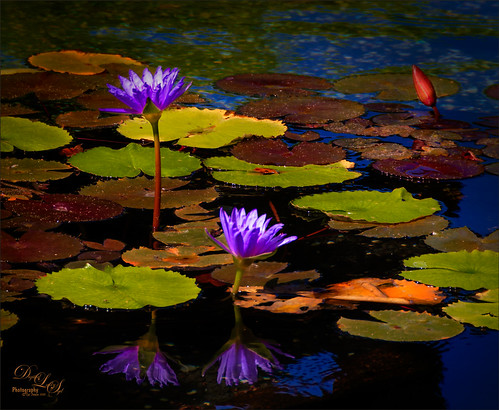
I really love water lilies and these are no exception. Taken at the Hilton Waikoloa Village a while back. I love the colors that were in this image. In Lightroom the HSL panel was adjusted to get the pretty colors. In Photoshop this image used Denny Tang’s Tone and Color Chart for Photoshop video – this worked very nicely on this image. A couple Spot Light layers were used in different colors set to Overlay blend mode to add some color focus. Topaz (see sidebar for website link) Lens Effect was used to add a soft olive Green vignette around the image. Nik Viveza 2 was used to slightly add focus to the water lilies. Not much was done to this image…..Digital Lady Syd
Blue Herons Nesting
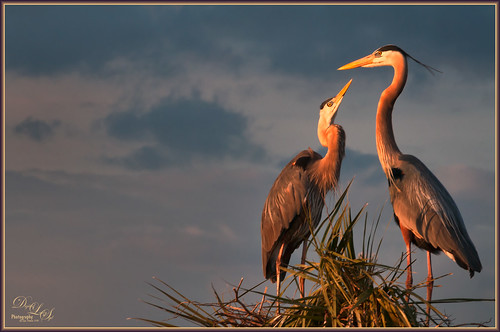
These two beautiful Blue Herons were nesting at the Viera Wetlands (also know as the Richard Grissom Memorial Wetlands) in Brevard County, Florida, a while back – I had not post-processed the image as I just could not get a great result. Now that Luminar 2018 (see sidebar for website link) is available for we Windows people, it really made the image pop! After doing some basic editing in Lightroom, it was then actually edited in Luminar (these filters were used: Accent-AI, Polarizing, Clarity, Golden Hour, Orton Effect, Details Enhancer, and Top & Bottom Lighting). Once image came back int LR as a TIFF file, Photoshop was opened for some quick clean up, applying Nik Viveza 2 to highlight the birds’ heads a little more, and a Curve Adjustment Layer for contrast. The frame was created using a Stroke Layer Style and setting it to Fill Type Gradient instead of Color – then sampled colors from the image to create the gradient. I love Herons!…..Digital Lady Syd
King Bladud’s Pig
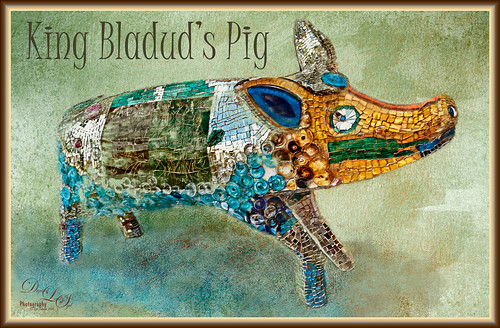
This little pig has an interesting story since the image was taken way back in 2008 when the Town of Bath in England was having a public art event to celebrate Bath’s origins and artists. King Bladud’s (cc863 BC) Pig (this is the pigs actual name and was created by Annette Martin) is one of 106 pigs that were on display all over the city (I only saw a few) and they were sold at auction to raise money for the benefit of Bath’s Two Tunnels Project.
The post-processing was minimal in Lightroom, just some Basic slider adjustments. In Photoshop, On1 Photo Raw Effects 2018 was used to sharpen the image (Dynamic Contrast filter, Sharpening filter and HDR Look filter – all just applied to the pig only with a mask). Lucis Pro filter was also used on further sharpen the pig. Next a texture by French Kiss (see sidebar for website link) called Color Wash Sage was added and a layer mask was used to paint the pig through the texture with a black brush. A New Layer was added and a shadow was painted in under the pig with a darker blue tone. Another texture by French Kiss called Redstrake was added and set to Color Burn blend mode at 65% Fill Opacity. Nik Viveza 2 was added to add a little vignetting. A text layer was added using a font called Juice ITC. Last step added one of my layer style frames (see my How to Create a Quick Layer Style Border or Frame blog). Wish I had taken more pics of these beautiful pigs!…..Digital Lady Syd
A Bird and His Reflection
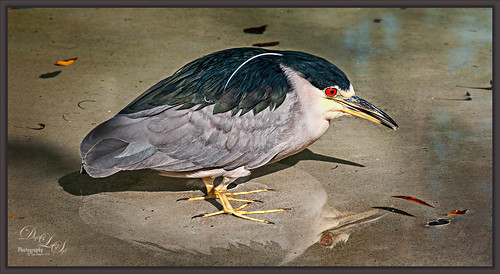
This little Black Crowned Night Heron at the Jacksonville Zoo had a pretty interesting reflection in the shallow wet water. And that eye – not even touched up – just bright red! I really love photographing birds just being birds! And not much was done with this image – in Lightroom applied the Modern 10 profile. In Photoshop On1 Photo Raw 2018 Effects (see sidebar for website link) was opened and the Dynamic Contrast filter was applied to just the bird (masked out the background), Sharpening filter, and the HDR Look filter to just parts of the bird (masking out other areas again). Nik Viveza was opened and used to adjust the tones for the focal point in the bird. A vignette was created around the heron. Last step added a layer style frame and that was it. Pretty easy to do!…..Digital Lady Syd
A Mermaid in the Mist of a Fountain
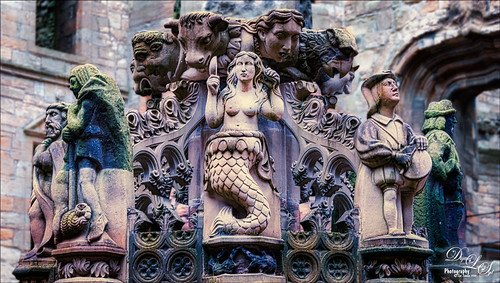
This is another image of part of the interesting Fountain at Linthlithgow Palace in Scotland (where Mary, Queen of Scots was born). The fountain was built in 1538 by James V – it has been known to flow with wine on a few occasions. These colors came from the image itself so I imagine at some time it was quite beautiful. I found the mermaid a rather interesting character in the mist of all the other statues. (See my previous Deer on a Fountain blog.) In Lightroom applied the new Artistic 04 profile that comes with LR/ACR, cropped the image, and did a few basic slider adjustments. In Photoshop duplicated the background layer and opened up Luminar 2018 (see sidebar for website link) where the AI Filter, Brilliance and Warmth, and Image Radiance filters were applied. The background was duplicated again and a Gaussian Blur set to 4.0 was applied to soften the stone in the palace which was very distracting behind the fountain. A layer mask was added to the Luminar layer and the background was painted out so the blur layer shows through. A 50% gray dodge and burn layer was also used to help emphasize the figures. A stamped layer was created and Nik Viveza 2 was used to direct attention to the mermaid. Last step involved adding a spotlight effect on the mermaid using a large white brush at 9% Flow on an Overlay blend mode layer. That was it. Would love to go back and take some more pics!…..Digital Lady Syd
Teacher and Student
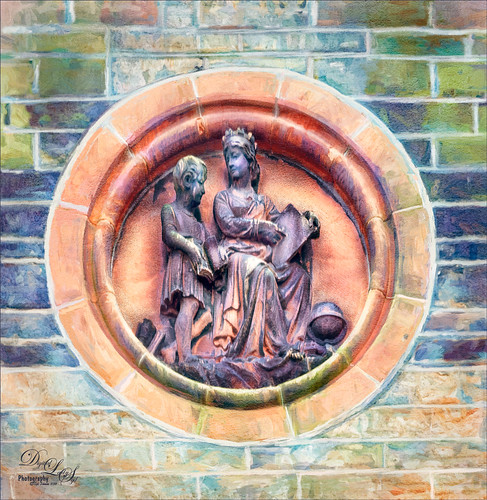
Am planning on taking a few weeks off from blogging to get some things done around the home – blogging takes up a lot time, so this will be it for a few! This image is of some architectural sculpture associated with the “Castle School” building connected to the Camera Obscura building in Edinburgh, Scotland, near the castle. I thought the sculpture was really charming of a teacher and her student. In LR the image used a Profile by VoxColor called NC to get the interesting tones. In Photoshop just did some normal clean up, used a Black and White Adjustment Layer, a Curves Adjustment Layer, and a Dodge and Burn layer. On a stamped layer, opened up Topaz Studio (see sidebar for website link) and applied the Impression Adjustment and Topaz AI ReMix Adjustment at 0.14 to add some painterly effect into the image. Then added several painting layers using my SJ Pastel 3 brushes (see my How to Create my Favorite Brush Blog and my Painting Fun in Photoshop Blog) to smooth out some of the paint strokes from the Impression filter. A New Layer set to Overlay was used to add a little spotlight effect on the figures. French Kiss (see sidebar for website link) Solstice Initiation texture was set to Color Burn blend mode at 59%. A Hue/Saturation Adjustment Layer was clipped to it and the Saturation was reduced to -43 to reduce the color effect of the texture. Finished off with Nik Viveza 2 to draw focus a little more into the sculpture. Last step was to create a vignette using Matt Kloskowski’s technique (see my How to Create a Subtle Vignette blog). That was it – lots of fun here! Will try to add some more blogs as time allows!…..Digital Lady Syd
Just Dazzling
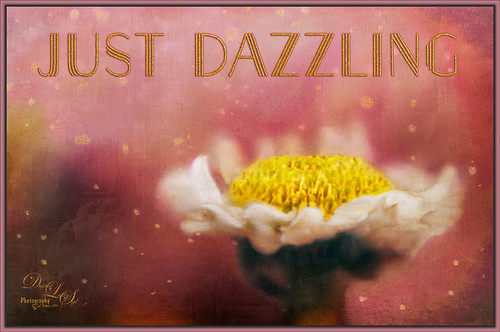
Got some beautiful flowers for my kids this past week so I pull out the old trusty Nikon and added my old LensBaby Composer to it. Got some really nice soft effects like the one shown above using a 2.8 aperture and a +10 Macro 37 mm lens. It is a lot of fun to experiments with this lens – always give surprising results. Used Nicolesy Contempo 02 profile on the image and used a Daylight White Balance in Lightroom. Did a few Basic Panel adjustments and on into Photoshop where the background was cleaned up. Nik Viveza 2 was used on the image to clean up all the edges and sharpen the focus a little. Then some clean up with both my regular SJ Pastel 3 painting brush and a mixer brush. Added two textures: one of my textures that is gray and white and set to Linear Burn blend mode at 44% layer opacity and one of 2 Lil Owls Studio (see sidebar for website link) workshop texture set to Multiply blend mode. Added text using the Naive Deco Sans font with a Bevel & Emboss and Outer Glow layer style. Last step involved adding the frame created in one of my You Tube videos to finish up. I really like the LensBaby effect – still looks good even when using an older version……Digital Lady Syd
Having a Snack
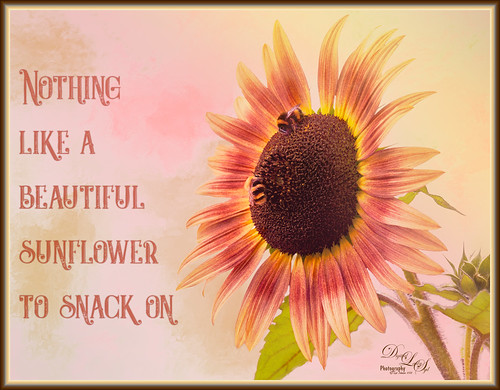
These two little bees were quite happy hanging around with this beautiful colored sunflower at the Old Village of Ayaymku restoration in Belarus. It was really simple to post-process. In Lightroom the new Artistic 02 profile was applied and then just a few Basic panel changes. The flower was selected from the busy background in Photoshop’s Select and Refine dialog. A background was placed behind the flower – one I had painted in Corel Painter that had some nice green and pink strokes. Created a Color Burn blank New Layer and painted with white to emphasize some of the color in the petals and set it to 70% layer opacity. Cleaned up the bees just a little so they stood out a little more. Added the text using the Castile Inline Grunge font. A Light Leak was applied using a pink to yellow leak. A little Nik Viveza 2 was applied and one of my borders using a layer style was added. (See my How to Create a Quick Layer Style Border or Frame blog). That was it. Have a great day!…..Digital Lady Syd
Beautiful Hibiscus
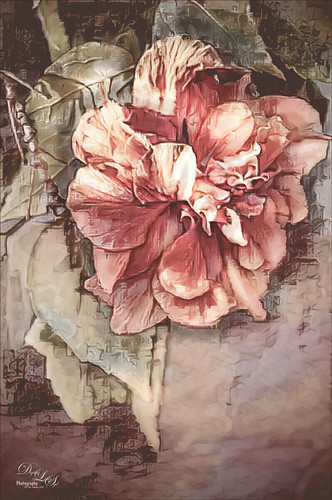
Had fun with this image. This is one of my peach hibiscus that I turned into a beautiful coral color. Used On1 (see sidebar for website link) Photo Raw 2018 Effects Dynamic Contrast on parts of the image by using the filter’s mask, and Sharpening filter. In Photoshop painted on the layer to fill in areas that were blown out. Added a Texture from Melissa Gallo Paints called Garden Canvas (from her Painting with Photoshop Workshop – excellent course and comes with some great brushes) at 26% layer opacity. Duplicated it and set Blend If Underlying Layer white tab split to 30/60. Three colored spotlight effects were painted on the petals. On a stamped layer, Topaz (see sidebar for website link) Studio was opened and the AI ReMix adjustment applied twice and Dehaze adjustment once. The image had a really bright red and orange effect color. Nik Viveza was opened to add some focus. Then applied my SJ Nastalgia profile (from a preset) in Camera Raw Filter. (See my How to Create Profiles in ACR from LR Presets and some PS LUT Files blog for info on this.) Now the colors are this pretty pink color. A couple layer of painting and burning and that was it. …..Digital Lady Syd
Posing for my Portrait
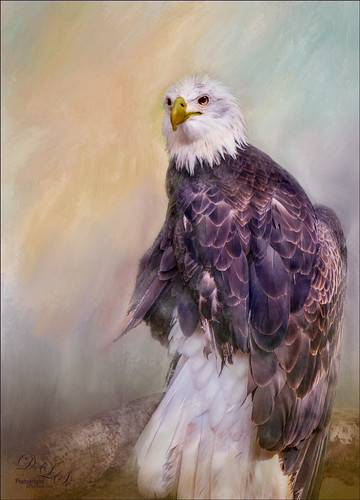
I love this shot of the Bald Eagle – he looks like a king posing for his portrait. I have no idea how he got his feathers this way – I took the image at the Jacksonville Zoo and he was sitting on an old tree stump I think. It is interesting to see his white feather plume. In Lightroom the Adobe Vivid profile was used. Then in Photoshop this guy was separated from the background using Topaz (see sidebar for website link) ReMask 5 as I could not get PS’s Select and Mask to give a good result. I usually can get a better result with ReMask if the selection is complicated. I used two of my own textures behind the eagle but could not quite get the look I wanted. So I took the Eagle layer into Corel Painter and created this soft version for a background. Back in PS the the other two textures were blended in. Used a couple Exposure Adjustment Layers for the eyes and the beak. Curves Adjustment Layers were clipped to each Exposure Adjustment Layer to get the right color in the eyes and beak. Several layers were created for painting out the edges a little with different mixer brushes. On a stamped layer Nik Viveza 2 was used to set the focus on the Eagle’s head and to clarify the feather detail. A Black and White Adjustment Layer set to Luminosity blend mode was used to further adjust the overall color. This is not really a painted image, but it has a painterly feel to it. …..Digital Lady Syd
Bathing Beauties
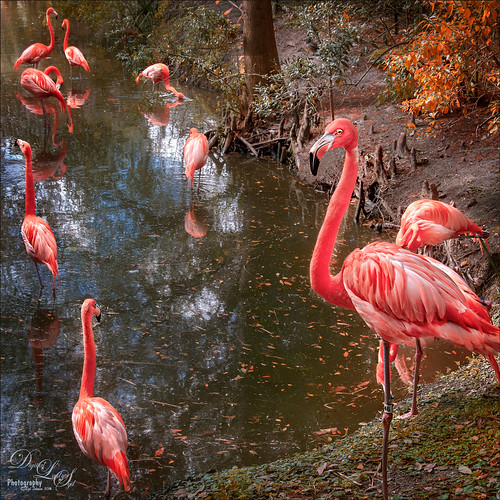
These birds look just like bathing beauties stepping into the water daintily. I just love Flamingos – they are so much fun to watch and photograph. Took this image of some Flamingos a while back at the Jacksonville Zoo and did not think it was that great. After watching a couple videos on On1 Photo Raw 2018 (see sidebar for website link), I decided to give it a go and see if I could get this image to look better and I was pretty pleased. When I did a Fun Photoshop blog on sharpening (see my Comparing Some Sharpening Techniques blog), I mentioned how good both On1 Effects Dynamic Contrast and Sharpening filters were. Well once again, I am pretty pleased with the results. If you have On1 software, check out Colby Brown’s video on Top 5 Tips for Wildlife Photography where he discusses how to use these filters. Then the rest of the image was post-processed in Photoshop. A stamped layer set to Hard Mix blend mode at 6% Fill Opacity was used to add an overall sharpening to the image (this was also mentioned in my sharpening blog). A Spotlight Layer set to Overlay blend mode and white was painted on the feathers (see my How to Add a Spot of Light blog.) Then a little vibrance was added using the Channel Mixer Adjustment Layer – learned this nifty trick from Denny Tang in his Vibrancy Masking Photoshop Tutorial video. Nik Viveza 2 was used to direct the focus, a Black and White Adjustment Layer set to Luminosity blend mode at 36% layer opacity, and a darken/lighten layer to emphasize the eyes and beaks a little. and a Matt K vignette (see my How to Create a Subtle Vignette blog). I might add that I used Artistic Profile 03 in the new Lightroom update to begin working on this image. I love it when I try out a new technique and it works really well……Digital Lady Syd
Enjoying the Attention
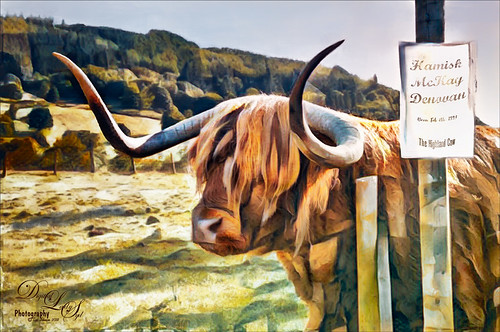
Here is an image of one of the most beloved creatures in Scotland – Hamish McKay Denovan, the Highland Cow. This guy was as tame and sweet as could be. (Another Flickr contributor noted that “Hamish the Highland Bull at Kilmahog, a popular stop off point on the road through the Trossachs to Lochaber and the western isle” in Scotland is where this guy can be found.) It had not been post-processed since it had a fence going everywhere in the image, but Photoshop’s terrific spot healing brush took the lines out completely. Just Basic Panel changes were done in Lightroom. Then in Photoshop, after removing the fencing, a stamped layer was created. Topaz Studio (see sidebar for website link) was opened and once again and three Adjustments were added, Precision Contrast and two AI ReMix (settings were: Precision Contrast: Micro -0.52, Low 0.72, Medium 0.27, High 0.45, Shadow 0.51, and Midtone 0.12; AI ReMix: Opacity 0.79, Low, Row 13/Col 2 swatch, Brightness 0.14, Contrast 1.15, Sat 0.75; and AI ReMix: Opacity 0.89, Color bm, Low, Col 17/Row 1 swatch, Painted out the animal slightly). The sign on the fence post was different and faded so I put some text in it for this highland cow – three different text layers were used, grouped, duplicated, turned off, and the copy was rasterized. Then the text could be transformed using the Warp to fit the paper. Some clean up was done and some darkening and lightening using two Curves Adjustment Layers with black layer masks. Google Nik Viveza 2 was used to emphasize the focal point. Then my final workflow steps were done: added a Red Channel Luminosity Curves adjustment layer, a Gradient Map adjustment layer using a reddish tone to light blue color gradient, added a layer for a white spotlight effect on his face, and finished up with Matt Kloskowski’s vignette. Love how the Topaz AI ReMix can produce this type of interesting texture…..Digital Lady Syd
Parliament
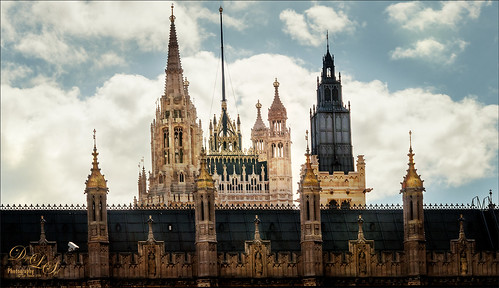
This is an image of Parliament taken from Westminster Abbey in London. I was trying out a few different tricks on this image to see if they worked. The Smart Sharpen Filter ws used to sharpen the image (Amount 155%, Radius 8.1, Reduce Noise 33%, Remove Motion Blur at 53 degrees, Shadows Fade Amount 16%, Tonal Width 27%, Radius 7, Highlights Fade Amount 9%, Tonal Width 49% and Radius 8 px). This is from a video by Deke McCClelland (a Photoshop Guru from Photoshop World) called Sharpening Details – Compensating for Camera Shake. I could actually see a difference using these settings. Next I followed Denny Tang’s Tone and Color Chart for Photoshop video – this worked very nicely on this image. A couple Spot Light layers were used in different colors set to Overlay blend mode to add some focus. A new layer was set to Saturation blend mode and with a bright colored brush, the gold areas were painted – the layer opacity was set back to 87%. Nik Viveza 2 was used to even out the clouds a little. Finished up creating a vignette effect using Matt Kloskowski’s technique. (See my How to Create a Subtle Vignette blog.) Love the gold in this image……Digital Lady Syd
A Scottish Countryside Town
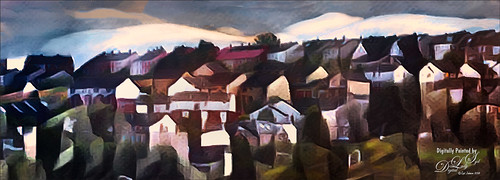
Loved how this image turned out using the new Topaz (see sidebar for website link) Studio AI ReMix Adjustment. I am finding that to get AI Remix to look really good, it helps to stack this adjustment a couple times to get an interesting look. In this case a Precision Contrast adjustment was added first, then an AI ReMix adjustment using the Row 13/Col 2 swatch, then AI ReMix adjustment was applied again using Row 6/Col 3 swatch set to Lighten color blend mode at 0.59 opacity, next an Edges adjustment set to Multiply blend mode, and finally a Color Theme adjustment to change some of the colors of the image (this adjustment seems to work best for changing the colors in these swatches). I created a preset called SJ AI Blocked Blue Look and put it up in the community group if you would like to try it. Back in PS the layer was set to the Luminosity blend mode, did a crop, and a little painting clean up was done in the background. A stamped layer (CTRL+ALT+SHIFT+E) and Nik Viveza 2 was opened and 4 control points were used to adjust the color. The last step was to go back into Topaz Studio and apply the Pony Express preset from the Simplify section. Back in PS it was set to 26% layer opacity. Last step was to add a Matt K vignette. (See my How to Create a Subtle Vignette blog). I really like the texture and color in this image…..Digital Lady Syd


