
Just Enjoying the Day

Just enjoyed posting an image a Bonobo Monkey at the Jacksonville Zoo – needed some wildlife post-processing practice! Used the Remove Tool, Sharpen Tool, a texture, Liquify Filter, layer for filling in hairs by painting using Coyote Mange animal hair brushes (still the best out there for this), Viveza, Lighten and Darken layers, Exposure Adjustment Layer for the eyes, Red Channel Curve Adjustment Layer, Luminar Leo Filter using my favorite Mystical effect, and Color Efex Pro Filter (an oldie but goodie for me). These are all techinques I have discussed on my Fun Photoshop Blog or my Tidbits Blog here at some time or another. As you can see, I still use them a lot. …… Digital Lady Syd
The Mighty Eagle

I am a huge Eagle fan (not the football team!) and am always checking in on Web Cams when the nesting season comes along. This guy is an injured Eagle that resides at the Jacksonville Zoo – I feel sorry for him since he is unable to fly the sky like his relatives. He is still a beautiful specimen and seems to enjoy people stopping by when visiting the Zoo. This image involved only a little AI to Expand the right side a bit to balance out his position in the photo and that is all. The rest was just my regular workflow: a Curves Adjustment Layer, two Hue/Saturation Adjustment Layers, Viveza 2 to pop the color of his feathers, Topaz Sharpen AI to sharpen up the feathers using Too Soft, a dodge and burn layer, an Exposure Adjustment Layer for the eyes, and a clean up layer. It felt good to get back to my regular post processing!…..Digital Lady Syd
Raindrops on a Queen

Can’t believe I did not post this image a while back. It is one of my favorites and it was taken using my 60 mm F/2.8 macro lens (with my Bower 0.5 x High Definition Wide Lens attached) right after a heavy rainfall. Lightroom Camera Raw settings were added before opening Photoshop. Topaz Sharpening AI was applied first (I still love this plugin!) and a Color Lookup Adjustment Layer using my preset. On a stamped layer (CTRL+ALT+SHIFT+E), Viveza was opened – the settings made the image pop! A Burn Layer was added above and another darken layer to darken the background more (used a soft round brush to do this). Last step involved adding a Film Grain Layer set to Overlay blend mode. Pretty basic!….Digital Lady Syd
Queen Emma, Governing the Garden

The above was taken in my front yard – these lilies grow like crazy down here in Florida but I really like them. Just had fun using some of my favorite plug-ins that seem to be disappearing from the scene. It took awhile to remove the flower petals from the background – had to do a lot by hand with a hard round 4-pixel brush in the layer mask to get a good result. A solid color blue fill adjustment layer was placed under the masked layer. Topaz Studio 2 was then opened and the Impression filter Degas Dancers preset was applied as is. Unfortunately Topaz Studio 2 is no longer available for purchase for several months now. The products they do have are great – I love this company – but I am crushed that their creative products are no longer available, including the fabulous Impression. A couple Color Lookup adjustment layers were added (PS Futuristic Bleak preset set to Color blend mode and Scott Kelby’s Deep Blue preset set to Multiply blend mode and 19% layer opacity). A Hue/Saturation adjustment layer was added to tweak the colors a bit. Then a brush I made from FrenchKiss’s Tableaux Mirage was added at 3800 pixels and stamped on top using white – set layer opacity to 63%. (See my Texture Brush You Tube video on how to do this.) Last step involved adding the old Nik Viveza 2 plug in, which never lets me down……Digital Lady Syd
Enjoying a Covered Patio

Had some fun with the beautiful lighting of this covered patio at The Garlic Restaurant in New Smyrna, Florida. Lots of nice tables outside to enjoy a refreshment before the evening arrives. This image was a bit hard to post-process due to the lighting issues. Luminar 4 was used to get the rich colors (I find this Photoshop plugin is great for this – see sidebar for website link) and Viveza was able to draw the focus to the correct areas. A few Adjustment Layers to lighten and darken some parts of the image and that was about it. Wish I lived closer to this place – a great place to have dinner!…..Digital Lady Syd
Fisherman’s Cabin

This image was created using one of Shorpy.com’s great images called Fisherman’s Cabin-Shore Road-Magnolia-Cloucester-Massachusetts, cc1905. This image was run through the Image Colorizer (see my How to Colorize Using Image Colorizer blog for info on this) first, then after some clean up in PS before taking the image into Topaz Studio 2 where Impression, Edges, and Color Theme filters were applied. Then the image was taken into Corel Painter and the image was painted over where the canned Impression program left stroke I did not like. Back in PS, the Mixer brushes were used to do the final clean up on the image. Lots of fun to do!…..Digital Lady Syd
Fishing in 1904

This image is a fabulous one from Shorpy.com, one of the best places to see great historical images. I decided to use one of my colorizing techniques since the image was so clear and interesting. Used my blog called How to Convert Black and White Images to Colorful Painting with Topaz Studio 2. The first step is very important as noted in the blog – make sure you have adjusted the resolution and size of the image before beginning to change the image. When opened in Topaz (see sidebar for website link) Studio 2, only AI ReMix was applied using Daylight Fade preset, High, Brightness 0.60, Contrast 1.00, Sat 0.75, Hue 0.15. From within Topaz Studio, Topaz Adjust AI was opened and set to Standard and Strength 0.71 – then mainly all the sliders were adjusted to get a really nice look. Back in PS, the skin color was painted in as for some reason it did not pick up color. The blue color came from Topaz ReStyle and Nik Viveza was used to even out the whole effect. This was the perfect image for this type of coloring…..Digital Lady Syd
Queen Emma Lily Displaying Her White Blossoms

Another image of my beautiful Queen Emma Lily blossoms. This time she has three visitors – not sure these are wanted guests. Looks like a little garden work is in store. This image contained a very short workflow – a little sharpening in Topaz (see sidebar for website link) Sharpen AI, some dodging and burning, and Nik Viveza to adjust the background color and focus on the blossom. Pretty easy. ….. Digital Lady Syd
Monarch Butterfly’s Magical Dust

This was one of many lovely Monarch and other types of butterflies that were very busy spreading the magic dust to the beautiful flowers that were in bloom at the Harry P. Leu Gardens in Orlando, Florida. This image took me forever to decide what to do with it! It had a really distracting background with all the crazy leaves going all over the place – it was a hard image to capture as the butterflies were going crazy on the hot day I visited. In Photoshop Luminar’s (see sidebar for website link) Flex was used to calm it down some and add some structure to the butterfly, then Viveza 2 twice to try and soften the background, before using Topaz (see sidebar for website link) ReStyle to get the final color palette. That’s along with some painting, spotlight effect, and Red Channel Curves Adjustment Layer. I think I finally got the mystical magical effect I was trying to create……Digital Lady Syd
Mars from Above

I follow a blog that sends out B&W images from the HiRISE Camera (link shows original image) on board the Mars Reconnaissance Orbiter. Every now and then a really interesting one shows up with lots of detail and depth like in the image above that shows Recurring Slope Lineae (dark markings on steep slopes). The image needed to be sharpened so Topaz’s (see sidebar for website link) new Sharpen AI was used. Then several adjustments layers were added: Channel Mixer set to Hard Mix blend mode at 36% opacity and 6% Fill, Gradient Map set to Vivid Light at 36% opacity, another Gradient Map set to Overlay, Hue/Saturation where the Greens were adjusted, and Curves set to Darken. Several Spotlight Effect layers in different colors were used to further direct attention to certain areas. Nik Viveza 2 was used to even out the tones and sharpen the focal points, and the font is called Abraham Lincoln. This was a lot of fun to do and it is hard to believe the image is from Mars!…..Digital Lady Syd
Splendiferous Bougainvillea

The beautiful blooms above are growing in my front yard right now – they are quite pretty and textured. Shot manually My 60 mm Nikkor macro lens was used with a Bower 0.5 x High Resolution Digital Lens with Macro added to the lens. I always love the results of this lens. Luminar 3 (see sidebar for website link) was used to bring out the detail (used Structure, Details Enhance, Image Radiance, and Top and Bottom filters). A mixer brush was used to smooth out the background. The font is called Beauty Angelique. Nik Viveza 2 was used to further highlight the focal area. That was it!…..Digital Lady Syd
Lantana Reaching for Air

These beautiful Lantana flowers (which was the largest plant I have seen – this is just a little part of it) was being totally smothered by several different kinds of palm plants along a golf course hole in Florida. It created sort of an intriguing image. Since this is an old Android phone photo, it was not the sharpest, even after running it through the marvelous Topaz (see sidebar for website link) AI JPG to RAW. So I had to improvise if I wanted to use the image. Therefore, I first ran it through Topaz Studio’s AI Clear which helped quite a bit (used High Sharpness, Recover Detail 0.39, Exposure -0.17, and Clarity 0.67). Also in Studio the Edges Adjustment was used and set to Dark Tones at a Strength of 0.37 and the Impression Adjustment using the default setting with an Opacity of 0.74. Back in PS a Color Lookup Adjustment Layer was applied and set to the Crisp Warm preset. A little painting, some Nik Viveza 2, some lighten and darken curves for dodging and burning, a Blur Tool layer, and a Sharpen Tool layer were also used. Topaz Sharpen AI set to Stabilize and a Remove Blur Amount of 0.80 was used. Last step was to add a slight vignette using Unmesh Dinda’s technique. I was surprised I could use all the AI programs on the image and get a decent effect. ….. Digital Lady Syd
Living in a Jungle Painting
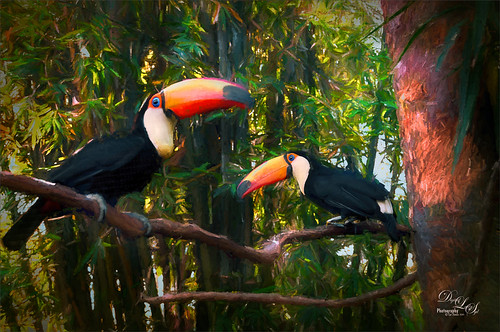
Yes, my friends at the St. Augustine Alligator Farm are making another appearance, this time showing off their painted jungle background. This is their favorite place to be. How did this happen? Well, if its a painted background, it is probably Topaz’s (see sidebar for website link) wonderful Impression plug-in, now in Topaz Studio. Yes, this time the Edward Hopper I preset was used and then the Toucans were painted out somewhat – left a few strokes around them. While in Studio, a Glow Adjustment using the Soft Liquid preset was applied and the Primary Glow was changed to 0.90 – used the same mask as in the Impression Adjustment so the birds were not affected. Also used AI Clear Adjustment to sharpen up their eyes and bodies. Several PS adjustment layers were used, a Clone Stamp layer to clean up the strokes, and Nik Viveza 2 to adjust the vignette effect. These birds are such happy creatures – no wonder they are the first exhibit you see when entering the Alligator Farm. ….. Digital Lady Syd
How Did This Happen?
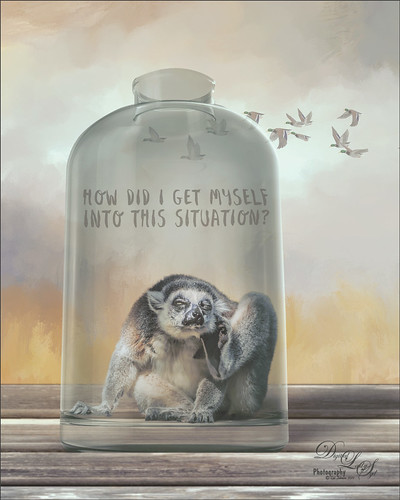
I had initially post-processed the Lemur as its own image. Then I ran across a nice video by Jesus Ramirez called The Best Way to Select and Mask Glass (or Transparent Objects in Photoshop. I had to try it and that is how my Lemur buddy ended up in a bottle. The original Ring-Tailed Lemur image was taken at the St. Augustine Alligator Farm in Florida. This image used a Noise Gradient Map Adjustment Layer (see my How to Randomize Some Color with the Gradient Map Adjustment Layer blog). The Lemur was selected out of my original image that I may post sometime and was run through the Select and Mask command before moving him into a glass bottle from Pixel Squid. The flying Canadian Geese are also from Pixel Squid. The background is one I painted in Corel Painter and the wood is a texture from Kelby One. Just a lot of fun to put together!…..Digital Lady Syd
My Magical Garden

This Spanish Moss image was photographed at Ravine Gardens in Palatka, Florida. Since the trees do not have their leaves yet, the Moss is just hanging off the bare branches and with the sun was just rising, it gave a sort of magical feel. This image took a lot of post processing. Topaz (see sidebar for website link) Studio’s AI Clear was applied and this time the Exposure was set up to 0.53 and Clarity to 0.36 to lighten up the whole image. And a little bit of Topaz Detail was used to really sharpen up the moss effect. Some lighten and darken Curves Adjustment Layers were used to add some contrast. On a stamped layer Topaz ReStyle”s Polo Blue and Pink Lace preset was applied at 62% opacity using the Color blend mode. Another stamped layer was created and Luminar’s (see sidebar for website link) Image Radiance (this creates a really nice effect) and Cross Processing using the Auckland preset at Amount of 20 finally gave me the result I liked when set to 53% opacity. Nik Viveza 2 was used to even out all the coloring and adjust the focal point. Who knew all these filters would be needed to get this magical effect???……Digital Lady Syd
Happy Valentines Day

These beautiful birds, the Greater Flamingos which are not real bright pink like the American Flamingos, are enjoying the holiday – here they are observing some rather tree-like hearts in the pen. Since it is a holiday, I will not go into major detail on how I created this effect – it was a major trial-and-error in this case. The hearts are all from Julia Mead, a really great scrapbook object creator. The texture is called Imperfect Heart Soft Pink by Evelyn Flint (can’t find a link but it was in her Flickr feed at one time), and the font is Antalia Script. The rest is my own doing. Used so many different filters: Topaz AI Clear and AI ReMix, Luminar, and Nik Viveza 2 and Color Efex Pro 4. Lots of clean up layers and adjustment layers. Lots of fun to do. Everyone have a very Happy Valentine’s Day…..Digital Lady Syd
Please Return Me to the Jacksonville Zoo!
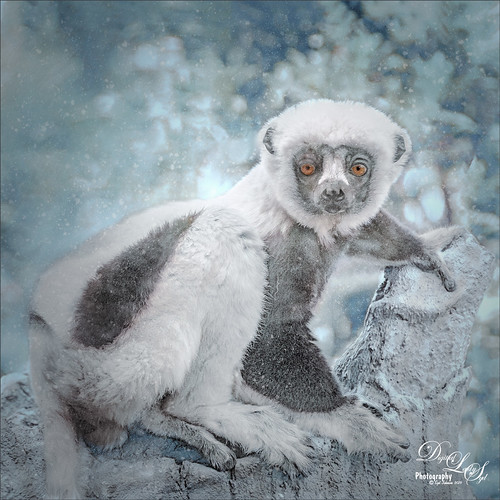
This Coquerel’s Sifaka is actually a native of Madagascar and would never be caught in a snowstorm, much less at the Jacksonville Zoo in Florida. But with a great image and crazy imagination, I felt he just looked like he was in a winter coat. I spent a long time taking pictures of this guy and his buddies – they were very entertaining and those eyes! In Lightroom used one of my camera profiles that created an HDR desaturated look – then just some Basic panel adjustments. The original image was post-processed using the correct coloring of the Lemur with the green background. In PS had to remove some background items with Edit -> Content Aware Fill command. On a stamped layer Topaz (see sidebar for website link) AI Clear, Precision Detail, and HSL Color Tuning adjustments were applied. Then a Darken Curves Adjustment Layer, Nik Viveza 2, Exposure Adjustment Layer for the eyes, and PS’s Charcoal Filter setting the foreground and background colors to light green and yellow. So where did the blue color come from??? The Fuji Eterna 250D Kodak preset was applied and set to Divide at 47% layer opacity – there is the blue. Serge Ramelli’s snow brushes were used on a separate layers to add the snow effect – love these brushes! (The free Snow Brushes can be downloaded under his video called How to Create Snow in Photoshop CC.) Then just another Darken Curves Adjustment Layer to darken his coat in places and a vignette. Lots of fun here!…..Digital Lady Syd
Miss February
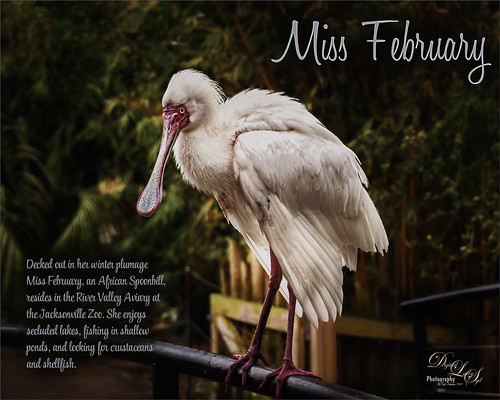
This big African Spoonbill just appeared to look like a calendar girl to me so I had to create an image for this. She was really huge! In Lightroom used Serge Ramelli’s Safari Warm Dramatic Light preset as a starting point – then adjusted a few sliders before coming into PS. On a duplicate layer used Topaz (see sidebar for website link) Studio’s AI Clear with Auto for Noise and High for sharpening. Used Detail on just the bird to enhance some of the feathering. Also worked on bird in Nik Viveza 2 to adjust the tones on the bird. This was a difficult image since the background was so busy. Luminar (see sidebar for website link) was used to help darken it down by using Joel Grime’s Portrait Pop the Blue preset and adjusting the vignette. A few text layers were added and that was about it. She/he is definitely intimidating!…..Digital Lady Syd
Vintage Hy-Red Gasoline Station
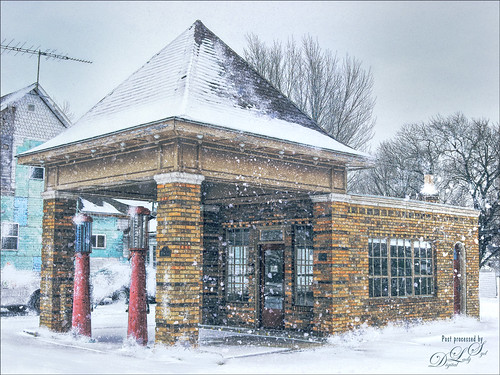
I saw this image posted on Facebook for my hometown and remembered driving by this old 1930 Hy-Red Gas Station in Greentown, Indiana, many times while growing up – apparently it is still standing and is on the National Register of Historic Places. Since Indiana is in the middle of a terrible cold spell right now, I thought I would add some more snow to it to really give this image a major wintry feel. It also gave me a chance to play with the free Snow Brushes that Serge Ramelli offered during the holidays (see under his video called How to Create Snow in Photoshop CC). I used a couple other splatter brushes to add solid snow build ups to the image (one by Melissa Gallo from a long time ago and one from Aaron Blaise). Topaz (see sidebar for website link) Studio’s AI Clear, Precision Detail and Precision Contrast Adjustments were used to really get a nice sharp effect to the image. On a stamped layer in PS, Topaz ReStyle’s Warm Steel Wash preset was applied to the image, then set to 50% layer opacity and Color blend mode – this gives it the vintage feel. Nik Viveza 2 was used to add just a soft blue color to the sky which was a total white – two control points were placed in the upper corners where the Brightness sliders were set to the negative side to add in the wintry sky color. I was really surprised how sharp the image turned out……Digital Lady Syd
Happy New Year!
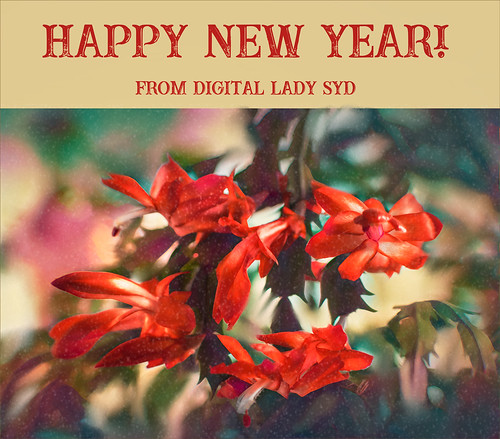
Happy New Year to everyone – thanks for visiting my blog when you get a chance. This image is of my Christmas Cactus that was in full bloom for my holiday this year. To get the soft background, used Topaz (see sidebar for website link) AI Remix (A Neon Rose preset with the leaves brushed out at 50%). Painted some texture and snow on the image. Last step was to add Nik Viveza 2 to sharpen up the petals a little. The font is called Buffalo Inline 2 Grunge. Looking forward to have a wonderful 2019!…..Digital Lady Syd
Santa Relaxing after Busy Holiday Flight

Just an image of one of the my son’s favorite tree ornaments. Nothing like a warm dip after a hard night’s work. Workflow included a few changes and a crop in Lightroom. In Photoshop used Topaz (see sidebar for website link) AI Clear, Lucis Pro 6.0.9 applied with a black layer mask and painted in on Santa’s beard and Reindeer face, and some clean up and line accent. A spotlight layer was created on Santa and the Reindeer’s faces. Last step was to add a little Nik Viveza 2 to add a slight vignette effect. Hope everyone is having a wonderful holiday!…..Digital Lady Syd
Mockupped Sailboats
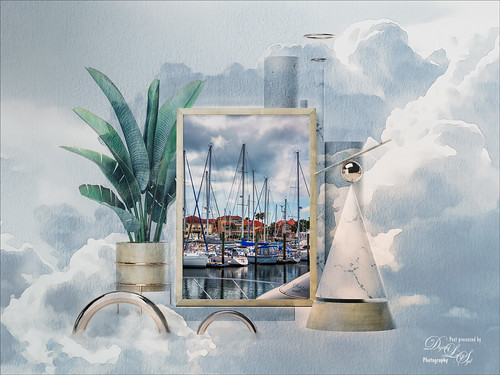
I have never used a Mockup File before to show off my images, but this one sort of seemed to fit this image since there is a strong triangle effect. First a free Abstract Mockup file by Best Pixels was opened up in Photoshop. The top layer is a Smart Object layer which must be opened by double-clicking on the thumbnail icon and then your own image can be placed in and aligned with a Free Transform (CTRL+T) if needed to fit the frame opening – must Save this image when warning comes up (the file does not appear anywhere in your folders but you still have to save to add in your image). This is where my Sailboat image from Camachee Cove was added into the image. On top of the bottom layer a Solid Color Fill Adjustment Layer was added using a light blue sky color. Next one of several free beautiful Watercolor Clouds Textures by Presets Galore was placed under the Smart Object ans set to 45% layer opacity. In a layer mask, the picture frame areas and few other places were masked out with a black brush. On top a Curves Adjustment Layer was added. Nik Viveza 2 was added on top where a little warmth was added into parts of the mockup. That was it. I love the dreamy feel this created…..Digital Lady Syd
Joyous Ornaments Lining Up for the Tree
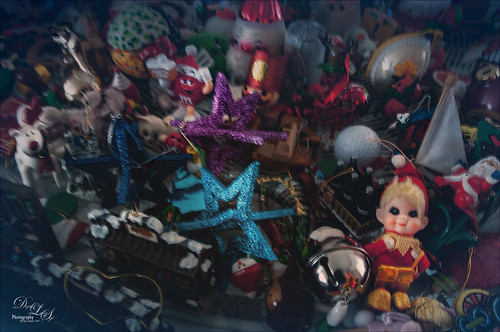
This is just one of those crazy photos that make me laugh. It is not all that sharp but sort of exemplifies the total chaos it is for me to get all the ornaments up and hanging right! Biggest issue I had was to get this image sharper without deteriorating the quality. In Lightroom’s Develop module, used my SJ Sharply Dark LUT (created in my blog and video called How to Create Profiles in ACR from LR Presets and Some PS LUT Files) and set it to Amount 81. Then did just the normal adjustments. Radial Filters were used to help sharpen up some of the ornaments I wanted particularly in focus. Went into Topaz (see sidebar for website link) Studio from LR and used AI Clear (applied it twice to get some additional sharpness and it worked!), the Precision Contrast adjustment, Topaz Lens Effects Diffusion Adjustment to soften overall just a little and Topaz Studio Focal Blur Adjustment, placing it over the main ornaments to keep sharp. Then back to LR where it was opened up in Photoshop. Did a little clean up of some edges and used Nik Viveza 2 to emphasize the focal point on a few ornaments. That was it. I find this a really soft sort of happy image – not one that goes up on the wall but one that reminds me of Christmas!…..Digital Lady Syd
Color of the Wind
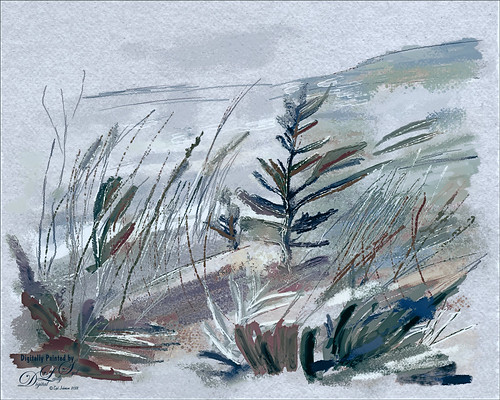
Once again just had some fun – this time painting with Grut’s Ink Brushes and paper. Decided to try and create an image somewhat like an Andrew Wyeth. (Right, like I could paint like Andrew Wyeth – I would be in heaven!) He is one of my favorite painters. It also gave me a chance to go through all the wonderful Ink Brush Nicolai has created at his Grut Brush site. There were so many I wanted to use but stayed instead to these brushes: Gone Coral, Coven Sloth, Pensive Linny, Bed Kelp, Bone Soak, Holy Slips, Go Folly, Raggedy Tag, and Wain Pip. (These were all placed into a brush Group named SJ Grut Ink Brush Favs – and backed up in the Preset Manager.) I also used his Oil Impasto Chip Gimble brush for ground cover. All these were used on separate layers so they could be adjusted and the opacity set correctly. Nicolai also has some marvelous papers – this one started with SP Espaloaf which gave the beautiful overall texture. To finish up, Topaz ReStyle was opened up and the Peppermint Gray preset applied for a very cool feeling to the image. Last step was to use Nik Viveza 2 to bring in the focus to the main tree. If you like ink brushes I suggest you check the Grut Brush Site – lots to choose from and for a low price, you can get all his brushes including these ink brushes. And the best deal is he gives away a free brush each week under his Freebies tab – all different kinds. I can’t tell you how many brushes I have gotten from this free downloads. …..Digital Lady Syd


