
Happy Thanksgiving!
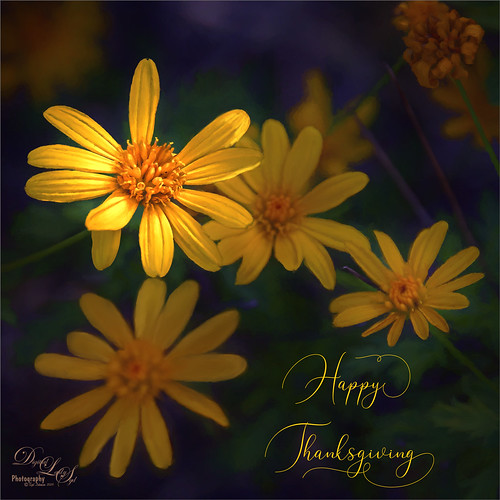
I still have a few yellow daisies blooming in my yard so they decided they would like their picture taken to wish everyone a wonderful Thanksgiving Day. What I like the most is the pretty font in this image – it is called Argentina Script. It lots of different Glyph settings to make your text look fancy. Also used Topaz (see sidebar for website link) Sharpen AI and Topaz Impression (for just the background – painted back the flowers), PS Color Lookup Adjustment Layer using Crisp Winter preset, a red Photo Filter set to 27% Density, and Nik Viveza. Great fun with this one!
Have a Happy Thanksgiving from Digital Lady Syd!
A Little Cherry Tree

Have not painted in a while so decided to give it a go. I wanted to paint a Cherry Tree since I lived in the Washington, DC area for many years and miss seeing them this time of year. The original image was created in Corel Painter 2015 on just the Canvas and using 9 different brushes on a Plaster Paper. This image was brought into Photoshop where a Clean Up layer was created. Three other layers using some of Aaron Blaise Foliage Brushes were added to soften some of the sharp edges mainly around the water and on the plants. A Motion Blur set to 4 was used to soften the graphic look os his brushes. Nik Viveza 2 was used to reinforce the focal area in the tree and a Level Adjustment Layer was added to make sure the contrast was correct. That was it! It was a lot of fun to get back to painting, but I still like to go between the programs……Digital Lady Syd
A Tuscan Blossom
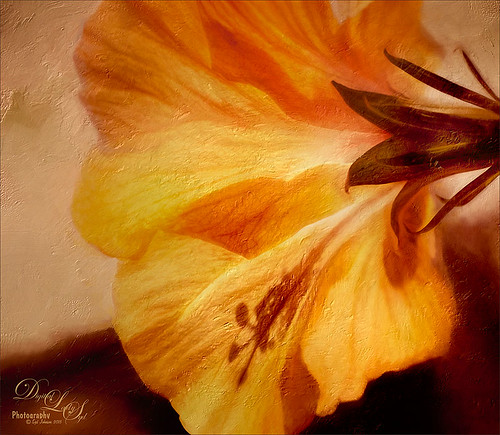
Just loved how this little Yellow Wing Hibiscus blossom image turned out. Did very little to the original image other than apply 2 Lil’ Owls (see sidebar for website link) Spring Whispers 4 preset and sharpening of the shadow stamen. On a duplicate layer of the background, Topaz (see sidebar for website link) Clarity was applied using John Barclay’s Basic Settings preset (see My Glowing Porch Flowers blog for settings). Next went into OnOne’s (see sidebar for website link) Perfect Effects 9 and applied the PE4 Vintage preset. I believe that OnOne gave it away with an earlier version, probably Perfect Effects 4. Next Topaz Impression was opened and the new preset created from Blake Rudis’s blog called Ethereal Background was applied next (see Blake Rudis video called Atmospheric Backgrounds with Topaz Impression). A New Layer and some clean up was done, especially a little Mixer Brush painting on some of the edges to smooth. Painted Textures Creamsicle texture was applied (not sure this texture is still available) set to Linear Burn blend mode at 73% opacity. A Hue/Sat Adjustment Layer was clipped to the layer and the Saturation set to -56 so there was not a lot of color added to the image, just texture. A Curves Adjustment Layer was added to add back some contrast and the last step was Nik Viveza with a control point on the focal point, or for me the stamen shadow. It was fun to experiment with my arsenal of filters!…..Digital Lady Syd
There’s a Leopard on the Floor!

Just having fun here. Took this image of a Snow Leopard Rug at the Native American Festival in Ormond Beach, Florida. No, I do not believe it was a real snow leopard skin, but it caught my eye so I snapped a shot. In Lightroom just used Seim’s (see sidebar for website link) Power Workflow 4 Super Hero X WhiBal and Tint 82A Cooling presets. Next in Photoshop I applied the Shake Reduction filter – seem to be getting good results with this. On a duplicate layer, the image was opened up in Topaz (see sidebar for website link) Black & White Effects and a preset I had created a while back was applied (settings for my SJ Sky and Green Preset are: Conversion section Basic Exposure Contrast 0.02, Brightness 0.02, Boost Blacks 0.71 and Boost Whites 0.25; Adaptive Exposure 0.62, Regions 34, Protect Highlights and Shadows 0.01, Detail 2.47, Detail Boost 1.04, and check Process Details Independently; Creative Effects Diffusion Softness 0.17, Diffusion 0.69, and Diffusion Transition 0.50; Local Adjustments Detail Brush (Brush Size 110, Opacity 0.45, Hardness 0.01 and Edge Aware 1.00) and painted over eyes and some of the facial features in the face; with Burn brush painted in (using a small Brush Size 10, Opacity 0.23, Hardness 0, and Edge Aware 1.00) some of the hairs around the face and up to the ear; and using the Color Brush with the same settings painted in the eyes and a bit of the nose; Finishing Touches Silver and Paper Tone set to Tonal Strength 0.19, Balance 0, Silver Hue 42.58, Silver Tone Strength 0.46, Paper Hue 46.48, and Paper Tone Strength 0.48; Quad Tone Color 1 Region (black) set to 0.00, Color 2 Region (R3/G36/B22) set to 67.18, Color 3 Region (R214/G223/B238) set to 146.6, and Color 4 Region Set (white) set to 255.0; Vignette Center – had to center on the right eye since clicking on the image in a whitish area left a noticeable white blog – think it is a glitch in the plug-in, Vignette Strength -0.25, Vignette Size 0.01, Vignette Transition 0.17, and Vignette Curvature 0.50; and Transparency slider set to 0.89). On a New Layer some clean up was done to remove distracting objects. On a stamped layer on top (CTRL+ALT+SHIFT+E), Nik Analog Efex Pro 2 was applied (settings for my preset SJ Blown Out Beach: Basic Adjustment Detail Extractor 18%, Brightness -10%, Contrast 13%, and Saturation 0%; Light Leaks Strength 13% and Soft First leak upper left with control point placed in upper right to darken down the corner showing Texture Strength set to 68%; Lens Vignette Amount 36%, Circle under ct in Rectangle, and Size 72% with the vignette set over the left eye; and Levels & Curves Opacity set to 70% and just bumping up the end of right bottom curve to 0/2 in the RGB curve, and dragged down the curve in the middle of the Luminosity slider to pop the picture a little). Nik Viveza 2 was added on another stamped layer and 6 control points were added – each corner was darkened down a little and softened by moving the Structure slider to the negative side, and a control point was placed on his face to brighten it up to draw the eye. Back in Photoshop a New Layer was created and just the eyes and nose were sharpened. On a final stamped layer my free SJ Thin Double Edge Frame layer style was added and colors sampled from the image. That was all that was done – just basically followed my Plug-in Workflow (see Digital Lady Syd’s Plug-in Workflow)…..Digital Lady Syd
Scottish Waterway
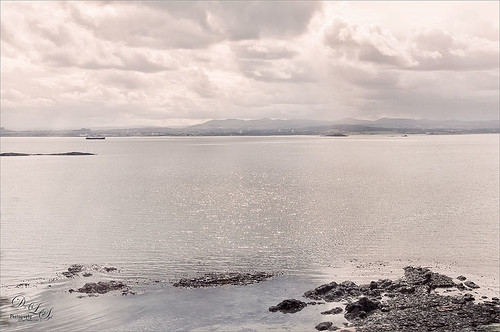
I so love the images I got from Scotland several years ago and I just felt like doing a regular post-processing on an image. This image is probably not the best, but I actually like the total feel of the image so I decided to work on it anyway. The sky in this image is just awesome! So what did I do, well just the basic changes in Lightroom – no presets. In Photoshop the Blur Filter Shake Reduction was used and help a little bit. Also Nik Viveza 2 was used to tone up the foreground rocks. A stamped version (CTRL+ALT+SHIFT+E) was created on top. Next Nik’s Color Efex Pro 4 was opened and Flypaper Textures Fly Shell Collection preset was applied (it contains the Cross Processing and High Key filters) – I am enjoying these presets as Flypaper Textures has created some very nice filter combinations in this set. A couple layers of clean up were done to add some contrast in the background mountains. Then my biggest problem in this image was a little bit of chromatic aberration with red edges around the rocks. I could not get Lightroom to remove them so I still had this issue. This time I added a Black and White Adjustment Layer, filled the mask with black, zoomed way in, and with a small 4 pixel white brush set to 70% brush opacity, painted out the red so it became desaturated. It took a bit of time but it did the trick and now there is no more edge color issues. The last step was to add in a slight pinkish Color Fill Adjustment Layer set to Color blend mode at 20% layer opacity to the whole image – just wanted a little warmer feel to the image. Now I have the view I want to remember!…..Digital Lady Syd
Daisies are Everywhere!

I wrote a Fun Photoshop Blog called “Using NIK’s Color Efex Pro 4 and Viveza Together” showing a great workflow using these plug-ins on the same Smart Object layer. Here are my daisies again shot at a different angle. (They were shot using my 18-200 mm zoom lens at 75 mm, F5.0, 1/60 sec, and ISO 400.) Different CEP4 filters were stacked to give a totally different result. (See settings below.) I really liked the way the color of the flower was altered to give this softer feel. Lightroom and ACR will give a fairly close look as to what Viveza achieves, but not exactly the same as discussed in the other blog. Give this workflow a try – download the trials and see what you get if you do not already own the plug-ins. This can be very addictive! Have fun…..Digital Lady Syd
Plug-in Settings for this image: CEP4 filters: Cross Processing (Method T04, Strength 86%, three controls in the background to remove the effect), Tonal Contrast (Highlights -80%, Midtones -80%, Shadows -80%, Saturation 20%, Contrast Type Fine, one control point on pink background flower, and Opacity Slider set to 62%), Darken/Lighten Center (#1, Center Luminosity -36%, Border Luminosity -2%, and Center Size 57%), and Vignette (Vignette Color set to light yellow, Shape 2, Adapt Edges 0%, Transition 84%, Size 46%, Opacity 38%, and one control point set on pink background flower to remove effect). Viveza used seven control points to adjust background and bring out the center of the flower.


