
Where Am I?

Believe it or not, this is an image of Haleakala volcano popping through the clouds, which is on the Hawaiian Island of Maui approximately 30 miles away, but I am standing at the summit of Mauna Kea volcano on the Big Island. Two dozen telescopes including the large Keck Telescope are located to the right of this shot. The height is at 13,796 feet and the air is a little thin – had to take a 4-wheel drive jeep on a very bumpy and steep gravel road to get to the top. There is also snow on the banks behind me. I loved the way the clouds look so fluffy and light.
Very little processing was done with this image other than a Curves Adjustment Layer and the Nik Color Efex Pro 4 Diamond Head recipe downloaded from Nik Presets and Recipes page.
Definitely try to get to this site if you are on the Big Island – the views are breathtaking and sometimes you do not have the cloud cover as shown above…..Digital Lady Syd
Daisies are Everywhere!

I wrote a Fun Photoshop Blog called “Using NIK’s Color Efex Pro 4 and Viveza Together” showing a great workflow using these plug-ins on the same Smart Object layer. Here are my daisies again shot at a different angle. (They were shot using my 18-200 mm zoom lens at 75 mm, F5.0, 1/60 sec, and ISO 400.) Different CEP4 filters were stacked to give a totally different result. (See settings below.) I really liked the way the color of the flower was altered to give this softer feel. Lightroom and ACR will give a fairly close look as to what Viveza achieves, but not exactly the same as discussed in the other blog. Give this workflow a try – download the trials and see what you get if you do not already own the plug-ins. This can be very addictive! Have fun…..Digital Lady Syd
Plug-in Settings for this image: CEP4 filters: Cross Processing (Method T04, Strength 86%, three controls in the background to remove the effect), Tonal Contrast (Highlights -80%, Midtones -80%, Shadows -80%, Saturation 20%, Contrast Type Fine, one control point on pink background flower, and Opacity Slider set to 62%), Darken/Lighten Center (#1, Center Luminosity -36%, Border Luminosity -2%, and Center Size 57%), and Vignette (Vignette Color set to light yellow, Shape 2, Adapt Edges 0%, Transition 84%, Size 46%, Opacity 38%, and one control point set on pink background flower to remove effect). Viveza used seven control points to adjust background and bring out the center of the flower.
Blue Orchids?

Yep – that’s what you see. I snapped this jpeg with my little Canon Power Shot camera while shopping in the grocery store for final holiday goodies a couple weeks ago. Wow! I guess the soil has been treated to make the color in the orchids turn blue. I had to grab a few shots!
To process this image, I first lightened it as the colors were so blue the detail was totally missing. Then I added a free Florabella Snow Texture (the link is to her Facebook page with the free download on the left side) to give it that nice winter feel. Next Nik Color Efex Pro 4 was applied using the Bleach Bypass, Darken/Lighten Center, Tonal Contrast, and Vignette filters to get this effect. Finally OnOne’s PhotoFrame acid burned controlled 13 (see sidebar for website link) was added. Enjoy!…..Digital Lady Syd
Digital Lady Syd’s Rule No. 5: Just Step Outside and Look Around!

If you find yourself bored because you have not taken any interesting images recently, just step outside and take a look around. I was feeling just this way this past week – with the holidays there just was not much time to go out and take some interesting pictures. So on Christmas Day, I decided to walk around outside just on the off chance there was something interesting. It was warmer than usual outside and there was this beautiful unexpected Monarch butterfly in my Purple Queen flowers. He seemed a little aggravated that I was taking his picture, but hey, I wasn’t really bothering him. (You can tell the butterfly is a male because of the black spot on his mid-hind wings in the vein.)
The image was shot with a Nikon D300 using my 18-200mm zoom lens at 200 mm, f/9.5, 1/90 sec, ISO 400 – did not have time to change to a macro lens or I would have missed the shot. I shot in burst mode and several of the shots were blurry as he was moving his wings so fast! Not used to taking pictures of butterflies! This image was processed using NIK Color Efex Pro 4 with the Detail Extractor Filter, Vignette Blur to get ride of distracting leaves and ground in the image, and a regular Vignette. Used the Sharpen Tool on another layer and a Curves Adjustment Layer to finish off.
It was fun to take more of a macro shot for a change I always love taking pictures of flowers. Great change of pace and it got me interested in working on my flower photos for a few days while the weather is pretty bad. In the meantime, take a look around outside your house and maybe you will find something interesting, like I did, that you had not noticed before!….Digital Lady Syd
A Little After-Holiday Cheer!

With the holidays winding down, I thought I would post one of the shots I took with my little point and shoot Canon 1000 camera of a friend’s Dickens Village set up in her living room. I can’t say enough about how beautiful it looked, especially in the evening when the houses were all lit up. Absolutely Amazing!
The image was processed in Lightroom just a bit – the colors were so strong it did not need much adjustment. Next NIK’s Color Efex Pro 4 was applied using the Detail Extractor filter and setting points so the snow was not affected as much, and a slight darkening Vignette filter. Back in Photoshop the Sharpen Tool was used on some of the figure’s faces and back edges to make them stand out a little more and that was it.
Hope you had a great holiday – I know I did……Digital Lady Syd
Digital Lady Syd Related Blogs:
NIK Color Efex Pro 4 – Digital Lady Syd’s Review!
Pseudo HDR Using NIK Color Efex Pro 4
NIK Color Efex Pro 4 – First Try!
Another Pseudo HDR Image with NIK CEP4 – Got to Love the Effect!

I am loving this pseudo HDR effect with NIK Color Efex Pro 4 (CEP4). This image just about represents my look when I am processing a picture – just love the sharpness and color. Before it took a lot more manipulation to get to the same place but with CEP4, it just pops into place. The steps I used to process this image are as follows:
1. In Lightroom, I applied my Vivid Drawing Look ACR/Lightroom Preset (see below for my blog link where you can manually apply the settings or download the presets). The Exposure, Blacks and Fill Light were adjusted just a bit and it was opened up in Photoshop.
2. Open image up as a regular copy and do any clean up using Clone Stamp or Healing Brush.
3. Duplicate cleaned up image layer and Convert to a Smart Object by right clicking on the layer and selecting Convert to a Smart Object.
3. Go into CEP4 and use the following filter effects stacked top to bottom:
- Apply Tonal Contrast, Darken/Lighten Center, Detail Extractor, (these three filters are contained in my Pseudo HDR1 recipe (see Settings for Vivid Drawing Look ACR/Lightroom Preset and NIK’s CEP4 Pseudo HDR Recipe to download or enter slider amounts manually);
- Glamour Glow with 3 control points (each covering 20% of image) to remove most of the effect from clock face and center of porch (Glow 32%, Saturation -100%, and Glow Warmth -47%, Shadows 41%, and Highlights 44%);
- Photo Stylizer adding a plus control point in center of image to place effect just there covering 42% of image (Varitone, Style 6, Strength 67%); and
- Vignette (Vignette Color whitish as sampled from image, Shape 2, Adapt Edges 0%, Transition 80%, Size 0%, and Opacity 43%).
3. After coming out of the plug-in and back into Photoshop, the image was sharpened with the Unsharp Mask filter although I now prefer the more localized use of the Sharpen Tool.
4. Added Inner Glow and Stroke Layer Styles.
5. Added a Curves Adjustment Layer to get that good final contrast.
6. One of the things I did do on this image was double-click on the right side of the Color Efex Pro 4 layer inside the Smart Object and reduced the effect to 75%.
I love the final result – it really looks like the old historic St. Augustine on the day I visited. Try this little recipe on one of your detailed images and see if you like what you see…..Digital Lady Syd
Related Digital Lady Syd blogs:
Pseudo HDR Using NIK Color Efex Pro 4
Where Am I?
With One Good Photo – Try the Pseudo HDR Effect
Why I Love Topaz Adjust!
Using Topaz Adjust 5 and Color Efex Pro 4 with Photoshop Elements
Since I began showing some of the things you can do in Photoshop Elements, I thought I would show how you can get really great results adding plug-ins to the program. They work the same in Photoshop CS5 and Elements. This is a really good deal for Elements users since it gives you some features you cannot do in the program itself. For example, Topaz Adjust 5 has a Curve Tool where tonal contrast can be added to image there is you need it.
 |
The image is one of the towers of the old Hotel Alcazar (now St. Augustine’s City Hall and Lightner Museum). Hover over the picture to see the original shot. To begin with, I was not happy with the washed out sky – not a hint of color in it!
1. Once in Photoshop Elements, you can immediately go into NIK Color Efex Pro 4 because this plug-in creates its own layer to make changes to. Go to Filter -> NIK – > Color Efex Pro 4. After lots of experimentation (which is really nice since if you mess up, there is a History panel on the left so you can go back to where you started), a new Flagler Tower recipe was created stacking these 5 filters: High Key, Film Efex: Vintage (using Film Type 7), Brilliance/Warmth, Vignette, and Detail Extractor in this order. Not a lot of changes were made to the sliders.
2. Duplicate this layer and name Topaz Adjust 5.
3. Open the Filter the same way as above. In Adjust a preset created in an earlier version was applied that was called Sunset on Building. I cannot tell you how it was created since it was done some time ago in an earlier version. Unfortunately it is very hard to tell which preset you started with in Topaz (as opposed to NIK) – you just have to save what you like. I did use the Curve Tool in the Global Adjustments section to make the contrast in the image better.
4. Back in Photoshop the layer was changed to the Darken Blend Mode.
Do take the time to check out these two plug-ins, especially the Topaz Adjust 5 plug-in (see right sidebar for Topaz Adjust 4 to link to website) – it was the first one I bought and I have not regretted it. Topaz is known for their reasonable prices in the plug-in world and once you buy their plug-ins, you get their upgrades for free! No one does that! And NIK’s Color Efex Pro 4 may be the best plug-in ever developed! And do not forget to try the combinations of your plug-ins – sometimes the results are incredible!
I hope this gives everyone an idea on how easy it is to use plug-ins, and most plug-ins compatible with Photoshop CS5 are also compatible with Elements. They usually have reasonable trial periods so you should see if this will take your Photoshop expression to a new level. I know it does for me!…..Digital Lady Syd
Digital Lady Syd’s Related Blogs:
Digital Lady Syd’s Review of Topaz Adjust 5
Topaz Adjust 5 is Here! First Look!
The New Film Efex-Vintage Filter From NIK CEP 4
NIK Color Efex Pro 4 – Digital Lady Syd’s Review!
Combining Plug-ins – Double the Effect!
Psuedo HDR Using NIK Color Efex Pro!
Why I Love Topaz Adjust!
Loving Both Filters!
 |
The above image is one of the beautiful Lion Posts outside Flagler College in St. Augustine, Florida, which used to be the Ponce de Leon Hotel built in 1887. Absolutely beautiful building. Cannot miss it if you go to this wonderful historic city.
Wow – all I can say is that I cannot decide which program I like best – NIK Color Efex 4 or Topaz Black and White Effects. So different and so much alike! I keep trying the same image in each program and get totally different looks but both are really nice! What to do, what to do!
The top image was processed with NIK Color Efex Pro 4 using the Film Efex: Vintage filter on Film Type 14; Detail Extractor filter; and Brilliance/Warmth filter. I used the Sharpening Tool in Photoshop to sharpen the eyes and mane of the Lion. Then Grunge 03 OnOne PhotoFrame was applied in a dark navy. I loved how it became very artsy and colorful. And the background detail is incredible!
Topaz Black and White Effect produced a very different feel that can be seen by hovering over the image. Same exact image from Lightroom except this time I wanted to see what how this image would look as a black and white. I used the new Platinum Collection – Platinum VI as a starting point. What really improved this image was using the Local Adjustment Dodge brush and Detail brush on the shadows in the face and the lamp. This really brought the eyes out very clearly. Using the Color brush, the lights was added back into the lamp. A black border, dark edge exposure, and dark vignette was added. In Photoshop the Sharpen Tool was used on the eyes a little more and the mane. Overall a very different feel to the same image.
I really love both filters and I do not believe I can recommend one over the other. Both totally great. Give the trials a try and see what you think!…..Digital Lady Syd
Related Digital Lady Syd Blog Links:
Topaz B&W Effects Plug-in – A Real Winner!
NIK Color Efex Pro 4.0 – First Try!
The New Film Efex-Vintage Filter from NIK CEP 4
Quad Tones in Topaz Black and White Effects Plug-in
Sunny Preset for Topaz Black and White Effects
NIK Color Efex Pro 4 – Digital Lady Syd’s Review!
The Art Corner: Painting and Sculpture by Tassaert
Pseudo HDR Using NIK Color Efex Pro 4
The New Film Efex-Vintage Filter From NIK CEP 4
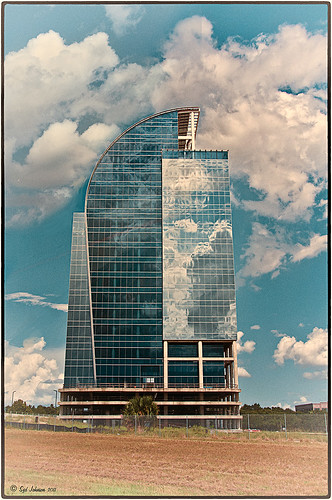 |
I love this image – the clouds reflecting in this building on I-4 in Orlando were beautiful! Hover over image to see original image. The stack contains these filter effects: Darken/Lighten Center, Brilliance/Warmth, Tonal Contrast, Image Borders, Dark Contrasts, and Film Efex: Vintage (another one of the new filters that has so many different film types that it is hard to choose one). Below is what the Film Efex: Vintage screen looks like to give you an idea of how many choices you have just for this one new filter.

In this NIK interface image, you can see how all the filter effects stack. For just this filter there are 29 film types to choose from – the one showing is Type 17 but I actually ended up using Type 11. There are so many sliders to adjust to get just the look you want. (In case you cannot read them, from top to bottom they are: Saturation, Warmth, Vignette, Brightness, Grain per Pixel, Film Strength, Film Type (drop down list) and Opacity. The Opacity slider at the bottom will do a final effect amount so the image does not look overdone. Below is another example of what a nice effect this filter will give. Only this filter with Film Type 16 was applied and it brought out the texture of the wall very nicely.

Just using this one filter and trying out different effects will be a lot of fun! Definitely give this filter a second look – much more than it appears at first glance!…..Digital Lady Syd
PS: Check out my Fun Photoshop Blog “NIK Color Efex Pro – Digital Lady Syd’s Review” and my Tidbit Blog “NIK Color Efex Pro 4 – First Try!” for more information on this great plug-in from NIK.
NIK Color Efex Pro 4 – First Try!
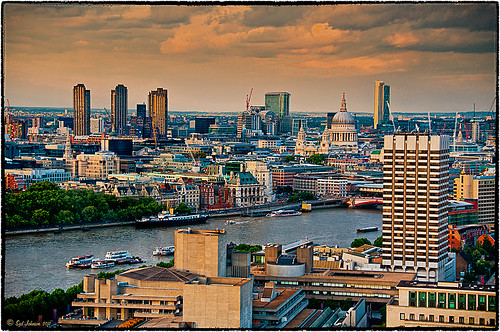 |
Well, here is my old standby image from the London Eye used as an example of what the long-awaited NIK Color Efex Pro 4 upgrade will do. Hover over image to see original. I am still sorting through all the new features they have added to this wonderful plug-in. Check out my Fun Photoshop Blog “Nik Color Efex Pro 4 – Digital Lady Syd’s Review” for a more in depth discussion.
One of the major new features allows you to stack any number of filters and save the whole group as a preset to use again. I really stacked up this image just to see what results I could get. The filters in the order they are stacked are: Tonal Contrast, Brilliance/Warmth, Vignette: Lens (a new filter), Contrast Color Range, Remove Color Cast (Plus Control Point set on faded green trees on left – click to see original problem area), Graduated Filter, and Image Borders.
I believe the final result is quite striking. In the meantime I will still be playing with the filters and trying different stacks to see what really looks good. If you get a chance, go download the trial version and see what you think…..Digital Lady Syd


