
Senior Neighborhood Pine Cone Meeting Today
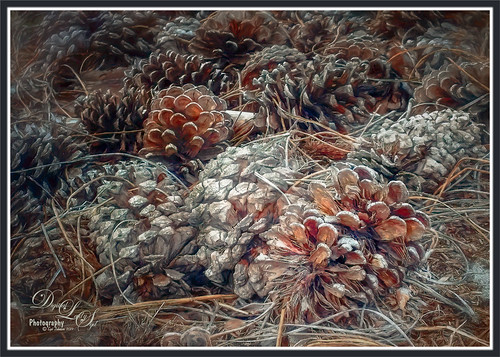
The old Pine Cones were all having a giant convention underneath a couple of their favorite Pines trees. I decided to sneak up on them and get an image of part of this large group. Since I took this image with an older Android phone, it was not one of the best but I liked it. Therefore I ran the image through Topaz (see sidebar for website link) JPEG to Raw AI program which produced a Raw tiff file. (See my What Is Topaz’s New JPEG to RAW AI? blog.) Then the image was opened in Adobe Camera Raw and adjusted before going into Photoshop. The image was first run through Nik’s Color Efex Pro. Then a Saturation mask was created for a Hue/Saturation Adjustment Layer. Some spotlight effects were created on the cones. Then Topaz Studio was opened were AI Clear, HSL Color Tuning, and Impression’s default with Type 03 brush was applied. That was it. It was a lot of fun to post-process!…..Digital Lady Syd
Happy Valentines Day

These beautiful birds, the Greater Flamingos which are not real bright pink like the American Flamingos, are enjoying the holiday – here they are observing some rather tree-like hearts in the pen. Since it is a holiday, I will not go into major detail on how I created this effect – it was a major trial-and-error in this case. The hearts are all from Julia Mead, a really great scrapbook object creator. The texture is called Imperfect Heart Soft Pink by Evelyn Flint (can’t find a link but it was in her Flickr feed at one time), and the font is Antalia Script. The rest is my own doing. Used so many different filters: Topaz AI Clear and AI ReMix, Luminar, and Nik Viveza 2 and Color Efex Pro 4. Lots of clean up layers and adjustment layers. Lots of fun to do. Everyone have a very Happy Valentine’s Day…..Digital Lady Syd
Enjoying a Swim
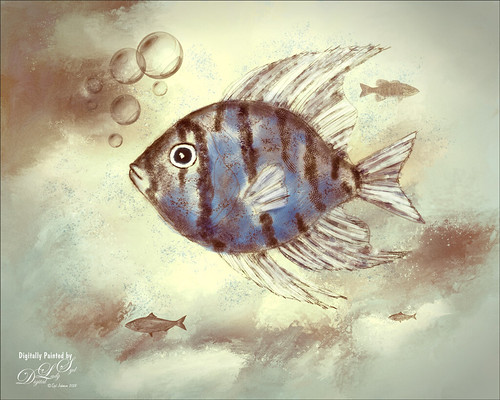
I am not the best drawer, but I did this Angelfish image following a really fun blog called How to Draw a Tropical Fish by Eugenia Hauss at Envato Tuts. It does not look exactly like the final result of the tutorial, but this was all done digitally where the tutorial is using actual graphite pencils. For the drawing Grut’s I Qwillo brush for doing the beginning design, Grut’s H Hatch Blanket brush (he has the best hatch brushes around), and Grut’s NM Shim Timber for shading were used. One of my Corel Painter textures was placed underneath for the watery look. The little fish are from Fish No2 Ars Frafix (no longer available) and the bubbles are from Lisa Carney’s Filters and Smart Objects Creative Live class which created a bubbles brush. A stamped layer was placed on top and Topaz ReStyle’s Silver and Ivory Cloak preset was applied with a few changes. Nik’s Color Efex Pro 4 was used on another stamped layer and the Film Efex Vintage filter with no changes and a Vignette set very softly were added. A Luminosity Red Channel Curves Adjustment Layer and a Dodge and Burn layer using a 50% gray layer set to Overlay to finish up. It was a lot of fun to create!…..Digital Lady Syd
Happy Halloween

This Halloween grouping was taken at a local Lowe’s Garden Center on my Android – just could not resist the cuteness of these guys. I would love to have one of those straw looking characters but we do not get many Trick-or-Treaters here so no need to put outside. Anyway, since it was just a JPEG taken on the fly, the image itself needed some work. Only basic adjustments were done in LR, then in Photoshop the first thing done was to run the Shake Reduction Filter to try and sharpen up the edges a little. Next the background was removed using the Quick Selection Tool and Mask and Select command. One of my textures was placed underneath for a background. To further sharpen the image, it was taken into Lucis Pro (no longer available) and it really helped. On a stamped layer, Nik Color Efex Pro 4 using one of the Flypaper recipes presets to get this overall vintage feel – I forgot to write down which preset. So many of them looked good. Two inches were added to the bottom of the image and the Naive Deco Sans font was selected for type. On a New Layer a Mixer blender brush was used to smooth edges. Nik Viveza 2 was applied on a stamped layer to draw focus to the center pumpkin. Last step was to add a Curves Adjustment Layer for a little vintage feel to the overall image. Happy Halloween Everyone!…..Digital Lady Syd
Hitching a Ride

This image was taken at the Jacksonville Zoo – this little guy was hitching a ride across the large field for the Lowland Gorillas. The image was first processed in Lightroom using Seim’s Magic – Harsh Sun Fixer preset and then adding Dave Delnea’s Backlight 002 Horiz preset to it to give the interesting lighting effect. Dave’s preset was adjusted before sending the image to Photoshop. Adding this kind of lighting can really pop a boring image. In Photoshop Topaz (see sidebar for website link) Detail 3 was applied using my Little Med Large Detail preset – added a black layer mask and painted back the detail just on the back of the gorilla and the little gorilla. On a stamped (CTRL+ALT+SHIFT+E) layer, Nik Color Efex Pro 4 was added using these filters: Darken/Lighten Center, Color Effex: Vintage set to Film Type 2 and 82% overall opacity, Brilliance/Warmth set only to Warmth at 32%, and Glamour Glow to soften the image a little. Nik Viveza 2 was used to adjust the lighting on the gorillas. I love post processing and painting images from the zoo!…..Digital Lady Syd
The Road to Hana
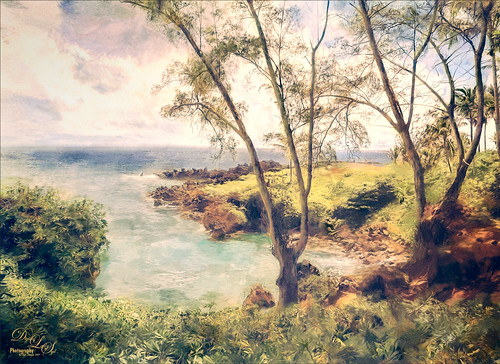
This Maui image of a little water inlet on the Hana Highway is another example of the poster look that was in my Getting That Poster Effect Fun Photoshop Blog. Used a similar workflow with Lucis Pro 6.0.9 (any sharpening filter would work), Topaz (see sidebar for website link) Impression 2 using one of my presets (I do not use the same preset for each image) – just have to use a little trial and error to find the right painting look. A layer mask was added and parts were painted out that did not look so good. The RGB luminosity layer and the brighten whites layer were also created. PS’s Poster Edges Filter was used with the same settings as my original blog. PS’s Stylized Filter using the same settings from the original blog was added. Nik Color Efex Pro 4 was opened and these filters were stacked: Glamour Glow, Reflector Efex, Film Efex Vintage using Film Type 14, and Cross Processing using Method B02 at 17% Strength – this really added to the painterly effect. On a New Layer and using my SJ Pastel Brush, some clean up and colors were added in parts of the image to create a more painterly look. A Red Channel Luminosity Curve was used to further even out the tone of the image. A Color Balance Adjustment Layer was used to get the exact warmth into the image. On a stamped layer (CTRL+ALT+SHIFT+E) Topaz (see sidebar for website link) Lens Effects Diffusion filter was opened and just a little diffusion and softness was added to the image to smooth some of the strokes. My favorite texture group from 2 Lil’ Owls (see sidebar for website link) Color Bokeh Grunge Set (these are .png files) number 3 was added to the image and set to Overlay blend mode. Last step involved taking another composite layer into Nik Viveza 2 (still my favorite plug-in ever and now it is free) and added a little vignette and lightened the focal point, which is the point at waters edge and the tree almost in the center. It did take a while to do this image, but I am always surprised at how good these poster effects come out! Each time I try it I feel I am getting a better result…..Digital Lady Syd
Just Being Purple
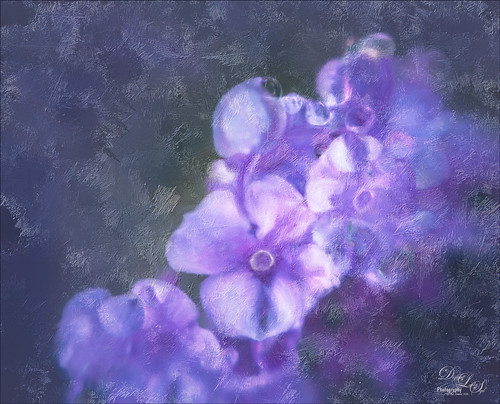
These pretty little purple lantana grown in my front yard and had some fresh water drops on them. Just found out in the reference link that their berries are poisonous and the leaves toxic to animals. It is considered an invasive plant in Florida – all this just to get a few butterflies! Used Lucis Pro (no longer available) to sharpen up the flower edges a little. In the now free Nik Color Efex Pro 4, the Vignette filter and Glamour Glow were used. Lots of petal clean up on separate layers , but what really made this image pop was the Melissa Gallo texture called Snowy Sky set to Linear Light blend mode. This texture gave a really nice icy look which I think goes with purple perfectly!…..Digital Lady Syd
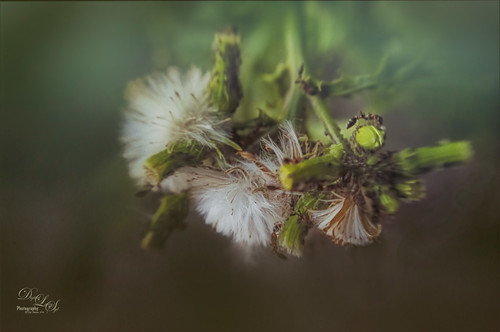
Blowing in the Wind!
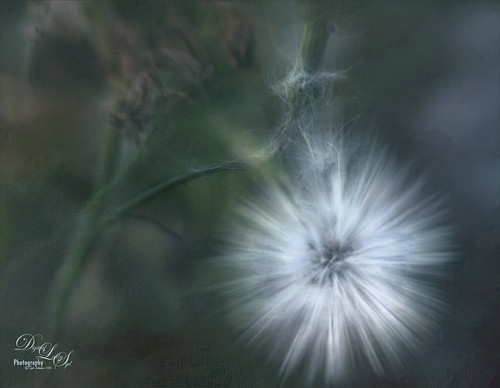
Had some fun with this little dandelion – it was taken using my Lensbaby Composer at F/4 using a Macro +4 Lens. In Lightroom just the regular basic adjustments. In Photoshop Nik Viveza 2 was used to lighten up the white strands in the flower. Then Lucis Pro 6.0.9 was applied using the Split Channels. Next Nik Color Efex Pro 4 was opened and 4 filters were added: Detail Extractor, Glamour Glow, Reflector Efex, and Darken/Lighten Center. Can you tell I was having a lot of fun with this one? Next Topaz (see sidebar for website link) Lens Effects was opened and the Motion filter Type Zoom was centered on the flower to straighten out the strands. In a black layer mask, just the strands were painted back. A Levels Adjustment Layer was used to lighten up the overall image. Next Topaz Texture Effects was used to apply one of my painted textures set to Blend mode Subtract in the plug-in. Back in PS, Melissa Gallo’s Trees in May texture was added and set to Linear Dodge blend mode and 40% layer opacity. That was it! It is so much fun just to play around with an image and I am sure this little dandelion did not care!…..Digital Lady Syd
Flagler Museum
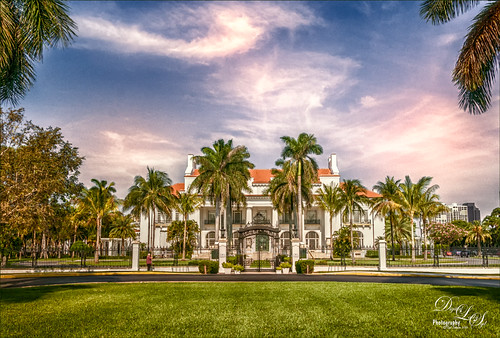
This is the outside of the magnificent Flagler Museum, also called Whitehall, last home of Henry Flagler in Palm Beach, Florida. It is one of the images used in my Fun Photoshop How To Create a Quick Montage blog. This is a great place to take images if you are in the area and has wonderful history! Nik’s free plug-ins HDR Efex Pro 2, Viveza 2, and Color Efex Pro 4 using Midnight filter at 51% and Detail Extractor filter on just the foreground and museum were applied all in one Smart Object. Nik Define was used at default for a little noise removal and that was it. …..Digital Lady Syd
The Dressing Table
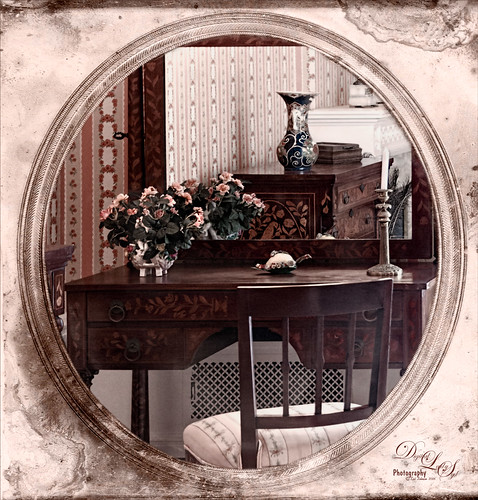
This is an image of a dressing table in one of several bedrooms at the Flagler Museum (Whitehall) in Palm Beach Florida. I really loved the effect of the furniture in the mirror – real vintage flavor here! Basically this image used several filters to get this result. Started with Lucis Pro 6.0.1 (AOIC 0/100; Red 207, Green 207, and Blue 79) (See my Fun Photoshop Digital Lady Syd Reviews Lucis Pro 6.0.9 (Now Affordable!) blog.); Topaz Detail 3 to sharpen it up a bit; the now free Nik Color Efex Pro 4 using Film Efex Vintage Film Type 11, Pro Contrast, and Midnight using Color Set Neutral and overall opacity at 64%. Darken and Lighten Curves Adjustment Layers were added. (See my Fun Photoshop How To use Curves Adjustment Layers to Dodge and Burn an Image blog.) Then on top a Vintage Film was used for the old frame opening. A Pattern Adjustment Layer was clipped to the frame (ALT+click between layers) and set to Color blend mode and a Solid Color Fill Adjustment Layer set to a brown tone was also clipped. Last step was to add a Luminosity Curves Adjustment Layer. (See my Fun Photoshop How To use a Red Channel to Create a Nice Blended Image Effect blog.) That was it – it was a lot of fun to do!…..Digital Lady Syd
Fountain Grass
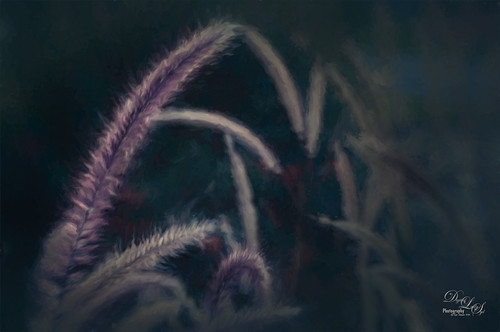
This image is of Hameln Fountain Grass that is growing in my front yard around my, of all things, dolphin fountain! This image was taken with my older Lensbaby Composer at F/4. Kim Klassen’s free Truegrit Lightroom preset was applied before bringing image into Photoshop. The Background was duplicated and Topaz (see sidebar for website link) Impression 2’s Cezanne II preset was applied as is. A layer mask was added and parts of the grass were lightly painted back to bring in some detail on the stalks. On a stamped layer, the now free Nik Color Efex Pro 4 was opened and three filters were stacked. First the Darken/Lighten Center filter, Monday Morning filter set to Color Set Neutral and overall opacity at 53%, and the Vignette Filter and sampling a darker color in the image to blend nicely. The last step involved adding a Black and White Adjustment Layer set to Luminosity to bring out the colors just right. I really like how Impression 2 is worked so well with this image!…..Digital Lady Syd
The Mighty Ant
For some reason, this dandelion weed has grown to some humongous size by my front door in this major hot summer we are having and the ants are having a ball tromping all over it! I decided to pull out my old Lensbaby Composer set it to F/4 and Macro +4 lens to get this guy doing some kind of balancing act on a bud. This pretty much is how the image looked out of camera. I love the soft DOF you get with the Lensbaby. On a duplicate layer the now free Nik Color Efex Pro 4 was opened. The Detail Extractor was applied to mainly just the ant and a little bit of the foreground to give it a little more sharpness, and the Vignette Filter was used where a darker green color was sampled from the image to soften the bottom. Back in PS, Topaz (see sidebar for website link) Texture Effects’s Crisp Morning Run preset was applied (removed Adjustments, and added Diffusion panel, changed the Blur to 0.42, then painted back the ants, then set Strength 0.58, Softness 1.00) to get the beautiful turquoise effect in the background. I had not used this lens in a long time so it was a lot of fun to use!…..Digital Lady Syd
Busy As a Bee!
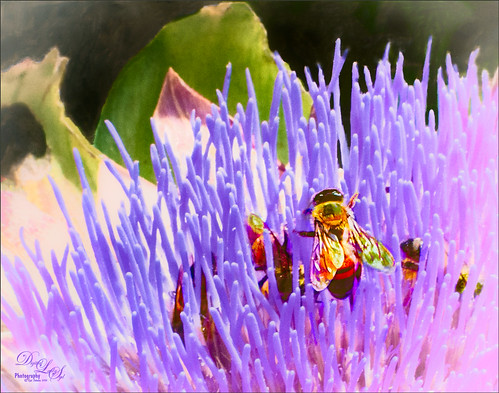
This little bee and his buddies were very busy checking out this magnificent specimen of a purple succulent at the Harry P. Leu Gardens in Orlando, Florida. I am not sure what kind of plant this was, but it was a gorgeous color! No wonder the bees were attracted to it! The image was opened in Photoshop and the background duplicated. Next JixiPix Spectral Art’s Dark Lines preset was applied to the layer – see my How to Use the Free Spectrel Art Plug-in blog to download. A black layer mask was added and the effect was only applied to the bees to give a little more detail to the wings. A stamped layer was created on top (CTRL+ALT+SHIFT+E) and Lucis Pro 6.0.9 (see my Digital Lady Syd Reviews Lucis Pro 6.0.9 (Now Affordible!) blog) was applied to further sharpen up the bees. Another black layer mask was added and the bees were painted out again and in the Properties bar, the Density was set to 80%. Some clean up was done on a layer. On another stamped layer the now free Nik Color Efex Pro 4 was applied using my favorite grouping of Film Efex: Vintage (set to Film Type 2), Darken/Lighten Center, and Monday Morning set to no Smear, Color Set Sepia, and overall Opacity 56%. On yet another stamped layer, Topaz (see sidebar for website link) ReStyle was opened up. The Sunflower Fields preset was applied and in the ReStyle Masks section, just the color was painted into the bees – this gives the really pretty golden color in the bees, and in the Basic section, the Detail Structure was set to -0.69 to soften everything but the bees. The last step was to create another stamped layer and apply the also free Nik Viveza 2 to the image to draw more focus to the bees. It always amazes me how these different plug-ins work together to get some great effects!…..Digital Lady Syd
Red Sunflower Saying Hello
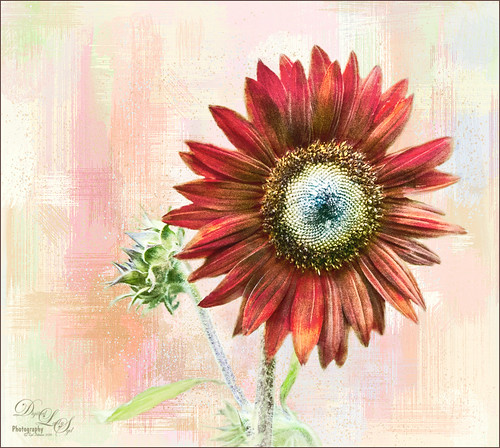
This gorgeous red sunflower image was taken at the Harry P. Leu Gardens in Orlando, Florida (a wonderful place to take flower pix!). I had never seen a red sunflower growing before – grew up around yellow ones! Did a tight crop around the flower first. Next tried out the new Photoshop feature called Select and Mask to remove the flower, buds and stems from the busy background. Works pretty nicely but takes a little practice to get a good result – the computer runs pretty hard while using it. The selection was applied on a new layer with a mask. Placed one of my Corel Painter textures behind the flower and buds. Next created a stamped layer (CTRL+ALT+SHIFT+E) on top and opened up the now free Nik Color Efex Pro 4 – used 3 of my favorite filters: Film Efex Vintage Film Type 6 and placed several control points around the outside removing the filter effect from these areas – this preserved the texture effect; Darken/Lighten Center; and Monday Morning with 4 control points on outside and 48% opacity. Back in Photoshop the Nik layer was set to 77% layer opacity. That was it! Pretty easy and I like the results – it feels summery to me!…..Digital Lady Syd
White Ibises Playing at the Sea
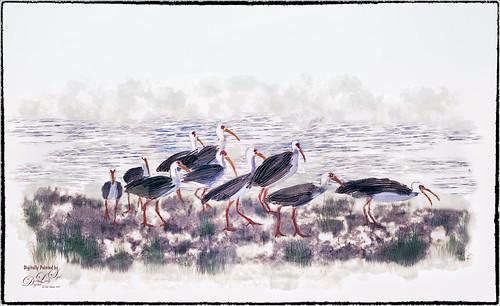
This image is of a group of White Ibis at the West Palm Beach Zoo – when someone threw out some treats, the whole exhibit sort of “flew the coop” and came out with everybody walking around on the sidewalks. Totally funny! I decided to make it a more interesting get-away area! Basically just sharpened the birds in Topaz (see sidebar for website link) Detail 3. Then selected the birds from their background – I used Topaz ReMask 5. With a layer mask several birds were removed where they were partly hidden by other birds. Several layers were added for painting – used Grut’s FX Cloud brushes (love these brushes) for clouds and ground areas, Grut’s Dusky Covert brush for color on birds, Kyle T. Websters Sparse Bristle Watercolor brush for lines on body, Aaron Blaise’s water brush sb 46 10, and Frostbo’s Grass Set 2 brushes 005 and 009. The newly free Nik Color Efex Pro 4 was used to create the final effect (Filters used: Tonal Contrast, Brilliance/Warmth, Vignette: Lens, Remove Color Cast, Graduated Filters, and Image Borders) – I like to just play around with the different filters to see what happens! This was just a lot of fun to paint – and not that difficult!…..Digital Lady Syd
Hiding from the Sun
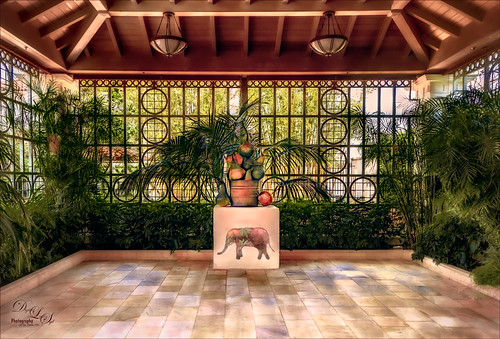 This restful place was located at the Philip Hulitar Sculpture and Botanical Gardens in West Palm Beach, Florida. This particular bronze sculpture was called Harvest Pears and was in this building with a fountain and another sculpture called the Monumental Apple Basket – both sculptures are by Luis Montoya and Leslie Ortiz.
This image used Topaz (see sidebar for website link) Glow on a duplicate layer – using one of my presets called SJ Painterly Wonderland (see my Tidbits Blog called My Glowing Porch Flowers for preset settings). On a stamped layer (CTRL+ALT+SHIFT+E) applied Lucis Pro 6.0.9 (Settings were: Assign Original Image Color – 0/100 original and Smooth 4791 and Enhance 45589). The Elephant on the stand is from Design Cuts Elephant Children’s Book Freebie Pack-77. A lot was done to make the elephant fit into the image like softening the edges and adding some defining lines. On another stamped layer Nik Color Efex Pro 4 (now free) was added using these filters: Film Efex Vintage, Glamour Glow, Darken/Lighten Center, Monday Morning, Detail Extractor, and Sunlight. Last step was to add Nik Viveza 2 to emphasize the focal point. This took a long time to do, but it is always worth it when I take my time on post-processing……Digital Lady Syd
Get the Boy Something He Wants!
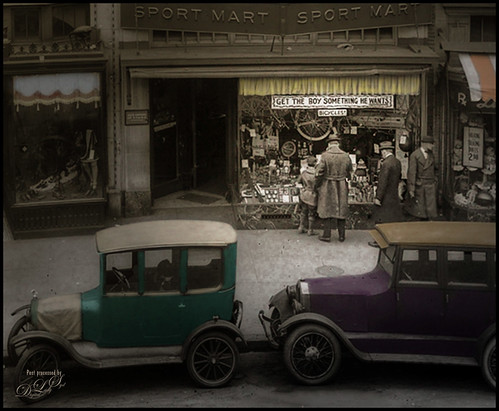
This image was downloaded from Shorpy.com of the Sport Mart on F Street NW in Washington. DC around 1922. I had originally started tinting the whole image as I thought the old cars were quite interesting. Once zoomed into the people, the image took on a whole different perspective! Therefore it was cropped tight to see the boy and his father and/or grandfather looking at the bicycles and other items in the store window. The sign sort of capped off what I consider a great story! All I could think about is what the little boy wanted.
The tinting was done using the technique and brush in my How to Hand Tint a Vintage Image and Create a Brush to Do This blog. After resizing and cleaning up the image a little, several layers were painted with the Tint Brush created in the linked blog. Then image was cropped as the cars looked good still in front of the store. On a stamped layer (CTRL+ALT+SHIFT+E), Nik Color Efex Pro 4 (now free) was used to create the rather dewy soft vintage feel in the image. (These filters were used: Glamour Glow, Midnight with Blur turned off and set to 52% opacity, Reflector Efex, Vignette Filter and Image Borders.) Nik Viveza 2 (also free) was used to focus on the store window a little more. On another stamped layer Photoshop’s Camera Raw filter was opened and using the Detail section, some color noise was removed in the coats of the people. Adding a black layer mask (CTLR+I in white mask) to the layer, just the coats and any colored noise areas were painted over with a white brush to remove the noise. On another stamped layer the Camera Raw Radial Filter was used to lighten just the people and sign using the Brush in the filter to pinpoint just them. This layer was set to 55% layer opacity. Next a Red Channel Curves Adjustment Layer was used to brighten up the luminous areas just slightly. (See my How to Use a Red Channel to Create a Nice Blended Imaged Effect blog.) That was all that was done. I am really enjoying this technique!…..Digital Lady Syd
A Pub at the Borough Market
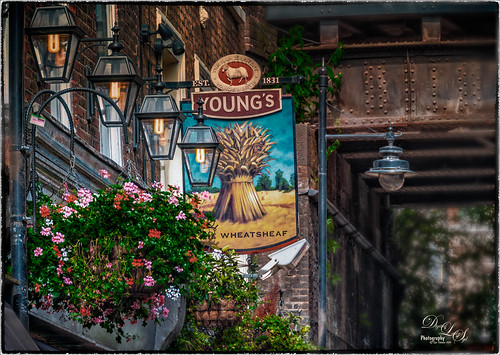
Found this old picture from the Borough Market in London, England, taken several years ago. It just looked so good when Nik Color Efex Pro 4 was used. I had created a preset years ago that used these filters: Tonal Contrast, Brilliance/Warmth, Vignette: Lens, Contrast Color Range, Remove Color Cast, Graduated Filters, and Image Borders. A Gaussian Blur effect set to 16.8 Radius was added to blur the lower right area. Check out the Nik plug-ins as they are now free from google and try them out……Digital Lady Syd
Paintstorm Studio Purple Flowers
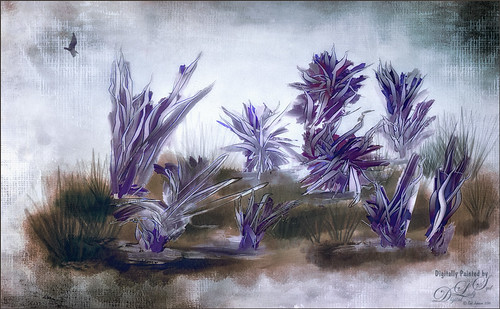
These flowers were painted in an inexpensive painting program I recently purchased called Paintstorm Studio. Just learning how to use all the various settings, but if you save down your images as a PSD file, you get nice layers with objects on them. That is how I created these flowers – just painted on a layer and saved down as a PSD file. This program has some incredible brushes and you can import PS brushes! Pretty cool! A couple textures were added in PS – 2 Lil’ Owls (see sidebar for website link) Mosaic Set’s Aveline set to Multiply blend mode and 56% layer opacity and Jai Johnson’s DT-Be My Valentine-12 set to Color Burn blend mode at 80% layer opacity. Topaz (see sidebar for website link) Restyle’s Lavender Gray preset was applied which make the image more purplish instead of pinkish. I tend to do a lot in pink so I liked the change here. Nik’s Color Efex Pro 4 was applied using the Warm Preset (Polarization, Sunlight, and Vignette Lens filters). Obsidian Dawn’s Birds Flying Single 3 brush was added to the image and a Pattern Fill was used to give the nice wing effect.
Tower on the Mall

This is an older image I did several years ago of some building roofs on The Mall in Washington, DC. On a couple extra layers, Obsidian Dawn clouds were painted in the sky. On a stamped layer (CTRL+ALT+SHIFT+E) Nik Color Efex Pro was opened and Film Efex Vintage (Film Type 15), Pro Contrast (just Dynamic Contrast 28%), and Darken/Lighten Center filters. The last step was a Curves Adjustment Layer to increase contrast. Pretty simple for what I consider a nice High Key image with interesting architectural lines…..Digital Lady Syd
Only in Florida!
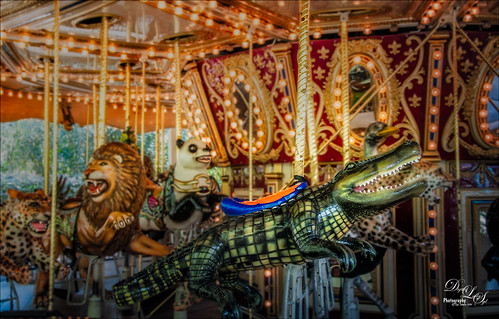
Had to take this image of the alligator that can be ridden on the Jacksonville Zoo‘s Merry-Go-Round in Florida. I had to take it quick when it was stopped. I could not get the angle I wanted, but the lion and polar bear look kind of nice behind my main subject, so I think it actually looks like a zoo carousel. This took a lot more work than I wanted since in the original image it looks like the alligator is swallowing a jaguar whole with an ostrich head coming out of the top of his head. What a disaster! About all I could do was to blur the background with a Gaussian Blur set to Radius of 5 and paint the foreground back in. Got the nice color effect using Nik Color Efex Pro 4 using Darken/Lighten Center, Glamour Glow, and Pro Contrast filters. Had to do some selective dodging and burning using layers set to Overlay blend mode and using black and white brushes set to 12% brush opacity. Last step was using Nik Viveza 2 to direct attention to his head. I really wanted to ride that alligator!…..Digital Lady Syd
Beautiful Hole 4
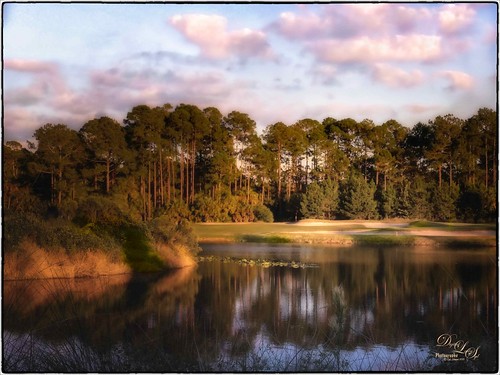 So this is why I play golf. It’s not because I play well but the views are fabulous. This course is one of the most natural looking and it feels like you are walking in a park! This image taken just before the gold hour in late afternoon was first corrected in Lightroom by just adjusting the Basic sliders. It was taken into Photoshop where Topaz (see sidebar for website link) DeNoise 5 was applied just to the sky where most of the noise appeared. On a duplicate layer, Nik Color Efex Pro 4 was used to get this overall effect – filter effects used were: Darken/Lighten Center, Glamour Glow, Monday Morning, and Image Borders. A Curves Adjustment Layer and a Color Balance Adjustment Layer were added and the masks filled with black. With a soft low opacity brush, the clouds were painted back just the cloud areas that were too vivid with the Nik filters applied to them. That is about it. Hope you all are enjoying your Fall season!…..Digital Lady Syd
Where Are My Eyes?
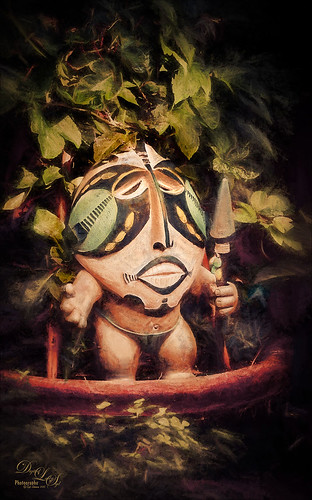
This image was taken at the St. Augustine Alligator Farm website link. I don’t know anything about it, just that it greets you when entering the attraction. Very little was done to this image. In Lightroom Trey Radcliff’s Dramatically Clean Chipmunk preset was applied. In Photoshop Topaz (see sidebar for website link) Impression’s Turner Storm II preset was applied. A white layer mask was added in PS and a little bit of the lighter areas were painted back in the face to draw some focus to it. On a stamped layer (CTRL+ALT+SHIFT+E) that was converted into a Smart Object, Nik Color Efex Pro 4 was opened. The Graduated Neutral Density filter selected (Upper Tonality -25%, Lower Tonality 7%, Blend 27%, Vertical Shift 43%, Rotation to adjust the light 158 degrees, and Highlights 1/4 of the way to right). In the same Smart Object Nik Viveza 2 was applied. A Focal Point was added to the eyes and nose area (Brightness 33%, Contrast 40%, Saturation 38% and Structure 58%). Two Curves Adjustment Layers were added – one a darken curve to separate the head from the busy leaf background, and one to add contrast to the face since an S-shape curve was used. Both layer masks were turned to black (CTRL+I inside the mask) and just localized areas were painted back with a soft white brush at 17% brush opacity. Last step involved adding a New Layer and actually painting in some color where it was needed using a very low opacity brush (12%) and sampling in the image to match areas. That was it. Lots of fun to do!…..Digital Lady Syd
Painted Apples
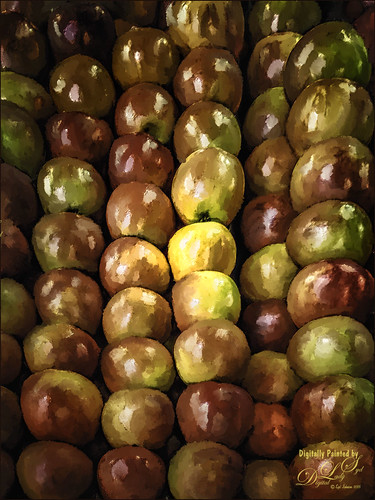
Not sure what inspired me to paint these apples from image taken at the local grocery store, but I did. The image was first opened in Lightroom where the basic image was adjusted, then in Photoshop. After some clean up, a stamped layer was created on top (CTRL+ALT+SHIFT+E) where Topaz (see sidebar for website link) Clarity was applied using the Landscape III preset. Next on a duplicate layer, Nik Color Efex Pro 4 was used (used Cross Processing Method L05 at Strength 27%; Darken/Lighten Center set to Shape 1, Center Luminosity 73%, Border Luminosity -46%, and Center Size 24%; Low Key Glow 0%, Standard Low Key 6%, Dynamics Low Key 0%, Sat 56%, Whites 3%, and Contrast 72%; and Detail Extractor 22%, Contrast 14%, Sat 25%, Shadow under ow, and Highlights under hl). On a New Layer above, used a Blender Mixer brush using property bar settings of Wet 100%, Load 1%, Mix 100%, and Flow 100% and set to Sample All Layers – turn off Load Brush After Each Stroke so it will just be a blender and mix the colors underneath. I am not sure which brush I used, but any brush you like should be a nice blender with the above settings. On a new Stamped Layer, Nik Viveza 2 was used to add focus to the center area. Last step was a Curves Adjustment Layer. I also painted this in Corel Painter and got a much more abstract look. Will probably show that version in a later post. Anyway, love the Photoshop Mixer Brush effect on these apples!…..Digital Lady Syd


