
The Pond Fairy…is always watching you
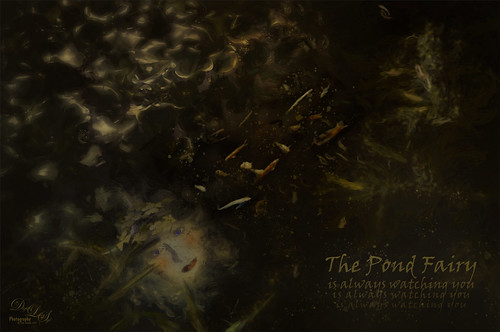
The Pond Fairy was a lot of fun to create. The original image was a lily pad pond image taken at the Ormond Memorial Art Museum and Gardens. The sun appeared in the water as a brilliant white glare where the face is located. The fairy face is made from a brush I created from a model’s face. Corel Painter’s ParticleShop Photoshop plug-in was opened and the Cluster brush set to a bright yellow with the Glow checked and was painted on the plant on the left side and little on the tips of the lily pads. A texture from 2 Lil Owl (see sidebar for website link) called Mosaic Set Aqua Grunge – this is one of her best sets in my opinion – was applied and set to Subtract blend mode at 19%layer opacity. Topaz (see sidebar for website link) Lens Effects was opened and the Diffusion filter was applied to really soften up her face and some of the sharp lily lines. Then it was removed in part of the image with a layer mask. Topaz Restyle was opened and a preset was made of the image at this point. Then the actual image sliders were changed to get a little bit different color palette. This is a great way to get the colors just like you want them, especially if they are pretty close to what you like. The other presets just did not work with this image. (See my How to Use a Topaz ReStyle Trick for Improving Your Image blog for how to do this.) A few splats were placed on a New Layer to give a little fairy dust and water bubble look. On a composite layer on top (CTRL+ALT+SHIFT+E) and opened Nik Color Efex Pro 4 – used Detail Extractor, Glamour Glow and Midnight filters. This layer was set to Multiply blend mode and 24% layer opacity. A group was created for the face layers where the eyes, cheeks and lips were painted. Also the clover hat was added to her image here. This was from my favorite object site – PixelSquid. The fish are from an image taken in Hawaii at the Hilton Waikoloa Village. It was layered on top of the water lily image, then free transformed to fit the pond area. A Black and White Adjustment Layer and Levels Adjustment Layer were set to get the correct tone and color in them. A layer mask was used to fine tune the fish into the area. Nik Viveza 2 was opened to adjust the focus. The text is a free font called Viner Hand ITC. Quite a few steps but lots of fun. So next time you look into a pond, check out The Pond Fairy who will be watching you…..Digital Lady Syd
Finding the Shade
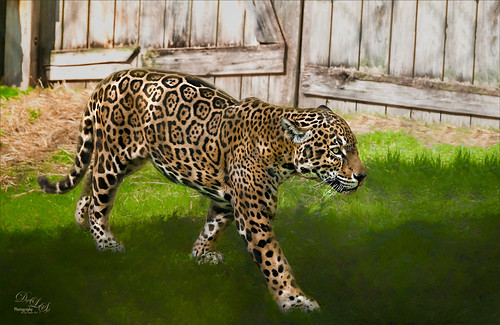
This jaguar started off as not a very pretty image at all – his lower foot was cut off, but the wood fence looked really good so I decided to process it. The image was taken at the Jacksonville Zoo behind a chain-linked fence where light shadow lines were throughout the image. In Lightroom Dave Delnea’s Backlight _Vertical_Left preset was applied and the settings adjusted. Used the Adjustment Brush to add a little Clarity and Sharpness to the just the face and ears. In Photoshop first the canvas had to be extended at the bottom and on the right side – filled some of the area using the Rectangular Marquee Tool and with Content-Aware Fill. Then the back foot was selected and copied (CTRL+J) to put on its own layer. The Free Transform Tool (CTRL+T) was used to add the bottom of this front leg and the spot Healing Brush was used to blend it all together. Topaz (see sidebar for website link) Impression 2 was used to blend some of the dark chain-linked fence shadows out and the spot Healing Brush was also used to remove them. Jai Johnson’s Oil Glaze preset (see video to create) was used and most of the jaguar was painted out on a layer mask. On a stamped layer (CTRL+ALT+SHIFT+E) Lucis Pro was opened and the Detail was set to 113. Then just parts of the jaguar were painted back in the mask to add more detail to the face. A Red Channel Luminosity Curves Adjustment Layer was added next. On another stamped layer, Nik Color Efex Pro was opened and the Pro Contrast filter with the Dynamic Contrast set to 41% and the Darken/Lighten Filter were applied. It took a bit of time to work out the problems in this image, but the results were worth it!…..Digital Lady Syd
Hyacinths Deep in Reflection

Recently I posted a blog using this image called Take the Time to Experiment! where a Mirror Effect filter from The Plugin Galaxy was used. This time the Flood Filter from Flaming Pear was applied. I love this filter. It is the only one that gives a really realistic look to a water reflection. Before applying the filter, the canvas had to be increased to add the reflection under the image. (Here are the Flood filter settings used so you can see all the sliders that can be manipulated: Horizon 60, Offset 0, Perspective 68, Altitude 6, Waviness 17, Complexity 17, Brilliance 28, Blur 15, Size 0, Height 23, Undulation 46, and Glue Normal.) See my Fun Photoshop Blog The Flood Look for tips on how to apply this filter. Nik Color Efex Pro 4‘s Midnight, Polaroid Transfer, and Detail Extractor filters were applied to just the hyacinths to add back some color to the flowers, especially in the reflection. In Photoshop the layer was then set to 69% opacity. That was it. Really fun effect!…..Digital Lady Syd


