
Vintage Pottery and Glassware
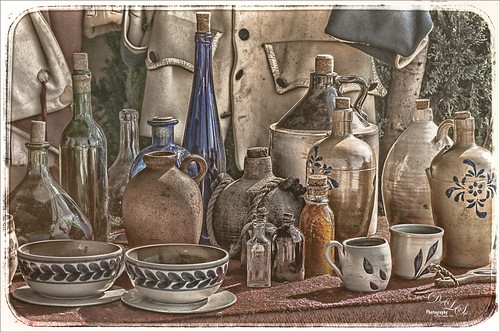
This image was taken at a Native American Festival of a pottery and glassware display. Since the items are so vintage, I decided to a add a vintage feel to the image. After doing some Basic Panel corrections in Lightroom, the image was duplicated in Photoshop and Lucis Pro 6.0.9 (no long available) was used to sharpen the image. A stamped layer (CTRL+ALT+SHIFT+E) was added on top the free Nik Analog Efex Pro plug-in was applied. This filter is really fun to play with and gives some beautiful vintage effects! These filter effects were stacked: Basic Adjustments, Light Leaks, Film Type, Frames, and Levels & Curves which includes a Luminosity curve which is very handy! If you have never used this filter, note that many of the sections allow you to move the effects around within the image. Back in PS, a Red Channel Luminosity Curve Adjustment Layer was created. (See my How to Use a Red Channel to Create a Nice Blended Image Effect blog for more info on this.) On another stamped layer, Nik Viveza 2 was used to emphasize the focal point. It was just slightly too bright for that vintage feel, so a Pattern Fill Adjustment Layer was added using a light cream color pattern set to a Color Blend Mode at 52% layer opacity. That was it! I love the vintage effect!…..Digital Lady Syd
There’s a Leopard on the Floor!

Just having fun here. Took this image of a Snow Leopard Rug at the Native American Festival in Ormond Beach, Florida. No, I do not believe it was a real snow leopard skin, but it caught my eye so I snapped a shot. In Lightroom just used Seim’s (see sidebar for website link) Power Workflow 4 Super Hero X WhiBal and Tint 82A Cooling presets. Next in Photoshop I applied the Shake Reduction filter – seem to be getting good results with this. On a duplicate layer, the image was opened up in Topaz (see sidebar for website link) Black & White Effects and a preset I had created a while back was applied (settings for my SJ Sky and Green Preset are: Conversion section Basic Exposure Contrast 0.02, Brightness 0.02, Boost Blacks 0.71 and Boost Whites 0.25; Adaptive Exposure 0.62, Regions 34, Protect Highlights and Shadows 0.01, Detail 2.47, Detail Boost 1.04, and check Process Details Independently; Creative Effects Diffusion Softness 0.17, Diffusion 0.69, and Diffusion Transition 0.50; Local Adjustments Detail Brush (Brush Size 110, Opacity 0.45, Hardness 0.01 and Edge Aware 1.00) and painted over eyes and some of the facial features in the face; with Burn brush painted in (using a small Brush Size 10, Opacity 0.23, Hardness 0, and Edge Aware 1.00) some of the hairs around the face and up to the ear; and using the Color Brush with the same settings painted in the eyes and a bit of the nose; Finishing Touches Silver and Paper Tone set to Tonal Strength 0.19, Balance 0, Silver Hue 42.58, Silver Tone Strength 0.46, Paper Hue 46.48, and Paper Tone Strength 0.48; Quad Tone Color 1 Region (black) set to 0.00, Color 2 Region (R3/G36/B22) set to 67.18, Color 3 Region (R214/G223/B238) set to 146.6, and Color 4 Region Set (white) set to 255.0; Vignette Center – had to center on the right eye since clicking on the image in a whitish area left a noticeable white blog – think it is a glitch in the plug-in, Vignette Strength -0.25, Vignette Size 0.01, Vignette Transition 0.17, and Vignette Curvature 0.50; and Transparency slider set to 0.89). On a New Layer some clean up was done to remove distracting objects. On a stamped layer on top (CTRL+ALT+SHIFT+E), Nik Analog Efex Pro 2 was applied (settings for my preset SJ Blown Out Beach: Basic Adjustment Detail Extractor 18%, Brightness -10%, Contrast 13%, and Saturation 0%; Light Leaks Strength 13% and Soft First leak upper left with control point placed in upper right to darken down the corner showing Texture Strength set to 68%; Lens Vignette Amount 36%, Circle under ct in Rectangle, and Size 72% with the vignette set over the left eye; and Levels & Curves Opacity set to 70% and just bumping up the end of right bottom curve to 0/2 in the RGB curve, and dragged down the curve in the middle of the Luminosity slider to pop the picture a little). Nik Viveza 2 was added on another stamped layer and 6 control points were added – each corner was darkened down a little and softened by moving the Structure slider to the negative side, and a control point was placed on his face to brighten it up to draw the eye. Back in Photoshop a New Layer was created and just the eyes and nose were sharpened. On a final stamped layer my free SJ Thin Double Edge Frame layer style was added and colors sampled from the image. That was all that was done – just basically followed my Plug-in Workflow (see Digital Lady Syd’s Plug-in Workflow)…..Digital Lady Syd
Love the Tryptych in Nik Analog Efex Pro 2!
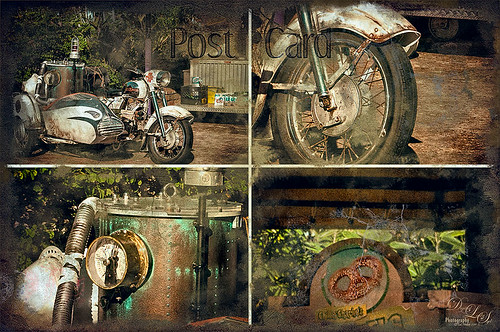
Universal Studios Orlando has so many interesting shooting places – this would have looked great with a person sitting on the bike too. Used the new updated Nik Analog Efex Pro 2 to get this great four image triptych effect. It uses the same image but each section can be manipulated individually. This is a lot of fun to do with an image that has a lot of areas to look at closely. The filters used in this plug-in were the Basic Adjustments with Detail Extraction at 66% and Brightness at -17%; Film Type Bolton 3 at 91% Strength; and Multilens with Variation Strength set to 73% and Variation Type 5. Back in Photoshop Shadowhouse Creations Old Post Set PCB texture (a free download) was added on top. A white layer mask was added and with my Charcoal Brush (Adobe’s Charcoal Brush 60 with an added 19% Angle Jitter in Shape Dynamics section of the Brush Panel to get a different angle with each stroke), the areas I wanted showing were painted back in leaving an interesting border effect. A Curves Adjustment Layer was added to bring back some contrast and a New Layer was used to paint in a little grunge for more vintage feel. On a New Layer, the Sharpen Tool was used to just sharpen up the focal areas in each section. The last step involved added Topaz (see sidebar for website link) ReStyle using the Peat and Rock Preset at 74% opacity. This really popped the image. This was lots of fun to work on!…..Digital Lady Syd
Digital Lady Syd Related Blogs:
How About That Update to Nik Analog Efex Pro 2?
Harry Potter World
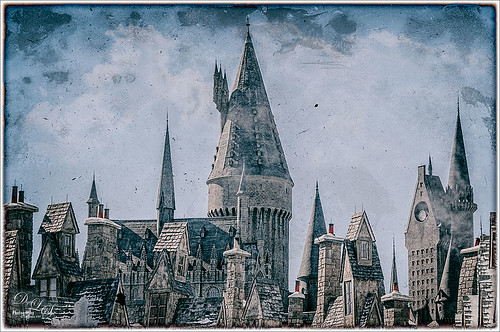
Having some fun here with two of my favorite filters in Photoshop. This is just an image of the tops of the Wizarding World of Harry Potter at Universal Studio in Orlando, Florida. Did basic slider adjustments in Lightroom, then in Photoshop applied Topaz (see sidebar for website link) Detail 3 to sharpen. Added a couple clouds from my free Cloud Brush Set, and applied Nik’s Analog Efex Pro plug-in to get the real vintage feel. Used Puppet Warp twice to try and straighten the towers which are not straight no matter what, but I wanted the big one in the middle straight looking. (See my Straightening with Puppet Warp! blog.) Added a layer style to create the framing. That was it……Digital Lady Syd
Driftwood Eagle
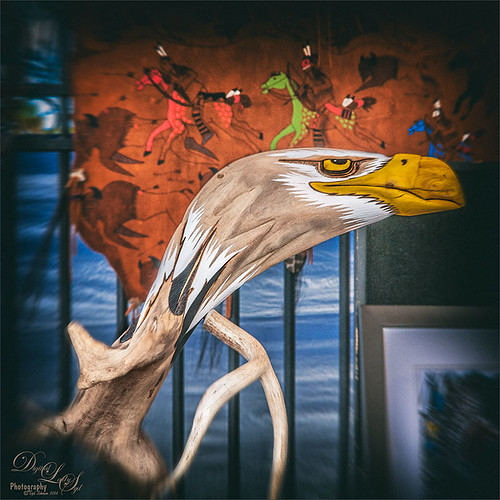
I loved this beautiful piece of art that one of the vendors was selling at the 2014 Native American Festival in Ormond Beach, Florida, recently. The image just seemed to say Nik Analog Efex Pro to me, so this filter was applied as a Smart Object. In the filter the Basic Adjustments, Lens Distortion, Zoom & Rotate Blur, Lens Vignette, and Film Type were selected. Then back in Photoshop, the actual face and part of the wood body were painted back in the filter mask. A Curves Adjustment Layer with a slight S-curve was added on top and that was it. Love the color in this image – really reminds me of the festival……Digital Lady Syd
Wishing I Was Back in Hawaii
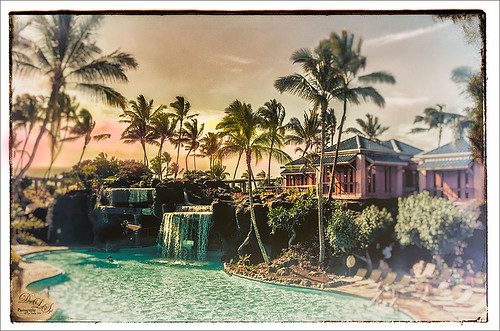
Wishing I was back in Hawaii – been a while. Taken at the Hilton Waikoloa Village on the Big Island – really fun place to stay. I just love the what Nik’s Analog Efex Pro does to give a nice vintage feel. Otherwise just a little clean up here and adding some contrast using Curves Adjustment Layer……Digital Lady Syd
Digital Lady Syd’s Favorite Preset for Nik’s Analog Efex Pro

Just another example of what Nik’s Analog Efex Pro can do. Used Topaz (see sidebar for website link) ReStyle’s Shaded Subways preset (with these changes: Color Style Lum Secondary 0.07, Third -0.48, and Fourth 0.34; Texture Strength 1.00; and Sharpness 0.84.) Once again used my favorite settings for the plug-in. And that was it. I love the results – using ReStyle with Analog Efex Pro is a really nice combination. Since I am using this preset so much and find it really easy to adjust, I thought I would share the settings with anyone that would like to get a similar effect. Just tune out if you do not want them.
The preset was named SJ Favorite preset. The settings for each section used in the image above are as follows: Basic Adjustments – Detail Extraction 65%, Brightness 14%, Contrast -36%, and Saturation 13; Light Leaks – Strength slider 50%, set to Soft, and selected third row over and fifth row down (a reddish triangle coming from the left and the center point in the middle lower left (this can be adjusted depending on your image); Lens Vignette – Amount 78%, slider moved all the way right under Rectangle, and Size 44% with the center point in the middle of the image; Film Type – Subtle selected using the third row over and fourth row down film, Neutral to Faded slider placed just a little to right of middle, Strength 70%, Grain per pixel 400, and Soft to Hard slider in the middle; Frames – selected White in drop-down and used the first column fourth row down frame – I believe I clicked the Vary button a couple times here but not much difference occurred; and Levels & Curves – this is a little tricky but it makes all the difference in the preset. This is a 16 X 16 grid, so set the points where noted. For the Luminosity Channel, create a curve that starts with a point at 0,0, then one at 8.5, 8, and the last one goes up to the top with a small straight line to the top right corner so use this point 14, 16 – you may want to adjust this the way you want but it really pops my image by adjusting this curve – all other curve lines are left alone. You can go to the Camera Kit and add in other effects to get a little different look – I do this all the time.
The second image in my Photoshop With Corel Painter for Texture blog shows this same preset. Hope you will give it a try – Nik’s Analog Efex Pro is really a lot of fun!…..Digital Lady Syd
What a Dolling Picture!
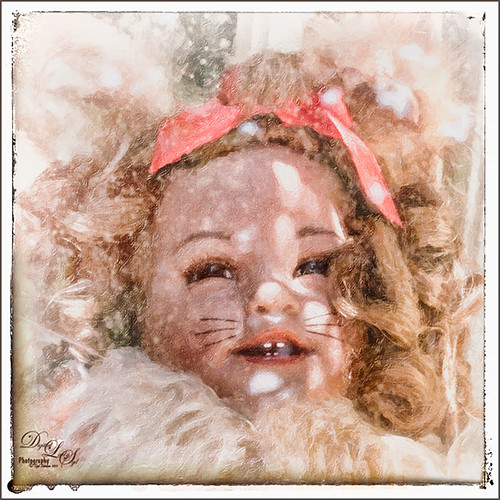
This is a rather crazy image of a doll in a lion outfit that I decided to do some processing on. The RAW image had a lot of window reflection, but for some reason I just liked the way the sun lit up the doll and hair on the right side. I do not even mind the white blown out spectral spots – it sort of added to the wintry old feel. In the original file had a lot of spectral highlights that looked like snow. Alien Skin Snap Art 4 was applied in Photoshop using the Impasto Detailed preset and two Detail Masks to bring in the facial features. Then I added my free SJ Snow2 slight blur overlay set to 34% layer opacity. A Solid Color Fill Adjustment Layer was clipped (ALT+click between layers) to the overlay to give a little light peach color to the snow. Nik Analog Efex Pro was applied for a little vintage feel. The last step was to add a Curves Adjustment Layer to add contrast to the image. That was it – for some reason I really like this image!…..Digital Lady Syd
Bamboo Forest Abstract
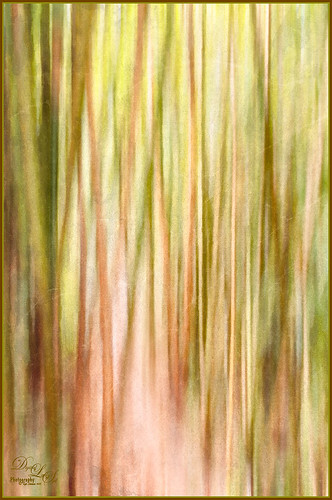
Got inspired by a short tutorial called Dustin Abbott’s Autumn Abstract with Snap Art 4 on Alien Skin’s website where he created this really interesting abstract painting. The image above is of a bamboo forest on the Big Island in Hawaii. I wanted a little less abstraction so some of the bamboo could be seen but the beautiful Hawaiian forest colors were the main interest. Therefore, I only used a Motion Blur Distance of 594 pixels. Next in Snap Art 4 Dustin Abbott’s Autumn Abstract preset (he graciously lets you download the preset in the tutorial link above) was applied. Back in Photoshop a layer mask was added where a few of the trees were painted back softly just to exaggerate the foreground tree shapes. Next Topaz ReStyle (see sidebar for website link) plug-in was added. (Started with Olivine Pastures preset to keep the Hawaiian green and pink colors intact. Color Style Hue Third -0.14, Sat Primary -0.28, Third 0.20, and Fifth -0.17, and Lum Third 0.63 and Fifth 0.59; Texture Strength 1.00; Basic Opacity 62%, Blend Mode Screen, Color Tint 0.16 and Sat 0.20; and Detail Structure 0.31.) The last step involved adding another of my favorite plug-ins, Nik Analog Efex Pro. (Used these filter settings: Basic Adjustments with Sat at 24%; Dirt & Scratches 82% using the last Organic thumbnail; Photo Plate Corroded – 2nd down 2nd over – at 20% Strength; and Levels & Curves with RGB and Luminosity Curves pulled just a little down and over at 81% Strength.) I think the image depicts exactly what I wanted to express – mainly emphasizing the gorgeous colors and the soft vertical feel of the forest. Give this technique a try and see what you can do……Digital Lady Syd
Digital Lady Syd Related Blogs:
Digital Lady Syd Reviews Alien Skin Snap Art 4
Wintry Dahlia

Loved how this beautiful white dahlia bloom came out – and once again it used two of my favorite Photoshop plug-ins. First applied Trey Radcliff’s Yesterepoch preset to flower in Lightroom. In Photoshop sharpened up the image using Topaz (see sidebar for website link) Detail 3 using these settings: Detail Panel: Highlight – Small Details 0.42, Small Details Boost 0.45, Medium Details 0.54, Medium Details Boost 0.40, Large Details 0.48, and Large Details Boost 0.44. Back in Photoshop filled a layer mask with black and painted back just the edges of the flower that I wanted emphasized – this kept the petals in back less in focus. Added one of my textures that I made in Corel Painter with a layer mask so the flower did not have texture applied, and set the layer to 32% layer opacity. Next opened Nik’s Analog Efex Pro plug-in and used a preset I created called Very Basic Set up. It contains just the Basic Adjustments panel (Detail Extraction 30%, Brightness 35%, Contrast 25% and Saturation -30%), Bokeh filter (Blur Strength 24%, Boost Highlights 94%, and centered on middle of flower), and Lens Vignette filter (Amount -33%, slider set under R in Rectangle, Size 77%, and also centered on flower middle). Back in Photoshop added a Levels Adjustment Layer to give just a little more contrast. I really liked the soft textured feel to the flower…..Digital Lady Syd
Surprising Results with Nik Analog Efex Pro

I really love how the light was playing through these beautiful huge philodendron leaves – bright sunlight was shining on them near a pond at the Ormond Memorial Art Museum and Gardens in Ormond Beach, Florida. By applying Nik’s new Analog Efex Pro Photoshop plug-in to the image, I was able to make the background slightly blurred while maintaining the striking light on the leaves. I really like this plug-in as it can be used without getting too much of that vintage effect on the image but yet you can still use some of the tools that can really localize an effect in an image. I think what really added to the image is that there are some unusual patterns in the leaves the misty water effect is interesting. Anyway, turned out to be a surprise which is what is so much fun about Photoshop and all the plug-ins available for it!…..Digital Lady Syd
Rural Church in Belarus

Just another pretty picture of a church in the Belarusian countryside. I wish we had stopped so I could set up the picture, but the trees are so pretty it does not seem to matter that the church is partially hidden from view. Once again in Lightroom I started with a Trey Radcliff preset – this time I used . In Photoshop Nik’s Analog Efex Pro was applied – it really lightened up the image. Therefore a Curves Adjustment Layer was added above the plug-in layer to add back just a little bit more contrast. That was it! I really like what the Nik plug-in does on images – it takes a while to work with the settings, but once you figure them out, it can add interesting and beautiful effects…..Digital Lady Syd
Keeping Time

Just loved how this image turned out. I liked the fact that the dining room was light and bright and slightly out-of-focus and the clock and plant looked pretty nice when put together. The little philodendron was rooted from a clipping of a plant I have had 20 years – amazing! The original image was processed in Lightroom using just the Basic Sliders and Dave Delnea’s Backlight Vertical Right preset. Once opened in Photoshop Topaz (see sidebar for website link) Detail 3’s Shadow Relief III preset was applied to sharpen up the image little. Nik’s Analog Efex Pro‘s plug-in was applied – it is turning into one of my very favorite plug-ins! Basic Adjustments, Bokeh, Light Leaks, Dirt & Scratches, Lens Vignette, Film Type, Frames, and Level & Curves tabs were used. I have created a favorite look preset and just keep modifying it – I think that is the easiest way to use this plug-in. A Curves Adjustment Layer was added to increase contrast and that was it. This is just too much fun to do!…..Digital Lady Syd
Digital Lady Syd Related Blogs:
Digital Lady Syd Reviews Nik Analog Efex Pro
Using Nik’s Analog Efex Pro on a Historic Statue
Using Nik’s Analog Efex Pro on a Historic Statue
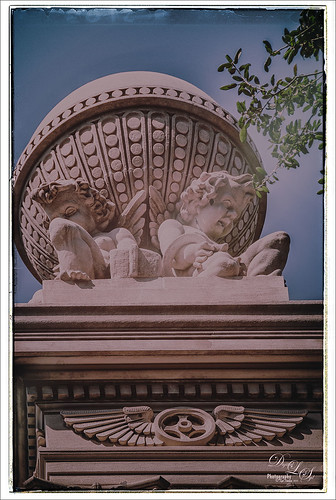
I really like what Nik’s Analog Efex Pro plug-in does for statues and historic images. At first I did not like this image of the Gordon Monument in Wright Square in Savannah, but since it had that historic look to it, it seemed like a great fit with this new plug-in. Sure enough, it really created a beautiful image and has a feel to it that suits the image. I believe I used the Vintage Camera 4 preset as a starting point, but changed everything up so it is really hard to tell. I always start with the Basic Adjustments tab. Light Leaks was changed (third down, second over) and the Strength set to 67% – the On Image Control was moved towards the bottom. In Lens Vignette the control was set on the figures and the size and amount adjusted. The Film Type was Subtle (second down, first one) and the fading was increased.I changed the Frame – really liked this one in Whites (third row, second over). Back in Photoshop I did add a Curves Adjustment Layer just to pop the colors a little more. I find it a rather charming picture! See my Fun Photoshop Blog Digital Lady Syd Reviews Nik Analog Efex Pro for more information on this new plug-in from Nik. Personally, I love it!…..Digital Lady Syd


