
Peach Hibiscus
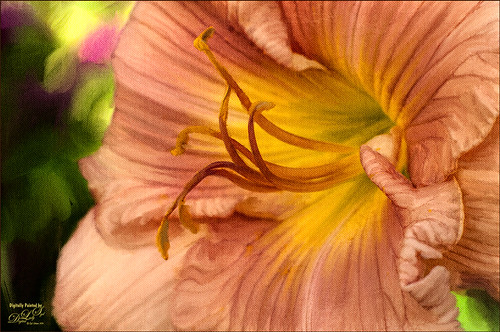
This peach hibiscus that was growing on my back porch in Florida and was painted in Photoshop. The technique used is presented in the November Issue of Photoshop User Magazine on KelbyOne, so if you are a member, check it out. It gives you directions for creating 3 mixer brushes and basically makes the effort a lot easier than using the built-in Photoshop Mixer Brush Cloning Paint Setup default action. A Canvas Texture was added on top for a more painterly overall effect. I will be experimenting more with this technique using some of my own brushes and see what happens……Digital Lady Syd
An Old Victorian House
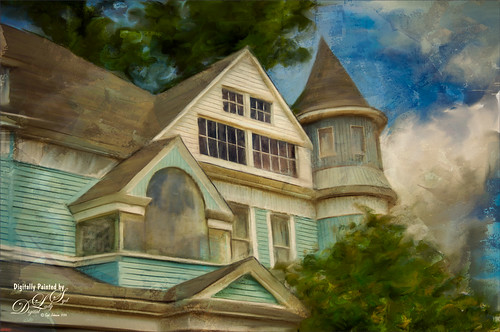
I recently bought a set of videos from Udemy called “Turn Photographs Into Digital Paintings Using Photoshop” by Lori Jill. If you watch their sales, you can get all kinds of videos on photography for a very reasonable amount. The above is my first image created following her instructions – she instructs on how to create Mixer (cloner) brushes to get effects you like. She also uses the Photoshop action called Mixer Brush Cloning Paint Setup. This appears to be very similar to the original Dr. Brown’s Painting Assistant Extension for CS5 and CS6. Anyway, I was very pleased with my first attempt. I also used one of Melissa Gallo’s beautiful textures, Pilgrims Journey, twice to get the vintage feel to the strokes. I still have a few lessons to go, so hopefully I will post a new image soon using this technique……Digital Lady Syd
Digital Lady Syd’s Related Blogs:
Dr. Brown’s Painting Assistant Panel for CS6 and CS5!
Jack Davis Painting Action Really Works!
I See You! Checking Out a Snowy Egret
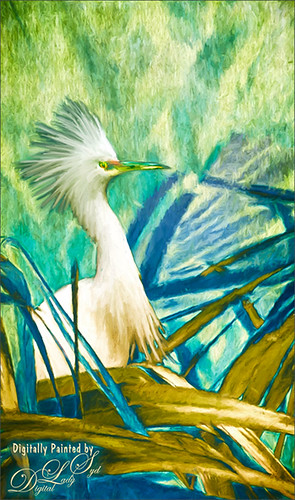
Another shot of a beautiful Snowy Egret from the St. Augustine Alligator Farm Rookery. This time it was painted twice – once using Mixer Brushes and once applying Topaz (see sidebar for website link) Impression Cezanne II preset. Photoshop’s Flat Angle Mixer was used to do a lot of the paint clean up……Digital Lady Syd
Feeling Like a Walk on the Island

Really loved how this image turned out – this is what the Bahamas (Great Guana Cay in this case) looked like to me when just walking around on some of the more deserted areas of the islands. This image was not that great to begin with, even with adjustments in Lightroom, but by adding Alien Skin’s Snap Art 3 Photoshop plug-in, it turned into a nice painterly effect. The Factory default preset was applied – I find I like it on many of my images. Using two layers in the plug-in, the focal point at the end of the path was painted with a more photorealistic slider detail and a few items in the foreground were slightly blurred. To finish up I used my free SJ Painter Oil Frame and painted around the edges with Fay Sirkis’s Mixer Brushes (used her Palette Knife Tap n Blend brush and Signature Palette Blender brush – brushes can be downloaded from her Four Seasons painting on-line training classes on NAPP – I think her brushes are the best out there!) to smooth the framing into the image a little more realistically. That was all that I did, but I think I might print this one for my wall……Digital Lady Syd
Which Tool to Use – Smudge or Mixer Brush?

I ran across an old tutorial that was in the very first Photoshop Creative magazine back in 2006. It was on how to create a digital painting by using the Smudge Tool. Well that was something I had to try out – couldn’t believe I had not tried this before! I really like the Mixer Brushes, which is what I usually use (see my blog Adobe Photoshop CS5’s Mixer Brushes). Once I started playing around with the Smudge Tool using different brushes and sizes and opacities, it was actually fun. My curiosity got the best of me and now I needed to know what IS the difference between the two tools – they create very similar results? I was able to find a reasonable answer on the Internet at Model Mayhem.com. Here is what they said:
“The Smudge Tool simulates the effect you see when you drag a finger through wet paint. The tool picks up color where the stroke begins and pushes it in the direction you drag……The Mixer Brush simulates realistic painting techniques such as mixing colors on the canvas, combining colors on a brush, and varying paint wetness across a stroke.”
I think this is a nice short explanation of what is happening. For my Peach Dahlia I found it was nice to use both tools. It seemed it was easier to blend colors with the Mixer Brush and then smooth edges and shape color using the Smudge Tool. The Photoshop Wow Book for CS3 and CS4 (still my favorite Photoshop book) had a nice section on painting with the Smudge Tool. They recommended using the Natural Brushes that come with Photoshop and start by using short strokes, which samples the color underneath more frequently. Then use a small brush size for detail.
To create this image, first a blank layer was placed on top. Then these two brushes were used to paint: Mixer Brush – created tool preset brush with these settings: Stipple Dense 26 pixels from Natural Brushes set (Options Bar: No Current Brush Load, Load the Brush After Each Stroke, Wet 100%, Load 1%, Mix 91%, Flow 100%, Check Sample All Layers). Smudge Brush Tool Preset created using Stipple 54 pixels from Natural Brushes preset with Options Bar set to Mode Normal, Strength 78%, and Checked Sample All Layers. Be sure to save these brushes as Tool Presets so the Options Bar settings are retained – if just saved as brushes, the settings might not be correct. Also, note that if the Finger Painting box is checked in the Smudge Tool options bar, the smear stroke will start with the Foreground color. If turned off, the color under the cursor is sampled first. At 100% Strength, only the first color sampled is applied – at lower settings it fades out the first color and picks up the new one. Then I just alternated mixing and smudging until I liked what I saw. The last step involved adding three textures to the image to give a real painting look: the first one is a light gray canvas texture (I created it by taking a picture of a portion of the canvas on a large oil painting in my dining room – try this – you might really like the results) set to Soft Light at 53% opacity; next ShadowHouse Creations Old Photo 2 set to Overlay at 100% opacity – it provides the interesting edging on the image; and Flypaper Textures Aquaflora taster set to Overlay at 80% opacity. I painted out a little bit of the texture on the top two textures just to direct the eye to the center of the flower. A Curves Adjustment layer was added on top to give just a small contrast boost. Overall it was really fun to try out a new tool and learn something about it!…..Digital Lady Syd
Think Pink! Rally for the Cure Pink Rose
 |
Since October is Breast Cancer Awareness month in the United States, last week I participated in a “Rally for the Cure” golf tournament. This beautiful pink rose came from this event. I am really pleased with the results for the above image that used the new Mixer Brush panel from one of my favorite Photoshop gurus, Russell Brown. Hover over the image to see the before photograph used to create this painterly effect.
One of the best new features in Adobe Photoshop CS5 are the Mixer Brushes. (See my Fun Photoshop Blog “Adobe Photoshop CS5’s Mixer Brushes” where I talk about how to use and create your own Mixer Brushes.) Dr. Brown created a new panel to load into Photoshop called the Painting Assistant that makes the whole painter process much simpler. I was able to create the above in very little time using this new panel. Basically it contains six button steps with very clear instructions listed – just click each button after you finish each step. This is pretty ingenious in my mind, but then that is what Dr. Brown is known for! To download the panel and a video, click here and scroll down to the 6th item. A text layer using the “Old Script” font was created and set on a slant using Free Transform – then a layer mask was used to paint out the lettering from the rose.
Give this technique a try, especially if you like the painterly look. It is very easy to do since the Mixer Brushes are already set up for your use. And if you get a chance to participate in a “Rally for the Cure” event, please do – they are always lots of fun and the proceeds could not go to a better cause!…..Digital Lady Syd


