
My Happy Firecracker Plant

No matter what weather is down here in Florida, this plant is blooming and always healthy. It gets huge every year and needs to be cut back. I paid $.75 for it in the damaged plant section of Lowe’s – now it is repaying me with great health! I guess I wish all my plants were like this. Anyway, this Firecracker Plant macro image was processed pretty much with just the same ole workflow that I always follow. I did use it to try out Blake Rudis’s Video for getting the best detail out of a photo – it is called Don’t Use Clarity – Use This Instead and involves using the High Pass Filter. Actually I felt it did a little better adding detail in this image compared to Topaz Sharpen. A small highlight was added on a few of the blooms where the focal point have been more pronounced. A Color Lookup Adjustment Layer set to the Foggy Night preset at 71% Layer Opacity and Luminosity Blend Mode was added. On a stamped layer The Smart Photo Editor filter was used to add a final effect. Fun to get back to my flower photography again!…..Digital Lady Syd
Raindrops on a Queen

Can’t believe I did not post this image a while back. It is one of my favorites and it was taken using my 60 mm F/2.8 macro lens (with my Bower 0.5 x High Definition Wide Lens attached) right after a heavy rainfall. Lightroom Camera Raw settings were added before opening Photoshop. Topaz Sharpening AI was applied first (I still love this plugin!) and a Color Lookup Adjustment Layer using my preset. On a stamped layer (CTRL+ALT+SHIFT+E), Viveza was opened – the settings made the image pop! A Burn Layer was added above and another darken layer to darken the background more (used a soft round brush to do this). Last step involved adding a Film Grain Layer set to Overlay blend mode. Pretty basic!….Digital Lady Syd
The Queen Emma Bloom

This is one of my favorite blooms in my yard. I take a lot of images of them and here is another one. This one was shot at using my Nikon 60 mm macro lens at F/5.6, ISO 200, and -1/2 EV. In Lightroom Serge Ramelli’s Safari Warm Dramatic Light preset was applied (to download, check out his How to Edit Amazing Landscape Photos video). In Photoshop Topaz (see sidebar for website link) Sharpen AI set to Remove Blur 30 and Suppress Noise 40 was applied – then a layer mask was added and the effect was painted off the dark background area. Luminar (see sidebar for website link) Flex was applied on a duplicate layer – used these filters: Structure, Brilliance/Warmth, and Advanced Contrast. That was all that was done – pretty simple. ….. Digital Lady Syd
Orange Daisies
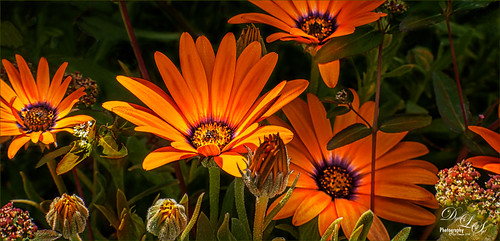
Found this image of some orange daisies from my yard taken a while back. It was a macro shot using a 60 mm lens with a Bower 0.5 x High Res Lens at F16. In PS Luminar 2018 (see sidebar for website link) was opened and the Details Enhancer filter, Structure filter, and the Top & Bottom Lighting filter were used. Then in PS just did a little clean up on the petals and the background, and added several layers to lightly spotlight various parts of the image. Finished up using Matt Kloskowski’s vignette (see my How to Create a Subtle Vignette blog). These flowers were so pretty to photograph!…..Digital Lady Syd
My Parisian Violets!

These beautiful violets I recently bought at Wal-Mart and they are so pretty. They really like the filtered light from my south facing window in my kitchen. I used my handy, dandy 60 mm Nikkor macro lens at F/4.8, 1/90 sec, and ISO 200. A Bower 0.5 x High Resolution Digital Lens with Macro was added to the lens. In Lightroom 4 I just followed my workflow in my blog How to Use Adobe Camera Raw (ACR) or Lightroom 4 Quickly. I painted over the center of the flower using an Adjustment Brush set to a high sharpening and just a little Clarity. In Photoshop a Curves Adjustment Layer was used to selectively remove a shadow behind the front flower (see my Using Curves Adjustment Layers to Get Rid of Shadows and Highlights blog). Painted Textures Seafoam textures was added and just the flower lightly painted back using a white layer mask and painting in black. Next 2 Lil’ Owls Affetto Grunge Mosaic texture (see sidebar for website link) was added and the center painted out so only the darkened edges remained on most of the image. French Kiss’s Vintage French Brush No. 2 set -Dec 1924 was placed on the left side of the image and set to 89% opacity. A Layer Style was opened on this overlay layer. A dark Stroke set to 3 pixels inside was added, a Pattern Overlay using that wonderful default Photoshop pattern Bubbles was checked to add some variation in the text (I think this is the first time I have ever used it!), and an Outer Glow at 39% opacity was used. A Color Fill Adjustment Layer was clipped to the overlay and set to a light blue color. On the upper right French Kiss’s Vintage French Brush 1903 (same link as above) writing was applied and another Color Fill Adjustment Layer was clipped using the purple color from the flower. That was it! Lots of fun to do!…..Digital Lady Syd
Yellow Dogface Butterfly in her Glory!

This Southern Dogface Butterflies (named for their heads that look like French poodles) visited my purple pentas this fall. They are very skiddish butterflies and are hard to photograph. I used my 60 mm Nikon Macro Lens to catch the shot at F/3.2, 1/2000, and ISO 200. The image was processed first in Lightroom 4 using the workflow from my How to Use Adobe Camera Raw (ACR) or Lightroom 4 Quickly blog. To create the soft effect, Nik Color Efex Pro 4 was applied with several filters stacked: Midnight using Neutral Color Set, Glamour Glow with Glow set to 90%, Vignette, and Film Efex Vintage set to Film Type 2 and an Overall Opacity of 40%. The Sharpen Tool was applied to the face. Nik Viveza 2 was applied to soften the bright tones in the background and to sharpen the head a little more. My Mid Size Double Edged Frame was added to the image to finish up. I really enjoyed working on this image – it has a different feel to what I normally do……Digital Lady Syd
Just Bloomin’ Beautiful!

This miniature mum was in bloom again for the fall season. Just beautiful! This image was taken with my Micro Nikkor 60 mm f/2.8 macro lens set to Manual mode, 1/90 sec, F/5.6 and ISO 200. Very little processing but did use Flypaper Texture Rainbow Trout Taster and my Double Edge Frame Layer Style sampling the Inner Shadow color from the image. Enjoy!…..Digital Lady Syd
Digital Lady Syd Related Blogs:
The Macro Shot
Beautiful Soft Flowers
Beautiful Soft Flowers

Just loved the pink hyacinths I bought – hope they will come back next year! This image was taken with my Micro Nikkor 60 mm f/2.8 lens at f/9.5. Used Mike Moats workflow (see info on this in related blogs below) with Color Efex Pro 4 (stacking Tonal Contrast, Darken/Lighten Center, and Vignette filters) added first and then Viveza 2 to make the details sharp. OnOne PhotoFrame napp_frame_12 (see website link in sidebar) was added. Final result – beautiful!…..Digital Lady Syd
Digital Lady Syd Related Blogs:
Using NIK’s Color Efex Pro 4 and Viveza Together
Nik’s Viveza 2 Plug-In – A Hidden Gem!
The Macro Shot
Magnificent Macros with Nik Plug-Ins

The Jazze Rose Frost Alstroemeria flower is one of the prettiest perennials that you will find. This one resides in my front yard now. The same workflow with Nik products that really make your landscapes pop was applied to this macro. Silver Efex Pro 2 (same High Structure-Harsh preset with Color Filter set to Green), Color Efex Pro 4 (Darken/Lighter Center and Graduated Neutral Density filters stacked), and Viveza 2 to bring out details in the stamen structure were applied. That was it! Check out my Fun Photoshop blog “Use NIK Color Efex Pro 4 and Silver Efex Pro 2 Together to Create Fabulous Landscapes!” for more information.
Give this a try next time you want a different look for your macros!…..Digital Lady Syd
Soft-Look Flowers Using Textures

These beautiful dahlia flowers are now planted in a flower bed in my front yard. To get this effect, it was a pretty simple process. I sharpened the center and darkened the green stems first. Next ShadowHouse Creations Subtle Tones ST-8 texture was set to Color Blend Mode. With a layer mask I painted out the texture over the flowers very lightly using a soft 13% opacity brush and building up the effect until it looked the way I liked it. Next ShadowHouse Creations 3 Assorted Texture Set T 2 texture was set to Hard Light Blend Mode to add a very feminine look – also a layer mask was used to clear the lacy texture from on top of the flowers. A Hue/Saturation Adjustment Layer was added on top to select the correct texture color by adjusting the Hue slider. The last step added OnOnePhotoFrames toner scratch 21 (see sidebar for website) with a very light purple-pink color. That was it. I loved the final result. I hope you will try using some of the beautiful textures from ShadowHouse Creations website where there is a huge selection of textures that can be downloaded for free. Major thanks for what he does to help us budget-minded Photoshoppers!…..Digital Lady Syd
The flowers were photographed on a table with a science fair 3-sided white board behind them and natural light from a window – shot with a Nikkor 60 mm Macro Lens set to F/3.2, 1/15 sec at ISO 400 with an attached Bower 0.5 x High Resolution Digital Lens with Macro lens, which gives the large depth-of-field effect.
The Macro Shot

Recently I have been working on my Macro photography, especially since I have had some beautiful flowers on my porch due to the warm winter we are having in Florida this year. One of my favorite blogs is by Mike Moats called Tiny Landscapes where he gives some great advice on taking and processing macro images. A few things I am starting to try and the above chrysanthemums are the result of one of my efforts. A 60 mm Nikkor macro lens was used at F/19 at 1/20 to 1/350 sec. A Bower 0.5 x High Resolution Digital Lens with Macro was added to the lens. I created an HDR image from five shots which is how I got the large dynamic range in the photo. After that the processing was in Nik Color Efex Pro 4 using Tonal Contrast, Detail Extractor and High Key filter effects and Viveza 2. This is the basic workflow Mike Moats uses and it works very well on macro photos. My original shot was taken with a white background but I just did not like the way it looked. Mike says if you do not like the background feel, crop tight, which is what I did. I hope to try out some of his other tips in the near future – it is a lot of fun to take those close up shots…..Digital Lady Syd


