
St. Andrews Golf Shops & Hotels

Enjoying watching The British Open at the Old Course in St. Andrews for the next few days (yep, I am a golfer) and decided to find an image I had not post processed when I was there several years ago (I believe this is the 18th green). Had to do a bit of cloning on the sidewalk area – turned out better than using Content-Aware Fill. Still had a little Chromatic Aberration in this image even after using Lightroom to remove most of it. Therefore a duplicate image was created and a Gaussian Blue was set to Radius of 6.0 – then set layer to Color Blend Mode, added a black layer mask (press ALT+Layer Mask icon to create), and painted out the aberration colors. Worked like a charm! On a stamped layer, Topaz AI Sharpen Filter was set to Out of Focus with Auto settings to sharpen up the whole image. On another stamped layer, my favorite stand-by filter that is no longer available, Lucis Pro 6.0.9 was applied – love the effect! A Color Lookup Adjustment Layer was added and a free Sparkle Stock LUT set called Beautiful Day using Carnival 02 LUT. Last step involved adding New Layers for Darkening and Highlighting part of the image – used Sam Peterson’s technique to do this (see my blog A Few Photoshop and Lightroom Tips and Tricks – No. 2). That was it – wish I was there but I am enjoying the memories by working on this older image……Digital Lady Syd
A Duck Enjoying his Habitat

This beautiful and rather friendly male Mallard Duck was swimming all over the place while several people were trying to take his picture at Ames Park, Ormond Beach, Florida. His coloration is what attracted me to this image. Did my basic workflow on this image but thought I would share that Topaz (see sidebar for website link) Sharpen AI was used to really sharpen him up. The Lucis Pro filter was also used – too bad no one has decided to make this great little filter available again. Also Viveza 2 was used – my go to filter to finish up a look. ……. Digital Lady Syd
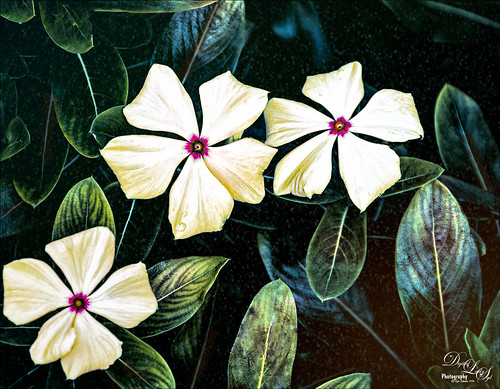
Queen Emma Lily Dressed Up
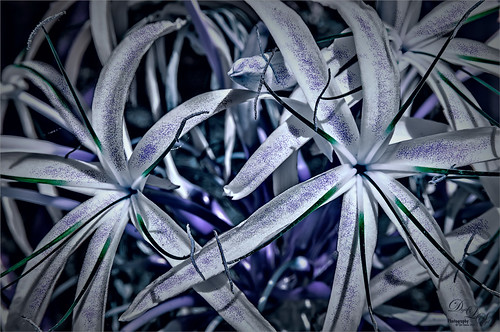
Have been practicing my Macro Photography recently and decided to give some of my very favorite blossoms a different look. Today we are adding an inverted image (CTRL+I in thumbnail – then set to Color blend mode) showing greens and blues instead of the traditional reds and whites to our collection. These beautiful blossoms were accented with some purple glitter thanks to Kyle’s Concept Brush Small Branch Mix in PS that was converted to a Mixer, thanks to the expertise of Nicolai at Grut Brushes – did you know you can convert any brush into a Mixer by simply clicking on the Mixer brush and ALT+CTRL clicking on a regular brush in the Brushes Panel? That’s what was done here on a New Layer and set to Linar Burn blend mode. Some Sharpening was done using the new updated Topaz (see sidebar for website link) Sharpen AI filter and Lucis Pro. Topaz ReStyle’s Warm Steel Wash preset applied to further enhance the color to the Lily. Last step was to use a Levels Adjustment Layer vignette to further enhance the beautiful blossoms. Yes, the Lily is definitely ready for Spring Holiday Extravaganzas. ….. Digital Lady Syd
Just Saying Hi!
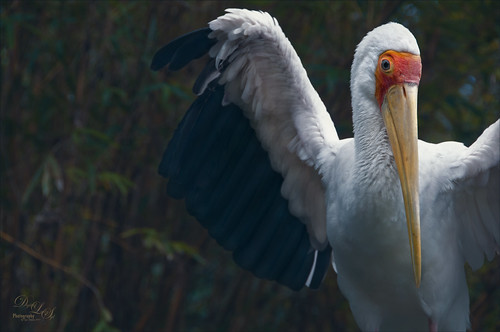
This beautiful big yellow-billed crane lives at the Jacksonville Zoo and I believe he is in charge of the aviary as he greets every person who walks through the door. I have never seen such a tame big bird and he will give you quite a show. This guy did a complete 360 wing spread for me while I was about 6 feet from him. Just a few basic adjustments were done in Lightroom. Once in Photoshop, Lucis Pro (no longer available) was used to slightly sharpen the bird’s face and beak and to define a few feathers (used a black layer mask and just painted back those areas). On a New Layer painted in a little white spotlight at very low opacity to lighten up lower wing area. Used a Selective Color Adjustment Layer to brighten the beak yellow just a little. Used a Curves Adjustment Layer to lighten his eye. Added the Foggy Night Color Lookup Adjustment Layer preset set to 57% layer opacity. Not much to this image as it was pretty nice as shot…..Digital Lady Syd
A Beautiful View
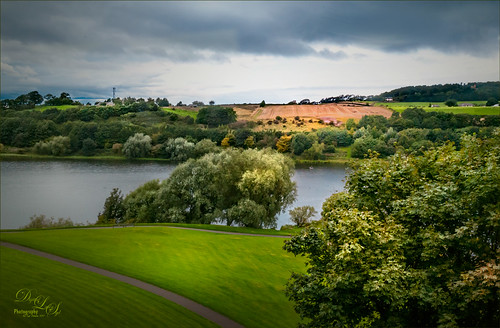
Loved this view of the Scottish countryside taken from a window in Linlithgow Palace – this is the palace where Mary, Queen of Scots was born in 1542 and lived for 7 months but did not return for another 20 years. Lots of interesting history here. Started adjusting this image in Lightroom doing Basic Panel adjustments. In Photoshop on a duplicate layer, Lucis Pro (no longer available) was applied, then a black mask added and painted back just areas that needed more definition. On a stamped layer (CTRL+ALT+SHIFT+E) On1 Photo Effects was opened and the Color Enhancer filter, Tone Enhancer, and Textures was used to help especially in the sky area. On another stamped layer Nik Viveza 2 was applied to even out the lighting in the front foreground and midground areas. That was it!…..Digital Lady Syd
A British Countryside
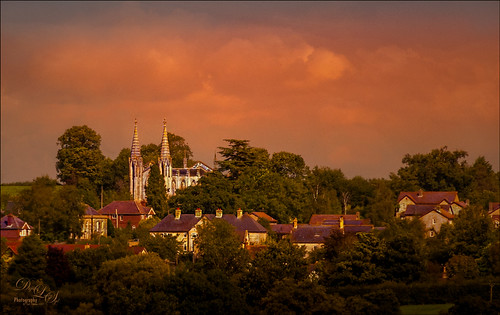
This image was taken of the British countryside on the way to Stonehinge. Lots of post-processing in Lightroom following Serge Ramirez’s instructions and using his very Sunset preset. Check out his My Most Liked Photos-Part 1: The Making of a Composition for basic info on this. Then in PS used Lucis Pro (no longer available) to really sharpen up the image. A couple Curves Adjustments layers, Topaz (see sidebar for website link) ReStyle to really add the nice color treatment, and Camera Raw Filter to add a top bluish gradient. A final little sky clean up and that was it. Really like the nice feel of the little town…..Digital Lady Syd
On Safari
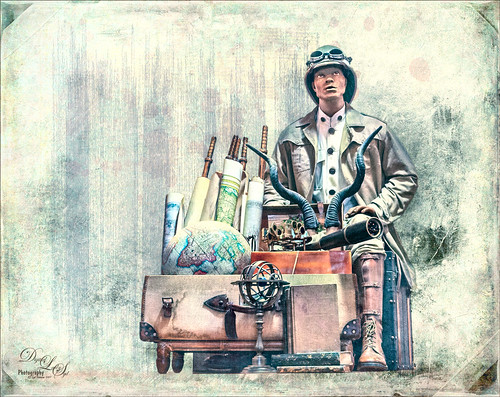
This image was taken at Universal Studios-Florida in a gift shop. I thought it was a very interesting display. Just followed one of my basic image workflows for this one. First selected the display from the background. Then added underneath a Texture from 2 Lil Owls (see sidebar for website link), a texture I created a long time ago set to Darker Color at 46%, and an object of just vertical lines on top of it set to 46%. The actual cut-out layer was opened in Lucis Pro to get the almost illustrative effect. Then some clean up layers and Nik Viveza 2 to direct the eye properly. A Red Channel Luminosity layer, Topaz (see sidebar for website link) ReStyle’s Ash Gray and Eggshell on another layer, and a Camera Raw Filter to add grain were the final steps. That was it. I really like the overall effect…..Digital Lady Syd
A Beautiful Bedroom
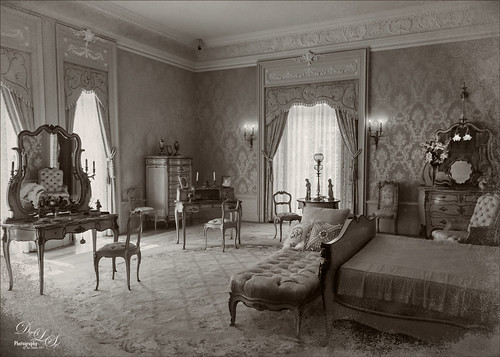
Decided to experiment and turn this Master Bedroom in the Flagler Museum or Whitehall in Palm Beach, Florida, into a monotone color – it just looked pretty after David DuChemin’s Lightroom Develop Preset was applied called B+W Duo-Cool to Warm. It actually was a little too bleached out but this is point that I started in Photoshop. I wanted to have a vintage feel to the image. The actual image was done in bright golds and yellows. The image was sharpened using Lucis Pro (no longer available) and then adding a black layer mask and painting back just some of the detail. An outside border was created using Shadowhouse Creations Heavenly Vintage Texture Set-Lavender Texture which was desaturated (CTRL+SHIFT+U). Nik Viveza 2 was added to sharpen up the left mirror reflection. To add a little color tone to the image, a Color Fill Adjustment Layer was added using a beige-pink color – set to Color blend mode at 54% layer opacity. I really like the overall effect…..Digital Lady Syd
Beautiful Clouds at Stirling Castle
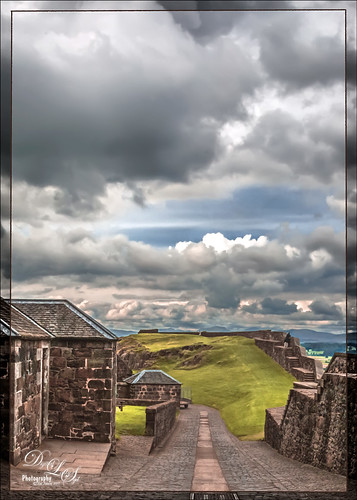
This image was taken at Stirling Castle in Scotland. The sky was so dramatic that there were many different ways to process the clouds, but I settled on a less dramatic and more sunny feel to the image. It was actually quite an overcast day when this image shot. There was not a lot done to this image. Biggest problem was some noise – both Luminance and Color so Adobe Camera Raw was used to clean it up. I can’t remember the last time I had color noise so this was unusual. On a stamped layer, Lucis Pro was applied and the clouds were painted out in a layer mask to keep them from being too crisp. Nik Viveza 2 and a Red Channel Luminance Adjustment Layer was added. Then I realized I had a slightly crooked image so PS Adaptive Wide Angle Filter was used to straighten it up just a little – worked perfectly! (See my How to Use the Adaptive Wide Angle Filter blog.) Then a border was created using single line rectangle, selecting the outside, adding a layer mask to a stamped layer, and clipping a Black & White Adjustment Layer on top. That was it. What a wonderful place to visit!…..Digital Lady Syd
The Whisker Cactus
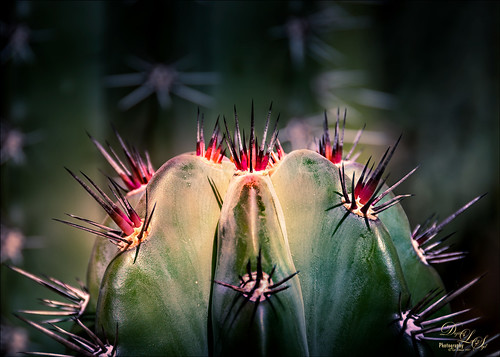
A local hotel in Phoenix, Arizona, labelled this a Whisker Cactus – the red spikes are at the top of the stalk. They had this wonderful cactus garden with several different types. Unfortunately I did not have my macro lens with me, but this image has a pretty nice macro feel to it. A lot of the post-processing was done in Lightroom using the Bad Weather 8 preset by Serge Ramelli with adjustments to the Gradient Filters and Radial Filters. In PS, Lucis Pro (no longer available) was used to just add some texture and sharpening into the cactus only. Nik Viveza 2 was used to emphasize the plant colors. Matt Kloskowski’s technique was used to create a vignette. (See my How to Create a Subtle Vignette blog.) On another layer the Sharpen Tool and Blur Tool was used selectively and a 50% gray Dodge and Burn layer was used on the focal point areas. That was it. These cactus are pretty but incredibly sharp!…..Digital Lady Syd
The Neighborhood Puppy
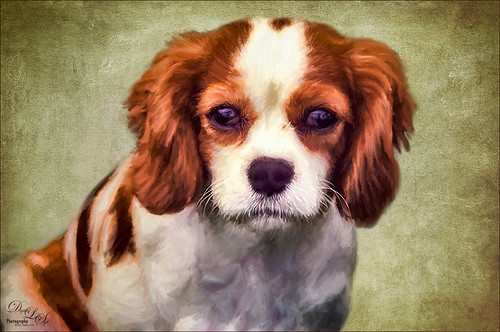
This is one of the cutest puppies I think I have ever seen. Her name is Kaila and I get to play with her every now and then when she is on one of her neighborhood walks. This time she let me take a few images of her, so I thought I would take advantage of this photo and try out a recent Topaz blog called Cartoon Your Critter – Make Your Pet a Work of Art by Taylor Seaton. I did not follow the steps exactly since my image is not really a cartoon effect, but I liked the final results. So how did I get to this point? Well I used Topaz (see sidebar for website link) ReMask, but I also tried Photoshop’s Mask and Select, which gave a great result too, just to see which is is better. (I think the results depend totally on the image IMHO, so if you do not like the results of one, try the other.) I did not like the results Topaz Simplify gave to this image, so Lucis Pro 6.0.9 (unfortunately no longer available) was applied on a duplicate layer of just the selected dog. Again the layer was duplicated and following the Topaz blog, the image was taken into Topaz Impression 2 where the Cartoon Your Critter preset was downloaded from the Community. No changes were made to it. Next Artiste Old Master texture from French Kiss (see sidebar for website link) was placed underneath the dog layer. Topaz has several nice textures in their blog that can be downloaded if a nice one is needed. Then created a stamped layer (CTRL+ALT+SHIFT+E) on top so it can be taken back into Topaz Impression 2. On separate layers above lots of painting with PS was done to add my own painting flair. On another stamped layer Nik Viveza 2 was applied and just a little bit of vignetting was added along with a little work on the nose and mouth. I really like the results. And as always, it was a lot of fun to do!…..Digital Lady Syd
Hospital Militar
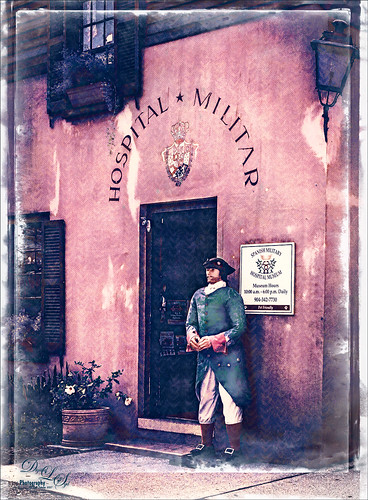
Just had some fun adding an interesting effect to this front door image of the Spanish Military Hospital Museum in St. Augustine, Florida. In PS a free action by Chris Spooner called Engraved Effect Medium was used on the whole image. If you use this action be careful-it makes your image huge. What you need to do is look in the group and decide which layers you want to apply and remove the others to control the final size of the image. I really like the engraved look and the action contains three different levels to experiment using. Then the image was taken into Topaz (see sidebar for website link) Impression 2 and applied the Abstract I preset with changes to fine tune to this image. Next a stamped layer was created (CTRL+ALT+SHIFT+E) was placed on top. Lucis Pro 6.0.9 (no longer available was applied and just the Smooth Detail slider was used. One of my PNG textures was added to the image and set to Overlay blend mode and then set to a bright blue color by clipping a Color Fill Adjustment Layer. The Foggy Night Color Lookup was added and set to 34% layer opacity. Next 2 Lil’ Owls (see sidebar for website link) Starry Night 6 was applied and set to Saturation blend mode at 46% layer opacity. The last step was to use one of Sebastian Michaels edges. It like the sort of vintage feel in the image…..Digital Lady Syd
The Golden Dragon
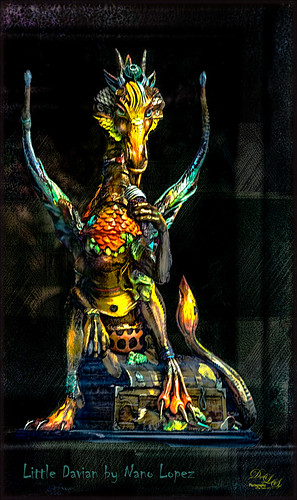
I had never seen a Nano Lopez sculpture until my recent visit to St. Augustine where the James Coleman Gallery had it displayed- this piece is called Little Davian. I shot this beauty through the front window in bright daylight so it took a lot of cleaning up to get rid of the reflections . I thought that the dragon was singing into a microphone but he is actually eating a “Dragon Berry” ice cream cone! Need to check out all Nano’s work – it is amazing! I will give you a quick run down of what was done to the image, but many steps were involved to get an effect I liked. First the dragon was run through Lucis Pro (no longer available) to get the edges defined better – it does not really sharpen but gives a similar look. Then PS Select and Mask command was used to extract the dragon from the background. To get the interesting cyan texture on the right side, a grunge type object created in Corel Painter was placed behind the extracted dragon, set to Soft Light and 52% layer opacity. A Hue/Sat Adjustment Layer was clipped to the layer and set to a Cyan color. A Darken/Lighten 50% gray layer was added. Nik Viveza 2 was used to adjust the color and tone throughout the image – this helped fix the glass reflection problem. Topaz (see sidebar for website link) Clarity was used on just the dragon. A Spotlight Layer set to Overlay blend mode was used on the dragon head. 4 Light Leaks were used on the edges – top and bottom set to a little dark red color, right side cyan and left side a warmish orange. 2 Lil’ Owls (see sidebar for website link) Color Bokeh Grunge Set – overlay 6 was set to Divide blend mode at 40% layer opacity to darken the edge of image. The font is called Chiller. Last step involved adding Topaz Detail 3 – just gave the overall image some sharpening and emphasized the background texture. Obviously my image does not do justice to the actual beautiful piece created by the artist, but it was a joy to work on the image!…..Digital Lady Syd
A Pink Orchard
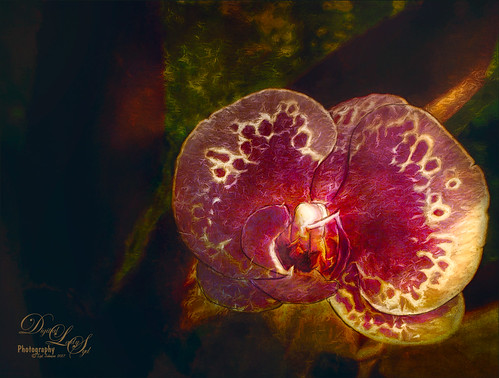
This orchard image was taken at the Harry P. Leu Gardens in Orlando, Florida – a wonderful place to take flower images if you are in the area. This image was started several weeks ago so I am not completely sure what I wanted as an end result. This flower began as a purple orchard, but Topaz (see sidebar for website link) Texture Effects 2 was opened and the Citronella Lily was applied with several adjustments. On a stamped layer (CTRL+ALT+SHIFT+E) Topaz Impression’s Fine Brush Scumble was applied. On another stamped layer, Topaz Detail 3 was applied, another composite layer and Lucis Pro was applied, and finally on yet another stamped layer, Topaz ReStyle’s Rustic Red and Orange preset. Sort of amazing all the Topaz effects in this little flower! I used my favorite line brush, Grut’s Ink Pin Clinger – to actually draw around just a little around the petals. Two textures were added: Kim Klassen’s August Trio Traverse blend mode set to Vivid Light at 18% and her Fav Collection Cinnamon set to Multiply blend mode at 65% layer opacity. A couple Curves Adjustment Layers and a Color Lookup Adjustment Layer set to Foggy Night at 55% layer opacity. Another stamped layer was created and Nik Viveza 2 was used to adjust the lighting in the image. A Red Channel Luminosity Curve was applied as a final step. Lots going on here……Digital Lady Syd
Native American Bottles, Pots and Dishes
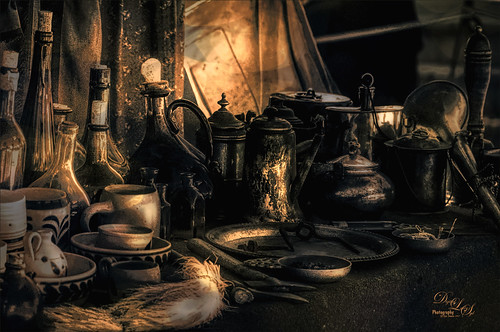
This image taken at the Ormond Beach Native American Festival was actually turned into a black and white in Lightroom. Painting in the highlights with an adjustment brush really made the light pop in the final iteration. In Photoshop, to remove a bit of noise, especially in the shadows, Topaz DeNoise 6 was used to remove it (used the Overall and Shadow sliders). Then Lucis Pro was opened to sharpen the details a little. It was set to Difference blend mode at 24% layer opacity and the Blend If sliders were used to further pull in the details. A Curves Adjustment Layer was used to add contrast. For color a Hue/Saturation Adjustment Layer was set to Colorize and a teal color effect was selected. Next another Hue/Saturation Layer was opened and a yellow-orange was applied to just the Highlights of the image. At this point the image looked really flat, but kind of old and vintage looking. I rather liked it. On a stamped layer (CTRL+ALT+SHIFT+E), Topaz ReStyle was opened and the Rustic Red and Orange preset was applied with a few adjustments and set to 74% layer opacity. On another stamped layer Topaz Texture Effects 2 was opened and A Little Dingy preset was applied. The Texture section was changed to a gold and black bokeh which enhanced the lighting effect. That was all that was done……Digital Lady Syd
An Urgent Plea
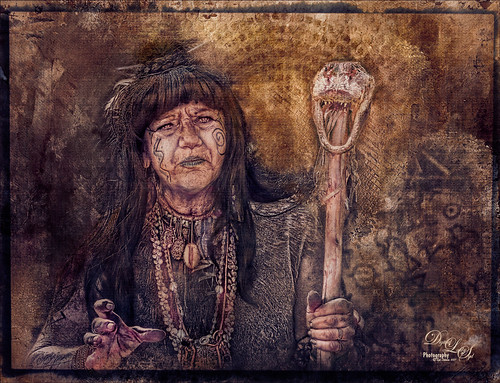
This is a lovely Native American woman I met at the recent Ormond Beach Native American Festival. She was actually doing a little presentation to the students from the local elementary schools on Native American traditions. I wish I could remember which was her tribe, but I would bet she is or was a teacher – very entertaining for the kids, and us adult kids too. Her expression reminded me of the past plight of the American tribes, and liked the fact that she represented how a female member would be attired. I can honestly say this image took me forever to finalize – just could not pull the whole look together. Finally the right textures fell into place and ended up just using my basic Photoshop workflow. Lucis Pro added the detail as an almost hyper-effect mode. Topaz (see sidebar for website link) ReStyle was used to get an interesting color palette and Topaz Texture Effects 2’s Fudge Brownie preset gave the vintage feel to the image. Then several clean up layers and of course, Nik Viveza 2 to draw attention to the face and the Alligator stick (hum). Needless to say, the kids loved that artifact. Just one image but three textures from 2 Lil Owls (see sidebar for website link) and one from Kim Klassen were used to get the final effect. Overall it turned out pretty much like I wanted…..Digital Lady Sy
St. Giles Cathedral Entranceway

This image of St. Giles Cathedral in Edinburgh, Scotland is of the West Doorway and contains many interesting carvings that were done by John Rhind in 1884. I am still trying to figure out who the sculptures are of – they represent historical people of Scotland – the middle guy is named Alexander, maybe the king who erected the first church at this location in 1120. Also the Gargoyle surprised me as he was rather prominent in the image (they are used as waterspouts and protect the church from evil spirits). I still wonder who all the people are that are just carved faces in the wall. The workflow is basically the same one used in the my Adding a Creating Painting Effect Fun Photoshop Blog. Lucis Pro was used to sharpen it up a bit. Topaz (see sidebar for website link) Impression’s Abstract Settings Blake Rudis set to 63% layer opacity. A white layer with many parts painted out in a mask. A frame was added with a Pattern Adjustment Layer clipped to give the soft pink tones. Some clean up, a little dodging and burning, and Nik Viveza 2 to finish off. Would love to get back to Scotland and see who all these carvings are. ….. Digital Lady Syd
Finding the Shade
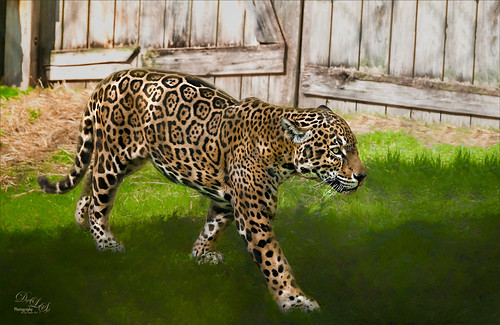
This jaguar started off as not a very pretty image at all – his lower foot was cut off, but the wood fence looked really good so I decided to process it. The image was taken at the Jacksonville Zoo behind a chain-linked fence where light shadow lines were throughout the image. In Lightroom Dave Delnea’s Backlight _Vertical_Left preset was applied and the settings adjusted. Used the Adjustment Brush to add a little Clarity and Sharpness to the just the face and ears. In Photoshop first the canvas had to be extended at the bottom and on the right side – filled some of the area using the Rectangular Marquee Tool and with Content-Aware Fill. Then the back foot was selected and copied (CTRL+J) to put on its own layer. The Free Transform Tool (CTRL+T) was used to add the bottom of this front leg and the spot Healing Brush was used to blend it all together. Topaz (see sidebar for website link) Impression 2 was used to blend some of the dark chain-linked fence shadows out and the spot Healing Brush was also used to remove them. Jai Johnson’s Oil Glaze preset (see video to create) was used and most of the jaguar was painted out on a layer mask. On a stamped layer (CTRL+ALT+SHIFT+E) Lucis Pro was opened and the Detail was set to 113. Then just parts of the jaguar were painted back in the mask to add more detail to the face. A Red Channel Luminosity Curves Adjustment Layer was added next. On another stamped layer, Nik Color Efex Pro was opened and the Pro Contrast filter with the Dynamic Contrast set to 41% and the Darken/Lighten Filter were applied. It took a bit of time to work out the problems in this image, but the results were worth it!…..Digital Lady Syd
The Road to Hana
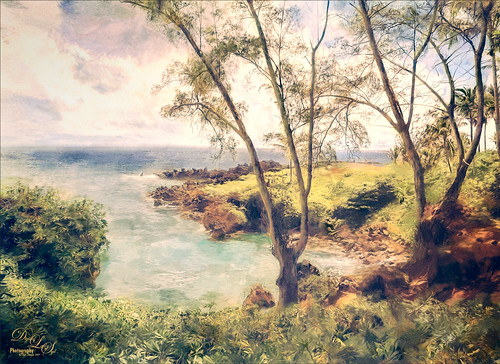
This Maui image of a little water inlet on the Hana Highway is another example of the poster look that was in my Getting That Poster Effect Fun Photoshop Blog. Used a similar workflow with Lucis Pro 6.0.9 (any sharpening filter would work), Topaz (see sidebar for website link) Impression 2 using one of my presets (I do not use the same preset for each image) – just have to use a little trial and error to find the right painting look. A layer mask was added and parts were painted out that did not look so good. The RGB luminosity layer and the brighten whites layer were also created. PS’s Poster Edges Filter was used with the same settings as my original blog. PS’s Stylized Filter using the same settings from the original blog was added. Nik Color Efex Pro 4 was opened and these filters were stacked: Glamour Glow, Reflector Efex, Film Efex Vintage using Film Type 14, and Cross Processing using Method B02 at 17% Strength – this really added to the painterly effect. On a New Layer and using my SJ Pastel Brush, some clean up and colors were added in parts of the image to create a more painterly look. A Red Channel Luminosity Curve was used to further even out the tone of the image. A Color Balance Adjustment Layer was used to get the exact warmth into the image. On a stamped layer (CTRL+ALT+SHIFT+E) Topaz (see sidebar for website link) Lens Effects Diffusion filter was opened and just a little diffusion and softness was added to the image to smooth some of the strokes. My favorite texture group from 2 Lil’ Owls (see sidebar for website link) Color Bokeh Grunge Set (these are .png files) number 3 was added to the image and set to Overlay blend mode. Last step involved taking another composite layer into Nik Viveza 2 (still my favorite plug-in ever and now it is free) and added a little vignette and lightened the focal point, which is the point at waters edge and the tree almost in the center. It did take a while to do this image, but I am always surprised at how good these poster effects come out! Each time I try it I feel I am getting a better result…..Digital Lady Syd
Castillo de San Marcos
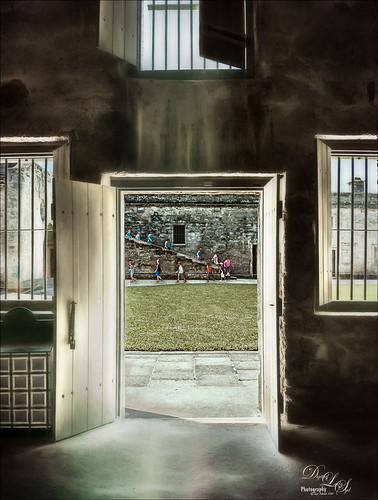
Loved how this image of the Castillo de San Marcos has such a soft feel inside the fort. The sharpness in the outside area where the kids was created using Lucis Pro 6.0.9 (no longer available, but I keep watching for everyone). The original image has the inside area looking much brighter. This was darkened down a little using Nik Viveza 2. Then to bring out the softening effect, Topaz (see sidebar for website link) Glow 2 and a preset called Room Glow by Blake Rudis was applied and set to Overlay blend mode. This preset was created using Glow 1 but works fine in Glow 2 and can be created by downloading the Topaz Labs Glow Webinar PDF file from Blake, who is a Photoshop and Topaz genius. In fact all 4 of the presets in this PDF are very useful in Glow. A Layer Mask was added to paint out the outside area in the door. On a stamped layer (CTRL+ALT+SHIFT+E) on top, Topaz Impression 2 was opened and the Fine Brush Scumble II preset was applied as is. To further add a little softness Topaz Lens Effects was opened and the Slight Diffusion preset was applied. Layer Masks were also added to these layers to keep the outside area tack sharp. Try out these filters for this soft effect…..Digital Lady Syd
A Surreal New York New York Hotel
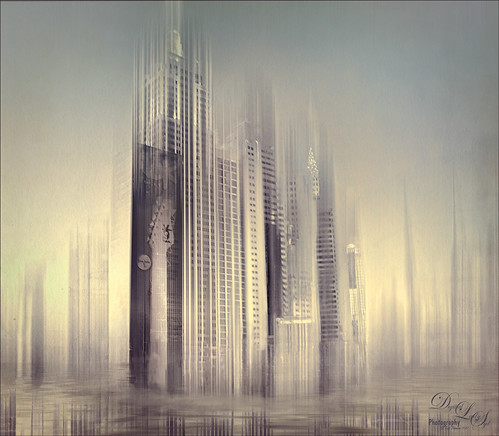
Not sure what possessed me to create this, but it was a lot of fun. This is not really a hard effect to achieve. Just made some basic Lightroom adjustments so my image had nice tones and detail. In Photoshop, added a little Lucis Pro (no longer available) to sharpen it just a little more – could have used Topaz (see sidebar for website link) Detail or Clarity to do this. Had to do quite a bit of clean up since there is there is a roller coaster running in front of the New York New York Hotel in Las Vegas. On a stamped layer (CTRL+ALT+SHIFT+E), added a pretty severe motion blur by going to Filter -> Blur -> Motion Bur and setting the Angle to -90 (vertical effect for this image) and the Distance to 687. Added a duplicate layer of the Lucis Pro layer on top of the blur layer and a Black Layer Mask – the buildings were lightly painted back to give some building effect but still left it really vague. Another stamped layer was used and the now free Nik Silver Efex Pro 2 was opened. Started with a preset and tweaked the sliders to get a pleasing effect. On a duplicate layer, the Flaming Pear Flood filter was added that gave a bit more of an eerie look – the lines in the bottom foreground came by selecting a Glue called spin light – thought it was an interesting effect. On another stamped layer used Topaz Texture Effects 2 using the Crisp Morning Run – did a lot of adjustments and used the Spot Mask a couple times, once on the Texture section and another in the Masking section. Added a Red Channel Luminosity Curve Adjustment Layer. On another stamped layer above used Nik Viveza 2 to add focus to the guitar on the building. Used a Selective Color Adjustment Layer to give that final color look to get the sort of soft abstract effect. This was a lot of fun to try something different……Digital Lady Syd
Magic Kingdom Snow
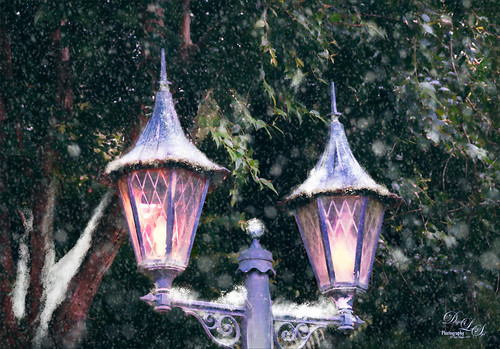
This image is of a pair of lanterns taken at the Magic Kingdom although they look like they are from Hogwarts and the Harry Potter movies. Most processing was done with Lucis Pro (which is no longer available), Topaz (see sidebar for website link) Glow 2 and Nik Viveza 2. Many painting snow layers as shown in my How to Paint in a Snow Storm blog. It is really fun to add snow into images to get a little different look……Digital Lady Syd
Tiger in Snooze Mode
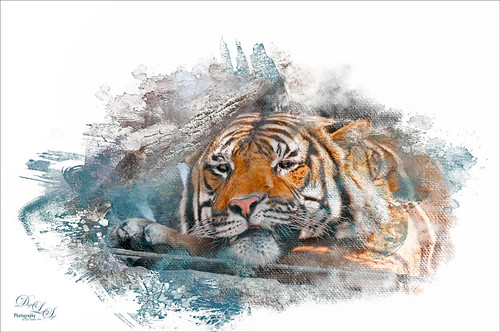
This Sumatran Tiger was trying to get a little snooze at the Jacksonville Zoo. What a cutie – guess he had to keep his eyes open a little just keep up with all the goings-on in his part of the zoo. Since he made an appearance in my 2016 Inexpensive Gifts for the Photoshop Lover on Your List Fun Photoshop Blog, I thought I would cover some of the things done to get this interesting effect. First the fencing in front of his face had to be removed and the very handy Spot Healing Brush worked wonders on this. A stamped layer (CTRL+ALT+SHIFT+E) was then placed on top. Lucis Pro 6.0.9 (no longer available) was applied. On another stamped layer, Topaz (see sidebar for website link) Lens Effects Reflector filter was used to even out only the parts of the face in the shadows. The eyes were brightened using an Exposure Adjustment Layer (see my How To Do a Quick Eye Sharpening In Photoshop blog.) All these tiger layers were grouped. Next Jai Johnson’s Unpredictable Collection Texture 25 was placed underneath this group. It was duplicated and the second one was set to Multiply blend mode at 82% layer opacity. Now, on the group on top, a black layer mask was added (CTRL+I in the mask to make it black). I just painted in white with a rough edged chalk brush the parts of the tiger I wanted to show up. A little of the free Nik Viveza 2 was added, and a canvas texture set to Soft Light blend mode at 42% layer opacity was placed on top. Love the effect of these textures by Jai…..Digital Lady Syd
Flowers Enjoying the Day
These cute little flowers are Crepe Jasmine, I believe, and are growing in my front yard. Not a whole lot post-processing on this image. Topaz (see sidebar for website link) Clarity was used to sharpen up the overall image. On a duplicate layer Lucis Pro (unfortunately no longer available) was set to Enhance (R161/G169/B67). Duplicated the layer again and applied Topaz Texture Effects’ Winter Wilderness preset. On yet another duplicated layer, Nik Viveza 2 (now free) was applied to darken the corners slightly and sharpen the focal point at the center of the flowers. Finally, a New Layer was opened on top. Used a soft round brush to paint with black at a very low opacity to reduce the brightness of the stems of the flowers and leaves. Applying the Lucis Pro plug-in gave the very well defined effect on the leaves and flowers. This image was a lot of fun to do!…..Digital Lady Syd


