
Standing Guard at the Hospital

This image was taken a while back of the Spanish Military Hospital Museum in St. Augustine, Florida. What I was trying to do was get an interesting texture on the building. This was done using one of my very favorite Photoshop plugins, Luminar 4 (see sidebar for website link). By following one of their fun videos on YouTube called Create an Antique Faded Look by Darlene Hildebrandt, the effect was created. The Essentials Color filter, Creative Matte Look filter, and the Professional Split Toning (Amount 50 and Shadows Hue 56 and Sat 60) were applied to get the antique effect. Then Lucis Pro 6.09 (which appears to be no long available unfortunately) was used to get really cool color wash look. Just a lot of fun. ….. Digital Lady Syd
Pretty as a Postcard
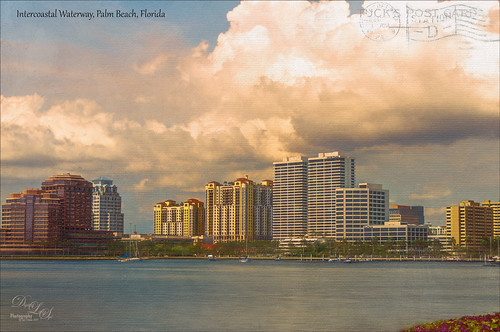
This is the Intracoastal Waterway (ICW) in Palm Beach, Florida. The skies were rather spectacular this day. Lucis Pro (now available for purchase again – see my Lucis Pro is Back!!!!! blog) was used on this image first. Then Photoshop’s Motion Blur Filter was opened and set to a Distance of 2000 pixels – once applied the far right icon on the layer was clicked and set to 63% opacity. A Selective Color Adjustment layer was applied to adjust the colors. On a stamped layer, Topaz Lens Effects (see sidebar for website link) Motion Blur was opened and 12.68 pixels was applied. Back in PS only the water was allowed to be visible in the layer mask so water looks smooth. The font Gabriola was used next. French Kiss (see sidebar for website link) Tableau Chateau was used to add texture to the image – this was done by clipping a Hue/Saturation Adjustment Layer to the image and setting the Saturation to -100. The texture was set to Hard Light at 15% layer opacity. Finally a Levels Adjustment Layer was also clipped to the texture to get the nice vintage postcard look. Nik Viveza 2 was added to add some emphasis to the buildings and a stamp from 2 Little Owls (see sidebar for website link) was added to further enhance the old look. I was love Palm Beach! …..Digital Lady Syd
King Bladud’s Pig
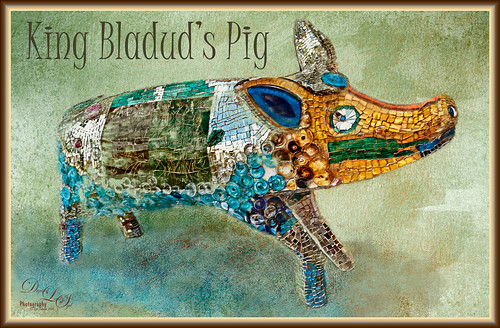
This little pig has an interesting story since the image was taken way back in 2008 when the Town of Bath in England was having a public art event to celebrate Bath’s origins and artists. King Bladud’s (cc863 BC) Pig (this is the pigs actual name and was created by Annette Martin) is one of 106 pigs that were on display all over the city (I only saw a few) and they were sold at auction to raise money for the benefit of Bath’s Two Tunnels Project.
The post-processing was minimal in Lightroom, just some Basic slider adjustments. In Photoshop, On1 Photo Raw Effects 2018 was used to sharpen the image (Dynamic Contrast filter, Sharpening filter and HDR Look filter – all just applied to the pig only with a mask). Lucis Pro filter was also used on further sharpen the pig. Next a texture by French Kiss (see sidebar for website link) called Color Wash Sage was added and a layer mask was used to paint the pig through the texture with a black brush. A New Layer was added and a shadow was painted in under the pig with a darker blue tone. Another texture by French Kiss called Redstrake was added and set to Color Burn blend mode at 65% Fill Opacity. Nik Viveza 2 was added to add a little vignetting. A text layer was added using a font called Juice ITC. Last step added one of my layer style frames (see my How to Create a Quick Layer Style Border or Frame blog). Wish I had taken more pics of these beautiful pigs!…..Digital Lady Syd
Merry Christmas from Digital Lady Syd!
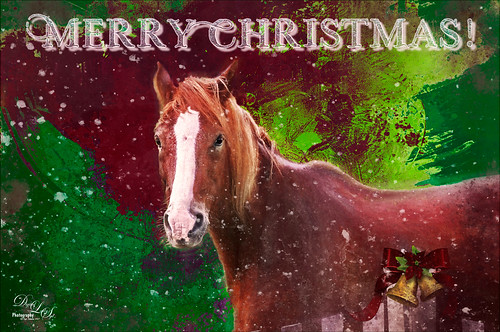
Wishing everyone a Merry Christmas here at Digital Lady Syd’s Tidbits Blog! This lovely horse image was taken in Belarus a while ago – for some reason I felt like adding some painterly Christmas effects to him. He definitely was checking me and my camera out. Normal LR changes and then in PS, Lucis Pro was used to sharpen the image. On a duplicate layer above, Topaz Studio was opened and a Topaz Impression preset called Chalk Smudge was applied. Next I did a selection of the horse. Underneath one of Jai Johnson’s Unpredictable PNG’s was added. A Hue/Saturation Adjustment Layer was used to create the Christmas colors. And under that, a solid blue-filled New Layer was added above the the background from keep white from showing through. On top a New Layer using Kyle’s Spatter Brush Beautiful Mess (comes with PS CC) was used in darkish red to create a subtle vignette. The eyes were sharpened with a Curves Adjustment Layer. A Black and White Adjustment Layer was set to Luminosity at 82% layer opacity. Texture Mate’s original starfield texture was added for the snow effect – set to Screen blend mode at 68%layer opacity. The Font is called Winter Holidays with a Bevel & Emboss, Outer Glow, and Drop Shadow Layer Styles added. That is about it. Hope everyone has a wonderful holiday season!…..Digital Lady Syd
Me and My Shadow
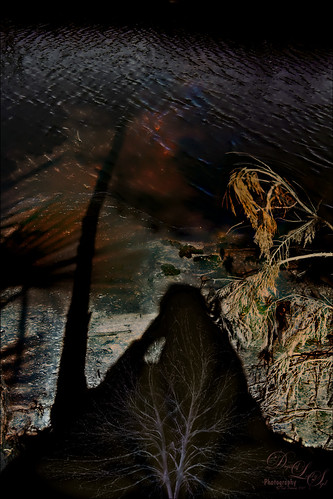
This image represents to me a contemplative mood – a connection with the Fall season and nature, and the nature of man with nature. It was a lot of fun to create. A tree from Pixelsquid was added into the shadow. Some of the colors are from using Lucis Pro. Topaz (see sidebar for website link) ReStyle’s Single Fawn was applied to the image. This image was taken into Luminar 2018 (see sidebar for website link) and the Adjustable Gradient Filter was added to the whole photo and the Sun Rays filter was added to just the foreground tree by using a layer mask. Loved how the tree turned out. PS Liquify filter was used to stretch the foreground tree where I wanted it. Some clean up layers and that was it. Love the whole concept of this image…..Digital Lady Syd
Just Hanging Out with His Buddies
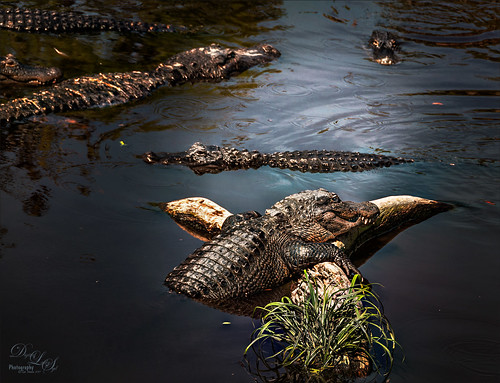
Just thought I would add this image of a bunch of alligators enjoying hanging out at The Rookery at St. Augustine Alligator Farm waiting for that egg that happens to fall out of a nest. Sad but true–sigh! Just my basic workflow here – some Lucis Pro, Camera Raw filter and Nik Viveza 2 to adjust the focus. Some Dodging and Burning, and Luminosity Curve and Black & White Adjustment Layers. Just a lot of fun here!…..Digital Lady Syd
Palm Frond
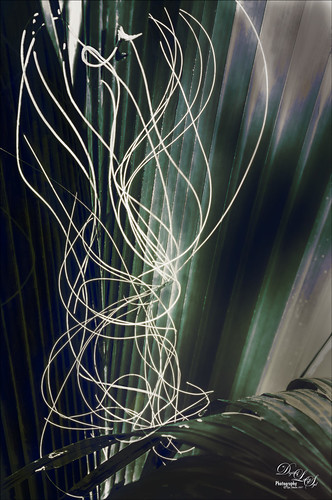
This rather abstract-looking palm frond was taken at the Ormond Beach Memorial Art Museum and Gardens. I was unable to figure out what the actual string-like material is – whether it is part of the palm or some type of Spanish Moss. Lucis Pro was used to sharpen the image. Topaz (see sidebar for website link) ReStyle’s Blue Shades preset was applied to the image. Next on a New Layer the String was selected and an Outer Glow layer style was added to emphasize it. A Levels Adjustment Layer was added and a Red Channel Luminosity Curves Adjustment Layer was applied. Nik Viveza 2 was applied on a stamped layer and then Matt K’s Vignette was applied. (See my Fun Photoshop How to Create a Subtle Vignette blog.) I am going to go back and see if I can find out more about this particular type of palm. ….. Digital Lady Syd
An Interesting Pink Flower
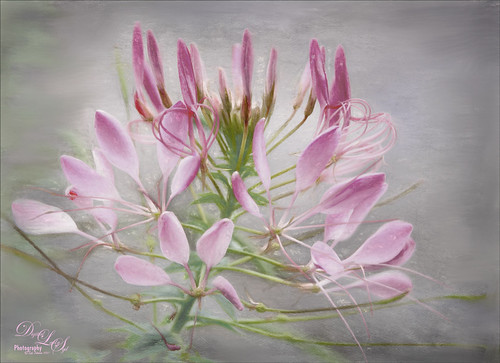
This image is of an interesting pink flower that was growing in the countryside of Belarus. Update: Someone on my Flickr account told me it is a Cleome Flower native to South America. The original image is beautiful, but this time I decided to add some new filter effects to get a totally different look. Lucis Pro (no longer available) was used to sharpen the actual petals, a Mixer brush by David Belliveau of Paintable was used to smooth the background and remove distracting items (this is the best brush for smoothing large areas and it can downloaded at the link), 2 Lil’ Owls’s Color Bokeh Grunge Set Texture 2 (see sidebar for website link) was applied and set to Luminosity blend mode, the free Nik Viveza 2 plug-in was used to adjust the focal point, a darken/lighten layer was applied to dodge and burn some of the edges, and finally Topaz (see sidebar for website link) was applied using the Charcoal I Slight Color preset (only adjusted the Color Magenta, Green and Orange Lightness sliders). On a New Layer did a final clean up with the same Mixer on the background. I really like the different result from the original…..Digital Lady Syd
Bamboo Trees
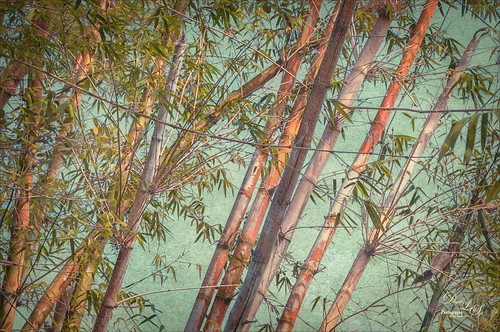
These beautiful trees are part of the Ormond Beach Memorial Art Museum and Gardens here in Florida. The blue sky was a perfect match for the colors in the tree trunks. I really wanted an oriental feel to the image. The first step was working on the RAW file in Lightroom. A free preset obtained from Allen Mowrery called Allen’s Vintage Retro achieved a bit of a sketch feel to the image and really softened the image. In Photoshop Lucis Pro (unfortunately no longer available) was applied using both the Enhance Detail and Smooth Detail sliders on all three channels to get a slight painterly effect in the image. Then Levels, Color Balance, and Selective Color Adjustment Layers were applied. On a stamped layer, Topaz Texture Effects 2 was opened and this is were the bluish texture became more obvious on the background. The texture used is one of the Topaz pinkish textures with darker edges. (Settings used: In Texture Section, selected texture that is a pinkish color with darken edges (in my All, 6th row down and first column), Size 1.00 and Rotation 0 – Keep Aspect Ration; Brightness -0.43, Contrast -0.14, Detail 0.79, Saturation -0.49, Color Strength 0; Opacity 0.33 set to Normal blend mode; and Enabled Masking and set the Color tab to Hue 0.12 and Range 0.09, which blacked out most of the trees and leaves leaving the white sky for the area the texture would be applied. Next Vignette section Strength 0.40, Size 0.70, Transition 0.53, Roundness 0.61, Color Black and center in middle, Opacity 0.90 set to Normal. Basic Adjustments Brightness -0.08, Shadow 0.11, Highlight 0.12, Clarity 0.24, Saturation -0.12, Temp -0.10, Tint 0, Opacity 0.43 set to Soft Light. Overall Opacity set to 0.62 and Luminosity blend mode.) My regular workflow was done next with a Black and White Adjustment Layer set to Luminosity blend mode, Nik Viveza 2 to emphasize the focal point, and a Red Channel Luminosity Curves Adjustment Layer. (Search on my Fun Photoshop Blog for info on these techniques.) The last step involved adding a Layer Style for a little Impasto texture effect on the tree bark. Used John Derry’s Impasto Smooth Light layer style and Grut’s IO (Impasto Oil) Gypsum Slate brush to paint in some of the tree trunks on a New Layer with a Fill set to 0. In areas that still needed a little texture, used the same brush on a New Layer just sampling nearby colors. Grut’s Impasto Oil brushes are great for just adding a bit of texture and depth here and there without going to the trouble of using a layer style. This was a lot of fun to do and I like the oriental color palette which bamboo always reminds of using……Digital Lady Syd


