Spotlight on the Pink Spica!

Just another example of the wonderful Camera Raw sliders now updated with Adobe Photoshop CS6 and Lightroom 4. This beautiful pink spica was taken at the Hawaii Botanical Tropical Garden and was first processed in Lightroom 4 by following Scott Kelby’s workflow in my How to Use Adobe Camera Raw (ACR) or Lightroom 4 Quickly blog. The White Balance was left as shot, Exposure set to -0.10, Contrast +24, Highlights -100, Shadows +100, Whites +10, Black -6, and no Clarity or Vibrance were used. The Green slider was set to -30 in the HSL Saturation section to reduce the color just a little. Noise reduction Luminance was set to 22, the Lens Correction profile was set to my camera lens, and in Effects a Highlight Priority Style Post-Crop Vignetting Amount set to -41.
In Photoshop a lot of clean up was done on the leaves – they had spots everywhere but the Spot Healing Brush worked wonders on most of it – just set to Content Aware in the Options Bar and swipe away. Scott’s Highlight Effect was applied to spotlight the flower (duplicate the layer and set it to Multiply blend mode, then add a layer mask and paint back in your object with a big soft black brush). Topaz (see sidebar for website link) Simplify 4’s Watercolor II preset was applied to soften the flower a little. A black layer mask was added and the flower was painted back with a low opacity brush in white to give just a hint of the painterly look. My Thin Double Edge Frame layer style was applied with colors sampled from the image. Very quick and very easy. Love the final look…..Digital Lady Syd
Digital Lady Syd Related Blogs:
Spotlight Effect With the New Subtract Blend Mode
A Little OnOne Perfect Effects Vintage Look

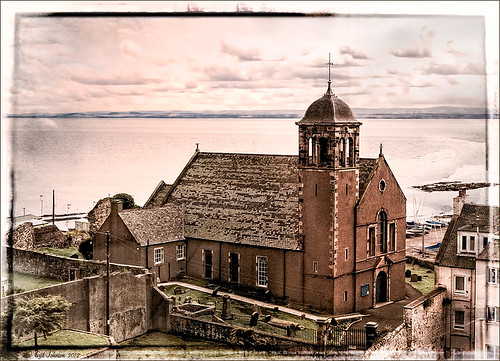
This beautiful Scottish Church was taken from a train going from Edinburgh to St. Andrews. This is a wonderful way to capture some of the countryside. I am surprised how sharp this image was since the train was moving – my settings using a 18-200mm Nikon lens were F/13, 1/200 sec, ISO 400 using a 45 mm lens. For post-processing, the first thing done was to create three Virtual Copies in Lightroom and set them at different exposure settings – one to about -2, one using the original, and one set to +1. This is a way to get an HDR look using a single image. The first two where then taken individually into Topaz DeNoise 5 (see sidebar for website link) and adjusted for noise issues. The +1 just used a little adjustment in Lightroom since the over-exposed image did not have a lot of noise. All three images were then selected in Lightroom and right-clicked to get menu – Open In -> Merge to HDR in Photoshop. That is how the bottom layer was created. Next by applying OnOne Perfect Effects (see sidebar for website link), the image took on a great look. This plug-in can do interesting things to images – usually when I just can’t put my finger on what I need for a photo, Perfect Effects has a solution. This image uses these filters presets stacked: Black and White->Warm Gray with colors swapped in Effects Options, Detail->Texture Booster, and Borders->Russell with Scale set to 4 in Effect Options. Back in Photoshop Nik’s Viveza 2 was applied to add a little soft color in the sky, sharpen the cupola, and add a little brightness to the front of the church. Then Topaz DeNoise 5 was applied one more time to get rid of some noise created by the plug-in application – this time it was targeted to the sky and water using an Overall Strength setting of .11, and for the lighter areas, Adjust Highlights set to .28. Recover Detail was set to .30 and Reduced Blur to .13. This sounds like it was a lot of effort, but it really was very quick to apply. The hardest part was adjusting the noise in the three virtual copies in Lightroom. …..Digital Lady Syd
Digital Lady Syd Related Blogs:
Can a Pseudo HDR Image be as Good as the Real Thing? (Part One)
Can a Pseudo HDR Image be as Good as the Real Thing? (Part Two)
Lightroom 4’s Graduated Filter – Check it Out for Landscapes!

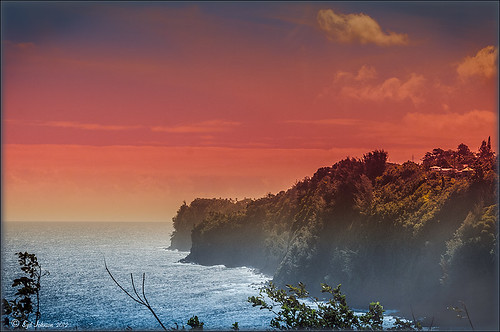
I have never used Lightroom’s Graduated Filter much as I usually do that kind of adjustment in Photoshop with the Gradient Tool on a mask. Recently I came upon a very interesting blog/videos, Adobe Photoshop Lightroom 4’s Graduated Filter Controls by David Marx, that discussed how much improved the Graduated Filter is and how to use it get some great landscape effects.
The image above is on the way to Hilo from Waipi’o Valley and shot through a car window???? Still thought it would be a good opportunity to see what I could do with it using this technique since the valley and water were so pretty and the clouds in the sky were a nice addition. This image was first tweaked in Lightroom globally, then 5 graduated filters were added, four for the sky colors and one for the water color coming up from below. I used the Color Wash technique on all four sky filters created, making some quite small to give a nice sunrise feel to the image. Finally it was taken into Photoshop where a layer using BBs Fogs and Mists Brushes were used to create an early morning foggy feel was added (and to cover up some uneven lighting on the valley walls) and for some noise reduction using Imagenomics Noiseware‘s Default setting (you could use Lightroom Noise Removal for a pretty nice result). Here is a small image of the original so you can see what the Camera Raw file looked like:

Once again, a pretty bad image was turned into something that really reminds me of my trip to the Big Island, even though it is not exactly as I shot it???? If you own Lightroom 4, definitely take a look at these very easy to follow videos – the results are quite amazing…..Digital Lady Syd
Creating a JPG From a Video in Lightroom 4

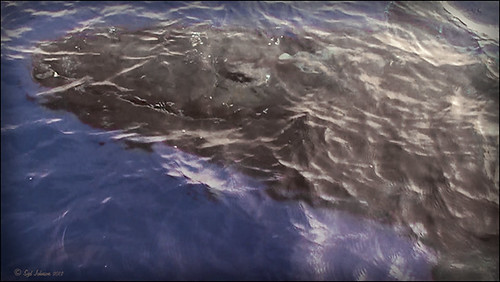
This whale came to visit the catamaran while I was whale watching (through Hawaii Ocean Sports) – I guess this is unheard of that a whale would come so close to the boat and hang out for 5 minutes like this guy did. Everybody on the boat including the boat personnel were going crazy as the whale would swim under the boat to the opposite side and then swim back under to the other side. He was so close you could almost touch him! He came up at the back of the boat and then turned around and raised his tail at the boat as he left. What a trip! Using my Sony Handycam HDR-XR500V video camera, I was able to get some nice video of the whale although it was hard to be at the right place at the right time with so many people around. What is really nice is that now Lightroom 4 has a limited video editing function. You can actually scrub through your video and select a frame that can be saved as a JPEG (click to open the square to the right of the video timeline and select Capture Frame) which can then be edited in both Lightroom and Photoshop. That is how I got this image.
The Exposure, Highlights, Shadows, and Blacks sliders all had to be reduced and the Contrast was increased to get a good image of his face. In Photoshop Topaz Adjust was opened using the Film Collection Effect Vintage Grunge IV preset. The Detail Strength was lessened a bit, the Warmth slider moved warmer a little, Grain and Vignette turned off, and Transparency slider set to o.25. Back in Photoshop a Hue Saturation Adjustment Layer was added to slightly desaturate and change the Hue in the Red tones on the whale. A Curves Adjustment Layer was added to improve contrast. Not bad for a fairly low resolution image. If you like Lightroom and have some video clips, you should take a look and see if you can use some of the frames you captured to add to your photo collection…..Digital Lady Syd


