
St. Giles Cathedral
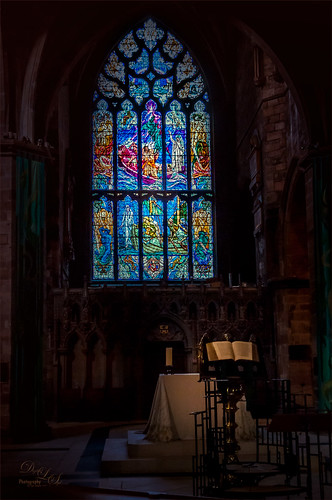
This beautiful stained glass image was taken at St. Giles Cathedral in Edinburgh, Scotland. In Lightroom used Serge Ramelli’s Bad Weather 9 preset as a starting point and added my own highlights and gradients. Not much was done in Photoshop – just some clean up, Nik Viveza 2 where 4 control points were placed in image with 2 on the glass and 1 on the Bible. A little noiseware was used on the image and a Gradient Fill Layer to darken the top slightly. That was it. There really is a lot of detail in the shot if seen at a larger size……Digital Lady Syd
Unexpected Humor in an Image

I was so busy trying to shoot these beautiful McCaws in sharp detail on my camera (Blue Horizons Show at SeaWorld-Orlando) that I did not notice what else I was shooting. What a surprise! Although I must say I did a pretty good job of catching the birds while they were zipping by pretty fast. The birds even look like they are laughing!
After basic processing in Lightroom, I decided the image needed a soft background feel as it was really busy and the birds were getting lost in the background. So I went back to one of my all time favorite filters, Nik Color Efex Pro 4‘s Film Efex-Vintage, to get the look I liked. First the Darken/Lighten Center filter and Brilliance/Warmth filter were applied – both of these filters I use a lot as they always give nice results. But one of my very favorites is the Film Efex-Vintage filter – there are so many options with this one filter that it is amazing. This time Film Type 11 was chosen with the vignette turned off. It turned this image into these beautiful brown tones. Clean up, a Curves Adjustment Layer to add just a little contrast, a Photo Adjustment Layer set to Cooling Filter 80 at 43% density (applied to just the birds by filling the layer to black and painting back in the birds in white), Noiseware‘s Default preset, and a soft painted layer was used to slightly soften the trapeze artist. My Soft Sparkle Overlay Frame was added with a Color Fill Adjustment Layer clipped to it to change the color to a dark brown. To see other results of using the Film Efex-Vintage filter, check out some of my older blog links below……Digital Lady Syd
Digital Lady Syd Related Blogs:
The New Film Efex-Vintage Filter From NIK CEP 4
Loving SeaWorld!
Hawaiian Bliss!
Nik Color Efex Pro 4 Just Does It Right!
Lightner Museum’s Unusual Chandelier

Sometimes you just like an image and that is what this is. The shot was taken at the Lightner Museum in St. Augustine, Florida and I am having trouble finding any information about the chandelier. Very simple processing using Nik Color Efex Pro 4 filters stacking Tonal Contrast, Darken/Lighten Center, Detail Extractor, and Vignette. Next Nik Viveza 2 was applied to bring out the color a little more on the green grapes and a couple of the glass flowers. Imagenomics Noiseware was applied at Full Noise Reduction preset as the image was quite noisy due to the high 1250 ISO value needed to shoot in the museum. The last step added the OnOne PhotoFrame Vincent Versace photo wide frame (see sidebar for website link). I got a chance to play around with some of my favorite plug-ins!…..Digital Lady Syd
Digital Lady Syd Related Blogs:
Little Girl Statue at Lightner Museum – contains all my other Lightner links at bottom of blog
Lightroom 4’s Graduated Filter – Check it Out for Landscapes!

I have never used Lightroom’s Graduated Filter much as I usually do that kind of adjustment in Photoshop with the Gradient Tool on a mask. Recently I came upon a very interesting blog/videos, Adobe Photoshop Lightroom 4’s Graduated Filter Controls by David Marx, that discussed how much improved the Graduated Filter is and how to use it get some great landscape effects.
The image above is on the way to Hilo from Waipi’o Valley and shot through a car window???? Still thought it would be a good opportunity to see what I could do with it using this technique since the valley and water were so pretty and the clouds in the sky were a nice addition. This image was first tweaked in Lightroom globally, then 5 graduated filters were added, four for the sky colors and one for the water color coming up from below. I used the Color Wash technique on all four sky filters created, making some quite small to give a nice sunrise feel to the image. Finally it was taken into Photoshop where a layer using BBs Fogs and Mists Brushes were used to create an early morning foggy feel was added (and to cover up some uneven lighting on the valley walls) and for some noise reduction using Imagenomics Noiseware‘s Default setting (you could use Lightroom Noise Removal for a pretty nice result). Here is a small image of the original so you can see what the Camera Raw file looked like:

Once again, a pretty bad image was turned into something that really reminds me of my trip to the Big Island, even though it is not exactly as I shot it???? If you own Lightroom 4, definitely take a look at these very easy to follow videos – the results are quite amazing…..Digital Lady Syd
32-Bit HDR Using Lightroom and CS6

This is a beautiful little town called Honomu is on the road to Akaka Falls on the Hilo side of the Big Island. I love how this image turned out – the original tonemapped file was totally flat. This image was processed as a 32-bit HDR image in Photoshop CS6’s Merge to HDR program, then brought back into Lightroom 4.1 as a TIFF file where it was adjusted using mainly the Basic sliders, then edited back in Photoshop CS6 as a 16-bit PSD file. From there, Nik’s Color Efex Pro 4‘s was opened and these filters stacked: Detail Extractor at 68%, Graduated Filters using Blue No.1 as the sky was an ugly gray color, and finally the Film Efex Vintage set to Film Type 21. Next Nik’s Viveza 2 was added and that is what really made the difference in this image – the detail was popped in the signage areas but smoothed in the sky. Imagenomics Noiseware was added to smooth out the roughness of the whole image. The frame I used is called SJ Thin Double Edge Frame and can be downloaded at my Tidbits Blog DLS Free Layer Style Frames. The colors for frame were sampled from the image. Once again an image that did not have too much going for it turned out really nice……Digital Lady Syd
Digital Lady Syd Related Blogs:
New Lightroom and Photoshop 32-bit Processing Capability
Where Am I?

I have not posted a Where Am I in a while, so here goes. This weekend while watching the Scottish Open at Castle Stuart Golf Links, I started reminiscing about my trip to Scotland a few years ago and what a beautiful county it is. This particular day it was raining, rather typical late summer weather in this region. I am standing at the top of the beautiful Urquhart Castle which overlooks Loch Ness. We were on a tour that arrived by boat and it was beautiful in spite of the ugly weather. This is a great castle to visit and explore if you get in this part of the world.
This image was processed in Lightroom on two different virtual copies – one to bring the sky in nicely, and one for the castle and surrounding grounds. The copies were selected and opened in Photoshop by going to Edit In -> Open as Layers in Photoshop so they were in one file. The castle layer was placed on the bottom and the sky layer on top. Added a layer mask to the sky layer and used a Black to Transparent linear gradient so only the sky still showed from the top layer. A composite was made and in Nik’s Color Efex Pro 4, the Detail Extractor filter was applied using the Detail slider at 42% and (-) control points applied to the sky and water, a Darken/Lighten Center filter was applied, and a dark Vignette filter. There was quite a bit of noise in the sky so Imagenomics Noiseware was applied at Stronger Luma Noise (I recently bought this plug-in as I found it to be very good.) The Sharpen Tool was used to bring back a little detail in the hillside foliage and the people after applying the noiseware – very subtle change here. A Curves Adjustment Layer was added and Nik’s Viveza 2 – just added that pop in parts of the castle stonework with layer set to 63%.
The results came out very nice and how I remember it – to be honest I think it really was a lot drearier than it appears here but this is how I want to remember it!…..Digital Lady Syd
Digital Lady Syd Related Blogs:
Can a Pseudo HDR Image be as Good as the Real Thing? (Part Two)


