
Infinity Light Fun!

The beautiful colored “Infinity Lights” were on display at the local St. Augustine Outlet Mall in Florida. You can actually check them out at Facebook@Happy Pappys Glowing Balls. They are quite striking at night!
This was really easy to process – actually took the image with my little point and shoot camera. Just did regular adjustments in Lightroom before going into Photoshop. First Topaz (see sidebar for website link) Detail 3 was used – applied Overall Detail Medium II with a Lt. Blue Sky Tone filter selected. (Did you know that Detail now has filters for each section? If you click on the upper right corner of each section, there is a drop-down with all kinds of presets for all the sections. For example, the Tone section has presets for Lt. Blue Sky, Lt. Contrast, Lt. Foliage, Dk. Bl. Sky, Dk. Foliage, Brighter I and II, Darker I and II, Med Contrast, High Contrast, and Skin Brightening I and II. This was added to their recent 3.1 upgrade – definitely download this if you have the plug-in and did not do this.) A New Layer was created and a stop sign removed in the background. A composite of the image was created (CTRL+ALT+SHIFT+E) was placed on top and a Gaussian Blur filter set to a Radius of 22 applied. A black layer mask was added and the background area was painted in white to keep the blur in those areas. The last step involved adding OnOne’s (see sidebar for website link) Perfect Effects 4 PhotoTone Cooler preset was applied, which added a little bit of a bluish tone to the total image. This preset was part of free download from OnOne if you own Perfect Effects 4 – they are from their original PhotoTunes program from many years ago. The last step involved adding my free SJ Thin Double Edged Frame with colors from image. I wish I had a good place to put a few of these really interesting lights. They are so pretty!…..Digital Lady Syd
Fake Panoramic Effect
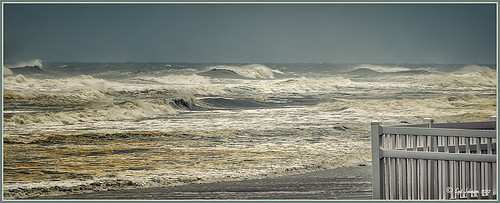 |
Taken the morning after Hurricane Sandy went past Ormond Beach in Florida, this image showed how strong the surf was and how gray the sky appeared even though the ferocious hurricane was not a direct hit. We were so fortunate that the storm did not hit Florida directly.
What I really like about the shot is how sharp the texture in the waves and beach surf is. To get this effect, the image was first processed in Lightroom where just basic slider corrections were made and a custom crop was created. I usually do not do this, but this image seemed to scream panorama to me as the sky was so plain and the main subject is the large expanse of water. Since everything was moving, a several shot panorama was out of the question, so it had to be faked. Click on image to see Lightroom version – it is very flat, not at all how I remember it. In Nik Color Efex Pro 4, a Cross Processing filter using Method C04 at 27% strength, Detail Extractor filter set to Normal (Detail Extractor at 64%, Contrast at 31%, and Saturation at16%) with 6 Control Points to restrict the filter effect to the sky area, and a Lens Vignette filter (Amount -9, toward Rectangle,Size 57% and Brightness -16%). In Nik Viveza 2 the Center was brightened. The Spot Healing Brush was used on a clean up layer, and Contrast was boosted with a Curves Adjustment Layer. The default preset in Imagenomics Noiseware was applied. When noiseware is applied, the image detail will usually get softer – therefore, in a white layer mask, I painted with a soft black brush the waves back so you can see the water mist detail. The last step was to apply my free SJ Thin Double Edge Frame layer style sampling colors from the image. Now I get the result I remember!…..Digital Lady Syd


