
Oahu Landscape
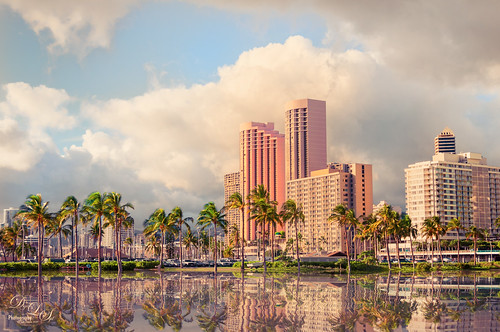
Had some fun with this image of some of the hotels and buildings along the beach of Waikiki. This image actually has a big pool of water in front with a large sandy beach and people swimming. Instead I added the Flaming Pear’s Flood Filter to create a beautiful reflection of the palm trees along the edge of the original water. A Channel Mixer Adjustment Layer was added to brighten up the colors – ran a free action by Sparklestock called Ultimate Vibrance. In a black layer mask the buildings and trees were painted back. On a stamped layer Nik Viveza 2 was applied to sharpen up the hotel fronts and add a subtle vignette around the edges. The last step involved going into the PS Camera Raw and applying a favorite preset from David duChemin’s older “Refining Your Vision in Adobe Photoshop Lightroom” book (all his books are great) named Classic India Split Tone (here are the very simple settings: use Split Toning section either in Lightroom or Camera Raw and set Highlights Hue to 50, Sat 60, Balance 0, Shadows Hue 266, and Sat 35). That was it. I loved the pinkish tones which this preset brings out…..Digital Lady Syd
Looking Through You!
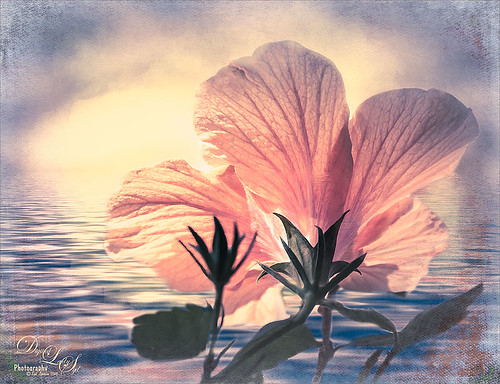
Took this image recently when the sun was shining so beautifully through the peach Hibiscus bloom. These are the most beautiful flowers but they only last a day. What a shame! This image was put together very simply. In Lightroom Trey Radcliff’s Sunday Alone preset was applied. Then in Photoshop, the Shake Reduction filter was applied – did not make much of a difference in this case. On a duplicate layer, Flaming Pear’s Flood preset was next used so that it covered up about 3/4 of the bloom. (Here are the settings used: Horizon 45, Offset 0, Perspective 57, Altitude 50, Waviness 78, Color dark blue #0b1b4e, Complexity 47, Brilliance 65, Blur 54, Size 0, Height 31, Undulation 40, and Glue Normal.) A layer mask was added and the bloom and leaves were painted back. On a New Layer above, Kyle’s Real Watercolor Big Rough Small Grain was painted onto the image to get a pretty soft sun glow. Used the same layer mask but this time painted back around the top of the blossom. On another New Layer, used a Pastel Brush set to 35 pixels, Multiply brush mode, 53% brush opacity, Pressure Sensitivity for Opacity icon on, and 100% Flow. By sampling in the blossom, I tried to smooth some of the shadow transition lines. Next 2 Lil” Owls (see sidebar for website link) Color Bokeh-Grunge Set 5 was placed on top in a layer mask, the center was cleared of the hazy feel to focus on the flower. The last step was a Curves Adjustment Layer. I really like the colors in this one…..Digital Lady Syd
Make an Ordinary Image Interesting

This image was one I did not think I would ever use. but once I was able to straighten it correctly in Lightroom with the Lens Correction Upright feature, it started looking pretty nice. So here is the Parliament building and the Thames River. The reason I love this image is the beautiful sky and the way it points to the building towers. After processing in Lightroom, a couple things really contributed to this interesting look. The Background layer was duplicated and then Nik’s HDR Pro 2 was opened (this was not an HDR image) and my favorite preset, Grannys Attic, was applied – no changes. Next the layer was duplicated and Nik’s Silver Efex Pro 2 was opened up in a Smart Object to save the settings. I am not sure which preset I used as a starting point but these are the settings I ended up with (Global Adjustments: Brightness 7%, Highlights -32%, Midtones 11%, Shadows 9%, and Dynamic Brightness 25%; Contrast 15%, Amplify Whites 0%, Amplify Blacks 0%, and Soft Contrast 8%; Structure 10%, Highlights -58%, Midtones 8%, Shadows 53%, and Fine Structure 62%; Selective Adjustments: 6 Control Points were added to add the color back in certain areas; Color Filter: Hue 43 degrees and Strength 114%; Film Types: Custom, Grain – Grain per pixel 500 and Soft to Hard center; Levels and Curves: Just a little contrast with curve lifted up; and Finishing Adjustments Toning was set to 3, Strength 59%, Silver Hue 215 degrees, Silver Toning 59%, Balance 57%, Paper Hue 50 degrees, and Paper Toning 22%. A clean up layer was created, but I just did not like the rough river look. So…. I decided to add Flaming Pear’s Flood Filter, but just to the water. (Here are the settings I used: Horizon 76, Offset 0, Perspective 35, Attitude 84, Waviness 6, Complexity 21, Brilliance 33, Blur 12, Size 12, Height 33, Undulation 40 and Glue Normal.) The building side was masked out so just the water was selected. The Layer was set to 84% opacity. The last step was to match the graininess to the Flood Filter water – Photoshop’s Add Noise set to 8 pixels, Gaussian Blur, and Monochromatic checked. Once again a layer mask was applied so just the water was affected. That was it – I really like what the flood filter did to the water. It added just a bit of the painterly look that the sky already contributed. Hope you enjoy!…..Digital Lady Syd
Digital Lady Syd Related Blogs:
Lightroom 5′s New Upright Adjustment Feature
Hyacinths Deep in Reflection
The Flood Look
Nik HDR Efex Pro Example
Hyacinths Deep in Reflection

Recently I posted a blog using this image called Take the Time to Experiment! where a Mirror Effect filter from The Plugin Galaxy was used. This time the Flood Filter from Flaming Pear was applied. I love this filter. It is the only one that gives a really realistic look to a water reflection. Before applying the filter, the canvas had to be increased to add the reflection under the image. (Here are the Flood filter settings used so you can see all the sliders that can be manipulated: Horizon 60, Offset 0, Perspective 68, Altitude 6, Waviness 17, Complexity 17, Brilliance 28, Blur 15, Size 0, Height 23, Undulation 46, and Glue Normal.) See my Fun Photoshop Blog The Flood Look for tips on how to apply this filter. Nik Color Efex Pro 4‘s Midnight, Polaroid Transfer, and Detail Extractor filters were applied to just the hyacinths to add back some color to the flowers, especially in the reflection. In Photoshop the layer was then set to 69% opacity. That was it. Really fun effect!…..Digital Lady Syd


