
NIK HDR Pro 2 and Topaz Clarity Together?

Just thought I would add a photo I took several years ago in the countryside of Belarus outside of Minsk. It was a good image to begin with so it was pretty hard to mess it up, but this time I tried something I had not done before. First I processed this image quite a bit in Lightroom – doing the basic sliders and then sharpening up the road and the foreground plants a little. Then once in Photoshop, I applied Nik’s HDR Pro 2 using the Deep 1 preset – no changes. I wondered how Topaz (see sidebar for website link) Clarity would stack up against the HDR program, so I duplicated the image and added Clarity. A preset I had created called Very Vivid Sharp was selected. (Settings if you want them are as follows: Clarity: Dynamics – Micro Contrast 0.84, Low Contrast 0.56, Medium Contrast -0.31, and High Contrast -0.09; Tone Level – all set to 0; and HSL Filter: Hue – no changes; Sat – Red 0.25, Orange 0.13, Yellow, Green, Aqua, Purple and Magenta all 0, Blue 0.06, and Overall 0.17; and Lum – Red -0.81, Orange -0.01, Yellow 0, Green -0.08, Aqua 0, Blue 0.23, Purple 0, Magenta 0.33, and Overall -0.12) Wow – it really popped the image! So now what to do, what to do?
I decided to move the Clarity layer on top and add a black layer mask. Then I selectively painted back areas that needed the extra boost that Clarity added. The results are quite spectacular I believe. Next time you get stuck, try applying a couple different filters to the original image – even ones that do not come together – and stack and mask them to get the best of both. The results can be quite incredible!…..Digital Lady Syd
Digital Lady Syd Related Blogs:
More Clarity on Topaz Clarity
Digital Lady Syd Reviews Topaz Clarity
Digital Lady Syd Reviews Nik HDR Efex Pro 2
Christmas Wreaths at SeaWorld

For this wonderful holiday, thought I would show this pretty image of wreaths from SeaWorld Orlando. Just a little basic processing in Lightroom before taking the image into Photoshop. Topaz (see sidebar for website link) Adjust 5’s High Key preset was applied with the Overall Transparency set to .24. Next Topaz Detail 3 was applied using the HDR Enhancement II preset. French Kiss’s Artiste Chamante texture was applied and set to Overlay at 100% opacity. My free Snow1 Overlay was next applied and set to 75% opacity. French Kiss’s Glorious Grunge Edging Overlay was applied next and a Solid Color Adjustment Layer set to a light pink was added. Since the edging did not seem to show up real well, it was duplicated along with the Adjustment Layer. That was all that was done and I love the final effect – the umbrella really added to the shot. Hope all are having a wonderful week!…..Digital Lady Syd
Soft and Sharp Image at the Same Time!

Holoholkai Beach, a lava filled beach, on the Big Island in Hawaii. I just really like this image. It was a 3-shot HDR image processed in Photoshop CS6 Merge to HDR. This was done before the Lightroom upgrade to allow 32-bit processed Tiff images for processing. This image actually has 13 control points in my favorite plug-in ever, Nik’s Viveza 2, that sharpened some of the Lava rock and smoothed out the rough water to lead the eye through the image. Next Nik’s Color Efex Pro 4 was used stacking Film Efex: Nostalgic filter using Film Type 4, Brilliance and Warmth using 34% warmth to warm up the image, and Glamour Glow which gives the image that soft look – a control point was placed at the focus point of the image to keep it sharp in that area. A Curves Adjustment Layer was used to for contrast and my Thin Layer Frame was applied (see DLS Free Layer Style Frames). Love the final result!…..Digital Lady Syd
Little Green Frog’s Makeover Using Nik’s Color Efex Pro 4!

This little guy was hiding between a couple Queen Emma Lily leaves during a rather heavy rainstorm. Had to get his picture! He is a Green Treefrog and is one of the reasons I don’t get a good night’s sleep this time of year, but his coloring is beautiful!
I tried several different effects before settling on a recipe of Nik’s Color Efex Pro 4 filters. These filters were stacked as follows: Detail Extractor set to an Overall Opacity of 50%; Midnight using Neutral Color Set, the Blur slider reduced to 8%, and Overall Opacity of the filter set to 80%; Vignette Lens centered on frog and Overall Opacity set to 53%; and Image Borders – just a plain Type 13. This is a reminder that you don’t have to use the filter effect at 100% – just open up the Control Points panel at bottom of each filter panel and an Opacity slider appears that can be adjusted for the amount you want. Back in Photoshop, I used the LAB Sharpening technique to sharpen up just his body a little (see my blog Unsharp Mask Filter in LAB Mode). A Curves Adjustment Layer was added to increase contrast just a little and that was it. He has no idea how handsome he is!…..Digital Lady Syd
Digital Lady Syd Related Blogs:
NIK Color Efex Pro 4 – Digital Lady Syd’s Review!
Pseudo HDR Using NIK Color Efex Pro 4
White Daisies! Using Color Efex Pro Midnight Filter
Nik Color Efex Pro 4 Just Does It Right!
Topaz Adjust’s French Countryside Preset – Beautiful!
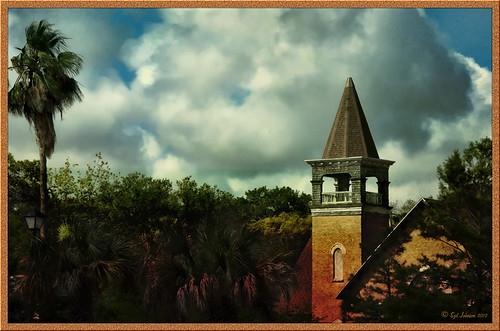 |
Thought I would do another Before and After where I show what one of my favorite presets in Topaz Adjust 5 (see sidebar for website link) looks like when applied. This image was taken in full light and I really took the image as a test shot before visiting some of the wonderful historic sites in St. Augustine, Florida. I really love steeples and cupolas on buildings. I had a hard time deciding what to do with it – it was a hand-held three HDR image. I processed it in Photoshop’s Merge to HDR Pro, only checking the Remove ghosts box before exiting to Photoshop (hover over image to see the tone-mapped image). Some image clean up was done, and two curves adjustment layers, one for contrast and one for color tone, were added since the image was not processed in Lightroom or Camera Raw. After much experimentation, I finally settled on using Topaz Adjust 5 and the French Countryside preset. It seems to soften the image just enough, yet retains some detail in the image – the trick is to adjust the Detail tab’s Threshold slider to bring back some of the details. Then I added Caleb Kimbrough Summer 4 Texture – one of my favorite textures to add the red and green tones into the image for that warm feel. (Also check out his site for many other wonderful textures.) The image took on a totally different feel. Try this preset if you have Adjust…..Digital Lady Syd
Digital Lady Syd Related Blogs:
Why I Love Topaz Adjust!
Topaz Adjust 5 Is Here! First Look!
Making An Ordinary Image Your Own
Nik Color Efex Pro 4 Just Does It Right!

Loved the beautiful old puppets on display in one of the walkways at the Hilton Waikoloa Village on the Big Island in Hawaii. It seemed like a perfect time to once again add the Nik Color Efex Pro 4’s new Film Efex – Vintage filter. The Colorize Filter, Midnight Filter, and Image Border were then stacked on top. Finally a little Nik Viveza 2 to sharpen the elephant a bit and that was it! Love the results!…..Digital Lady Syd
Digital Lady Syd Related Blogs:
The New Film Efex-Vintage Filter From NIK CEP 4
Beautiful Daisies with Film Efex: Vintage in Nik Color Efex Pro 4
Unsharp Mask Filter In LAB Mode
(Here are my settings for the filters: Film Efex-Vintage – Saturation 10%, Warmth 79, Vignette 63, Brightness -2, Grains per pixel 500, Film Strength 80%, and Film Type 13; Colorize – Method 6, Color R143G209B219, Strength 5%; Midnight – Color Set Neutral, Blur 0, Contrast 30, Brightness 60, Color 57, Shadows 20, and Overall 78%; and Image Border – Type 3, Size 60%, and Spread 98%.)
Beautiful Soft Flowers

Just loved the pink hyacinths I bought – hope they will come back next year! This image was taken with my Micro Nikkor 60 mm f/2.8 lens at f/9.5. Used Mike Moats workflow (see info on this in related blogs below) with Color Efex Pro 4 (stacking Tonal Contrast, Darken/Lighten Center, and Vignette filters) added first and then Viveza 2 to make the details sharp. OnOne PhotoFrame napp_frame_12 (see website link in sidebar) was added. Final result – beautiful!…..Digital Lady Syd
Digital Lady Syd Related Blogs:
Using NIK’s Color Efex Pro 4 and Viveza Together
Nik’s Viveza 2 Plug-In – A Hidden Gem!
The Macro Shot
Topaz Simplify and Topaz Detail Together

Recently I watched a video, this time for Topaz plug-ins (see sidebar for Topaz website and more blog links below), and learned a couple new things I thought I would share. If you have read my blogs before you know that I am a big fan of Topaz products – they may not be the most sophisticated, but they do some very cool effects the other major companies can’t achieve. Scott Stulberg did a lengthy video called “Memorable Travel and Stock Photography” where he covers Topaz Adjust, Detail and Simplify. I tried to incorporate a few of these tips in this image of sun-lighted grass growing on the road to Waipi’o Valley on the Big Island in Hawaii. Gosh it is hard to take a bad picture in Hawaii!
To begin with, Topaz Simplify was used. Scott suggested this plug-in is great to use on a shot that is a bit soft from a gentle breeze or a not-so-great lens – this effect can save an image and turn it into something very nice. There are two color space choices – RGB (more vivid colors) or YCbCr color space (more muted colors). This image used the YCbCr color space. Scott mainly uses the BuzSim preset – the trick is to move the Simplify Size slider to the left from the default setting (0.33) and you will see the detail return but the color stays saturated. On this image the Simplify Size slider was set to 0.05, Details Boost slider set to 0.79 (default is 1.00), and Details Size set to 0.13 (default is 0.20). It is a very similar result to using Vibrance in Photoshop but Simplify has much better color saturation. In the Adjust section, the Saturation was toned down a bit to 0.96 (default 1.31) and Saturation Boost set to 1.00 (default 1.15). He is basically lowering or turning off all the artistic settings and leaving the saturation turned on. One small problem I seem to have with Topaz products is that sometimes I have trouble retrieving the settings when using a Smart Object layer, which is supposed to retrieve the plug-in settings used on the image. Therefore, create a preset and name it something that will remind you of the image if you liked the result.
Next Topaz Detail was used. Scott feels that this plug-in makes it appear you were using a better lens than you really were. Basically you want to move the Medium Detail slider, then the Small Detail and Large Detail sliders until you get a sharper feeling image. He does very little sharpening to his photos but uses Detail to do the sharpening – it is like using the Clarity slider in a realistic way. That is how the plug-in was used for this image.
The final touch I added was a Hue/Saturation slider boosting the yellow saturation up quite a bit. Then I filled the layer mask with black (CTRL+Backspace) and painted with a very low opacity soft brush in to give just a soft yellow tone. OnOne’s Dave Cross 14 frame (see sidebar for website link) was added using a color sampled from the shot.
Sometimes it feels like I harp on all these these plug-ins, but they really are fun to use and they can take your images to a new level…..Digital Lady Syd
Digital Lady Syd Related Posts:
Simplifier and Simplify Filters
Topaz Plug-Ins – Same Image Trying Each! – this blog has many of my Topaz blog links at the bottom if you would like more information on any Topaz products
Topaz B&W Effects vs. Nik’s Silver Efex Pro
I did a blog on my Fun Photoshop Blog called “Topaz B&W Effect Plug-in – A Real Winner!” that touched on some of the differences of Topaz’s new plug-in and the great black and white standard plug-in by Nik called Silver Efex Pro 2.0. I thought I would just mention a few other things I noticed that are definitely different about the two programs.
Below is one of my favorite images for trying out new effects (the original has some basic flaws so I can see if the product will correct it) and was taken from the London Eye. Topaz B&W Effects was applied (hover over or click on image to see the Nik version).
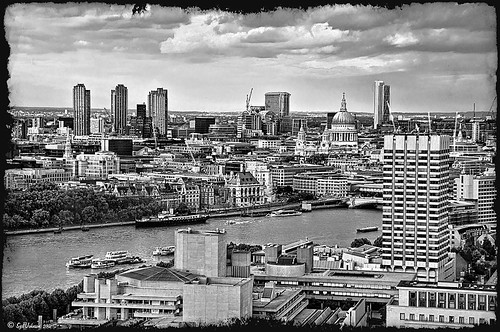 |
This is as close as I could get to making the two plug-ins look alike. The sky and some of the buildings’ contrast and detail are slightly different, but overall the results are pretty much the same. I am not sure which version I like best.
The image below I also used Topaz B&W Effects.

In this case, I could not duplicate the results in either NIK Silver Efex Pro 2.0 or Color Efex Pro 3.0. I liked the results and was surprised how nice the image turned out. By the way, I created for the Topaz plug-in a SJ-Cityscape preset for use in the Traditional Collection for both of the Topaz images – it can be downloaded here.
My final thought is to say that I think there is a place for both black and white plug-ins. Nik’s black and white plug-in is considered the best and I am not sure Topaz has created a better one, but it is very close. Topaz B&W Effects is definitely a great product since it does several things the other plug-in cannot do – and I really like that.
Well I hope you have fun (I sure am) trying out both of these excellent products. I plan on experimenting more with Topaz’s B&W Effects and will post more on it later……Digital Lady Syd
PS. Be sure to download the 30 day trial for Topaz B&W Effects – it is a fully functional trial to try out!


