Displacing an Overlay

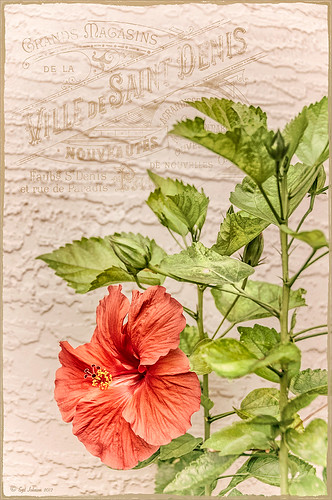
Since I have been posting a lot on overlays recently, I wanted to show how you can get a really authentic look to overlays by displacing them onto a textured background. In this image the lettering looks like it has been on the wall in the background all the time. This is pretty neat trick Photoshop can accomplish but I personally find it hard to do. Corey Barker, of The Photoshop Guys fame, gave a nice quick tutorial on his Planet Photoshop website called Graphic Texture. The process involves creating a displacement map psd file that is applied to the overlay layer. The steps are as follows:
1. Open image and make sure it is in 8 bit mode. To find out, go to Image -> Mode -> 8-bit. At this point I created a Stamped Composite layer of all the work I have done to have a clean layer to start this process on – go to CTRL+ALT+SHIFT+E.
2. Create duplicate copy of image by going to Image -> Duplicate Image and click OK. This will be your Displacement Map image. Convert this image to black and white image by going to Image -> Mode -> Grayscale. Save the Displacement Map as a psd on your desktop so you can get to it easily.
3. In your regular image, do corrections and add your overlay were you want it. Be sure to Rasterize (right click and select) your overlay if it is a Smart Object.
4. With overlay layer selected, go to Filter -> Distort -> Displace and in the dialog box, set Horizontal and Vertical to 5 for small displacement or 10 or larger – the image above used 5. You are then directed to find your grayscale image on your desktop. Once done, the overlay will distort by the amount of your settings.
5. CTRL+click on overlay layer thumbnail to select your graphic.
6. Highlight your layer underneath your overlay layer, and CTRL+J to copy to a New Layer. Turn off your old overlay layer. The lettering may totally disappear now. Desaturate the new displaced overlay layer by pressing CTRL+SHIFT+U. Go to Layer -> New Fill Layer -> Solid Color and check Use Previous Layer to Create Clipping Mask and OK. Change to any color – try sampling in your image when you hover your mouse over it. You do not need to turn on the original displaced lettering layer.
7. Try changing the layer blend modes and opacity of your overlay layer. Add a Levels Adjustment Layer to increase contrast if needed.
That is it. It is not that difficult but does take a little manipulation to get to work. If you do get it right though, a beautiful result will occur…..Digital Lady Syd.
Digital Lady Syd Related Blogs:
How to Create Personal Overlays for Your Images


