
Sunny Winter Trees
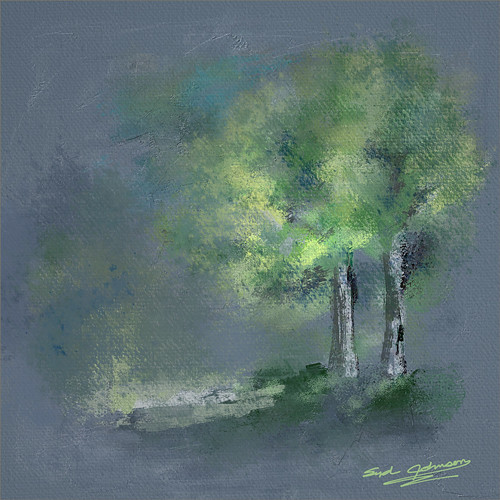
Just having some fun painting trees, my favorite thing to paint. This image was painted for starters in Corel Painter with a solid color light gray color for the background and using several different brushes. Then Photoshop was used and mainly Aaron Blaise’s Photoshop Canvas Texture brushes were used to add more leaves and color into the image. Then I decided I did not like the image but did not know why so I walked away for a couple of weeks. Today I decided to try again and decided the overall color was not what correct. A Hue/Saturation Adjustment Layer was used to change the background to a bluish color which I prefer. A Red Channel Adjustment Layer (see my How to Use a Red Channel to Create a Nice Blended Image Effect Fun Photoshop blog) was used to pop the original tree luminosity and it turned out much better. I am really enjoying getting back into Painter again, but I still have to have my PS brushes to help out!…..Digital Lady Syd
Thinking of Pink Tulips

This is an abstract I painted from some beautiful tulips that was taken with my phone. It was first painted in Corel Painter using just some very basic strokes. A Karen Sperling texture brush from back when Painter 11 was popular was used. Color were just block in. Then the image was taken into Photoshop and on a New Layer a sketch brush was used to define the form in a few places. A Curves Adjustment Layer was used to add a little contrast. A stamped layer was created and turned into a Smart Object. Nik Viveza 2 was opened and the pink flower in the middle was accentuated to further emphasize the focal point. The last step involved adding a New Layer on top and in white, add a few spatters using Kyle’s Real Watercolor-Spatter Mixed and set to a low layer opacity to add just a little texture in certain places. Very simple to do…..Digital Lady Syd
Beautiful Spring Flowers!

Just a little digital fun here with a phone image taken at the local Lowes Home and Garden Center. I recently purchased an inexpensive introductory Corel Painter video on Painting Portraits from Corel Master Karen Sperling. It comes with some of her great brushes – found one I really love! I had to reduce the size of the brushes since the image size was reduced to make Painter run smoother for me. I also added Topaz (see sidebar for website link) ReStyle’s Zambezi Zest preset as a source image before starting as I liked the color palette it gave me. Overall I was very pleased with her video and brushes, and it was fun to try out a new technique. This is a very easy way to get started learning Painter. Also I added afterwards in Photoshop the two Curve Adjustment Layers technique for dodging and burning that I blogged on recently. Loved the results!…..Digital Lady Syd
Digital Lady Syd Related Blogs:
How To Use Curves Adjustment Layers To Dodge and Burn an Image
Digital Lady Syd’s Rule No. 12: Try a New Tutorial and Experiment
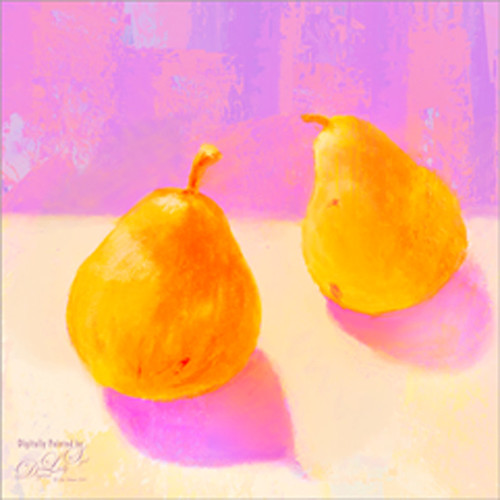
I have not done a Digital Lady Syd Rules (okay it s not Photoshop but the concept fits when doing Photoshop also) in a while. This image is just of some pears I sketched and painted in Corel Painter – I was informed that this is something first graders do but it was fun to relearn how to draw pears. I followed a tutorial posted at Peachpit Press by Corel Master Cher Threinen-Pendarvis called Blending and Feathering with Pastels in Painter-2015 – and once again I feel a bit like I was doing a Bob Ross painting. On the other hand, I learned a couple things while doing her tutorial: One is that I can sketch a little bit, and two is that I really like pastel brushes! So this was definitely worth my time to try. I finished up by using one of Melissa Gallo’s beautiful textures called August Copper, and I could not have done this tutorial justice if I had not taken her workshop and studio course on Painter. This was so much fun and I got a couple new brushes to play with at the same time!…..Digital Lady Syd
Now Just How Do These Shoes Lace Up?

I found this image called Ballerina by Equador on DeviantArt and thought I would practice painting in Corel Painter using it. The original image is very beautiful so it is hard to top it. Just followed several of the videos from Melissa Gallo’s Painted Texture’s Painter for Photographers Workshop. In Photoshop applied her Garden Canvas texture set to Overlay blend mode at 74% layer opacity. Since I did not want the actual texture on the painting, a Gaussian Blur was applied (as a Smart Object) to the texture and set to Radius of 6.1 – just enough to keep the texture color tones but blur the texture effect. Since it was a Smart Object, the amount could be adjusted to just the right amount after changing the blend mode. That is all that was done. I am loving this type of painting!…..Digital Lady Syd
Painting Scotland!
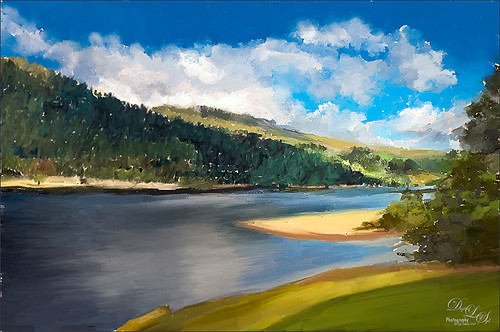
This image was painted from a shot I took while in Scotland several years ago – just can’t get enough of this beautiful country! This is where I am at with my painting journey. The basic image was painted in Corel Painter with some brushes I created after reading an older book by David Cole called Complete Digital Painting Techniques. Even though it uses an older software edition, I was able to follow his workflow for creating an oil painting and to create the brushes he was using in his example. I still had to supplement with a couple oil brushes from Fay Sirtis, a Corel Master who makes wonderful Painter and Photoshop brushes. After completing what I could in Painter, the image was brought into Photoshop and a Solid Fill Layer was added under the painted layer to add just a little different color in the areas that were not covered with paint, just to give a little interest. Come clean up was done to smooth out some rough edges, and a couple Radial Filters were applied using the Camera Raw filter. That was it and is where I am with my Painter journey, and oh yes, it was lots of fun to do!…..Digital Lady Syd
Four Picture Triptych with Topaz ReStyle

Well everyone probably knows by now that I love this little Photoshop plug-in from Topaz (see sidebar for website link). The original image was a low resolution Shutterstock stock photo (I could not find it on the website anymore) from Advanced Photoshop Magazine No. 25 CD from many years ago (not one to use stock photos but I loved this pitcher and flowers image). I actually did quite a bit to the original image – expanded it using Content-Aware Scale so there was more space on the left side, added my little tree I created in Corel Painter (it is getting a lot of use this season) and set it to Darken so the white background did not show up, added Shadowhouse Creations Tree Brushes Set #2 deer, and added Kim Klassen‘s beautiful Maybe and Peace Textures both set to Soft Light. My free SJ Snow 2 Overlay slight blur was applied at 79% opacity to just the pitcher to give it a ceramic dotted look. Next Kim’s Overlay 1 brush was used so it could be seen only in the window panes by using a layer mask. The font was Tramyad set to 40% layer opacity with an Inner Glow layer style added. Next a Levels Adjustment Layer was added to bring back contrast to the image and a High Pass Filter was used to add localized sharpening to the flowers only in a black layer mask. That was when the upper left green image was saved. The next three images all used different presets in Topaz ReStyle with some minor changes. I would list the presets, but two of them are from presets I used on other images. The frame texture is one I created in Corel Painter and added a Hue/Sat Adjustment Layer to it for the soft tan color. I love all four image effects! This is the biggest problem I have with ReStyle! Decisions, decisions! If you have not tried out this wonderful plug-in, download the trial and see what you think! Lots of fun!…..Digital Lady Syd
Digital Lady Syd Related Blogs:
Digital Lady Syd Reviews Topaz ReStyle
Using a Tych Panel to Show Off Your Images
Snowmen Passing Through!

I guess I just like to make holiday cards – they are so much fun to do. These three snowmen are one of my favorite holiday brushes from Christmas Brushes by Flina. I actually painted the background in Corel Painter using various Karen Bonaker brushes (her Painter brushes are some of the best and she gives many away) – just playing around and it turned out nice and wintry. In Photoshop Painted Textures Thanksgiving Winter Marsh texture was added and set to Linear Light at 55% layer opacity. My free SJ Holiday Greeting PNG Overlay was used for the greetings and set to a darkish turquoise color. The snowmen were added and then on a layer underneath, I painted in the color. On separate layers footsteps were created and snow was stacked. The lights on the tree were from Dirt2 Fantasy Light brushes. My SJ Snow2 Overlay slight blur (in with Overlay set above) was added and set to 30% opacity. This is way too much fun! Happy Holidays!…..Digital Lady Syd
Some Floral Holiday Cheer!

Happy Holidays to everyone! Had to post my beautiful gerberas that look so Christmasy (is that a word?). This was so easy to do. Started with my flowers in Lightroom – just the basic slider changes were done. In Photoshop the first step was to add Isabelle Lafrance‘s Fairytale Winter 2 overlay (apparently this overlay is no longer available which is a shame since it is so pretty) – she makes some of the best overlays available. A layer mask was added and the flowers were gently painted back. A stamped layer (CTRL+ALT+SHIFT+E) was created on top and desaturated (CTRL+SHIFT+U). To sharpen the image the layer was changed to Overlay blend mode and the Filter -> Other -> High Pass was opened using a setting of 7, just until I started seeing a little crispness without haloing. Now the Aaron Nace trick is to add a black layer mask and just paint back where the sharpening should be applied – just the parts of the flowers closest to the viewer. On a new layer Kim Klassen’s free Mini Sampler Holiday Brush holiday 10 was applied – I love everything Kim creates – textures, brushes, videos. I added my own text layer using the Bambino font. Then I remember I had been playing around in Corel Painter and created this little fur tree that looks like it was blowing in the wind on a white canvas. Therefore I added to my image and set it to Linear Burn blend mode at 61% – loved the final look. I am still loving Painter! Hope you have a wonderful Holiday Season!…..Digital Lady Syd
Digital Lady Syd Related Blogs:
Trying Out Some Aaron Nace Techniques
Corel Painter and Photoshop Together to Create a Pastel Painting

I just finished my first attempt at creating a pastel in Corel Painter 11. I tried to create one in Photoshop using pastel brushes, and just could not get the hang of it. Painter is great for converting your digital images into beautiful works of art. I have found the best book to use if you are just learning is Martin Addison’s Painter 11 for Photographers (if you are using or trying out Corel Painter 12, check Amazon for the updated version of this book).
The image was created by first using the Auto Painting part of the program (this is explained in his book) and a brush from the Smart Stroke Brushes category called Pastel Tapered using the brush default settings. My computer took forever to do the auto-painting – this program is a real memory hog! After getting almost all the painting covered using this technique, I created a New Layer in Painter and used a smaller brush (17.2 pixels) at 54% opacity to fill in the white holes and some of the details I wanted brought back into the image. The layer was set to 78% opacity after finishing. Saved the image as a PSD file and opened it up in Photoshop where I could clean it up more. The first thing I did was create a New Layer and used the Clone Stamp Tool at 70% opacity to clean up some of the ragged looking strokes – it did not need a lot of touch up. Next I added a Curves Adjustment Layer to lighten up the front door texture since it came out very dark in the Painter rendition – the layer mask was filled with black and only the door was painted back in at 60% opacity. I had put a large white edge around the image in Painter so it could have a soft painted framing – I did not like the look of it. In Photoshop on a composite layer (CTRL+ALT-SHIFT+E) and using the Quick Selection Tool, the white frame was selected and a layer mask added. The layer mask had to be inverted (CTRL+I on mask) so the frame was turned black to conceal. Next a texture, in this case a free one by Sarah Gardner called Blush Ginger (it is no longer available but there are many free texture resources – click on my Textures category on right for other blogs with links) was added below the image and set to 50%. It matched the image very nicely and has a great texture to it. Finally the top image was highlighted and a Inner Glow Layer Style was added to soften the edges of the image to match the texture underneath – the Color was changed by sampling the texture color and setting the Blend Mode to Normal and the Opacity to 88%.
Corel Painter is an expensive program but they do have great Education discounts if you are a student. I love the program but find I do not use it that much, especially since Photoshop CS6 has made some great strides towards achieving some of these same painterly effects. On the other hand, the Auto Painting function is very realistic and the program has so many more choices for brushes and styles of painting that I do not believe Photoshop will ever be able to completely compete in this area. Painter is definitely for those with the artistic flair……Digital Lady Syd
Digital Lady Syd Related Blogs:
Adobe Photoshop CS5′s Mixer Brushes
Digital Lady Syd’s Rule No. 6 – Try Something New!


