
Abandoned Texaco Station
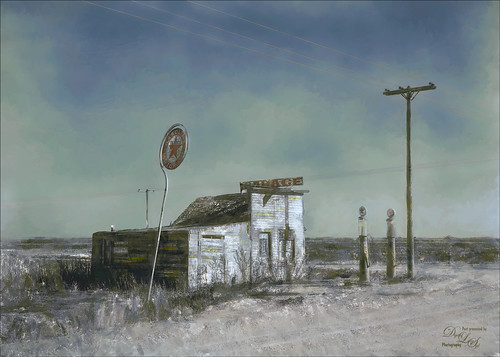
I found this image of an abandoned gas station in 1937 on Highway No. 2 in western North Dakota at Shorpy’s Historic Photo Archive but downloaded the original as a tif file from the Library of Congress. Seemed like a perfect candidate for colorizing in the new Topaz (see sidebar for website link) Studio. When working with these vintage black and white images, you always need to first adjust the resolution and resize it in Photoshop by going to Image -> Image Size command – set to a resolution of 300 by unchecking the Resample button, inserting 300, then rechecking the button to change the size. Next duplicated the layer in PS and opened up Topaz (see sidebar for website link) Studio and selected my SJ Colorize Black and White Image preset (it is up on the Community Site). Then added: Reduce Noise Adjustment and painted out the foreground in a mask so it only affected the sky; Dehaze Adjustment set to a Strength of 0.39 and Suppress Artifacts to 0.82; and Impression Adjustment using the Default settings changing the Stroke type to Stroke 09 and set the Painting Progress slider to 0.27. Back in Photoshop just did my normal workflow although it took a little more work. Used Nik Viveza 2 to adjust the overall image and several painting layers to smooth out the sky. Lots of fun here!…..Digital Lady Syd
Get the Boy Something He Wants!
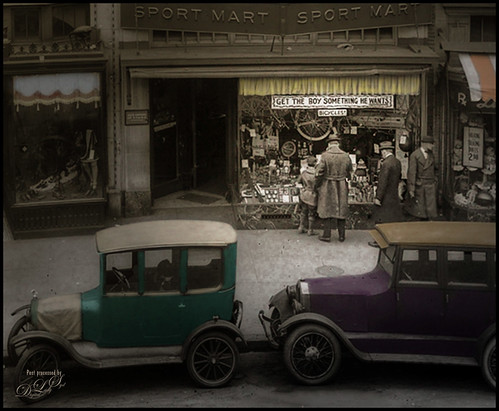
This image was downloaded from Shorpy.com of the Sport Mart on F Street NW in Washington. DC around 1922. I had originally started tinting the whole image as I thought the old cars were quite interesting. Once zoomed into the people, the image took on a whole different perspective! Therefore it was cropped tight to see the boy and his father and/or grandfather looking at the bicycles and other items in the store window. The sign sort of capped off what I consider a great story! All I could think about is what the little boy wanted.
The tinting was done using the technique and brush in my How to Hand Tint a Vintage Image and Create a Brush to Do This blog. After resizing and cleaning up the image a little, several layers were painted with the Tint Brush created in the linked blog. Then image was cropped as the cars looked good still in front of the store. On a stamped layer (CTRL+ALT+SHIFT+E), Nik Color Efex Pro 4 (now free) was used to create the rather dewy soft vintage feel in the image. (These filters were used: Glamour Glow, Midnight with Blur turned off and set to 52% opacity, Reflector Efex, Vignette Filter and Image Borders.) Nik Viveza 2 (also free) was used to focus on the store window a little more. On another stamped layer Photoshop’s Camera Raw filter was opened and using the Detail section, some color noise was removed in the coats of the people. Adding a black layer mask (CTLR+I in white mask) to the layer, just the coats and any colored noise areas were painted over with a white brush to remove the noise. On another stamped layer the Camera Raw Radial Filter was used to lighten just the people and sign using the Brush in the filter to pinpoint just them. This layer was set to 55% layer opacity. Next a Red Channel Curves Adjustment Layer was used to brighten up the luminous areas just slightly. (See my How to Use a Red Channel to Create a Nice Blended Imaged Effect blog.) That was all that was done. I am really enjoying this technique!…..Digital Lady Syd


