
Orchids with Russell Brown’s Paper Textures Panel

This was so easy and turned out so pretty. Need to darken the background of your image to get this effect. The the Flypaper Texture Creme Anglaise was added to give the painted look (in group of textures provided with Russell Brown’s Paper Texture Panel – see blog links below to download). A Hue/Saturation Adjustment Layer was added to darken the texture a bit more with Master set to Hue -146, Saturation -59, and Lightness -14. The flowers were painted out in the layer mask so they would not be affected by the color change, but it still did not have enough purple tone. Therefore a Color Fill Adjustment Layer was added with the color set to a deep blue (R101G33B227) set to 37% opacity. The flowers were once again painted out on the adjustment layer mask. The last step was OnOne PhotoFrame airbrush_06 (see sidebar for website link) and the color was sampled from the image to finish up. Very quick and easy effect…..Digital Lady Syd
Digital Lady Syd Related Blog:
Russell Brown’s Paper Texture Panel – A Real Winner!
Russell Brown’s Paper Texture Panel Updated!
Russell Brown Texture Panel Landscape Image
Using a Color Fill Adjustment Layer as a Spotlight

This image is of the Philippine Ground Orchid, a very dainty small pink flower. I am using this image as an example of how you can use a Color Fill Adjustment Layer as a subtle spotlight to direct the eye in the image but with a color vignette feel. I processed this image using Russell Brown’s Paper Texture Panel (I just love this panel and these textures – check out my blog Russell Brown’s Paper Texture Panel – A Real Winner! to download and use for free). Flypaper’s Apple Blush Texture was set to Hard Light Blend Mode at 71% Opacity and gave the image a very greenish look but with that great canvas texture. The Muscatel Texture was added next and set to Overlay Blend Mode at 29% Opacity to slightly darken the image and add some orange tones. Since I felt like the green was still a little overwhelming, a Color Fill Adjustment Layer was added – a royal blue color was selected and set to 54% Opacity. In the Color Fill Adjustment Layer’s white Layer Mask, a very soft large brush was set to 15% opacity and with black set as the color, the blue color was gently painted out to give the subtle spotlight effect from the light green tones underneath that will direct the eye. This is a great little trick if you need to draw the eye into a certain part of an image and works very well with flower images. I also like adding my own colors into an image. Have fun experimenting…..Digital Lady Syd
Digital Lady Syd’s Related Blogs:
That Soft, Dreamy Look
Russell Brown Texture Panel Landscape Image
Adding a Texture for Flair!
Keeping Focus Where You Want It Using Focal Point 2 and Color Fill Adjustment Layer
Keeping Focus Where You Want It Using Focal Point 2 and Color Fill Adjustment Layer
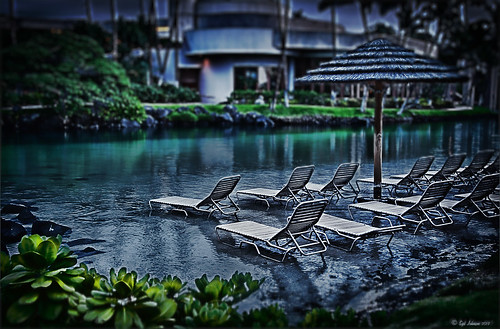 |
The above was shot in the early evening in the Lagoon Area at the Hilton Waikoloa Village – very near the Dolphin Learning Center. This is an HDR image processed in Nik’s HDR Efex Pro using three images. In my last blog OnOne’s Focal Point 2 (see sidebar for OnOne’s website link) was shown on a beautiful flower shot (see “Let’s Focus on OnOne’s Focus Point 2 – Nice Little Plug-in!“).
This time I wanted to show how pretty it works on a landscape. The Focus Bug was used to keep the lounge chairs in focus and the Focus Brush was used to keep the thatched umbrella in focus. Also a very nice dark vignette was added from inside the plug-in.
Here is a little tip on how to keep your highlights under control. In this case to keep the water highlights from becoming too dominant in the evening image, a Color Fill Adjustment Layer in any color was added, the layer masked filled with black (click on layer mask thumbnail and press backspace to fill with black), and then by double clicking on the adjustment layer color swatch, a dark blue color from the image water area was sampled so the fill color matches it. In the black layer mask, paint back with a very soft low opacity brush (between 10 and 30%) the areas you want darkened, in this case mainly the water areas around the lounge chairs – this is just a very subtle adjustment.
The last step involved adding a Curves Adjustment Layer to give a little darker feel to the image. That was it. To see the tonemapped image before the plug-in and color fill layers were added, hover over the image.
Give Focal Point 2 a try if you get chance (if you buy fine art photographer Vincent Versace’s book, “Welcome to Oz 2.0: A Cinematic Approach to Digital Still Photography with Photoshop,” the Focal Point 2 plug-in is a free download from the book which has good reviews. Also try using a Color Fill Adjustment Layer to reduce out-of-control highlights. It is a very simple technique that works very effectively!….Digital Lady Syd


