
Just Enjoying the Day

Just enjoyed posting an image a Bonobo Monkey at the Jacksonville Zoo – needed some wildlife post-processing practice! Used the Remove Tool, Sharpen Tool, a texture, Liquify Filter, layer for filling in hairs by painting using Coyote Mange animal hair brushes (still the best out there for this), Viveza, Lighten and Darken layers, Exposure Adjustment Layer for the eyes, Red Channel Curve Adjustment Layer, Luminar Leo Filter using my favorite Mystical effect, and Color Efex Pro Filter (an oldie but goodie for me). These are all techinques I have discussed on my Fun Photoshop Blog or my Tidbits Blog here at some time or another. As you can see, I still use them a lot. …… Digital Lady Syd
Visiting the Country
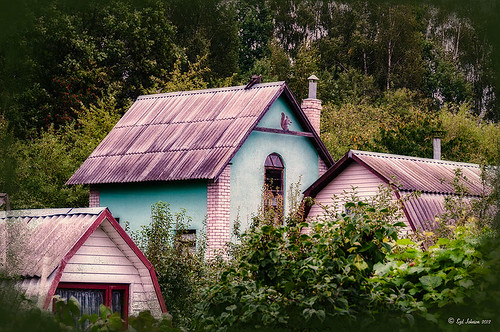
This is an image of several dachas in the countryside outside the City of Minsk in Belarus. This image had very little processing done to it – just three filters stacked in Nik Color Efex Pro 4 (Brilliance/Warmth, Midnight using the Neutral Color Set, and Detail Extractor). A Curves Adjustment Layer was added and several power lines were removed following my Get Rid of Those Power Lines Fast – with Paths and Spot Healing Tool! blog. The overlay is the same one created for the top image in the blog linked below, and was added with a dark green Color Fill Layer clipped (ALT+click between the layers) to it so it looks dark. See my How to Create an Overlay Out of a Texture blog on how to create this overlay. I like the soft diffused effect the filters created…..Digital Lady Syd
Turtle Talk

We appear to have a group of large turtles that like to meet on the fountain structure before it turns on every day. Sometimes there are five and sometimes there is one that is larger than all the others. It appears to me that they are gossiping in the sunshine before the day begins. All have their heads stretched way up.
Not much in the way of processing. First cropped in Lightroom and did a few color and tone adjustments. Added just a little sharpening and exposure to make the turtles pop out from the dark background using the Adjustment Brush. In Photoshop added Topaz (see sidebar for website link) Detail and then filled a layer mask with black and just painted back the turtles. Applied Nik Color Efex Pro filters: Darken/Lighten Center centering on the turtles, and then Monday Morning in the Neutral color set. Control Points were placed on the turtles and the opacity set to 41%. Back in Photoshop the brown text was added using the Regular Batik font. A Stroke layer style was added to a composite layer (CTRL+ALT+SHIFT+E) on top and instead of a color, a pattern was added to the at a Scale of 13% and a Size of 21 pixels. I used a pattern that had some of the natural brown tones for the frame. That was it. Totally easy. I hope to be able to get some more images of my new turtle friends. Seems like we have a whole group in our little lake…..Digital Lady Syd
Eastern Swallowtail Butterfly

Just had to display this beautiful butterfly that appeared on my Bottle Brush bush recently. This is a female Eastern Tiger Swallowtail and had at least a 4-inch wide wing span. I did basic processing in Lightroom and then opened it in Photoshop. Just did a clean up layer and a Topaz (see website link in sidebar) Detail filter using the Overall Medium Detail II preset. I tried several different textures and nothing seemed to look right. So the layer was duplicated and the image was opened in Nik Color Efex Pro 4. These filters were stacked: Detail Extractor, Monday Morning using the Neutral color set and an opacity of 58%, Film Efex Vintage set to Film Type 13, and Vignette using a white color. These are all favorite filters of mine in this plug-in. Next OnOne’s (see website link in sidebar) old PhotoFrame 4.6 filter was applied using Kevin Kubota’s preset Kinky set to 63% opacity and a size increase of 7% and using a creamy color sampled from the image. Back in Photoshop a Hue/Saturation Adjustment Layer was added and the Reds Saturation was set to -58 to tone down the bottle brush color. I love the vintage feel of this image. I am sorry that OnOne is not longer releasing PhotoFrames – I am having trouble duplicating these effects in their new suite……Digital Lady Syd
Where Am I?

May have figured this out already since I have posted very similar photos – but this is at Fortunato Park in Ormond Beach, Florida – and is one of my favorite places. The above is the rooftop cupola from the old Hotel Ormond – the only remaining part from a beautiful old hotel that was torn down in 1992. It was in such a bad condition that it could be restored – what a shame!
Okay – I am a huge Photoshop plug-in fan – I love to be able to do something with a photo that I could not do just in Photoshop or Lightroom alone. Nik plug-ins really made this image! Basically Nik’s Viveza 2 (my very FAVORITE plug-in – can’t beat it for fixing any problem in an image) was applied to the image to add detail and contrast to localized areas of the image (detail in the orange roof, saturation and color to sky in middle of cupola, and detail to the interesting lines on the building). That in itself added a huge improvement to the image. Next Nik’s Color Efex Pro 4 was added and three filters stacked: Bleach Bypass, Detail Extractor, and Film Efex Vintage using Method 14 and setting the Overall Opacity slider to 52% – did not want to overdo the vintage feel. I use the Film Efex Vintage often – lots of versatility in just this one filter! (See related blog links below for other examples.) Next Shadowhouse Creations Scratch Box frame layer was applied – this is from the Scratch & Frame Box Overlay.PSD file he supplies. (Check these out – some great borders just in the PSD file!) I created a PNG file of just the frame by following the steps in my blog How To Make Frames or Borders – scroll down to the section called “To save the frame you created as an overlay to use again” and follow steps. I used an off white color sampled from the image in a Color Adjustment Layer clipped (ALT+click between layers) for the frame. That was all I did and I love the slightly vintage effect – goes nice with historic buildings. Next time I will show you a totally different look for this same image (see A Fairytale Gazebo)……Digital Lady Syd
Digital Lady Syd Related Blogs:
Digital Lady Syd Reviews Nik HDR Efex Pro 2
Little Red Corvette
Yellow Dogface Butterfly in her Glory!
The New Film Efex-Vintage Filter From NIK CEP 4
Some French Tulips!

Love this image of my beautiful red tulips I got from the grocery a few weeks ago. I was experimenting with different settings and this one turned out perfect in my mind! It was shot with my 60 mm Nikon Macro Lens set at F/2.8, 1/3000, and ISO 400. Very little was done in Lightroom other then a little Basic slider adjustments following the workflow in my blog How to Use Adobe Camera Raw (ACR) or Lightroom 4 Quickly. I added a pretty texture (1) from 2 Lil’ Owls Studio textures (a free one from the site – see sidebar for website link) that I had first opened in Nik Color Efex Pro 4 and applied BiColor Filters using 40% opacity and Darken Center Filter to the texture. It gives more of a colorful look than the original texture. The beautiful French text is from French Kiss Glorious Grunge Letter 2 (a free download) – a brown colored Color Fill Adjustment Layer was clipped to the text (to clip just hold down ALT+click between the two layers in the Layers Panel, and the Adjustment Layer will attach to just the text). The text layer was set to 66% opacity. To keep the text from covering the flower, a Layer Mask was added to the text layer – with a black brush at 100% opacity, the text was removed from the flower itself. Next French Kiss Artiste Gateaux was added, set to Overlay blend mode and 28% Opacity. This makes the image look like a canvas – love this texture! The last step was a Curves Adjustment Layer added to the whole image to add some contrast. Sometimes it is just fun to play with an image you just like!…..Digital Lady Syd
Digital Lady Syd Related Blogs:
Check out my Textures category in the sidebar for more Tidbits Blogs
Check out my Fun Photoshop Blog (link at top of page) and click Textures category in the sidebar
Fake Panoramic Effect
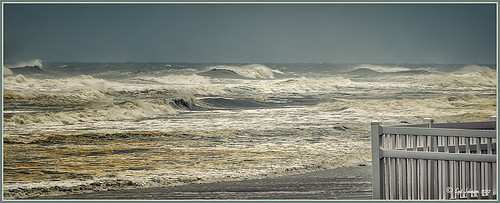 |
Taken the morning after Hurricane Sandy went past Ormond Beach in Florida, this image showed how strong the surf was and how gray the sky appeared even though the ferocious hurricane was not a direct hit. We were so fortunate that the storm did not hit Florida directly.
What I really like about the shot is how sharp the texture in the waves and beach surf is. To get this effect, the image was first processed in Lightroom where just basic slider corrections were made and a custom crop was created. I usually do not do this, but this image seemed to scream panorama to me as the sky was so plain and the main subject is the large expanse of water. Since everything was moving, a several shot panorama was out of the question, so it had to be faked. Click on image to see Lightroom version – it is very flat, not at all how I remember it. In Nik Color Efex Pro 4, a Cross Processing filter using Method C04 at 27% strength, Detail Extractor filter set to Normal (Detail Extractor at 64%, Contrast at 31%, and Saturation at16%) with 6 Control Points to restrict the filter effect to the sky area, and a Lens Vignette filter (Amount -9, toward Rectangle,Size 57% and Brightness -16%). In Nik Viveza 2 the Center was brightened. The Spot Healing Brush was used on a clean up layer, and Contrast was boosted with a Curves Adjustment Layer. The default preset in Imagenomics Noiseware was applied. When noiseware is applied, the image detail will usually get softer – therefore, in a white layer mask, I painted with a soft black brush the waves back so you can see the water mist detail. The last step was to apply my free SJ Thin Double Edge Frame layer style sampling colors from the image. Now I get the result I remember!…..Digital Lady Syd
Little Red Corvette

Just felt like using a couple of my old standby favorite plug-ins to create a vintage feel to this image. This old red corvette image was taken at the 39th Annual Daytona Turkey Run at the Daytona International Speedway infield. I love the way the raceway seats are in the background – it just seems to the be the right setting for this old girl – I love corvettes! It was processed first in Lightroom starting out with cropping and applying one of David duChemin’s Lightroom 4 presets called Warmer Sunset -.66 Grad – I was surprised it gave such a nice vintage feel for starting post-processing of the image. From there several adjustments basic Lightroom adjustments were done and the chrome was sharpened using an Adjustment Brush. In Photoshop Nik Viveza 2 was used with control points placed on the windshield to clean up some window glare (this plug-in does an amazing job with window glare) and on the detailing on the car. Then Nik Color Efex Pro 4 was applied and several of my favorite filters were stacked – Darken/Lighten Center, Detail Extractor, and my favorite for getting this vintage feel, Film Efex Vintage set to Film Type 14 with an overall opacity of 56%. A Curves Adjustment Layer was added and French Kiss free Glorious Grunge Edging Overlay with the lines inside removed was applied and set to a tan color. I wish I could fix up this car – she really was a beauty!…..Digital Lady Syd
Digital Lady Syd Related Blogs:
Yellow Dogface Butterfly in her Glory!
Soft and Sharp Image at the Same Time!
Unexpected Humor in an Image

I was so busy trying to shoot these beautiful McCaws in sharp detail on my camera (Blue Horizons Show at SeaWorld-Orlando) that I did not notice what else I was shooting. What a surprise! Although I must say I did a pretty good job of catching the birds while they were zipping by pretty fast. The birds even look like they are laughing!
After basic processing in Lightroom, I decided the image needed a soft background feel as it was really busy and the birds were getting lost in the background. So I went back to one of my all time favorite filters, Nik Color Efex Pro 4‘s Film Efex-Vintage, to get the look I liked. First the Darken/Lighten Center filter and Brilliance/Warmth filter were applied – both of these filters I use a lot as they always give nice results. But one of my very favorites is the Film Efex-Vintage filter – there are so many options with this one filter that it is amazing. This time Film Type 11 was chosen with the vignette turned off. It turned this image into these beautiful brown tones. Clean up, a Curves Adjustment Layer to add just a little contrast, a Photo Adjustment Layer set to Cooling Filter 80 at 43% density (applied to just the birds by filling the layer to black and painting back in the birds in white), Noiseware‘s Default preset, and a soft painted layer was used to slightly soften the trapeze artist. My Soft Sparkle Overlay Frame was added with a Color Fill Adjustment Layer clipped to it to change the color to a dark brown. To see other results of using the Film Efex-Vintage filter, check out some of my older blog links below……Digital Lady Syd
Digital Lady Syd Related Blogs:
The New Film Efex-Vintage Filter From NIK CEP 4
Loving SeaWorld!
Hawaiian Bliss!
Nik Color Efex Pro 4 Just Does It Right!
Yellow Dogface Butterfly in her Glory!

This Southern Dogface Butterflies (named for their heads that look like French poodles) visited my purple pentas this fall. They are very skiddish butterflies and are hard to photograph. I used my 60 mm Nikon Macro Lens to catch the shot at F/3.2, 1/2000, and ISO 200. The image was processed first in Lightroom 4 using the workflow from my How to Use Adobe Camera Raw (ACR) or Lightroom 4 Quickly blog. To create the soft effect, Nik Color Efex Pro 4 was applied with several filters stacked: Midnight using Neutral Color Set, Glamour Glow with Glow set to 90%, Vignette, and Film Efex Vintage set to Film Type 2 and an Overall Opacity of 40%. The Sharpen Tool was applied to the face. Nik Viveza 2 was applied to soften the bright tones in the background and to sharpen the head a little more. My Mid Size Double Edged Frame was added to the image to finish up. I really enjoyed working on this image – it has a different feel to what I normally do……Digital Lady Syd
Loving SeaWorld!

Just a great start to a fun day at SeaWorld-Orlando. This is what you see right after entering the theme park. The lovely red flowers are red Bougainvilleas. In Lightroom three images were used in PhotoMatix’s Merge to 32-bit HDR program. Then the resulting TIFF image also was processed in Lightroom 4.2 before it was opened up in Photoshop CS6. Nik Color Efex Pro 4 plug-in was applied stacking these filters: Film Efex: Vintage using Film Type 4, Glamour Glow, Midnight using an overall Opacity of 40%, and Image Border Type 4. A Curves Adjustment Layer was added to adjust contrast and the Sharpen Tool was used on the blooms. I really love the lighthouse with the whale image……Digital Lady Syd
Digital Lady Syd Related Blogs:
Digital Lady Syd Reviews Topaz DeNoise 5
Young Golfer of Long Ago

Since I am a golf fan and this weekend is the Ryder Cup, I thought I would post a golf picture I just found in my Scotland pictures. The image is of the monument at St. Andrews Cathedral of Young Tom (Tommy) Morris, who won four Open Championships (now called the British Open) in 1868-72, all before he was 22 years old. He also has the first recorded tournament “hole-in-one” and scored a course low of 77 on the Old Course at St. Andrews in 1868. Check out the link above for more interesting notes on his life. This image was processed in Photoshop using Nik Color Efex Pro 4 filters stacking: Detail Extractor at 88% opacity (otherwise it looked too grainy), Darken/Lighten Center, Brilliance/Warmth, Vignette, and Image Borders – simple black using Type 13. I love the way the Darken/Lighten Center can be used to direct the eye in an image. A Curves Adjustment Layer and some noise removal was applied – pretty much my basic workflow!…..Digital Lady Syd
Digital Lady Syd Related Blogs:
Where Am I?
The Old Course at St. Andrews
Same Image – Different Look!
Clowning Around with Topaz!
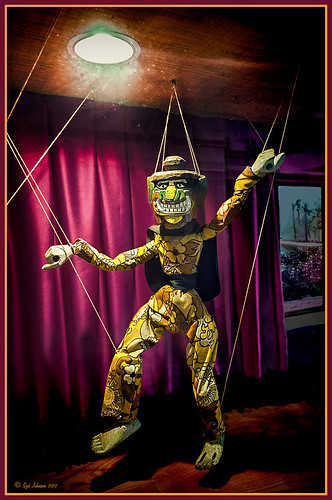 |
Here is another one of the beautiful puppets that lined the one-mile walkway between hotel accommodations and restaurants at the Hilton Waikaloa Village on the Big Island in Hawaii. To see original unprocessed raw file, hover over image. The image was first processed in Lightroom and opened up directly into the new Topaz photoFXlab (see sidebar for website link). Inside the plug-in the layer was duplicated and Adjustment tab sliders set using the wonderful Dynamics slider at 34. A stamped layer was created and the Plugin tab Black and White Effects preset (see my blog Hibiscus Flowers – I Love to Photograph Them! for settings) was applied to get a more calm darker feeling to the image. Back in photoFXlab the layer was set to the Darken blend mode. Another stamped layer was created and the Detail brush set to maximum strength was used to sharpen up the puppet only. Exit and the changes appeared on a TIFF copy back in Lightroom. Since I now had two Tiff files, they were highlighted to Edit In – > Open as Layers in Photoshop. The Topaz adjusted layer on top was set to 89% opacity. The difficulty with processing this image involved the terrible glass reflections. I decided that I needed something more so I opened up just Topaz Adjust and added a vignette effect just on the upper clown and light area – a little detail was added overall also. Back in Photoshop the image definitely need some noise reduction so Topaz DeNoise 5 was opened and the Overall Strength set to .18 – that’s all it needed! Next a Curves Adjustment Layer was added to darken some of the reflection – the clown was painted out to give more of a spotlight effect to it. A vignette was created around the image and selectively painted areas to further distract from the glass issue. A High Pass filter set to Overlay blend mode was used to sharpen the image – a black mask was added and the clown painted back to just sharpen that area. The last step was adding my Layer Style frame (see my blog Digital Lady Syd’s Free Layer Style Frames). There was also a lot of clean up on this image – more than I normally do. It amazes me how a pretty plain image can be brought to life by using several of Topaz’s wonderful plug-ins!…..Digital Lady Syd
Digital Lady Syd Related Blogs:
Using photoFXlab v1.1
InstaTone in photoFXlabs – Great Fun and Great Results!
Digital Lady Syd’s Free Layer Style Frames

To download the free layer style frame above, a thinner version of it, and a nice black and white double edged frame, go to my Deviant Art site and click on the SJ Double Edge Frame Styles Download File button in upper right corner. To load into Photoshop, the Style Panel needs to be open (Windows -> Styles) – click on the upper right corner icon on panel to open pop-out menu and select Load Styles – navigate to folder where the file was downloaded and click Load. (To add them to listed styles in pop-out, load the style manually. If using Windows 7, go to Local C Drive/Users/user name/AppData/Roaming/Adobe/Adobe Photoshop CS6/Presets/Styles and move downloaded .asl file here – this adds file to Photoshop internal settings.) When using these styles, be sure the top layer is a complete layer (see Step 1 below) or it will not apply correctly.
TIP: If you want to use the colors from your image, just double click on the effect in the Layers Panel which brings up the dialog box for that effect. Click on the color swatch in the effect and when the Color Picker opens, sample image using the eyedropper that appears when hovering in your image – click to add that color into the frame. For the Inner Shadow effect, if you are not seeing any color update when sampling, change the Blend Mode to Normal from Multiply. Note that the next time you use the Layer Style, it will return to whatever colors you set originally, so save it as a New Layer Style if you want to keep the new color settings (see Step 5 below). Sampling colors from the image can often frame it beautifully!
Below are the steps on how to create my layer styles. I am using the frame colors seen above as they seem to look nice on many of my images.
1. Need to have an image layer on top for the layer style to work correctly. To do this, highlight the top layer in the Layers Panel and press CTRL+ALT+SHIFT+E to create a layer that combines all the active layers (eyeballs showing on left edge) in the image. Need to remember this shortcut as it is very useful when doing a lot of things in Photoshop!
2. Double-click on the top layer and the Blending Options dialog box appears. Be sure Blending Options: Default is highlighted on left side.
3. Check and click on Inner Shadow effect and change just these settings: Blend Mode to Multiply, Color Swatch set to brownish color (R165/G120/B0), Opacity 100, Distance 0, Choke 83, and Size 15 pixels.
4. Check and click on Inner Glow effect and change just these settings: Blend Mode Normal, Opacity 100, Color Swatch to greenish color (R115/G121/B42), Technique Softer, Source Edge, Choke 90%, and Size 19 pixels.
5. To save these settings as a Layer Style preset for using on other images, click the New Style button and name it and leave checked Include Layer Effects. Now click on Styles at top left in dialog box or open the Style Panel (Window -> Styles), and it will appear at bottom of the listed styles.
To create the little thinner frame around your image, in Step 3 set Size to 21 and in Step 4 set Size to 29. (For example, see my blog 32-Bit HDR Using Lightroom and CS6.) To create a nice Black and White framing, set Inner Shadow to Normal Blend Mode and Color Swatch to Black – still using Size 51 pixels, and Inner Glow to a White Color Swatch and Size 62 pixels. Of course you can adjust the sizes to look good on your image if they need it. If you do not like the way the style looks after applying, just CTRL+Z to delete and try another one. Try adjusting all the sliders and seeing if you can get an even nicer look.
This image of my pretty little purple Agapanthus bloom was processed using Nik Color Efex Pro 4 – BiColor User Defined filter set to white and light pink colors, Darken/Lighten Center centered on the flower center, and Glamour Glow filters. Two textures were added using Dr. Brown’s Paper Texture Panel (see my blog Russell Brown’s Paper Texture Panel Updated!) and Flypaper’s Apple Blush taster texture using Linear Light at 39% opacity and Creme Anglaise taster texture set to Overlay at 100 opacity. The last step was clicking on my SJ Double Edge Frame layer style in Styles Panel to apply.
Try using these layer styles – I think you will like them. The framing gives a clean sharp edge to an image, especially for posting on the internet……Digital Lady Syd
Unknown Little Girl Statue

Here is another beautiful little girl statue from an unknown sculptor at the Lightner Museum (old Hotel Alcazar) in St. Augustine, Florida. I decided to use several of my own textures on this image. First it was cropped, processed a little in Lightroom, brought into Photoshop CS6 where Nik Viveza 2 was used to sharpen only the statue. Nik Color Efex Pro was opened and Dark Contrast Filter and Glamour Glow filters were stacked. I then used four layers of my own textures that I created (two were made by painting on a white background with soft colors using a large Mixer Brush and one is of my lace curtains) and finally finished off with ShadowHouse Creations Old Photo 6 texture used twice – once as a Color Dodge layer at 43% and one as a Linear Burn at 88% on the background only. I loved the way it has an old Western look – she reminds me of Rebecca of Sunnybrook Farm. Textures are so much fun!…..Digital Lady Syd
Big Sky Preset for Lightroom 4.1

This is my “big sky” view above my little lake and what I have been seeing every afternoon this summer in Florida. Beautiful but very scarey! I wanted to try out Matt Kloskowski‘s (one of the Photoshop Guys from NAPP) new free Lightroom presets called Big Sky as a starting point – Strong in this case. After making adjustments in Lightroom, the image was taken into Photoshop and first Nik’s Color Efex Pro 4 was applied stacking these filters: Brilliance/Warmth with Sat at 32%, Warmth 49%, and Perceptual Sat 40%; High Key With Dynamic High Key set to 61%; and Pastel Using Method 2. Next two Selective Color Adjustment Layers were created with black filled into their layer masks. One Adjustment layer was for the green grass so in the layer mask I painted back just the green area for that layer and the other targeted for the slight reddish color in the roofs. Next the new Color Lookup Adjustment Layer set to 3DLUT DropBlues.3DL was added – the sky was then painted over with a light gray to soften the change. (To learn more about Color Lookup, see TipsSquirrel’s Richard Hoffman’s short video here.) Next Nik Viveza 2 was used to smooth out the clouds and sharpen the house lines. Finally Imagenomics Noiseware was set to Full Stronger Noise preset. The last steps created a Curves Adjustment Layer for a little more blue using just the Blue Channel to increase the color and set to 70% opacity. Finally my Layer Style frame was used sampling the colors from the image (see DLS Free Layer Style Frames). I liked the way the preset worked – it looks very similar to how it appeared originally in Lightroom without all the adjustments and blue cast. The final result looks a bit like an architectural rendering seen in house brochures. And you got to love the clouds!…..Digital Lady Syd
Soft and Sharp Image at the Same Time!

Holoholkai Beach, a lava filled beach, on the Big Island in Hawaii. I just really like this image. It was a 3-shot HDR image processed in Photoshop CS6 Merge to HDR. This was done before the Lightroom upgrade to allow 32-bit processed Tiff images for processing. This image actually has 13 control points in my favorite plug-in ever, Nik’s Viveza 2, that sharpened some of the Lava rock and smoothed out the rough water to lead the eye through the image. Next Nik’s Color Efex Pro 4 was used stacking Film Efex: Nostalgic filter using Film Type 4, Brilliance and Warmth using 34% warmth to warm up the image, and Glamour Glow which gives the image that soft look – a control point was placed at the focus point of the image to keep it sharp in that area. A Curves Adjustment Layer was used to for contrast and my Thin Layer Frame was applied (see DLS Free Layer Style Frames). Love the final result!…..Digital Lady Syd
Lightner Museum’s Unusual Chandelier

Sometimes you just like an image and that is what this is. The shot was taken at the Lightner Museum in St. Augustine, Florida and I am having trouble finding any information about the chandelier. Very simple processing using Nik Color Efex Pro 4 filters stacking Tonal Contrast, Darken/Lighten Center, Detail Extractor, and Vignette. Next Nik Viveza 2 was applied to bring out the color a little more on the green grapes and a couple of the glass flowers. Imagenomics Noiseware was applied at Full Noise Reduction preset as the image was quite noisy due to the high 1250 ISO value needed to shoot in the museum. The last step added the OnOne PhotoFrame Vincent Versace photo wide frame (see sidebar for website link). I got a chance to play around with some of my favorite plug-ins!…..Digital Lady Syd
Digital Lady Syd Related Blogs:
Little Girl Statue at Lightner Museum – contains all my other Lightner links at bottom of blog
32-Bit HDR Using Lightroom and CS6

This is a beautiful little town called Honomu is on the road to Akaka Falls on the Hilo side of the Big Island. I love how this image turned out – the original tonemapped file was totally flat. This image was processed as a 32-bit HDR image in Photoshop CS6’s Merge to HDR program, then brought back into Lightroom 4.1 as a TIFF file where it was adjusted using mainly the Basic sliders, then edited back in Photoshop CS6 as a 16-bit PSD file. From there, Nik’s Color Efex Pro 4‘s was opened and these filters stacked: Detail Extractor at 68%, Graduated Filters using Blue No.1 as the sky was an ugly gray color, and finally the Film Efex Vintage set to Film Type 21. Next Nik’s Viveza 2 was added and that is what really made the difference in this image – the detail was popped in the signage areas but smoothed in the sky. Imagenomics Noiseware was added to smooth out the roughness of the whole image. The frame I used is called SJ Thin Double Edge Frame and can be downloaded at my Tidbits Blog DLS Free Layer Style Frames. The colors for frame were sampled from the image. Once again an image that did not have too much going for it turned out really nice……Digital Lady Syd
Digital Lady Syd Related Blogs:
New Lightroom and Photoshop 32-bit Processing Capability
Enhancing Works of Art with Nik Color Efex Pro 4

I really loved how this image captured the Buddha statue through the window with the musical sculpture and bell that is protected in the the 1-mile walkway that goes between the hotel buildings at the Hilton Waikoloa Village on the Big Island in Hawaii. I do not have any information on these pieces of art, but they are very interesting. Nik Color Efex Pro basically brought this image to life with four filters stacked: Film Efex Nostalgic using Film Type 4; Pro Contrast to brighten it up a little; Darken/Lighten Center placing the center towards the window; and Image Borders Type 12. A Curves Adjustment Layer was added back in Photoshop and that was it. The texture in the girl’s skirt is beautiful and the wall art was nice too!…..Digital Lady Syd
Hawaiian Bliss!

Every now and then I have to post another image from this wonderful resort! I know, a lot of people may consider it a little touristy, but I guess I am just a big tourist at heart and totally loved it!. This of course is the Hilton Waikoloa Village on the Big Island in Hawaii. A three shot HDR image was taken, processed in Photoshop’s Merge to HDR with no changes – just Remove Ghosting checked, then Nik’s Color Efex Pro 4 (stacked these filters: Film Efex Vintage – Film Type 11, Detail Extractor using overall strength of filter to 86%, and Image Border – Type 11), and Nik’s Viveza to darken the corners a little and bring out the detail in the center of the image. Not very difficult but then when it is as beautiful as Hawaii, it is pretty easy to get great pictures!…..Digital Lady Syd
Digital Lady Syd’s Related Blogs:
Nik’s Viveza 2 Plug-In – A Hidden Gem!
Whale Watching with Nik’s Color Efex Pro 4 & Viveza 2
Using NIK’s Color Efex Pro 4 and Viveza Together
Where Am I?

I have not posted a Where Am I in a while, so here goes. This weekend while watching the Scottish Open at Castle Stuart Golf Links, I started reminiscing about my trip to Scotland a few years ago and what a beautiful county it is. This particular day it was raining, rather typical late summer weather in this region. I am standing at the top of the beautiful Urquhart Castle which overlooks Loch Ness. We were on a tour that arrived by boat and it was beautiful in spite of the ugly weather. This is a great castle to visit and explore if you get in this part of the world.
This image was processed in Lightroom on two different virtual copies – one to bring the sky in nicely, and one for the castle and surrounding grounds. The copies were selected and opened in Photoshop by going to Edit In -> Open as Layers in Photoshop so they were in one file. The castle layer was placed on the bottom and the sky layer on top. Added a layer mask to the sky layer and used a Black to Transparent linear gradient so only the sky still showed from the top layer. A composite was made and in Nik’s Color Efex Pro 4, the Detail Extractor filter was applied using the Detail slider at 42% and (-) control points applied to the sky and water, a Darken/Lighten Center filter was applied, and a dark Vignette filter. There was quite a bit of noise in the sky so Imagenomics Noiseware was applied at Stronger Luma Noise (I recently bought this plug-in as I found it to be very good.) The Sharpen Tool was used to bring back a little detail in the hillside foliage and the people after applying the noiseware – very subtle change here. A Curves Adjustment Layer was added and Nik’s Viveza 2 – just added that pop in parts of the castle stonework with layer set to 63%.
The results came out very nice and how I remember it – to be honest I think it really was a lot drearier than it appears here but this is how I want to remember it!…..Digital Lady Syd
Digital Lady Syd Related Blogs:
Can a Pseudo HDR Image be as Good as the Real Thing? (Part Two)
Pseudo HDR Using an Old Image

I am not in the habit of using other peoples images but I just had to try a little “pseudo HDR” on this image from a junkyard in 1942. Shorpy Historical Photo Archive – Vintage Fine Art Prints has the best historical images you will ever see, including this recent one. They obtain most of their images from the Library of Congress (I searched for salvage depot and found other interesting images like the above). Shorpy’s website is on my list to visit on a daily basis. Most of his older images are not in color, but they are always interesting.
For this example the low res jpg image was used. Nik’s Color Efex Pro 4 with these filters were stacked: Detail Extractor, Film Efex Nostalgic Film Type 4 at 68% strength, Midnight using the Neutral Color Set and Blur at 4% and Overall Strength set to 50%, Vignette, and Image Borders. This image does not have any restrictions for use according to the Library of Congress so I feel comfortable showing it. It was fun trying different effects on this image. Go to either resource and see what you can find!…..Digital Lady Syd
Digital Lady Syd Related Blogs:
Little Green Frog’s Makeover Using Nik’s Color Efex Pro 4!
White Daisies! Using Color Efex Pro Midnight Filter
Nik CEP4’s Film Efex Faded for an Illustrative Look

Had fun working on this little Hawaiian ‘Elepaio bird that was living with a bunch of his buddies at the Palace Tower in the Hilton Waikoloa Village. For very small birds they really make a racket, especially around sunrise and sunset – very busy, busy, busy birds! To create this sketch-like effect, he was processed in Nik Color Efex Pro 4 stacking just two filters – the Detail Extractor and Film Efex Faded set to Film Type 11 and an overall opacity of 71%. A Curves Adjustment Layer was added to add contrast and OnOne PhotoFrame (see sidebar for website link) Dave Cross 02 to finish the image. Very simple but I really loved the illustrative look of the bird. These new Film Efex filters in Color Efex Pro 4 give some great results but you have to play around with them to achieve it sometimes. Here is a link that shows what the Film Efex Faded filter will do from their website – Nik is currently presenting a filter each week and showing how it can be used. Really good stuff here!…..Digital Lady Syd
Digital Lady Syd’s Related Blogs:
Nik Color Efex Pro 4 Just Does It Right!
The New Film Efex-Vintage Filter From NIK CEP 4


