
Snowy Butterfly with Akvis Sketch

This is a female Palamedes Swallowtail Butterfly (the males are smaller and blacker in color) that was so much fun to photograph – my favorite type of butterfly to photography as they as not so skiddish to shoot. I decided to try out the Akvis Sketch plug-in that I recently reviewed. (See Digital Lady Syd Reviews Akvis Sketch Plug-in for Photoshop.) To get this image, first I opened up the image in Photoshop. To sharpen the image Calvin Hollywood’s Freaky Amazing Details action was applied – see my Tidbits Blog A Little Hollywood for My Butterfly Model to get information on how to do this and the action download link. A composite was created on top (CTRL+ALT+SHIFT+E) and Akvis Sketch was opened – a preset I created before was applied, (Used the Classic style, Strokes section Color Pencil was set to 63, Edge section Edge Width was set to 56 and a Good Colored Sketch preset was created.) Next a Shadowhouse Creations Vintage Soft Grunge V27b texture was applied. A New Layer was added on top where French Kiss Spatter4 Brush 22 was set to 5000 px at 30% brush opacity to create the soft purple splotchy layer. Next Shadowhouse Creations free Cabin/Trees brush was applied at 49% layer opacity. The top layer used my free SJ Snow2 Overlay slight blur at 100% layer opacity. Anyway just another way to have fun with Akvis Sketch…..Digital Lady Syd
A Little Hollywood for My Butterfly Model

If you have ever tried Kelby Training, then you know how good it is. I just finished a short video class on Quick Composite From Photo to Finish by Calvin Hollywood, a wonderful Photoshop guru from Germany. He was shooting a lovely model but I like my lovely model above more. She spent quite a long time flitting around me and my bright pink penta flowers posing along the way. (She is using her proboscis to feed by sucking out the fluid of the flower, not unlike the trunk of an elephant.) I did a previous blog called Butterfly Beauty! a while back, where several different textures were applied. Also Mike Hardisty Photography recently posted a pretty white butterfly in his blog.
Calvin’s sharpening technique was used to sharpen the butterfly and it did do an amazing job! See Scott Kelby’s Guest Blog featuring Calvin with a short video on creating Freaky Amazing Details. An action for this can be downloaded here. His vignette technique was also used to spotlight my model and a couple of his color manipulation tricks were used to add some artistic flair. Overall, Calvin had a very good tutorial. The textures used in this image were ShadowHouse Creations Mixed Bag 2 set to Darker Color blend mode and Scratch Box 4 set to Overlay blend mode. The beautiful French writing in the background is French Kiss’s Script brushes that are for sale very inexpensively. ….Digital Lady Syd
Digital Lady Syd Related Blogs:
Spotlight Effect With the New Subtract Blend Mode
Spotlight Effect With the New Subtract Blend Mode
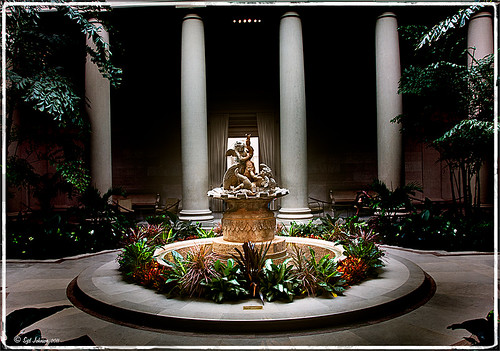 |
This beautiful sculpture, called Cherubs Playing with a Swan and created by Jean-Baptiste Tuby I in 1672-73, is located in the West Garden Court of the West Building of the National Gallery of Art in Washington, DC. I used an effect I learned from Calvin Hollywood recently in a video called “New Blend Modes – Divide and Subtract.” In this technique, the Subtract blend mode creates the dark feel to the image. Hover over the image to see the original camera raw image.
The basic steps used on the above image above are:
- Cropped image to balance in Lightroom.
- Opened image in Photoshop and duplicated the Background Layer.
- Change the top layer blend mode to Subtract.
- Went to Filter -> Bur -> Gaussian Blur and set Radius to 250. The image now has a night effect and not that blurry.
- Added a Layer Mask and painted white using a low opacity brush on the mask to emphasizing the sculpture and the areas to be lightened.
- A Curves Adjustment Layer and a Color Balance Adjustment Layer to adjust contrast and color were applied.
- A Composite Layer (CTRL+SHIFT+ALT+E) was created on top of the layer stack.
- Image was sharpened using the High Pass Filter set to a 9.1 radius and the blend mode changed to Soft Light.
I was surprised by the beautiful effect created on this image! It was interesting to learn that there is a useful purpose for this blend mode. Give it a try on an image and see what you get……Digital Lady Syd


