The Bubble Creature
This is a little creature I created following Adobe Evangelist Julieanne Kost’s How to Create a Smoke-Flake in Photoshop short video and written tutorial. There is an action used to created the basic geometric flake that can downloaded if you scroll to the end of the linked site. It was created from a smoke image and totally surprised me as to how easy it was to do. My flake was Free Transformed and a background was created. A few items were added and the bubbles painted on were from a PS brush set called bubble_brushes_by_jennyle88-d7bl6zd from DeviantArts. When doing this technique, make sure your image is not too big. My initial image came out to be over 4 Gigs (Yikes!). To compensate, the smoke image was changed to an 8 bit mode, and 6 inches X 6 inches at 200 res in the Canvas Size dialog. This is just a fun thing to play with in PS!…..Digital Lady Syd
Edinburgh Lunch

This image (a favorite of mine taken of a little street in Edinburgh, Scotland) was used to try out a new Photoshop Action downloaded from Adobe Create Magazine. It is called Painterly and is very flexible as to how it can be used to make a very nice artistic effect of an image. The action was created by BlackNull (or Nuwan Panditha) and also included brushes and patterns needed to run the action. There is a very informative 6-page PDF file that explains everything you need to know on how to get good results. It was a lot of fun to do and only took an hour or so to get this final image. A couple of my regular tweaks in Photoshop were done after applying the action, but overall the effect was from the action. One disadvantage is that the image, which was set to 8-bit, became over 1 Gig in size. Since I had turned off many of the layers while adjusting the action, I just right clicked on the Layers Panel upper right pop-out and selected Delete Hidden Layers. Then it became much more manageable. Anyway, thought I would present the action as it was really nice to try out. Enjoy!…..Digital Lady Syd
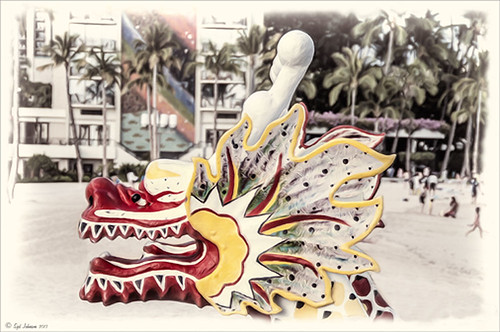
Painting a Dragon

This was the head on a wood boat pulled up on the sand in front of the Rainbow Tower at the Hilton Waikoloa Village on Waikiki Beach in Oahu, Hawaii. Recently I did a blog called Can You Get a Painting Look With a Photoshop Action? Jack Davis Can! where his Wow Smart Object Painting1 Action was applied to several images. This image uses the same action to create a nice basic painting. A darken layer was added above to show emphasize the edges for the dragon from the background image (see my The Best Dodging and Burning Technique blog). At this point I thought it looked pretty good, but the background was competing with the dragon in color, so I decided it needed to be pulled back some. Topaz (see sidebar for website link) Black and White Effects was used to soften the background. Several of the presets created really interesting looks due to the canvas effect being applied in the action first. I settled on an old wedding preset I had created back in version 1. (If you are interested, here they are: Conversion – Basic Exposure: Contrast 0.04, Brightness 0.10, Boost Blacks 0.35, and Boost Whites 0.01; and Finishing Touches – Silver and Paper Tones: Tonal Strength 0.44, Balance 0.96, Silver Hue 5.81, Silver Tone Strength 0.85, Paper Hue 77.42, and Paper Tone Strength 0.38; Transparency – Overall Transparency 0.80. A white border was then created around edge using Right Edge Size 0.11/Edge Exposure -1.00/Edge Transition 0.09; Left Edge Size 0.14/-1.00/0.08; Top 0.20/-1.00/0.09; and Bottom 0.09/-1.00/0.16.) Back in Photoshop a New Layer was created and the Clone Stamp was used to even out the border just a little around the image. A Curves Adjustment Layer was added to add contrast to the dragon and further separate it from the background – then the layer mask was filled with black (CTRL+I in mask) and just the dragon was painted back in white to reveal it (see my Using Curves Adjustment Layers to Get Rid of Shadows and Highlights blog). The last step was to add a Hue/Saturation Adjustment Layer to further adjust the background saturation (Saturation was set to -41 in Master) – but this time the dragon was painted in black to hide adjustment on it. This really turned out how I remember this image……Digital Lady Syd
Digital Lady Syd Related Blogs:
Digital Lady Syd Reviews Topaz Black & White Effects 2.1


