
Soft Pink Calla Lilies!
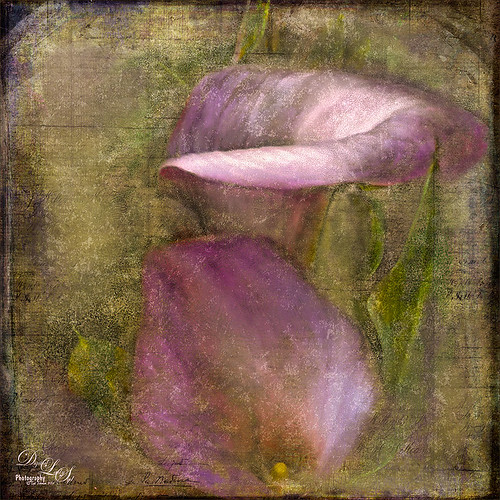
Just wanted to play with this beautiful image of soft pink calla lilies – love their color! Took them with my Android phone in the grocery and loved the result. Did nothing special to them in Lightroom – just the basics, then did a little clean up on the image in Photoshop before adding 2 Lil’ Owls (see sidebar for website link) Carnavale texture. Painted back the flowers in a layers mask attached to the texture and topped it off with Kim Klassen‘s Cloth & Paper Collection’s Magicfilm set to Soft Light blend mode at 45% layer opacity. This completed the vintage feel. The colors just did not look quite right to me and I had a hard time figuring out what to do to get the final look I liked. Then it hit me – go to my favorite plug-in – Nik’s Viveza 2 – and sure enough, with just two control points on the flower petals, I got just the color effect I wanted. Once again, lots of fun to do on boring Monday!…..Digital Lady Syd
Some Vintage Zinnias

Just playing with my Zinnias. I was trying to a vintage, wallpaper feel behind them. I actually opened Topaz (see sidebar for website link) photoFXlab from Lightroom. Here are the steps completed: Applied Topaz Clarity – SJ Illustrative Look – with a few adjustments, duplicated layer, set Dynamics slider to 9 and Saturation -17, duplicated layer, enter Topaz Adjust and apply my Rick Sammon Spicify Soft Artsy, back in photoFXlab the Adjustments settings stayed on this layer, duplicated layer, duplicate layer, in B&W Effects applied SJ_Quad_DkB_GR_Yel_Wh preset, an exited the plug-in to Photoshop. Just a few steps here. Guess what I am trying to show is that there is a lot of versatility here with photoFXlab. Once in Photoshop some clean up was done and French Kiss Studio Selections 3 White Wash texture was applied (I use this texture a lot and it is in a very reasonably priced set). On the white was I used Brush Lovers Art Flowers 2000 (liked the brush best when applied directly to the French Kiss WhiteWash texture – just looked better). This brush was set up as a preset – had to select the dark red color 4e322e and dark green color 3c3e38. In the Brush Panel I turned on Shape Dynamics, Scattering and Smoothing, Size 394 px, Spacing 434% and then Color Dynamics was added and size changed to 201 px. A layer mask was added to the layer to lightly brush out texture from the flower, but leaving a little to keep the grain intact. A Curves Adjustment Layer was clipped to the texture to bring out the cool texture a little bit more. 2 Lil’ Owls Studio Color Bokeh Grunge Set 4 (see sidebar for website link) was applied at 50% opacity and in the layer style, the Blend If This Layer’s white tab was set to 164. The last step involved adding two New Layers where just a couple strokes were applied, one layer using green and one the dark red color to add a little grunge feel to the image. The brush used was Nakatoni Custom Brushes texture brush (does not appear to be available anymore but any soft grunge brush would do). The preset settings are listed below. ….Digital Lady Syd
Here are the plug-in preset settings used if you are interested:
Topaz Clarity SJ Illustrative Look settings: If you would like the illustrative look, here are settings: in Clarity Section – Dynamics: Micro Contrast 1.00, Low Contrast 0.28, Medium Contrast -0.50, and High Contrast 0.06; Tone Level: Black Level 0.61, Midtones 0.14, and White Level 0.72; and in Hue/Sat/Lum Section – Hue: Only Red 0.16, Yellow -0.05, and Green -0.17 were adjusted; Sat: only Green -0.22 and Overall -0.45 were adjusted; and Lum: Only Orange 0.36, Yellow 0.89, Green -0.91, Aqua 0.30, and Blue -0.09 were adjusted.
Topaz Adjust Rick Sammon Spicify Soft Artsy settings: Adaptive Exposure section: Adaptive Exposure 0.50, Regions 25, Contrast -0.56, Brightness -0.13, Protect Highlights 0.03, and Protect Shadows 0.03; Details section: Strength 0.87, Detail Boost 1.15, Threshold 0.12, Radius 25.00, and Sharpen 1.01; Color section: Adaptive Saturation 0.33, Color Regions 10, Saturation 1.00, Saturation Boost 1.00, and Hue 0.00; and Noise section: Suppression 3.24, Amount 0.51, and check Use Topaz DeNoise.
Topaz B&W Effects SJ Quad DkB_Gr_Yel_Wh settings: Quad Tone: Color 1 Region: Color (R1/G1/B12) and set to 15.08, Color Region 2: Color (R63/G78/B85) and set to 143.9, Color Region 3: Color (R216/G211/B129) and set to 227.5, and Color Region 4: Color (R255/G254/B237) and set to 255.0: and Transparency: Overall Transparency 1.00.
I Must Have Flowers!

Here is another example of some of the beautiful flowers that people grow around their dacha’s outside of Minsk in Belarus. I saw so many unusual and gorgeous flowers when visiting there a few years ago. In Photoshop, Topaz (see sidebar for website link) Detail 3 and Simplify (Watercolor II preset) were applied first. Kim Klassen‘s 1612 texture was added on top at the Normal blend mode. A layer mask was added and the flowers were painted back in with a soft edged, low opacity black brush. A pink to white to pink diagonal Gradient Fill Adjustment Layer came next and set to 40% opacity. Kim Klassen’s Cloth & Paper texture Touch (one of my very favorite textures) was set to Soft Light at 64% opacity. The last major step included adding 2 Lil’ Owls Studios (see sidebar for website link) Dream Freebie 1 texture set to Soft Light at 100% opacity, where the layer mask from the first texture was copied and added to this texture (ALT+drag the mask to new layer to copy). A Levels Adjustment Layer’s Midtone slider was adjusted to bring back some contrast to the image. Text was added using the free fonts Ruthie and Batik Regular. That was it. I love the soft feel to the image and the little bug in the flower…..Digital Lady Syd
Some French Tulips!

Love this image of my beautiful red tulips I got from the grocery a few weeks ago. I was experimenting with different settings and this one turned out perfect in my mind! It was shot with my 60 mm Nikon Macro Lens set at F/2.8, 1/3000, and ISO 400. Very little was done in Lightroom other then a little Basic slider adjustments following the workflow in my blog How to Use Adobe Camera Raw (ACR) or Lightroom 4 Quickly. I added a pretty texture (1) from 2 Lil’ Owls Studio textures (a free one from the site – see sidebar for website link) that I had first opened in Nik Color Efex Pro 4 and applied BiColor Filters using 40% opacity and Darken Center Filter to the texture. It gives more of a colorful look than the original texture. The beautiful French text is from French Kiss Glorious Grunge Letter 2 (a free download) – a brown colored Color Fill Adjustment Layer was clipped to the text (to clip just hold down ALT+click between the two layers in the Layers Panel, and the Adjustment Layer will attach to just the text). The text layer was set to 66% opacity. To keep the text from covering the flower, a Layer Mask was added to the text layer – with a black brush at 100% opacity, the text was removed from the flower itself. Next French Kiss Artiste Gateaux was added, set to Overlay blend mode and 28% Opacity. This makes the image look like a canvas – love this texture! The last step was a Curves Adjustment Layer added to the whole image to add some contrast. Sometimes it is just fun to play with an image you just like!…..Digital Lady Syd
Digital Lady Syd Related Blogs:
Check out my Textures category in the sidebar for more Tidbits Blogs
Check out my Fun Photoshop Blog (link at top of page) and click Textures category in the sidebar


