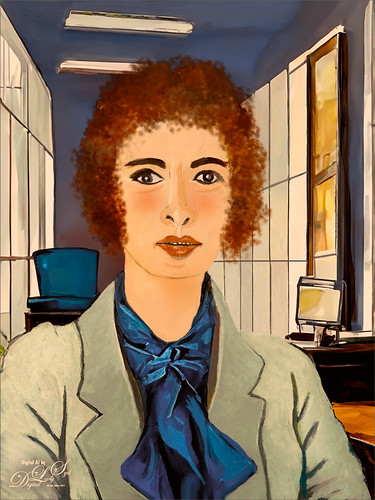
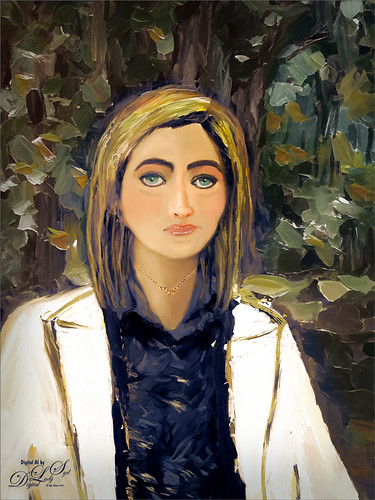
Anything Photoshop or Photography

Latest

The Worker Bee

Selfie AI Generated portrait image

Here is another member of my Selfie Family – this time in a work environment. Tried out some new brushes and thought I would share what they are. To get the texture in her jacket, used Kyle’s Bruno Brush from his Spring 2022 set (go to Brush Settings pop-out at top right and select Get More Brushes and go to the set to download – double-click the file to load once downloaded). In the Brush Settings Panel, turned off the Scattering settings and set the Options Bar Opacity to 40% – but also liked it at 80%. The texture looks very painterly in this brush. For her face and cheek coloring, used an Airbrush (which means buildup is turned on either in the Brush Settings Panel or clicking on the Airbrush icon in the Options Bar). To make this brush, download Kyle’s Real Watercolor brushes from Photoshop (as discussed above – they are a separate group in this list). Choose Kyle’s Square Simple brush and in the Brush Settings Panel set Shape Dynamics to Size Jitter Control: Pen Pressure, Transfer to Opacity Jitter of 92% and Opacity Jitter Control to Pen Pressure, Buildup checked on, and Smoothing checked on. Put the Flow to 18% in the Options Bar. The hair was painted using Zummerfish Blending Brushes – Sampled Brush 43 2 for the curls. The last brush used was one I have mentioned before and really like – Kyle’s Fall 2023 (another set to download like above) Great Brush (changed Flow to 54% and Smoothing to 12% in the Options Bar) – used small size for detail brush and larger to paint in solid colors. Selected the background area and ran Generative Fill with prompt Acrylic office interior for this image – the Oil Painting Interior results did not look good. Also used my original selfie nose again, but this time ran another Generative Fill (Oil Painting Nose) to get a better result than from the total subject fill. That’s it – the new brushes actually worked out really well!…..Digital Lady Syd

A Sophisticated Model

AI image created from a selfie variation in Photoshop

Thought I would put up another Photoshop Generative Fill variation from my selfie – this time a more sophisticated looking person selfie image (used Dave Kelly’s free Gen Fill Photo Painting Action set to GF Painting 40 before running Generative Fill). Had fun painting her as the Oil Painting prompt was too much for the overall image, but looked good in her hair. Used the same brushes that were used in my Fun Photoshop Placing any Photoshop Generative Fill Variation on a Layer Easily Blog. The main difference here is that Rebelle, a really nice and pretty inexpensive painting program, was used to smooth out the thick paint background and created a beautiful backdrop. Just took the PSD file into Rebelle and made some changes to the Oil & Acrylic Brushes -> Round -> Rough Oil Brush – changed the Loading to 100 and the Size to 50 – just sampled colors and painted softly around the subject. Pretty simple and easy to do. Oh yes, I didn’t like her nose so I copied my from the original selfie layer into the image and blended it in. It was in the right place at least!…..Digital Lady Syd

Another Selfie???

AI image taken from a selfie

Used the same selfie from my Creating an AI Selfie? Fun Photoshop Blog using a different variation this time selfie image (used Dave Kelly’s free Gen Fill Photo Painting Action set to GF Painting 40 and Generative Fill Prompt: Oil Painting). Really liked the way the hair was done by Photoshop’s Generative Fill command and the background texture was really nice. Lots of clean up on the original was done due to the many messed up areas (like the earrings did not match up, her face look chopped up, etc.) that AI often seems to create. And a lot of time was spent cleaning up the image with Photoshop’s Mixer brushes – ended up using some old Picasso Mixer brushes made by Fay Sirkis. The key was to find the right brush dab to get a somewhat closely matched up painterly stroke to the AI effect and didn’t smooth things out too much – this to me is the biggest problem with PS’s Mixers. Fay’s Picasso brushes used a Bristle Brush as the foundation for her mixers. Guess that is what is important – finding the right brush for the image!…..Digital Lady Syd

The Mighty Eagle

Image of an Eagle taken at the Jacksonville Zoo

I am a huge Eagle fan (not the football team!) and am always checking in on Web Cams when the nesting season comes along. This guy is an injured Eagle that resides at the Jacksonville Zoo – I feel sorry for him since he is unable to fly the sky like his relatives. He is still a beautiful specimen and seems to enjoy people stopping by when visiting the Zoo. This image involved only a little AI to Expand the right side a bit to balance out his position in the photo and that is all. The rest was just my regular workflow: a Curves Adjustment Layer, two Hue/Saturation Adjustment Layers, Viveza 2 to pop the color of his feathers, Topaz Sharpen AI to sharpen up the feathers using Too Soft, a dodge and burn layer, an Exposure Adjustment Layer for the eyes, and a clean up layer. It felt good to get back to my regular post processing!…..Digital Lady Syd

St. Michaels Parish Church in Scotland

Black and white image of St. Michaels Parish Church in Scotland

The image above is from the old Parish Church next to Linlithgow Castle, where Mary, Queen of Scotts was born in 1542 and baptized here. Recently I tried out a new technique by Joel Grimes using his YouTube video called How to Use Photoshop Brushes to Build Atmosphere and Drama. The Light Ray brush he used (and can be downloaded there) created the lovely light rays coming through the windows above. To convert to black and white, a stamped layer was taken into my old Nik Silver Efex Pro 2 (here is a link for the newer version) and just applied the Soft Sepia preset. Another stamped layer was added and taken into Luminar Neo (latest Luminar version but the older versions can be used also) using Joel’s settings. Used Kyle’s 100 px Vignette found in Kyle’s Photoshop Action Set for Artists. Last step was to apply Topaz DeNoise as it appeared just a little grainy for my taste (I used an older version and it works fine). Have not done a black and white in a while and it was fun to do…..Digital Lady Syd

My Happy Firecracker Plant

Image of a Firecracker Plant

No matter what weather is down here in Florida, this plant is blooming and always healthy. It gets huge every year and needs to be cut back. I paid $.75 for it in the damaged plant section of Lowe’s – now it is repaying me with great health! I guess I wish all my plants were like this. Anyway, this Firecracker Plant macro image was processed pretty much with just the same ole workflow that I always follow. I did use it to try out Blake Rudis’s Video for getting the best detail out of a photo – it is called Don’t Use Clarity – Use This Instead and involves using the High Pass Filter. Actually I felt it did a little better adding detail in this image compared to Topaz Sharpen. A small highlight was added on a few of the blooms where the focal point have been more pronounced. A Color Lookup Adjustment Layer set to the Foggy Night preset at 71% Layer Opacity and Luminosity Blend Mode was added. On a stamped layer The Smart Photo Editor filter was used to add a final effect. Fun to get back to my flower photography again!…..Digital Lady Syd

The Frontier Saga Movie Poster

Image of a western style movie poster

Just had fun creating this after watching a couple videos this weekend that got me inspired. The original image is from Unsplash (etty fidele-457310-Bologna Italy – can’t find a link as it is an old download). It was cropped down using the Default Crop, and then followed a pretty cool video by Marty at Blue Lightning called Create a Pencil Drawing from a Photo (he supplies you with brushes and a paper texture also). My image was turned into a brown and yellow one by adding a Gradient Map on top that went from oranges to reds and was set to Vivid Light blend mode at 98% opacity. Next extended down the image using the new Crop Tool Generative Expand – incredible. In the prompt typed “brown and yellow western scene pencil effect” and that is where the little scene at the bottom appeared in the one of the choices. How did I know to do this? I also watched this really interesting video by Lisa Carney (Hollywood poster creator) and Tomasz Opansinski (Creative Technologist for AI/ML at Adobe) where they talked about everything posters. It was called Adobe Firefly Live Weekly Meetup: Using Ai for Entertainment Design and that is how I knew to add a little scene at the bottom – classic poster design. His glasses were removed using the Remove Tool which did a great job on this. The rest was just basic Photoshop creating 3 Text layers and some glows around them and some clean up. Creating digital posters is really fun to do!…..Digital Lady Syd

Older Woman of Another Generation

AI Image of an older woman

I recently read an interesting article Unveiling the Intriguing World of Face Cubism: Exploring the Artistic Journey on how to do a Basic Cubism Portrait so it seemed like a good idea to try it out in PS Beta AI. Using an image by Jude Infantini at Unsplash, it did not work well, but I did get an effect that I sort of liked. Actually it looked like a man with all this hair (because I used Dave Kelly’s Gen Fill Photo Painting Action set to 40% so the image will not look much like the original), but the overall image was quite striking. Added several New Layers on top and just started painting in the image the way I wanted it. Added in the necklace using AI – with the Lasso Tool selected where necklace should go, I ran Generative AI again (Prompt: Native American Necklace). Ended up using a Curves Adjustment Layer, the Sharpen Tool, and a Layer Style to finish off the image. I am currently reading The Travels of Marco Polo, and I think this rather older woman could possibly look like what a women of this region from back in the 13th Century. Anyway, it was fun to ponder…..Digital Lady Syd

Vintage Fashion Statement

AI created image of a vintage model with a flowered hat

AI created image using Jerzy GorecKi’s Pixabay model image for starters. First added in some room on the left side and top side with the Crop Tool and using Generative Fill. On a stamped layer, ran Generative Fill with a prompt saying “vintage old fashioned look” – generated and got all kinds of results. Liked this image the best except for her eyes. Therefore, used the Lasso Tool around eyes and ran Generate to get the eyes shown. A little clean up removing a misplaced earring and that was it. It does have a nice vintage feel to it……Digital Lady Syd

A Halloween AI Party

AI created image from the Natural Bridge - used Halloween theme.

I have always loved doing Halloween images so it was a lot of fun to create this one after this rather weird AI generated background from the Photoshop Beta software was produced. The prompt used on this one was “flowers and river oil painting” – see my AI Digital Oil Painting – How To Do This Fun Photoshop Blog for more on how this was done (used Method 2 by Brian Mataish called Photoshop Generative Fill AI Can Turn Photos into Paintings. This Tidbits Blog is on just the post-processing steps used after the AI background was created.

The original AI background had this pretty scary vampire looking guy on the right, so that felt very much like Halloween. A Halloween theme was created using a free Color Lookup Adjustment Layer called SS Vieru 02 for the basic color that I thought looked really good (to download click Sparkle Stock Canyon Film). On a New Layer the Vampire was painted in using my SJ-Pastel-3 Painting Brush (see my How to Create My Favorite Brush Fun Photoshop Blog for the settings) and some cloning was done on another layer. The Remove Tool/Spot Healing Brush layer was created to remove some bad looking areas – I am finding I do switch between them (see center of my Photoshop Beta AI with Fenced Zoo Images Fun Photoshop Blog for more on this). The Pot and Fire were both generated in two different generation layer prompts and read “Halloween black witches pot” and “flames” – then smoke was added on layer above using some really old smoke brushes. The bat was generated using “Halloween bat” in the prompt. The cat is from a Halloween Obsidian Dawn vectors set ($4 set) which had the cat brush, skeleton brush and the raven brush. The cat was painted with a Cheetah Fur brush that the great Aaron Blaise taught how to make (see How to Make a Digital Brush using a Photo) and the tail was flared out to look scary (used Coyote Mange Rough Tough brush for this – still the best animal fur brushes around!). The Dark Skin Cobra Attacking Pose Snake is from PixelSquid, the greatest object resource item around – hopefully even after AI – it is a pay-to-use site. (For more info on them, check out my Some Compositing Tips and Resources Fun Photoshop Blog halfway down.) A sampled light orange was used on a New Layer to add some Fog (used Grut-I Fixray brush – he has the best brushes around – and a free brush weekly!) and then on another New Layer used the same brush with a darker sampled color for a slight vignette effect. Two layers were added as Darken and Highlight layers using Sam Peterson’s brush and colors – see my A Few Photoshop and Lightroom Tips and Tricks Fun Photoshop Blog – Tip 2 – use this for pinpointing light and shadows on an object. A Black and White Adjustment Layer set to Luminosity (because it always looks good) was added next. Used Pratik Naik’s technique Tip 2 for lightening and darkening parts of image (on new layers above set to Overlay blend mode – use at least a 100 px soft round brush set to Airbrush in the Options Bar and Flow at 9% and use white or light color to lighten image or black or darker color to darken image – different colors give some great results – use layer opacity to lower effect). This enhanced the light at the top coming and the dark in areas for more of a cave feel. Last step involved adding a New Layer on top with a few little sprinklers to add some texture in the lighted areas. Phew! That was it – took a while to complete!…..Digital Lady Syd